In this lesson, we have published several step-by-step master classes that clearly show how to make birds from plasticine with your own hands. Let's look at the step-by-step steps of sculpting a crow and a woodpecker. First, tell your children interesting information about these birds, and then proceed to carry out your plans.
Birds are amazing creatures of nature that literally fill our lives with new meaning. They can be colorful, such as parrots, hummingbirds, flamingos or other exotic birds, or seemingly inconspicuous, such as crows, sparrows and others. But they are all amazingly beautiful, graceful and lead a special way of life.
In both the first and second cases, the main color of the plasticine will be black. Only the first craft will be completely dark, and the second will be diluted with white and red.
Preparing your desktop
First of all, you need to prepare your table on which you will work. There should be no unnecessary things on it and every tool should be at hand. Not everyone has their own desktop and has probably already thought about creating one. Making a table is not difficult, but choosing a place for it in the house is difficult. The ideal option is an insulated balcony, on which you can do crafts at any time. I have already written about preparing the table in a separate article and tried to describe in as much detail as possible the entire process of creating it. If you don’t know how to prepare your workplace, then read the following Article. After you have completed the process of creating a table, try to start choosing your future craft.
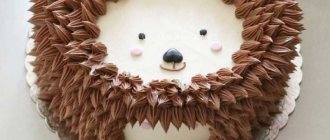
How to make a woodpecker from plasticine.
If you watch cartoons with your child, read poems and riddles about woodpeckers, you will immediately see that this bird is portrayed as none other than a forest orderly. Indeed, woodpeckers treat trees, especially old ones, from all sorts of worms, thereby prolonging their life, although at first glance it may seem that they are causing harm. Let's make this bird out of plasticine, because it is not so easy to meet a woodpecker in the city, and even in the village - they hide from people far in the depths of the forest and can only occasionally fly over a residential area.
To sculpt a woodpecker you will need:
- three colors of plasticine – white, black and red;
- stack.
1. Of the three colors listed above, only black will be used to the maximum. We will sculpt a black base for the body, head, wings and tail, and use the rest of the colors to complement the craft.
2. It is most convenient to make the oblong body of the bird the central part, and attach all other parts of the body to it. Make this part from black plasticine.
3. Attach a small head on top.
4. Spread white plasticine in the form of an oval on the front part of the body - chest and abdomen.
5. Prepare three small black balls for sculpting the wings and tail.
6. Next, draw out narrow long wings and the same tail. You should get flat parts of a certain shape.
7. Woodpeckers have a beautiful pockmarked pattern on their plumage. You can create it by applying small dots on the wings and tail in a checkerboard pattern. Or, if you want to save time, at the initial stage of preparing small pieces of plasticine, simply mix a little white into the black mass.
8. Attach the wings and tail.
9. Give your bird eyes and beak. The eyes are black dots that need to be attached to the white areas. The beak must be very powerful and quite long, because with its help the woodpecker punches holes in the dense bark of trees.
10. The woodpecker should have a beret on its head - at this stage we will need red plasticine. Attach a brightly colored cake. At the back - in the neck area, add a white cake.
11. Make two very small feet; black or brown plasticine is suitable for this.
12. Attach the lower limbs.
A bright bird – a woodpecker, a doctor and a forest nurse – is ready. All children want to see this bird if they hear a confident knock on wood overhead. Today they will have such an opportunity.
If you find an error, please select a piece of text and press Ctrl+Enter.
Olesya Selikhova
About the author: Psychologist, specialist in the field of family relationships and raising children. I love drawing, modeling, needlework and any interesting creativity. Mother of two children and a wonderful wife!
birds
Share with friends:
We also recommend watching!
Modeling a crab from plasticine
Modeling of Losyash from plasticine (film “Smeshariki”)
We choose quality material
The main material is plywood. The choice is always difficult. Each of us has probably encountered such a problem as delamination of plywood from the end part and asked the question, what causes this delamination? Well, of course, this is mainly due to low-quality plywood. If this is not the first time you have picked up a jigsaw, then you can select plywood from the remnants of a previous craft. If you are new to sawing and you don’t have plywood, then buy it at a hardware store. Choosing material for sawing is always difficult. You should always choose plywood carefully, often look at the defects of the wood (knots, cracks) and draw conclusions. The difficulty in choosing plywood lies in the fact that no matter how you guess at its defects and shelf life. For example, you bought plywood, cleaned it, translated the drawing and suddenly it began to delaminate. Of course, this has happened to almost everyone and it’s oh, how unpleasant. So it is better to pay attention when choosing and choose good plywood. I wrote a special Article in which all the principles of choosing plywood are described step by step.
What do you need
For the main toy:
— Demonstration toy prototype. Interestingly, the woodpecker is also used in speech therapy.
— A tube and an elastic band for the mechanism.
— Paper woodpecker (and monkey)
for the toy version).
— Scissors, glue, colored pencils.
For additional options and experiences:
— Matchbox, clothespin, thread, paper clips, wooden skewer, wire, plasticine.
Stripping plywood
We clean our plywood with sandpaper. As you already know, “Medium-grained” and “Fine-grained” sandpaper is used for cleaning plywood when sawing. You've probably seen sandpaper in hardware stores, and that's what we'll need. In your work you will need “Coarse-grained”, “Medium-grained” and “Fine-grained” sandpaper. Each of them has its own property, but a completely different coating, by which it is classified. “Coarse-grained” sandpaper is used for processing rough plywood, i.e. which has many defects, chips, and cracks. “Medium-grained” sandpaper is used for processing plywood after “Coarse” sandpaper and has a slight coating. “Fine-grained” or otherwise “Nulevka”. This sandpaper serves as the final process for stripping plywood. It gives the plywood smoothness, and therefore the plywood will be pleasant to the touch. Sand the prepared plywood in stages, starting with medium-grain sandpaper and ending with fine sandpaper. Sanding should be done along the layers, not across. A well-polished surface should be flat, completely smooth, glossy in the light and silky to the touch. How best to prepare plywood for sawing and which sandpaper is best to choose Read here. After stripping, check the plywood for burrs and small irregularities. If there are no visible defects, then you can proceed to the process of translating the drawing.
Options and experiences
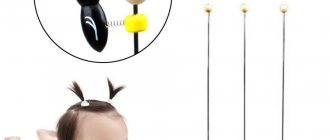
Task for the child: carry out four experiments, as in the picture, and explain the results.
1. Glue a piece of plastic tube to a thick strip of paper measuring approximately 15x2 cm or roll up the edge of the strip, securing it with tape. Pass the elastic through the tube (roll). Hang on a strip of paper monkeys
or other figures - they will sway and slide down the vine.
2. Attach two paper clips to a matchbox - as in the picture. Pass the thread through the resulting small loops and pull it tight. Put a paperclip in the box - now your new toy will descend and knock like a real woodpecker. You can stick a picture of a bird on the box.
3. Do the same experiment with a clothespin and an elastic band.
4. Take a thin wire about 10 cm long and wrap it around a skewer. You will get a spring. You can also get a ready-made spring from a ballpoint pen. Place half of the spring on a skewer, bend the other half and attach a woodpecker figurine to it (you can weight it down with plasticine). Stick a skewer into a piece of plasticine. The woodpecker will descend and “peck” the skewer.
Why do toys move like that? Why don't they slide down quickly? What do all the toy options have in common? How are vibrations depicted in the drawings? What do these lines remind you of?
Translation of the drawing
For me, drawing translation has always been the main process in my work. I will tell you a couple of rules, as well as tips for high-quality translation of a drawing. Many people transfer the drawing onto plywood not only using a pencil and copying, but also using “Black Tape”, glue the drawing to the plywood, then wash off the drawing with water and the markings of the drawing remain on the plywood. In general, there are many ways, but I will tell you about the most common method. To transfer the drawing onto prepared plywood, you must use a copy, a ruler, a sharp pencil and a non-writing pen. Fasten the drawing in plywood using buttons or simply hold it with your left hand. Check if the drawing fits the dimensions. Arrange the clock drawing so that you can use a sheet of plywood as economically as possible. Translate the drawing using a non-writing pen and ruler. There is no need to rush, because your future craft depends on the drawing.
Useful tips
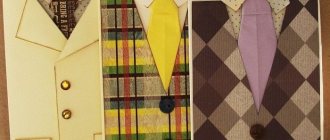
- The suit can be supplemented with a small tail , the pattern for which is made following the example of the wings. The difference is the width: the tail should be slightly wider than the boy’s back.
- For shoes, use sneakers, slip-ons or shoes in suitable colors : gray, brown, black.
- The cap can be replaced with a black plain scarf, which is complemented by eyes and a beak. In this case, the costumes are also suitable for girls.
Every child excitedly awaits the approaching New Year celebrations. Garlands, Christmas tree decorations, gifts and costume parties help maintain an atmosphere of magic and wonder. Every holiday is necessarily accompanied by original and colorful costumes. A sparrow carnival costume will become a favorite holiday outfit for any boy.
Drilling holes in the parts
As you have already noticed, the parts contain parts of the grooves that need to be cut out from the inside. To cut out such parts, you need to drill holes in them using a hand drill or, as in the old fashioned way, make holes with an awl. By the way, the diameter of the hole must be at least 1 mm, otherwise you can damage the elements of the drawing, which, alas, are sometimes difficult to restore. To avoid damaging your work table when drilling holes, you must place a board under the workpiece so as not to damage the work table. It is always difficult to drill holes alone, so ask a friend to help you in your task.
Comments for the teacher
Physics propaedeutics for primary school: during the lesson, scientific concepts that have visual manifestations in the toy are discussed: vibrations, forces, etc.
In middle school, the toy and its homemade versions can illustrate relevant lesson topics. Particular attention is paid to the ratio of the diameters of the support and the mating part, as well as the materials from which they are made.
Olympiad physics and STEM for high school students: using the example of a toy, scientific and technical concepts such as an oscillatory system, oscillator, braking, sliding, vibration, inertia, pendulum, energy conversion, bushing, coupling, damper, skew, beating are studied. The relationship between all components of the oscillator is so complex that stable operation of the toy is achieved empirically, and a complete description of the oscillator is a complex task of modern physics.
Source
Sawing parts
There are many rules for cutting, but you need to stick to the most common ones. First of all, you need to cut out the internal parts, only then according to the external pattern. There is no need to rush when cutting. The main thing is to always keep the jigsaw straight at a 90-degree angle when cutting. Cut out the parts along the lines you accurately marked. The movements of the jigsaw should always be smooth up and down. Also, do not forget to monitor your posture. Try to avoid bevels and unevenness. If you go off the line while cutting, don't worry. Such bevels and irregularities can be removed using flat files or “coarse-grained” sandpaper.
Bird Day - scenario
After familiarizing yourself with it, it will be easier for parents to come up with a costume for their child, and teachers will learn what gaming and educational tasks can be included in the event program.
The hall is decorated accordingly. You can put up homemade birch trees, decorate walls and windows with branches to create a forest atmosphere. There are many songs about birds. The teacher turns on one of them, and the children enter the hall to the music.
They are dressed in matching costumes. Someone imagines a woodpecker, a cuckoo, a dove, a sparrow, a swan.
The presenter tells riddles, and the answer will be the character of some child. Children must find out and answer which bird is meant.
The containers are placed at a certain distance. Children take turns hitting them with a small ball. Each participant is allowed three attempts. For one hit, 1 point is assigned, at the end of the competition the results are summed up, and the winner is selected.
The next task is intellectual. It is necessary to prepare cards with photographs of birds and drawings of food for them. In addition to this, you also need to prepare incorrect cards, which will show what birds cannot eat. For example, salt, black bread.
Two cards will show millet and simple. Children should put photographs of a waxwing, sparrow, siskin, bunting, and goldfinch on this loose food. Since these birds are very fond of this cereal.
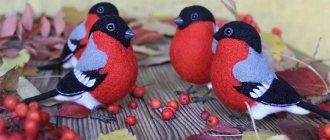
Children will put photographs of waxwings and bullfinch on cards with images of elderberry, rowan, and bird cherry. These birds love these berries.
On the seeds of melon and watermelon you need to place a nuthatch, tit, and woodpecker. And next to the dry branches of nettle, quinoa and burdock, place the bullfinch, goldfinch, tit, and siskin.
Nuthatches, tits, bullfinches, and sparrows love sunflower seeds.
The next game is active, called “Bird Meeting”. Children in feathered costumes are called up. One guardian of the birds is selected. Others at this time must resolve important issues at their meeting. As soon as a stranger appears near the group, the guard must give a voice, imitating the singing or cry of the very bird whose costume he is wearing.
For Bird Day in kindergarten, the scenario may include proposed calm and active games, as well as others.
Cleaning Parts
You should always clean the parts of a future craft carefully. At the very beginning of the work, you already sanded the plywood with sandpaper. Now you have to do a small part of stripping the plywood. Using medium-grain sandpaper, sand the edges of the parts and the back of the plywood. “Fine-grained” sandpaper is considered the final stage of cleaning parts. It is better to clean the front part of the parts with fine sandpaper. When processing plywood, take your time. You can also use a rounded file, which is convenient for cleaning the inside of the holes. Try to ensure that the parts come out without burrs or irregularities.