It seems to many that a church is a complex craft, and to create it with your own hands will require a lot of effort, time, patience, experience and certain skills. In fact, there are many simple options. Craftswomen and craftsmen assemble simple but beautiful temples from matches, “build” them from ordinary plastic bottles, cardboard packaging, paper, cardboard and even pasta.
Sequence of gluing a paper church
The “patterns” of all the walls will need to be bent along pre-designated lines, then the walls will be glued to the cardboard area. When all the walls are glued to the site and the glue has dried, you will need to “attach” the domes on top. You can glue them with the same glue that held the walls together. As an option, you can color the cardboard area with colored pencils or paints, or go even further - glue small pebbles and sand to it, and also, for greater realism, make a fence out of matches or toothpicks. Creating an environment is entirely up to your imagination and capabilities. Any paper craft involves a wide range of imagination and creativity.
Conclusion:
Installation of domes
The main work is behind us, but it doesn’t end there. What else will be needed? All that remains is to attach the domes. Just don’t forget that the building turned out to be without “isthmuses”, which should be crowned with golden domes.
To carry out the work, you need to mold cylindrical shapes from gypsum, having a height of ¼ of the height of the building itself. They are attached to the tops of each block. You will get 3 “isthmuses”.
Now you need to install the domes. Experts recommend pulling them onto the bases. You just need to do this carefully, otherwise the dome will rupture. This cannot be allowed, otherwise the work will have to be done first.
Pasta craft
For kindergarten, you can make a miniature temple out of pasta with your own hands.
The “construction” material will be pasta of different textures – straight thick, openwork round, flat long “noodle” type. In addition to them you need:
Read also: The cat went blind, then regained its sight
- scissors, pencil and ruler;
- foil and thick cardboard;
- PVA glue or glue gun.
We make a hexagonal prism with equal sides from cardboard and cover it tightly with pasta in the shape of logs.
We close the corners of the “log house” and the top with flat elements. Using openwork parts, we lay out the trim along the top of the walls and build “columns”.
Recommendation for coloring
Plaster may have a grayish tint. In this regard, it will merge with the stand. What to do in such a situation? You need to focus on snow-white color.
- In order for the church to be whiter than spring clouds, it is necessary to focus on applying 2-3 layers.
- However, they are permissible only after the first layer has dried. Then you can get a snow-white surroundings.
Required materials and tools
To make a temple out of paper or cardboard with your own hands, you will need the following materials and tools:
- paper cutting board;
- ruler;
- pencil;
- cutter (construction or office);
- glue (PVA, silicone);
- felt-tip pens, paints, markers;
- decorative elements.
Decor options
The finished craft can be revived by decorating it with a variety of decor:
- To create openwork trim, use lace braid.
- Decorate the facade of the building with small paper icons.
- Cover the arches with satin ribbons or decorative colored paper.
- Place wooden figurines of trees and people around the building.
- Paste figurines of doves onto the walls of the building and decorate with gold half-beads and rhinestones.
- A paper dome will look festive if you sprinkle it with gold glitter or cover it with foil.
Ready-made models from paper and cardboard
A paper temple model is made for different purposes. This could be an object for an exhibition of arts and crafts, a competition for children's crafts, or thematic design of a space.
A paper church can look like a Catholic church or a simple village Orthodox building.
A three-dimensional model is made according to exact drawings from thick Whatman paper or thin ornamental cardboard. Very sharp tools are used to cut out parts.
A bright model can be obtained if you assemble a church using the modular origami technique using colored paper.
Wooden church
This option is not suitable for small children and beginners. Even experienced people don’t succeed the first time. But when the craft can be completed safely, it turns out to be a real work of art.
Preparation
You will need a few materials:
- wooden skewers. The required diameter is 3 mm, the material is only birch, never bamboo;
- ice cream sticks or those used to stir coffee;
- matches;
- toothpicks;
- bamboo napkins. Take those where the sticks are the flattest;
- moss.
When making a church out of wood, more than in any other case, good tools are important. You will need:
- sharp knife (construction knife, with the ability to replace blades);
- modified PVA glue;
- needle file
In addition, you will need a photo of the source, preferably more than one and from different angles. Using it, you can calculate in advance the scale of the building in height, length and width.
Step-by-step algorithm:
- Unpack the skewers and inspect them. You should immediately remove crooked, ugly, etc. It will take about a third of the package to throw away. If you do buy bamboo skewers, be prepared to throw away more than half.
- We unravel the bamboo napkins and clean the sticks from any remaining glue and thread.
- In half of the “logs,” notches are made approximately a centimeter from each edge. They are laid in a “well”, so that the notch falls on the edge of the perpendicular “log”.
- Between the first and second logs, lay a floor made from elements of a former bamboo napkin.
- Lay out the walls to the top, gluing each layer. Treat uneven areas with a file.
- Form the top part: place the napkin boards in a “house”. Place logs between them, fasten everything with glue.
- Secure the boards to the roof.
- It is better to have a dome ready. You can make it yourself only on a lathe.
- Decorate the edges of the windows with frames made from the same elements of napkins, matches or toothpicks, three in a row.
- Run two long, narrow strips of wood along the roof ridge to cover the joint.
Your church is ready. Its production is an extremely labor-intensive process that does not always go smoothly. Many things don’t work out the first time and have to be redone. So, before you start this craft, be patient.
If desired, the skewers could be painted with stain before starting the craft - it would be more beautiful and more durable.
It is better to do all the churches yourself, based on photos of layouts on the Internet. So before you start, be sure to look at what result you should get and strive for it.
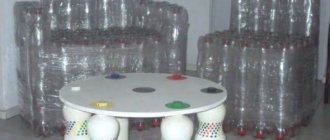
From plastic bottles
You can make a church with your own hands from anything if you have the desire and the mood. Waste material is also suitable for such a craft - drink bottles, water.
We will “build” on the basis. It must be durable. The ideal option is a shoe box lid. The size of the temple depends on the size of the base - we will select the bottle so that it does not protrude beyond the cardboard lid.
In addition to the base and bottle you need:
- rope and wire;
- thin cardboard and cotton wool;
- white, blue plasticine;
- white paint and brush;
- double-sided tape, PVA glue;
- openwork braid for decoration;
- sharp scissors with long blades.
First you need to prepare the base - paint and build a fence from cardboard “boards”.
Cut off the bottom part and the top with thread from the bottle. We cut the bottom of the workpiece into “noodles” - with its help we will attach the “structure” to the base of the craft. We bend the strips, it looks like a flower.
We bring the “poppy” of the church to the desired shape using plasticine. We make a cross from blue wire and fasten it.
We cover the base of the bottle with double-sided tape, wrap it tightly with white thread, and decorate it with blue lace. We decorate the poppy with cakes made of white and blue plasticine. We place them in a checkerboard pattern.
We cover the “noodles” at the base of the church with double-sided tape and attach it to the base with a fence.
We pave the space between the temple and the fence with cotton wool - these are snowdrifts. With their help, we close the place where the structure is attached and the base of the craft.
You can not limit yourself to one material, but try to combine, for example, wooden skewers and pasta, plastic. Such a church is sure to attract attention and become the leading exhibit at a school exhibition. Imagine, experiment, work with pleasure.
Creation of domes
What is a church without domes? That's right, only completely destroyed by enemies or time. What to do in such a situation? Everything is quite and extremely simple. You will need 3 sheets of gold paper (yellow cardboard) to complete the job.
Each sheet is cut in half. These pieces will be rolled into cones. To them you need to glue vertically semicircular parts, which are cut out from the remaining materials.
- The domes have been created. If desired, you can insert a toothpick into the center for a simple attachment.
- However, this is not necessary when it comes to thick colored cardboard. It keeps its shape.
- With sheets, it is better to use a toothpick, one end of which will rest against the base of the dome, and the other end against the plaster.
- The toothpick does not weigh down the structure, but it allows you to hold the dome.
For large models, it is better to take two tied or glued toothpicks. They will increase the reliability of the design. The church will turn out to be a solid building.
Development of a rafter plan
Master class craft product modeling design how I make gnomes on legs cardboard material waste polystyrene foam fabric
Ready rafter plan
When developing a rafter plan, the following procedures are performed:
- Drawing modular coordination axes to which the thickness values of the main walls of the building are attached. In this case, the extension of the crowning cornice of the structure used is displayed on the plan of the external walls in the form of a contour line;
- Smoke and ventilation ducts and pipelines are drawn on the plan, the location of which is necessarily taken into account in the process of placing elements of the designed rafter system;
- A plan of the selected roof shape is developed in the form of a sketch, which should also take into account the location of the walls. The ridge, valleys, ribs, as well as the following elements are drawn on the plan in the form of lines:
- The shape of the roof slopes;
- Slope direction;
- Location of dormer windows;
- Location of gables, etc.
Using the roof plan, a plan of the rafter system is drawn, which should indicate the placement of the following elements:
- Rafter beam;
- Mauerlats;
- Rafter legs with fillies and tie rods, resting on mauerlats;
- Racks, as well as longitudinal struts, providing the necessary spatial rigidity of the rafter system (displayed as a dashed line);
The cross sections of the various elements take approximate values depending on what type of wood will be used in construction (boards, beams or logs). The pitch of the rafters, that is, the distance between them, is selected depending on what kind of scaffolding is used in the construction of the roof, as well as on the weight of the material used for covering:
- The pitch of wooden rafters is 100-120 cm;
- The pitch of rafters made from beams is from 150 to 180 cm.
In addition, the distance between the rafters can change when chimney or ventilation pipes are passed between them.
In addition, these pipes can be passed by interrupting the rafter legs; for this, their free ends rest on wooden jumpers located between adjacent rafters, for the fastening of which a special rafter cut is performed.
In the case of gable or gable roofs, dormer windows are placed in the gables located at the ends. This increases the efficiency of ventilation of the attic during the warm season.
When developing a project for a hipped roof, you should display on the plan such elements as the slanted diagonal legs of the rafters, the flanges resting on them, as well as the dormer windows located on the hips.
If an attic floor is installed in the under-roof space, the plan should also show the upper beams of the framing walls on which the rafters will rest.
It should also be taken into account that the development of a plan for the rafter system should be carried out in parallel with the development of a plan for the various structural sections of the designed building, which must be interconnected.
On the rafter plan drawing, the values of the distances between the modular axes of the designed building are indicated, to which the wall thickness values are attached. Dimensional lines, which mark the chain of steps between the rafter axes, are drawn on the plan closer to its outline. Inside the plan, the distances between the racks, ventilation and chimney pipes, as well as between the various structural elements of the rafter system are indicated. In addition, it is necessary to display callouts on the plan, which will indicate the values of the lengths and cross sections of the listed elements.
The rafter system is the most important element of the structure of the roof being erected, on the correct design of which indicators such as the reliability of the roof, its safety and the length of its service life depend.
Be careful
When gluing white paper with colored paper or foil, you need to try to make the whole process as smooth as possible. You shouldn't have any folds. Do everything so as not to accidentally crush the workpiece, because the quality of the domes and the appearance of the entire structure directly depend on its quality. When the paper patterns are ready, you will need to cut out windows in the paper walls very carefully. If you don’t want to cut them out, then you can do it easier - draw them with pencils or paints. Lastly, all the parts are assembled and glued. It is necessary to smear the seams with glue so that it does not protrude and is not visible, otherwise the church will not have a neat appearance.