Make or buy? Pessimists or simply lazy people, of course, will object: why make something out of trash.
But it is worth noting that plastic bottles are an excellent ready-made material for crafts. And, in addition, a person’s hands and head work, imagination searches for solutions, logical thinking develops, and you can still make money from this.
We will not invent anything new, but will show interesting ideas and the work of wonderful needlewomen, whose inventions are inexhaustible.
READ ON TOPIC: DIY holiday gift ideas. New Year's toy made from a plastic bottle
We collect materials that will be useful to make a Christmas tree from plastic bottles with your own hands:
- plastic bottles with a volume of 1.5-2 liters, ideally green, blue or silver
- scissors
- sharp knife
- thick A4 paper
- narrow tape
- double sided tape
- glue moment or universal
- candle
- ornaments for decoration
Summary
This article describes three main ways to make a Christmas tree from plastic bottles with your own hands.
Each of them is strictly suitable for one specific situation. The simplest is the last, third, which allows you to create a three-dimensional image of a Christmas tree. The most difficult is the first one. It requires a lot of material and is not that easy to implement. For people who are concerned about the preservation of forests and are opposed to the use of natural trees for the New Year holidays, this version of the Christmas tree can be very useful. not the best option for a house or apartment, but for a courtyard area it will be a good decoration for the holiday.
Snowman from a disposable cup
Snowmen are now being made with their own hands for the New Year 2022 from just about anything. Another interesting idea is a craft made from a disposable cup.
To do this you will need:
- Disposable tableware - cups;
- Colored paper;
- Scissors;
- Glue;
- Paints;
- Brush;
- Textile.
- Since the cup is white, there is no need to repaint it. On its surface you need to draw eyes, nose and mouth. For the toy, you need to make a hat and scarf from fabric. To make these products hold more firmly, you can use glue.
- It is best to make arms, legs and buttons from colored paper and glue them to the surface. It turned out to be an excellent snowman for the New Year 2019, made with your own hands from disposable tableware. This craft is quite suitable for children to make on their own.
DIY bottle tree
To make such a Christmas tree you will need a sufficient number of plastic bottles of various capacities: from 2 liters to 0.5 liters. It is desirable that all bottles be green, although not required.
You will also need a wooden base for the future tree. This, of course, is a traditional cross and a round post with a diameter of 60-80mm attached to it. The height of the rack is selected depending on the scope of the project and the number of bottles collected. You will also need a screwdriver or screwdriver and about fifty 30mm long screws.
So, how to make a Christmas tree
from bottles with your own hands
? The most capacitive containers of 2 liters are placed on the first row of bottle branches. The corks are twisted from the bottles selected for this section of the tree and secured in a circle at the bottom of the wooden stand, marking the first bottom row. Each plug is applied to the barrel with the thread facing outward, and screwed through the inside with a screw.
Then the bottles are screwed into the corks. If something doesn’t work out right the first time, it’s not a problem to rearrange the plugs to a more advantageous position. Leave a small gap from the bottom row of bottles to the ground. The first row will contain 9-10 bottles.
Bottles with a smaller capacity of 1.5 liters are selected for the next row. It is more expedient to place them above the spaces between the lower bottles, that is, in a checkerboard pattern. This must be done for thickness and a more aesthetic appearance. The thicker the tree, the better it will look.
So, step by step, reducing the container capacity, you need to move to the top of the artificial tree. The topmost bottle with a capacity of 0.5 liters should be attached vertically with the neck down. First, cut off the bottom and tightly insert a shiny Christmas tree ball of a suitable size into the middle of the bottle.
You can decorate the remaining “branches” with balls. They simply need to be attached to the bottom of each bottle using glue. The recess in the bottom of the bottle is very convenient for such an operation. It is realistic to use ordinary construction liquid nails as glue. If the convex part of the ball with a loop for the thread gets in the way, then you should drill a hole with a diameter of 10 mm in the bottom of the bottle and, during the gluing process, direct the protruding part of the ball into this hole.
It is possible to make such a tree from identical bottles of the largest sizes. You will just need to cut off the bottom of the bottles and shorten each subsequent row even more. You can even cut the bottles at an angle to create the perfect conical shape for your spruce tree. In this case, shiny balls will have to be inserted inside the bottles.
Further decoration of the Christmas tree has a lot of options and will depend on the imagination of its creators. There are also many other options for creating a Christmas tree from empty plastic “containers”. And clearly, how to make a Christmas tree from bottles with your own hands
, these videos will introduce you.
In December, a brisk trade in New Year trees will open on the city streets. It would seem that we should rejoice at such an abundance of New Year's markets, but often we feel sincerely sorry for the green beauties cut down at a time when they were just beginning to grow. Fortunately, many people are now purchasing artificial plastic trees or even making them at home from the most unusual means at hand - lemonade bottles, balloons, tinsel, pine cones and even books! Today we will share with you new information on what and how to make a Christmas tree with your own hands for the New Year 2022, how to decorate it, what crafts you can bring to school and kindergarten for the competition. From our master classes with step-by-step instructions and photos, you will learn how to make a green miracle with your own hands from paper and cardboard, cotton pads, threads and ribbons.
Hanging decoration
When decorating the interior of your home, you can bring to life a lot of interesting ideas for crafts. Pay attention to this master class.
Materials:
- 28 green plastic glasses.
- The shiny ribbon is not wide.
- Stapler.
- Glue.
- Plastic balls of small diameter.
- Scotch.
Step-by-step instruction:
- To get started, take 7 glasses and attach them to each other. You need to fasten along the very edge. On the back side we will re-secure everything using tape. Since we will hang the craft, it should be well glued between the parts.
- We make a second one on top of the bottom row; it will take 6 glasses. We repeat the fastening algorithm in the same way as the first time, and also do not forget to additionally connect the bottom and top rows.
- Next, we continue to compose all the rows in the same way, decreasing by one unit, until we complete the last glass.
- On the back side = tape the entire structure for strength. We attach ribbons on top, from which we make a hanging loop for our craft, and we will attach it to it. We make a bow from the remaining ends of the ribbon, and curl the ends using scissors.
- Inside each cup you need to glue a shiny Christmas ball using a glue gun.
Using not many materials and without spending a lot of time, we created a beautiful and original Christmas tree to decorate the interior. It can easily be placed in any corner of the house.
Manufacturing sequence
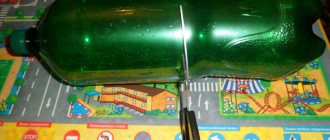
Before you start working with a plastic bottle, it should be thoroughly washed and dried.
In addition, you need to prepare patterns for the blanks from which the Christmas tree will be assembled. They are five-pointed stars of different sizes.
In the case under consideration, their diameters vary from 8 to 2 cm. From the largest diameter, they should decrease by 1.5–2 cm, resulting in 4–5 star patterns.
You can print these stars by downloading a suitable picture from the Internet, or you can draw them by hand.
Prepared templates must be cut out. Using office glue, they need to be glued to the bottle.
Tip: it is better to glue the larger parts first, and then, between them, the smaller ones. This way the layout will be more economical, and quite a lot of parts can be cut out of one bottle.
Use stationery scissors to cut out the details of the Christmas tree. There should be several of each type of part. In addition, from the largest diameter to the smallest, the number of blanks should increase by 1. Then the Christmas tree made from plastic bottles will take on a beautiful natural shape, without sharp transitions and protruding parts.
After cutting, the paper templates must be removed from the blanks.
After this, you need to process all the plastic parts. Using nail scissors with curved ends, cut the edges of each star.
Next, the “branches” of the future Christmas tree need to be melted a little along the edges, passing the candle over the flame. The result will be very realistic and beautiful “paws” of the spruce.
In the middle of each piece, make a hole equal to the diameter of the cocktail tube. This can be done using the same nail scissors.
From thin cardboard you need to cut 2 pieces measuring approximately 3 * 3 cm. On one of them, using a compass, you should draw a circle with a diameter of 2.5 cm, with a hole for a tube in the middle.
This circle, as well as the hole in it, must be cut out.
One end of the tube should be cut lengthwise into 4 equal parts (cut length is approximately 1.5 cm). This edge must be inserted into the cardboard blank.
Both the tube and the cardboard circle, pre-lubricated with Moment glue, need to be glued onto the second cardboard square.
A piece of white felt should be glued to the bottom of the cardboard.
On top of the entire structure you need to sequentially glue a piece of office paper and a piece of white felt. Paper is needed if the cardboard used is visible through the top layer of felt.
On the top layer of felt you need to mark a circle with a diameter of 3 cm.
Using simple scissors or wave scissors, you need to carefully trim off the excess felt. As a result, the future bottle tree will receive a nice and practical support.
Popular articles Corals and shells in the interior of the house
Then you need to collect the New Year's tree. To do this, all prepared stars, starting with the largest and ending with the smallest, must be strung on a tube.
The top of the tree should be crowned with a small star made of yellow felt. You can cut out the star detail using a small template for the base of the Christmas tree.
The star blank needs to be glued onto a piece of yellow felt.
You do not need to spread glue on the entire piece, but only on the rays, so that you can put the star on the tube.
Excess felt around the edges must be trimmed.
The top of the tube should be coated with a small amount of glue. When it starts to dry, you need to put a felt star on the top of the Christmas tree.
Your DIY Christmas tree made from plastic bottles is ready!
If desired, you can attach a loop to it, and you will get an air suspension for interior decoration or a miniature toy for a large Christmas tree. In addition, using a dry brush and acrylic paints with glitter, you can create a kind of sparkling frost on the Christmas tree, and by gluing small rhinestones, beads or beads onto the branches, you can create a real New Year's decoration.
To make a larger Christmas tree, you will need several plastic bottles, and the branch blanks themselves should be larger in diameter.
Christmas trees made from transparent or blue plastic will turn out very impressive - real snow-covered blue spruce trees.
Whatever Christmas tree you decide to make from plastic bottles, let it turn out beautiful, airy, and give you the mood of your favorite holiday.
With coming!
Author
Zabava Rodionova Author of the portal Mama66.ru
All articles by the author
I like!
News Media2
Miniature fluffy Christmas trees
In this master class we will not need bottles of different sizes. Prepare any container, scissors, cardboard and tape.
Making a mini Christmas tree:
- Cut off the top and bottom of the bottles, leaving a flat middle.
- Divide it crosswise into 2-3 rectangles.
- We make vertical cuts on each, slightly short of the edge. The smaller the step between cuts, the fluffier the tree will be.
- A stable round stick or a rolled sheet of cardboard is suitable for the base.
- We assemble the tree from below. Glue each fragment with the curve upward onto the tape.
- Each next tier should be smaller than the previous one.
- The branches can be decorated with artificial snow or painted with white acrylic paint. This Christmas tree looks great in New Year's compositions. You can even hang miniature balls on it.
Tip Bottles make excellent bases for Christmas tree decorations. The neck is the ideal place to attach the hook on which the craft will hang.
Casket for needlework
Empty boxes can be found in every home. Every kitchen has a drawer of small items. It contains something that would be a shame to throw away. What if it comes in handy? Don't rush to throw away the plastic cake box. You'll get some great crafts.
- Cut a circle to size from a beautiful piece of cardboard. We insert it in the middle. For the inner sides, you can take a laminate backing or padding polyester.
- Making a fabric top. It is adjusted, the top and sides are stitched. It will be closed with a lace with a drawstring.
- We glue the filler - the backing - to the cardboard strips. We wrap everything in fabric. We fix it.
- We put the elements inside. Everything is connected with a hot compound using a special gun.
- The bottom will also consist of three layers. Sew it to the base. Later, the seam can be decorated with braid.
- We decorate the product with any little things at hand. Flowers, ribbons, beads - everything will come in handy. This box is convenient for storing sewing threads and needles.
Gifts from bottles
In this master class you will learn how to make topiary. This is an unusual home decoration. Decorative wood is made from coffee, fabric, and napkins. Green and brown empty containers, pine cones, and special glue are suitable for our craft.
First, the trunk is made. Branches will join it. Cut out several transparent rings of the same size. We form a circle out of them. We make diamonds, stars, and flowers of different diameters from green plastic. The edges are made with fringe. We bend the leaves upward towards the base. We form buds.
Now we attach each element to the top. The top of your head will be decorated with the cutest pine cone. Next we attach the greens in a circle. Periodically dilute with pine parts. Having decorated half, let the whole composition dry a little.
We make the barrel. Take the neck and a 10x5 cm rectangle. Roll the shape into a tube and push it through the neck. The bottom side of the pipe must be made with cuts for stability. We connect both fragments.
We are finishing the crown decor. Such a tree will stand in a brown thicket, from the bottom. You can decorate with colored stones. This handmade gift from a bottle will make anyone happy.
Vase made from disposable straws
You can make a beautiful vase from ordinary straws from juice or other drinks. It turns out to be a very beautiful craft for the New Year 2019, made with your own hands from disposable tableware. This is not just an unusual decoration for the home, but also useful, since you can put artificial flowers in this kind of vase. All this will perfectly decorate the room.
To do this you will need:
- Lots of colored disposable straws;
- Plastic bottle;
- Glue;
- Decor.
- The top of the bottle needs to be cut off and will not be needed for this craft.
- The bottle must be covered with disposable tubes, alternating colors. When the work is finished, the product will delight you, because it contains many bright colors. To decorate a vase made with your own hands from disposable tableware, you can use various decor: ribbons, beads, rhinestones, etc. For the New Year 2022, such a product will become truly excellent and relevant, because the abundance of bright rainbow colors will significantly improve the mood of the entire environment.
We are finishing work on a large spruce tree
When the first tier is ready, wrap the space underneath with fringe and move on to the second tier. It will consist of four branches, each of which has two small branches. The length of the branches is about 9 cm. Wrap the frame and the second spacer piece with plastic pine needles.
The branches of the third tier should be about 10 cm long, the lowest - 15 cm. But four tiers of the “New Year Tree” craft are not the limit. You can make the spruce much taller. The main thing is to make each tier wider and more branched.
All that remains is to make a stand. You can make it yourself from two planks or buy it ready-made in the store. Well, don’t forget to dress up the plastic beauty with beautiful New Year’s toys. This craft requires perseverance and patience, but the result will please you very much!
How to make a Christmas tree from pine cones with your own hands
Shot: @Art and Craft / YouTube
What do you need
- Cones;
- green spray paint;
- brush;
- PVA glue;
- salt;
- glue gun or superglue;
- decorative star.
How to make a Christmas tree
Cover the pine cones completely with paint and dry.
Shot: @Art and Craft / YouTube
Using a brush, coat the edges of the pine cones with glue. Roll in salt to make a “snowball”.
Shot: @Art and Craft / YouTube
Glue the beads in some places using hot glue or super glue.
Shot: @Art and Craft / YouTube
Glue a star to the top of your head.
What other options are there?
You will get an original Christmas tree if you glue a lot of cones to a cone-shaped base:
Here's how to make a very beautiful topiary in the form of a Christmas tree:
And such a stylish Christmas tree is made not from whole cones, but from their scales:
Decoration from disposable plates
If you are in doubt about what kind of crafts you need to make from disposable tableware for the New Year 2022 with your own hands in order to perfectly decorate your home, we invite you to familiarize yourself with our excellent idea, which we hope you will like. This decoration, made from disposable plates, can be hung either on the wall in your apartment or placed neatly on a chest of drawers as a decorative item. If there is a desire and children, then it would be nice to present this product to a kindergarten in the form of a present.
For production you will need:
- disposable plates;
- glue;
- gouache paints;
- brushes;
- decorative elements: cotton wool, rhinestones, sparkles, bows and much more.
- First think about what you want to create: either a snowman, or Santa Claus, or a deer. Everything is at your discretion.
- Take an easy-to-use brush and paint the image of a fairy-tale character of your choice with paints.
- Then decorate it, if necessary, with cotton wool, glitter or anything else. For example, you can refer to the ideas presented in the photo. A great option, quite cheerful and colorful. Make your wishes come true and get excellent crafts for the New Year 2022, created with your own hands from disposable tableware.
How to make a Christmas tree from cotton pads with your own hands
Shot: @Pane, amore e creativevità / YouTube
What do you need
- Base for the Christmas tree (you can make a cone out of cardboard);
- cotton pads;
- glue gun;
- beads or sequins;
- decorative star.
How to make a Christmas tree
Fold the cotton pad in half.
Shot: @Pane, amore e creativevità / YouTube
Lubricate it with glue under the fold on one side and attach it to the bottom of the cone.
Shot: @Pane, amore e creativevità / YouTube
Glue a few more of the same parts in a circle.
Shot: @Pane, amore e creativevità / YouTube
In the next row, glue the discs so that they are located between the previous ones.
Shot: @Pane, amore e creativevità / YouTube
Continue decorating the Christmas tree in the same way.
Shot: @Pane, amore e creativevità / YouTube
Decorate with beads or sequins and a star.
What other options are there?
You can make something like flowers from the disks and glue them to the base:
Here's a quicker and easier way:
And another easy and beautiful option:
What do you need
- 4 green plastic bottles with a volume of 2 l;
- scissors;
- candle;
- lighter or matches;
- awl;
- White paint;
- brush;
- PVA glue;
- glitter;
- drill;
- wooden stick;
- glue gun;
- decorative bow;
- beads.
How to make a Christmas tree
Cut off the neck and bottom of the bottle. Cut the remaining part and straighten it. Divide into six equal 8.5 x 6 cm rectangles and cut.
Shot: @Art and Craft / YouTube
Trim each piece into a petal shape. Fold the narrow end over. Make many cuts on all sides, as shown in the photo and video below. Lightly burn the cut edges with a burning candle.
Shot: @Art and Craft / YouTube
Try to ensure that the cut edges do not look straight. Make a hole in the curved tip with an awl.
Shot: @Art and Craft / YouTube
Do the same with the remaining cut out rectangles.
From the remaining bottles, cut out six more pieces measuring 7 x 6 cm, five pieces measuring 6.5 x 6 and 6 x 6 cm, four pieces measuring 6 x 5.5 and 6 x 5 cm, and three pieces measuring 5 x 4 ,5, 5 x 4 cm and 3 x 3 cm.
Make the same petals with holes out of them.
Shot: @Art and Craft / YouTube
Paint the edges with white paint. When it dries, cover it with PVA glue and sprinkle with glitter.
Place one cut bottle bottom on the other. Drill a hole in the middle with a drill, insert a stick there and secure with hot glue.
Place one of the largest petals on the stick with the sparkles facing up and also secure it with glue to the “trunk”.
Shot: @Art and Craft / YouTube
Popular articles Satin ribbon headband
Place the remaining pieces of the same size in a circle, securing each with glue.
Shot: @Art and Craft / YouTube
For each next row, use smaller pieces. Continue until you run out of petals.
Shot: @Art and Craft / YouTube
Glue a bow to the top, and beads to the “branches”.
What other options are there?
This Christmas tree is even easier to make:
Here's how to make a Christmas tree from plastic fringe:
And this craft can even replace a real tree:
Finally
So you have found out how you can create a variety of crafts from disposable tableware for the New Year 2022 with your own hands in an original and simple way. Transform your home in a chic and interesting way and the owner of the coming year, the Yellow Earth Pig, will reward you with good luck, prosperity and great happiness. Happy holiday, dear friends! All the best to you!
It is better to prepare for the New Year in advance. Making your own Christmas tree bells is a good idea. Even in the writings of ancient authors, the ability of bells to ward off evil forces was reflected. There are many options for making bells from scrap materials. We have selected the most original of them.
- Bandage or gauze.
- Eggshell.
- PVA glue.
- Brush.
- Paints (including gold).
- Putty, beads, semolina (optional).
Manufacturing method No. 1
Take the shell and bandage. We glue the bandage “overlapping” with PVA glue.
We strengthen our bell, it should dry well.
Prime with white paint so that the shell does not show through. When the bandage is dry, cut out the petals with scissors.
Make a hole at the top with a sharp object. The hole is needed for the lace. Glue the husk on top and paint it.
The bells are painted with Easter dyes + watercolors. The leaves of the bells can be safely bent back.
Two original green beauties
The third design option in Fig. 5. The principle of making a Christmas tree from plastic bottles with your own hands, as you understood from the previous options, is similar.
Let's briefly look at the features of this option:
- In this case, the middle of the bottle is cut into squares.
- Using a prepared stencil, cut out circles from squares.
- In the middle, use a hot nail to burn holes in each piece.
- We make strip cuts in a circle, not reaching the middle by about 1 cm.
- Then the resulting needles can be slightly curled, as in the first option, or melted at some distance above the candle.
- For the stand, we use the bottom of the bottle, where we also make a hole and insert either a skewer, or sushi chopsticks are perfect.
- We put the twigs on the resulting trunk, but there is one caveat: you need to come up with some kind of detail to put on between them - it could be a cork, it’s great if you can find large beads with a suitable hole. We decorate either each detail before assembling it, or the finished Christmas tree.
Fourth option Fig. 6.
Fig 5 - Green beauty. Option No. 3 Fig 6 - Green beauty. Option number 4.
In addition to the above, prepare a wine bottle cork, a strip of foam rubber, and a hard plastic cup.
The action plan is:
- The first step is all the same as in the previous options - we cut rectangles, then we make various stars out of them - these will be the “paws” of the spruce.
- Let's hold the resulting pieces over the fire just a little bit so that they bend slightly.
- We will make multiple cuts at the tips of the “legs” - this will make it more beautiful.
- Now we will glue a piece of foam rubber to the parts, the result will be a pyramid.
- The trunk of such a Christmas tree will be a cork plug.
- Drop a little glue into the glass and attach the cork to the bottom.
The Christmas tree made from plastic bottles is ready, you can give it for the New Year!
Make a Christmas tree with your own hands, cheaply, cheerfully and, in addition, quickly? This is possible, especially if you have some plastic containers - bottles or cups - accumulated in your house.
We present to your attention a double detailed master class: how to make an exclusive New Year’s building from recycled materials with your own hands.
Garland made from scrap materials
In addition to homemade Christmas trees, you can decorate your house with a chic garland made of plastic glasses. It’s extremely rare to come across such unusual decor in a festive interior, because many people can’t even imagine what can be made from ordinary plastic glasses.
That's all. A beautiful and unusual garland for the New Year's interior is ready.
Garland-ball
. You can make a garland in the shape of a ball. For production you will need:
- Transparent plastic cups - 50 units.
- Garland with fifty LEDs.
- Clothespins – 3 pcs.
- Stapler.
This unusual ball is perfect for creating a wonderful atmosphere at home or for dancing at a party.
Attention, TODAY only!
Do you have a lot of plastic dishes lying around at home and don’t know what to do with them? Our advice to you, do not throw it away under any circumstances, because from such improvised material, which looks quite primitive, you can create some decorations for your home for the New Year holidays with your own hands. This way you will save money and reveal yourself as a talented person. And the atmosphere of celebration in your home will take on the proper appearance. With such basic things, you will have a unique opportunity to show off your individuality in front of your guests and family. So, let's take a look at our article, which will provide you with 4 photos of ideas for beautiful crafts from disposable tableware for the New Year 2019, made with your own hands extremely quickly and easily. Without having the skills of this skill, you can freely acquire them with the help of our master classes containing easy-to-understand information.
DIY fabric Christmas tree. How to make a Christmas tree from felt.
You will need:
Glue or double tape
Scissors
* Try using two colors of felt to make the Christmas tree even more beautiful. In this example, yellow and orange felt was used.
1.
Make a cone out of cardboard. Secure the ends with glue or double tape.
2.
Prepare felt and cut circles of different diameters from it, from small to large (see picture). You can use pre-prepared circle templates made from cardboard.
3.
Glue Christmas tinsel to the bottom of the cone.
4.
Now you need to make a crosswise cut in the center of each circle cut out of felt. Do not cut too much to prevent the felt garment from falling off. Make the cut just enough to fit the circle tightly onto the cone.
5.
Start gradually putting circles on the cone. If you are using two colors, then put on the circles sequentially, first one color, then the other. Also worth noting. What to put on the next circle is not only on the cone, but also on top of the tips of the cuts of the previous circle.
6.
We decorate the top of the Christmas tree. To do this, simply add tinsel, onto which you will need to add a pre-prepared small felt cone. Secure the tinsel and crown with glue.
* If you wish, you can hide a sweet gift inside the cone.
Kanzashi style Christmas tree made of satin ribbon
Well, friends have now reached another elegant option, which looks quite bright and elegant. The green beauty turns out beautiful and lush. But first, you must master the kanzashi technique; for this you need to learn how to make special blanks in the form of triangles. Take a look at the diagram, if it is not clear, then in this post you will find a more detailed master class on making such things.
You have to take a green satin ribbon, cut it into pieces measuring 5 cm x 5 cm and repeat all these steps.
Or consider this tip.
So you will need:
- cone made of thick paper or cardboard
- satin tape
- star
- scissors
- wire
- candle
- heat gun
Stages:
1. Prepare everything you need for work. Place the gun to warm up.
2. Carefully and slowly glue the fabric blanks to the surface of the green cone in a circle and in a spiral.
3. Try to place all the triangles fairly close to each other. After the product is ready, take a star or any bow and glue it to the wire.
4. Place the ornament on the top of the tree. Decorate the souvenir with beads; they will act as a garland.
I came across a more simplified version of the craft in this film, perhaps you will also like it and you and your children will master this technique. Good luck!
Christmas tree
An unusual Christmas tree can be made from simple plastic bottles
It is important to collect the necessary materials for this craft and follow the master class step by step
To do this you will need:
- Plastic bottles;
- Scotch;
- Sandpaper (cardboard);
- Scissors.
Progress:
- The bottom and neck of the bottle should be removed, and then you will get a straight pipe. Then you should prepare blanks from twigs. They must be of different sizes so that the Christmas tree turns out to be cone-shaped.
- Then the plastic bottles need to be cut lengthwise into 3 parts so that subsequent tiers are smaller than the previous ones. You need to make needles on each workpiece, and to do this they are cut into thin strips, but not completely. To make the Christmas tree stand stable, it is advisable to use the bottom of one of the bottles as a stand.
- A sheet of cardboard needs to be rolled into a tube and placed in the neck of the bottle. You can secure it with tape. Now each tier of branches needs to be secured to the tree. You can install a toy on the top or come up with something else. To make the Christmas tree fluffy, the needles should be cut thinner. Usually blue or transparent bottles are used for this. That's all, our craft is ready!
Another creation option
There are many master classes on how to make a Christmas tree from plastic bottles. Let's talk in detail about another method.
Materials:
- A strong metal rod or a very smooth wooden pin, 50 cm high and 0.5 cm in diameter.
- Aluminum wire 2.5 ml in cross section.
- A lot of green plastic bottles, about 30-35 pcs. If your tree height is planned to be lower, then less consumables will be needed.
- A stand for crafts is two bars fastened together crosswise with a hole in the middle.
- Glue gun.
- Scissors.
Master class 2: how to make a Christmas tree from cups
The most difficult thing in this procedure is perhaps finding green cups.
We will need:
- plastic cups;
- stapler;
- glue;
- toys, balls for decorations.
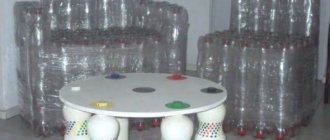
Stage one:
We place eight cups in the first row with our own hands, in a semicircle. We fasten them with a stapler. Then we put the second row on top - already seven cups. We also fasten them with a stapler. And so on, each row is one glass less. The rows can be lightly glued together for reliability, and also secured with staples. The finished tree should be stable.
Stage two:
Place a toy or ball in each cup. You can drip a little glue so that they are securely fixed inside. By the way, if you have a special glue gun, great, it will help you discreetly attach toys to plastic.
The original Christmas tree made from plastic cups is ready! But if you think that this idea is not creative enough, then here are options for decorating or modifying such a structure with your own hands:
- You can lay out the cups not in a semicircle, but in a circle. Only in this case is it better to “plant” them on a base made of a cardboard cone. Such a tree will have an attractive “facade”, that is, it can be placed in the center of the room, while a semicircular one looks good when standing against the wall.
- If you make a small cut in the top of each cup, you can pass a ribbon through it, secure it with a knot, and hang the decoration on it.
- Macaroni bows painted with golden gouache will look great as decorations.
- You can place a garland inside a round Christmas tree made from cups. It will shine very beautifully through the plastic, and its top light bulb will perfectly replace the traditional star.
Popular articles Fabric tulips
Cute decoration for the New Year from plastic dishes
This method of creating holiday crafts is very popular, if only because it is considered simple. Even a child can cope with the task. Another attractive thing is that the work requires a minimum of the most accessible materials. They are in almost every home.
First you need to collect materials and tools:
- 28 plastic cups;
- glue gun;
- stapler;
- varied decor.
Christmas tree made from bottles
This plastic beauty will decorate your home and create a New Year's mood for all its residents. A DIY Christmas tree made from plastic bottles can be made from any plastic containers. The size of the bottles does not matter, and the color scheme can be different, because you can’t always find a Christmas tree that is only green.
Materials:
- Plastic - bottles 2 pcs.
- Green paper 30 by 40 cm - 1 sheet.
- Scotch.
- Scissors.
Having prepared all the necessary materials, you can start making a Christmas tree from plastic bottles with your own hands.
First we need to make the base of our evergreen tree. To do this, take the bottles and, using scissors or a stationery knife, cut off their bottom and neck. Take a sheet of paper and roll it into a tube. The edges must be carefully secured with tape so that they do not unwind. We insert a sheet rolled into a tube into the neck of the cut bottle. Now you need to carefully look at the position of the sheet: it should not deviate in any direction, but only be positioned straight. If it has a slope, then you should trim the bottom of the neck a little so that it is leveled and the trunk of the future tree stands straight. We cut the remaining parts of the bottles into rings; their width should be 80 millimeters. Divide the first resulting ring into two equal parts. We cut the second into three components. We divide all the remaining rings into four parts. Using scissors, we divide each detail of the future Christmas tree into fringe cuts.
Please note that the thinner the fringes are, the more elegant and fluffy the tree will be. But don’t forget that they should be the same, like all the needles on the Christmas tree.
The fringe is not cut to the edge of the part by at least 10 millimeters. You need to start attaching the branch blanks using tape. You need to start from the bottom and work your way up. Accordingly, the largest parts will be at the bottom, and the smallest at the top. After the Christmas tree is finished, you will need to decorate it, for which small New Year's toys, preferably made of plastic, as well as small sequins, are perfect. Attach a tip or star at the top to hide the gluing areas.
If you want to make the tree taller and larger, then feel free to take more material to work with. There are no limits to imagination and restrictions on creativity.
Benefits of plastic cups
Cups are good because they allow you to create three-dimensional shapes. This advantage has a beneficial effect on the development of the child, making him:
- smart;
- attentive;
- diligent;
- able to see beauty in ordinary objects.
By making simple things, children acquire skills in working with glue, scissors, learn to model, and learn the properties of various materials. The experience gained will make learning in kindergarten and school easier.
Christmas trees made of plastic
There are more and more plastic bottles and bags every day; disposable tableware and old CDs are added to them. You can make interesting New Year's crafts from this material. Homemade Christmas trees are inexpensive and very creative.
From plastic bottles
Large Christmas tree made from plastic bottles - master class. This design requires a large number of bottles and a lot of time for installation and design. But the result cannot fail to impress:
Interesting video on how to make a Christmas tree with your own hands:
Small Christmas tree made of plastic bottles. From a green bottle (from Sprite or 7up) you can make such a festive decoration for your desktop - master class.
Artificial Christmas tree made from bags
A bright and elegant artificial tree made of oilcloth or plastic bags will become an integral attribute of the New Year's table. It is miniature and stable, looks great on a holiday or office table or just on a closet shelf. The master class was prepared by Oksana Biktubaeva.
Materials needed for work:
- Thin green oilcloth
- Soft wire
- Stick with a diameter of 1 cm
- Multi-colored satin or other decorative ribbons 0.5-1 cm wide
- Cream jar
- Alabaster
- Glue gun
- Styrofoam
- Beads, sparkles, stones for decoration.
We cut the oilcloth into strips 3 cm wide. The length of the strip will be different: 20 cm - 6 pcs. 15 cm – 6 pcs. 10 cm – 4-6 pcs. 5 cm – 4-6 pcs. 3 cm – 5 pcs. The number of stripes can be changed - the splendor of the tree will depend on this.
If the stripes are wrinkled, they must be ironed through a scarf. We bend each piece in half lengthwise and cut it with scissors, creating a fringe.
Cut a piece from the wire, twice the length of the green strip. We roll the wire into 2 layers and place it in the center of the tape. Carefully twist the oilcloth and wire, straightening the fringe evenly.
We scroll through all the strips in the same way, turning them into Christmas tree branches.
Let's get to the trunk of the tree - clean the stick from excess branches and level the bottom. The length of the stick will determine the height of the tree. For our beauty, a 30 cm long stick is just right.
We dilute the alabaster with water, fill the jar with this liquid and plant the stick. We fix the stick exactly in a vertical position and leave it until completely dry.
We begin to plant branches. We take the longest branches first and wrap each one around the trunk. We first drop a drop of glue onto the trunk so that the branches hold firmly and do not move down.
We do the same with each branch; at the top of the head we attach the smallest branch vertically, without wrapping it around the trunk.
Now the fun part is decorating the Christmas tree. The decor can be anything - small bows, beads, sequins, small Kinder Surprise toys and much more. In our case, the Christmas tree is decorated with bows made of satin ribbons. And the role of the garland is played by a golden ribbon 1 m long, which is wrapped around the tree in a spiral.
We also decorate the container in New Year's style. We paint the jar with nail polishes of blue, blue, and purple colors.
To disguise the alabaster and the edges of the jar, we glue pieces of foam plastic, creating a snowdrift.
The Christmas tree is ready for the holiday!!!!
Christmas tree made from plastic cups:
Snowflake toys for the Christmas tree
Another idea for simple crafts from Oksana Dubrovskaya.
Takike toys are made simply, affordably, from waste material, and are quite large in size. Therefore, they are well suited for decorating a street Christmas tree, home or entrance. As the New Year approaches, I want to create a festive mood around myself. Making Christmas tree decorations helps with this. You can do them yourself or with children. If such crafts are not useful for your own Christmas tree, they will be an indispensable find for children's educational institutions.
In addition, thanks to such creativity, the problem of the secondary life of plastic containers, which worries the majority of the population today, is being solved.
For Christmas tree decorations made from plastic bottles you will need (photo 1):
- the bottom of two plastic bottles of the same size;
- acrylic paints (enamel paints);
- satin ribbons to match the color of the paints;
- double-sided narrow tape;
- thin brush for paints;
- stationery knife.
First you need to separate the bottom of the bottle. For one toy you will need two blanks.
On the inside you need to draw arbitrary patterns of snowflakes; paints can be selected in different colors.
The finished pieces are connected in pairs using double-sided tape. Before this, the toys can be filled with rain, confetti, decorative balls and similar tinsel.
The tape is closed with a satin ribbon, which is matched to the color of the paint.
If the tape is wider than the ribbon, it is better to wrap it in two layers, then tie a bow. This will be the top part of the toy.
New Year's decorations are ready. They can be hung using paper clips.
The paper clips unbend and serve as hooks.
You can decorate the Christmas tree.
Despite the ease of manufacture, such toys made from plastic bottles open up a lot of scope for imagination. Try making these with your children, listen to their decoration suggestions - and get your own original, unique Christmas tree decorations.
The current version of the craft is a pig for the New Year 2022:
Christmas balls - master class with photos:
Video about similar balls:
You can also make the ball transparent and place any toys inside. You will get a completely different toy:
Elegant toy “Icicles” - how to make:
Simple toys made from bottles (other photos and tutorials here):
Detailed video on how to make beautiful bells:
See how snowmen, animals and Christmas trees are made from bottles here.
Video about a very beautiful Christmas tree toy made from a plastic bottle:
https://youtube.com/watch?v=PM350i6ONHY
Monkey made from scrap materials:
Another original ball, you can leave it plain, or you can further decorate it to your taste:
And more photos of crafts made from plastic bottles sent by our readers:
Also on the Internet, I came across the following ideas for using plastic bottles and disposable glasses:
from disposable glasses
And even entire Christmas trees made from plastic bottles:
We made this mobile from plastic cake packaging:
From a 5-liter bottle you can make not a Christmas tree toy, but a very useful winter craft - a bird feeder:
Even more interesting: Crafts for the New Year
You can also make the following flowers from the bottoms of plastic bottles:
And this is what girl Katya came up with from a bottle: