If you like to have fun and creativity is your thing, then creating Halloween costumes will be as memorable as the celebration itself.
Skillful hands and a flow of imagination sometimes create incredible things.
Treat yourself and your children to spectacular outfits of the dead and vampires, and the process of creating them will immerse you in the holiday atmosphere.
Cape with hood: design options
How to sew a cape with a hood with your own hands? The first thing you need to do is decide on the length of the cape. Take a measurement along the center of your back from the seventh cervical vertebra (at the crease of your neck) to your ankle (or higher, if desired). Then select the height of the hood.
On average, for an adult this length is 50 cm, for children - from 30 cm. Now we will calculate how much fabric you will need.
For a children's cape, whose sum of lengths (cape + hood) does not exceed the width of the fabric, a fabric length equal to the child's shoulder circumference plus 15-25 cm, depending on the desired pomp of the cape, will be sufficient.
For an adult cape, whose sum of lengths is most often greater than the width of the fabric, you need to prepare a piece with a length equal to the sum of the lengths of the cape and hood plus 5 cm for allowances.
As for the choice of fabric, silky and shiny taffeta looks most impressive. In addition, a slight dent during the holiday will not spoil it, unlike inexpensive satin. For costumes of princesses, fairies or elves, you can use airy chiffon.
The finishing on a cape with a hood is what will make it part of a particular costume. We suggest decorating the edge of the cape with a shimmering brocade ribbon of a suitable color.
The ties for the cape are made from the same ribbon. Lace or velvet ribbon will also look beautiful. You will need a length of ribbon equal to twice the length of the cape and hood plus 1 m for the ties.
Our hooded cape is sewn without a lining, so to disguise the seam allowance we sewed it using a double French seam.
So, let's sew a cape with a hood with your own hands!
Progress
Fold the cape panel in half with the wrong sides facing in along its entire length. Baste or pin and then stitch, leaving a foot width along the top edge. Press the seam and trim the seam allowance to 3mm.
- Turn the cape inside out. Pin the fabric around the seam allowances, enclosing them inside.
- Baste or pin and stitch to the width of your foot. Press the seam allowance to the side. Turn the cape right side out.
- Fold the edges and bottom of the cape 0.5 cm and iron. Fold again 1 cm, iron and baste. Sew, departing from the edge about 7 mm.
- Sew finishing tape to the edges of the cape and hood. Wrap the edges of the ribbon onto the wrong side of the cape and grab it when stitching.
- Set aside the length of the hood from the top seam on both sides and draw a line for the hood. Loosen the upper thread tension and set the stitch length to the maximum stitch length. Sew along the marked line, without securing the stitching at the beginning and end. Pull the fabric to the desired length so that the cape fits well around the neck.
- Sew the rest of the tape onto the pulled fabric: first from one edge of the tape, then from the other.
- Tie knots in the strings.
The cape with a hood is ready!
Paper wings
Paper and cardboard are common resources for creating this accessory. They are easy to use and low cost. However, this is a rather long process. It is necessary to cut out a lot of details that will eventually look like natural feathers.
Required Items
- Cardboard.
- White paper.
- A printer.
- Elastic band.
- Glue gun.
- Pencil.
- Scissors.
Progress
First you need to make a base. It is made of cardboard, onto which feathers will then be attached. The outline of the base need not be drawn; in any case, it will be carefully disguised with the help of feathers on the edge. An elastic band should be attached to the base.
Then you need to make feather blanks. For convenience, they can be printed. It is better to glue the feathers from the bottom of the base, otherwise the glue would not be noticeable even in layers.
Feathers should be glued to the top, the bottom can be curled with scissors.
How to sew a red and black cape with a hood with your own hands?
The sewing principle may be the same, but differ in color or finishing.
As for the fabric, I opted for satin, it’s inexpensive, looks bright and elegant, especially in photographs (the only drawback is that it wrinkles). Taffeta looks the most impressive, but it is also more expensive.
To sew a double-sided raincoat you needed:
- Red satin - 4 meters (4*1.5)
- Black satin - 4 meters (4*1.5)
- Nonwoven
- Satin ribbon for ties
- The pattern of the raincoat can be adjusted depending on the desired length. The width of fabric in stores is usually 1.4 m and 1.5 m (I have two pieces of fabric 1.5 m wide and 4 m long). I sewed a reversible raincoat, designed for tall people. I cut it according to my own pattern, based on the size of the fabric:
- We cut each section in half and sew it together (the dotted line means “Sew” in the drawing), we get two parts three meters wide. Cut it out as shown in the drawing. Using an iron, we glue the necks of the parts with non-woven material to prevent the collar from stretching.
- We sew everything together along the edge (front side to front side) except the neckline. Turn it inside out and sew a finishing stitch along the edge to secure it. The double-sided cape is ready, let's move on to the hood.
It is relatively large; in films, all sorts of sorcerers and magicians usually wear such hoods.
I think that the most interesting thing about a raincoat is the hood (I haven’t found such a sewing method on the Internet yet). The method is convenient in that the hood can be sewn without a pattern, relying only on scraps after sewing the cape.
From the “triangle scraps” that remained after cutting out the details of the cape we will sew the hood.
First we sew red with red and black with black (line 1 in the photo below). Then connect the red and black parts along line 2. We slightly round (cut) along line 3.
- We gather the hood along line 3 to a size equal to the neck of the cape. Line 3 is the line along which the hood is sewn to the cape. Thanks to this design, the hood is ideally shaped, i.e. voluminous at the back and sides.
Sew on the satin ribbon ties and the reversible raincoat is ready!
Fabrics
Atlas
Shiny fabric for elegant formal wear and bright accessories
Characteristics
More details
Felt
Woolen non-woven material made from the finest down of rabbits and goats
Characteristics
More details
Crepe satin
Popular fabric for sewing elegant dresses, light blouses and other items of clothing and accessories
Characteristics
More details
Galliano
An ideal lining fabric with phenomenal durability
Characteristics
More details
Canvas
Fabric intended for lining when sewing thin, delicate materials
Characteristics
More details
Crinoline
Lining material for clean, streamlined silhouettes
Characteristics
More details
How to sew a vampire cloak with your own hands
Material for work:
- Black fabric (1.80 m according to the pattern, but estimate according to the size of the person for whom the suit is being sewn);
- Red fabric such as satin or twill (1.80 m);
- Scissors;
- Threads with a needle;
- Cardboard or non-woven fabric;
- Centimeter.
1. From fabric of both colors we cut out half-suns of the same size.
2. Sew facing each other, leaving a cutout for the neck. Turn it inside out and iron it.
3. The remaining scraps will be used for the hood. We cut out two pieces of black and two pieces of red.
4. We sew together the parts of each color along the line B1-C3-C2. Two hoods came out. Now you need to sew these hoods with the seams facing out along the line A2-C2 and turn them inside out to make one. The red hood should be inside.
Instead of a hood, you can sew a stand-up collar to the cloak.
5. We make one piece of different colors and sew it together. We turn them inside out.
Inside, for rigidity, you should place cardboard or non-woven fabric and iron it thoroughly.
6. Then sew the hood or collar to the cloak, make the ties and the cloak is ready!
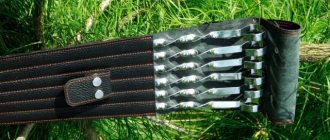
Another mandatory detail of a vampire’s image is fangs. What can they be made from? For example, from a disposable fork. Break off the teeth, leaving only the outer two, and attach them using special denture adhesive or dental wax.
Or using false nails. I filed my nails, giving them the shape of a fang and gluing them with denture glue.
Much attention is paid to makeup in this image. Without it, the image will be incomplete. Although this addition is more suitable for adults.
Defiantly catchy makeup is applied to a lifeless pale face. You can simulate bruises, oozing wounds, bite marks, bruises from strangulation, and bloody streams on the lips.
- You can whiten your face with powder, foundation or face painting, even baby powder.
- Line your eyebrows and eyes with a cosmetic black pencil and circle them with shadows of very dark colors.
- Apply bright red or bright scarlet lipstick to your lips.
Made from plasticine
A plasticine bat will be an interesting, educational activity for children 5-7 years old. To work you will need black, brown, gray and yellow plasticine, a board and a plastic knife. It would also be useful to think about the basis for the craft. This could be plywood or cardboard with natural materials attached to it: dried flowers, hay, yellow leaves or small pumpkins.
Operating procedure:
- Divide a piece of plasticine into three parts with a knife. Make a round head from one, and an elongated body from the other.
- Make a teardrop-shaped cake from the gray mass and glue it on your tummy.
- Make a small nose out of brown plasticine and attach it to your head. Here you can also make eyes and yellow or green material. But perhaps someone's bat will be romantically blue-eyed. It is better to fix the eye balls in the pits. Form the pupils and insert them into the eyes.
- Form teardrop-shaped ears. Glue gray or brown cakes to them, which will mark the inner, tender side. Make the legs.
- Form wings from black plasticine. Decorate them with thin sausage veins made of plasticine.
- Assemble the animal by connecting the head, wings and body. All that remains is to install the sculpture on a picturesque stand and place it at the exhibition of crafts.
Other craft options:
A mandatory attribute of a witch's outfit is a cap.
Material for work:
- Felt or any other material that holds its shape (cardboard as an option);
- Scissors; thread with a needle (for cardboard - PVA glue);
- A sheet of whatman paper or newspaper for a pattern;
- Compass;
- A simple pencil.
1. Add 1.5 cm to the head circumference for the seams and, using a compass, mark this value on the pattern.
2. Now we draw a second circle with a compass - these will be the fields of the cap. We add 20-30 cm to the first number (the size of the cap’s brim), cut out according to these templates and make patterns on the fabric.
3. We sew the resulting cone on the sides. Turn it inside out and sew it to the brim.
You can accessorize your witch's Halloween costume with pointy shoes.
These shoes can be made by taking any old shoes and gluing them using the papier-mâché technique.
Shoes and stockings
A vampire is an attractive image, so you should choose high-heeled shoes. Of course, these must be stilettos, as sharp as a vampire's fangs. Shoes are usually chosen black, but you can choose shoes of a different color that is present in the suit - purple, burgundy, etc. You can choose high stiletto boots for a mini dress.
Stockings should be black; they can be mesh or fishnet. Of course, if the dress is long and without a slit, then you can wear the most ordinary dark tights, but you should choose beautiful stockings to go with the mini.
Making a Death Suit
In various films, books or comics, Death most often appears in one incarnation - a dark figure wrapped in a cloak. At the same time, a dark robe hides the figure. An indispensable attribute is a scythe or sickle. The hood of the mystical image completely hides the face.
According to legends: at the most unexpected moment, a gloomy character can throw off his hood - instead of a face, he has a bare skull with fiery eye sockets.
Let's move on to the actual production of the costume. You can, of course, buy it in a store, but the vestments of a mystical creature made with your own hands will have no analogues.
What's most important? A cloak with a deep hood and a braid behind the back.
Making a mantle:
- Prepare black fabric. If you have any difficulties, you can take dark blue or dark gray.
- The black material should be larger than your height and extend down to the floor.
- The simplest option is simply black or dark blue rectangular fabric, stitched along the edges.
- The picture shows a pattern of a complex robe for a do-it-yourself death costume.
- Transfer the pattern to the fabric, cut and sew the edges.
- The next step is to combine the necessary parts with each other, baste and sew on a machine or by hand.
- To make the mantle look more impressive, add wedges at the bottom.
- The clasp can be attached to the top - it can be a button, snaps, brooch or pin.
- You can tie your Halloween costume with a belt. Don't forget to sew on special straps, otherwise you may be left without a belt.
- In the women's version, you can wear a black dress under the robe or not use a cloak at all. For men's attire - black trousers and a T-shirt.
Making bloodsucker fangs using cotton wool
This method is simple and at the same time very unreliable. In order to make fangs, take an ordinary cotton swab and remove the tips (the cotton components themselves) from it. You need to drop a little nail polish on each tip, press it to your teeth and hold it for a short time. At the same time, you should not count on a long-lasting effect from vampire fangs, since if you keep your mouth closed, the cotton wool will very quickly soften and lose its appearance. Therefore, we recommend resorting to this method only as a last resort.
We complement the image with accessories
If you are preparing a costume for Halloween and want to appear in the image of Death, do not forget about the indispensable attribute of this character - the scythe.
Where can I get it? Do it yourself!
- Take a piece of cardboard (be sure to choose a durable one at the store) and cut a blade out of it.
- For a foundation in your yard or summer cottage, find a foundation.
- The blade can be made in a classic shape and covered with foil for greater realism.
- Their base is made of a stick or staff - paint it brown.
- For real men, you can use a real braid (not the sharpened version). But remember, the instrument will weigh a lot; will it be convenient for you to carry an unnecessary load with you all evening?
Another advantage of cardboard is that the crescent blade can be decorated in any way. Add additional tenons, bevels and unusual finishes - just use your imagination and create!
Additional items
The bat costume, consisting of wings and a mask, practically does not need any additions.
But if time allows, you can cut out figures of small flying mice from felt, for example, blue or white, which can decorate everyday children's clothes.
Stencil for figures
We complete the image of the wizard - apply makeup
For the Death look, you will need mascara that will last a long time. Dark shadows - to add shading around the eyes. And light foundation and powder - to create the most pale look.
Using bright shadows you can draw additional elements - flowers and leaves. This technique will look impressive.
The basis of the image is to paint the face like a skeleton skull.
Some girls prefer to apply makeup for the Death costume only on the lower part of the face.
How to make a Halloween costume with your own hands?
Finding a carnival costume is not a problem today. There are special stores that sew and sell such outfits. In their assortment you can choose whatever your heart desires, however, this pleasure costs a lot. Why spend that kind of money for one outing (next year you’ll still have to pick up something new)?
It is quite possible to make or sew a costume for this holiday with your own hands, at home, using available tools and materials.
From the very beginning, you need to decide on the image (who and how you see yourself). You can choose some common and fashionable look, or maybe? come up with something exclusive and original.
There are several main thematic groups of images for Halloween:
- monsters, representatives of otherworldly forces and monsters (this includes the most terrible costumes - the embodiment of death, an evil witch, the dead bride of Frankenstein or himself, the vampire Count Dracula and his companion - the demonic vampire lady, mummy, zombies, skeletons, ghosts and other creepy evil spirits);
- images of positive and negative superheroes, heroes of TV series, popular feature films, comics and cartoons (we are talking about the costumes of Batman, Superhero, Spider-Man, Catwoman, as well as their antagonists? Harley Quinn, Joker, Poison Ivy and many others. Here This also includes the Billy doll costume from the movie “Saw”);
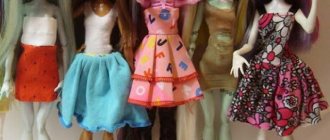
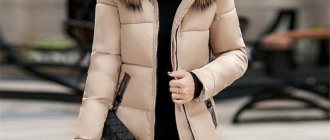
- the images may not be so scary or intimidating, for example, you can choose a completely opposite role for yourself and become an angel, a good fairy, a princess from Disney fairy tales, a Barbie doll, etc. Also, for girls, Halloween costumes can be very sexy (even a witch or vampire can be young and seductive. The images of legendary divas - Marilyn Monroe, Audrey Hepburn are very popular, and for men the roles of Elvis Presley or Charlie Chaplin are perfect);
- Will you also need to make costumes for the children? they also want to have fun. The main rule when making children's outfits is the absence of overly frightening horror and other monstrous things. Choose for your child an interesting image of a little wizard, a pirate, a kind and cheerful ghost, a bat, a fairy, etc. You can dress up as any animal, bird or insect: a tiger cub, a bear cub, a crocodile, a dragon, a bee, a spider. Halloween costumes for children in the form of the main symbol of the holiday - a pumpkin - are also popular.
Children's Superhero Cape
Choose your fabric. Since you won't be sewing this cape, it's best to choose a fabric that won't fray, such as felt or flannel. In total you will need about 90 cm of fabric.
This method can also be used to make a cape for an adult, but then you will need more fabric.
- Fold the fabric in half lengthwise. Position the resulting rectangle so that one of its narrow sides faces you.
- Draw the side edges of the cape. Use a tailor's chalk or marker to make a mark along the bottom edge of the fabric, 28cm from the fold. The depth of the mark can be adjusted at your discretion. The closer it is to the bottom edge of the fabric, the longer the cape will be. Place a second mark at the top edge of the fabric, 14cm from the fold. Connect the two marks along the ruler.
If you need a wider cape and have enough fabric, the bottom mark can be placed further from the fold.
- To more accurately calculate the length of the cape, add 14 cm to the desired length. This way you will take into account the space that will be spent on the neck.
- Use a plate or bowl to draw the outline of the neckline. Find a plate or bowl with a diameter of 20 cm. Attach it to the upper corner with a fold so that from the side of the fold the plate protrudes sideways beyond the fabric by 10 cm, and from the side of the upper edge creeps onto the fabric by 14 cm. Transfer the contours of the plate onto the fabric using tailor's chalk or marker.
- Cut out the fabric along the drawn lines. Try to cut the fabric along the inside of the lines so that there are no traces of chalk or marker left on the finished cape.
- You can leave the cape cut as is, or try modifying it according to one of the ideas below to increase your character choice.
- To give the cape a neater look, round the top and bottom corners.
- Make the bottom edge of the cape jagged. This is a great idea when a child wants to be Batman.
- Make notches and slits along the bottom edge of the cape to give it a battle-worn look.
- Add Velcro fastener. Buy ready-made square Velcro fasteners or cut them yourself from Velcro tape. Using hot glue or textile glue, glue the fastener halves to the corresponding “tendrils” on the top edge of the cape. One half of the fastener should be glued to the front side of one tendril of the cape, and the second - to the wrong side of the other.
Be aware that self-adhesive Velcro fasteners are also available for sale.
Consider adding a superhero emblem applique to your cape. Glue the thermal film onto a piece of fabric in a contrasting color. Draw a superhero emblem on it and then cut it out. Pin the emblem to the back of the cape. Iron it and then remove the pins.
All thermal films are slightly different from each other, so carefully follow the instructions for using your specific thermal film.
Alternatively, cut the emblem out of felt and adhere it to the back of the cape using hot glue or fabric glue.
From rubber gloves
Rubber gloves will make a fun and playful bat. She will spring, fly and jump. In addition, creating a toy will be a useful physical breathing exercise for children.
To create it you will need consumables:
- black disposable gloves;
- paper;
- black paint;
- brushes;
- scissors;
- glue or tape;
- wire;
- black corrugated paper or tape.
The procedure for creating a living, rubber craft:
- Wrap the wire with paper or tape.
- Inflate the gloves and tie their ends. These will be the wings.
- Connect the balls from the gloves together and secure with wire.
- Cut out a head from paper and place eyes on it.
- Secure the head with tape between the thumbs of the gloves.