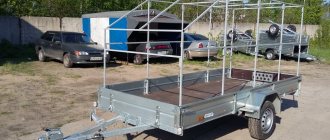
Despite the fact that stores sell towbars for any car, making a towbar with your own hands is much easier, faster and cheaper than waiting for delivery and then visiting a car repair shop to install it.
Making a towbar itself is not difficult, the main thing is to know how to use a grinder and welding.
Look at the assembly drawing of a homemade towbar for Renault Logan, you will agree - it’s not difficult to make it yourself!
Drawings will be required for manufacturing.
Drawings of a towbar for Renault Logan
So, look at the pictures below - these are the very drawings according to which you can make a towbar for a Renault Logan with your own hands.
The first drawing is a power beam, something that transfers forces from the hook to the supporting body of the car.
The side bracket is a connecting part of the power beam and the body of the Renault Logan car.
Hook. The trailer will cling to it. The hook is made of a pipe with a ball welded to it; to bend it, you need to use a pipe bender.
Flange. One of the parts of the power beam.
Cheek. Helps in attaching the hook to the load beam.
As you can see, there are no scarce parts or difficult places; anyone who knows how to use welding can make such a homemade towbar.
Of course, if you have no desire to do handicrafts, then you can take a ready-made tow bar.
After you have purchased or made your own towbar, you need to install it on the car.
I won’t describe the installation; it’s better to watch how to install a tow bar on a Renault Logan in the video.
As you can see, there are no problems here either, everything is done quite simply and does not require a special tool.
Anton comments:
Well, if you really want it, then of course you can install a tow bar on Logan. The only question is that these towbars on non-frame cars break the body.
Semyon comments:
Well, why does it immediately break? It drives quite well with a trailer, the main thing is not to drive over bumps!
Ivan Popov comments:
Come on, I used the towbar to pull out a stuck car - everything was fine!
Anton comments:
Still, it is better to install the towbar on a frame car. Otherwise, a sharp jerk can tear the car body in half. Look on YouTube for videos of how cars tear when pulled out.
Alex comments:
Thank you
Ruslan comments:
The dimensions are not visible on the drawings. I want to turn a sphere onto a hook.
alin3000 comments:
Please tell me. Where can I get a drawing according to which I can make a towbar? Thank you
The tow bar for Renault Logan can perform several tasks. Many motorists attach additional towbars and other movable structures to the car for transporting goods.
Brief information
At the very beginning of the 2000s, most French cars were not characterized by low maintenance costs and more and more surprised their owners with their capriciousness in operation. Popular representatives of that time, Peugeot and Citroen, were much lower in maintenance costs compared to cars of the same class from Korea or Japan. But in 2004, the Renault company decided to make a real boom in the world of automotive manufacturing and released a truly people's car, the Renault Logan.
This car immediately appealed to both residents of Europe and Russia. It would seem that this car has everything to drive comfortably and economically, but sometimes you get the feeling that something is still missing. But what is missing is precisely the payload that this vehicle would use for its intended purpose, in the form of transporting additional units and trailers. And for this you need a towbar.
Preparatory procedures
We are considering installing a tow bar with our own hands on a Renault Logan car. First, the car enthusiast needs to decide on the choice of towing device. If you have welding skills, you can make the part yourself, having a welding machine and steel.
There are many videos and photos on this topic on the Internet. These videos for Renault Logan describe in detail the process of welding a towbar from several components. The positive aspects of making a towbar with your own hands include:
- saving money, since this procedure will require a welding machine, steel fasteners and a pipe bender, the financial costs will be minimal;
- the quality of workmanship and the strength of materials are on the conscience of the owner of Renault Logan. With the proper level of skill and the presence of good steel, this is undoubtedly a plus, but otherwise it can result in dire consequences in the form of a traffic accident.
Metal cutting technology in the garage - video example
A towbar is an additional towing equipment designed to hitch a vehicle with a different body and a trailer. It consists of a supporting frame, which is attached to the car body, and a connecting hook with a ball (diameter - 50 mm). The design of the tow bar is regulated by Gosstandart 28248-89. The choice of towbar depends on the make and modification of the car.
Renault Logan is a French budget car of class “B”. The main production is located at a plant in Romania, but since 2005 the model has also been produced in Russia (at the Aftoframos and AvtoVAZ enterprises). It was conceived as a compact family car for developing countries: ground clearance was provided, and the bottom design was thought out. In 2004, the company introduced a sedan model. In 2007 and 2014, the model underwent modifications. The interior space has become more ergonomic, the quality of assembly, anti-corrosion coating and interior trim has increased. In different countries, the five-seater car is sold under different brands: Renault, Nissan or Dacia.
Disadvantages of self-installation
The negative points when making a towbar with your own hands include the following:
- installing homemade fasteners with low quality workmanship may require additional time;
- the total time for manufacturing and subsequent installation may increase in proportion to the degree of poor quality of manufacturing, and in general, even with good welding quality, it will take a lot of time;
- The owner will have to think through the wiring diagram along with the drawings independently, which in the absence of proper experience is fraught with difficulties (shorting of contacts in the presence of poor wiring, short circuit when making an incorrect circuit, other negative consequences).
What you need for work
If you don’t have a welding machine or desire, the part can be purchased. How much does a new towbar cost? Its price varies depending on the area, but does not exceed the limits of 4 to 15 thousand rubles. The cost depends on the type of new tow bar.
Removable devices for transporting cargo weighing up to 1 ton will cost around 5-8 thousand rubles. Electrical products, differing in their manufacturability and increased load weight, will accordingly cost more (in the range from 10 to 15 thousand rubles).
The most popular manufacturer of parts for this model is. The products are deservedly in demand due to their good price-quality ratio.
Fortunately, specialized stores offer a wide selection of models for the Renault Logan car. Using the factory article number (for example: 9010), the owner of a Renault Logan will be able to choose a part that is suitable in its characteristics for this car (before purchasing, you still need to check the dimensions and places of fastening of the part to the body, which is why it is necessary to take measurements of the original fasteners before going to the store ). The advantages of a purchased part are obvious:
- the connection diagram was developed by the manufacturer taking into account the characteristics of the Renault Logan car for any type of towbar;
- at the manufacturer’s factory, the part undergoes repeated tests for strength and reliability, for which specialized services have a certificate of conformity;
- the owner does not need to personally develop wiring drawings for installing the tow bar.
Connection process
It takes place in several stages:
- first you need to drive the car into the inspection hole;
- then additional supports must be placed under the front wheels (this is necessary to give the car the necessary stability);
- then proceed to the installation of the transverse beam, as the basis of the entire structure: the beam is attached to the body through special holes using bolts;
- Next, you need to install fastening plates and washers with nuts on the beam for subsequent fastening;
- then the clutch ball is adjusted, its position should correspond to the longitudinal axis of the car;
- then the towing hook must be installed on the pre-installed brackets;
- after completing the mechanical part of the installation of the structure, it is necessary, guided by the diagram, to connect the element to the car;
- To do this, you need to disconnect the car battery;
- It is necessary to route electrical wires through a special hole in the trunk and connect the towbar to the standard on-board network.
Front wheel bearing replacement sequence
After diagnosis, you can replace the wheel bearing yourself. But this will require pressing equipment; a hydraulic press is best.
Before jacking up the wheel, you need to unscrew the hub nut with a 30 mm wrench, having previously cleaned and lubricated it. Only after this the car is jacked up and the wheel is removed.
If the car is equipped with an ABS system, you need to disconnect its sensor by simply removing it from the connector. Next, the cleaned and lubricated steering tip nut is unscrewed; it can be 16 or 17. The steering tip is removed by lightly hitting the mount, and after it comes out, it is moved to the side.
The next step is to remove the brake caliper. First, you need to spread the pads with a screwdriver and unscrew the two 18-point bolts from the inside. The caliper is easily removed and hung with a hook made of ordinary wire on the strut spring. The disc can be removed with Torx 40 keys, but it must first be tapped because it sticks to the fist.
After this, you can proceed directly to removing the fist. To do this, loosen two nuts with an 18 wrench, while the bolt heads are held with another wrench, but the bolts remain in place. Next, remove the ball joint; to do this, you need to remove the 16mm bolt that compresses the fist.
After unscrewing the nut, you need to remove the bolt, which often sticks. But it is not advisable to knock it out; it is better to just continue unscrewing it so that it comes out of the mount. After removing the bolt, you need to unclench your fist by driving in a lubricated wedge, such as a screwdriver, and carefully knock the ball joint out of the mount. After this, the fist should freely come out of the axle; if it is stuck, lubricate the mount and knock it out with gentle blows.
After removing the knuckle, you can unscrew the protective casing, but this is not a fundamental point, if the bolts are stuck, replacing the front wheel bearing with a Logan is done the same way. The fist is installed on a hydraulic press to press out the hub using a wrench head that matches the diameter.
To remove the bearing, remove the retaining ring using a standard puller. Next, use a Renault Logan wheel bearing remover or a hydraulic press again.
The fist is placed on any plane with the clip facing up and is torn off with a suitable head, which is pressed with a press, a puller, you can simply hit it with a hammer, but this is the worst solution.
After this, the fist is installed on the mandrel and the bearing is pressed out of the fist. To remove the inner race from the hub, knock off the boot with a chisel, then you can use a special puller or simply cut the race with a grinder and carefully knock it off with a chisel, hitting the cut point.
The resulting notch is absolutely safe, but the surface where the bearing race is pressed must be perfectly flat; if it is damaged, the hub on the Renault Logan must be replaced. Such damage occurs if you knock down the inner race, pry it off, or when driving with a broken bearing.
After unpacking, check the condition of the parts and contents. The Renault wheel bearing without ABS does not have a special magnetic tape on the holder. The wheel bearing with ABS has a black magnetic tape on the holder, on which marks are applied. They can be seen using a special film. In addition, the kit should include a special ring for attaching the sensor.
The bearing seat in the knuckle is carefully cleaned, after which a ring for attaching the sensor is installed in it, but this is only for equipment with ABS; it is not required in the standard version. To prevent it from dangling and turning, it is better to put it on lubricant.
The original front wheel bearing with ABS must be installed with magnetic tape downwards towards the sensor installation ring. It is installed on the seat and sent with light blows of a hammer, while it is convenient to use an old bearing as a mandrel.
After this, the fist is installed on a puller or in a hydraulic press, the outer race is lubricated and pressed into place, making sure that it does not warp. The old bearing is used again as a mandrel. As a last resort, you can use a sledgehammer, but there is a high probability of distortion. The sensor ring must be firmly pressed by the holder, after which the retaining ring is installed.
At the last stage, the hub is pressed in, and the emphasis should only be on the inner race of the bearing. To make the work easier, the hub is installed on a plane and the inner race is pressed onto it; it is better to lubricate the hub.
If you make a mistake and do not focus on the inner race, the bearing will fall apart and cannot be reassembled. All the work will have to be done again with new spare parts.
You can check the wheel bearing by simply spinning the hub - it should rotate freely along with the inner race. Installation of the fist is done in the reverse order, but it is necessary to clean the seat for the inner race and splines. This is done with a regular metal brush.
The tightening torque of the front wheel bearing is 280 Nm.
Drawing conclusions
As a result, the process of installing a tow bar on a given car does not present any particular difficulties for any installation option (both homemade and purchased devices). The main thing is to follow the sequence of actions in the process and precautions.
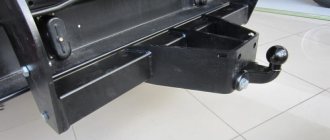
A towbar is a beam with side flanges that is attached to the side members. There is a hook installed in the center of the beam, to which the trailer is hooked. The towbar design must contain a minimum number of parts. We present a drawing of a tow bar for the first generation Renault Logan. It, that is, this drawing, contains 8 elements. And then we consider what needs to be done to make the tow bar compatible with the design of cars from generation II - those that have been produced by the VAZ plant since 2014.
We show you how to install a towbar easier in the video.
Is it necessary to register a towbar with the traffic police in 2020?
In this case, everything depends on the tow bar itself and the documents available for it:
- If there are documents for the towbar, then the driver does not need to contact the traffic police to make changes to the registration certificate. You can simply install the towbar and safely operate the car with a trailer.
- If there are no documents or they cannot be restored, then installing a tow bar is a design change that should be registered with the traffic police.
Note. The necessary documents for the towbar will be discussed below.
For example, if the original towbar is installed on the car at the factory, then no additional actions need to be taken when contacting the traffic police to register the car. If the traffic police has any questions about the vehicle in the future, you can at any time request documents from the automaker and defend your own case.
On the other hand, if the towbar is made independently and simply welded to the car body, then this is a design change. To register it, you need to contact the traffic police. Moreover, it is far from certain that permission for the installation will ultimately be obtained.
Currently reading: Right air duct grille 7700838358 Renault. Wholesale and retail.
Let me remind you that the algorithm for making changes to the design of a vehicle is discussed in a separate article:
Making changes to the design
It implies that the car owner must contact various organizations 7 times, i.e. quite labor intensive.
In this regard, in practice this option is also possible. If the towbar is already installed on the car, but there are no documents for it and it is impossible to restore them, then it may be easier, faster and cheaper to buy a new towbar with documents than to try to register a change in the design of the car with the traffic police.
Drawings of all parts with dimensions, option 1 (Renault Logan phase 1 and 2)
You can make a towbar for Renault Logan with your own hands, but you need to study the drawings very carefully. If we are talking about a car from phase 1 or 2, read the text further. The drawings are not suitable for “phase 3”, that is, for the latest generation of sedans.
Complete structure
The entire structure consists of three units - two flanges and one beam. We will call the side flanges brackets. Their drawing is shown in the photo.
Side bracket (2 pcs.)
The assembled beam includes five parts. The beam itself is a pipe with external dimensions of 60 by 40. You can use a pipe with a cross-section of 40 by 40, but then the cutout in the “cheek” will be reduced: dimensions 50 and 115 will become equal to 40 and 125. Everything is simple here.
All parts of the beam assembly
Please note that the M12 nut must be welded to the flange. If this is not possible, mounting holes are drilled in the pipe wall. But it’s better not to do this - the beam must remain sealed!
The drawings of the Renault Logan tow bar shown above were obtained by measuring the parts included in the factory kit. M12 nuts and screws tighten the entire structure, and it itself is attached to the side members with M10 bolts and nuts. By the way, bushings will also be needed. Their dimensions are given in Chapter 4.
Hook
The kit in question included a part called a “hook.” Here are its dimensions.
The most important part of the tow bar
The ball diameter shown here is the standard 50mm. We do not consider manufacturing technology.
Appearance of the towbar according to drawing No. 1
Below is what the towbar from Project 1 looks like. Read on to learn how to install it.
Homemade car from the first generation
For those who don’t know how to weld, it’s easier to forget about making something like this.
The thickness of the steel sheet must be at least 3 mm. The thickness of the beam walls is 2.5 mm. Less is impossible!
Preparation for work on repairing the Reno Logan engine and brief information about the internal combustion engine
Engine Renault K7M 710/800 1.6 8V
Engine characteristics Renault Logan 1.6
Manufacture - Automobile Dacia Years of production - K7M 710 (2004 - 2021), K7M 800 (2021 - our time) Brand Renault Logan engine type - K7M Cylinder block material - cast iron Power system - injector Type - in-line Number of cylinders - 4 Valves per cylinder - 2 Piston stroke - 80.5 mm Diameter cylinder – 79.5 mm Compression ratio – 9.5 Engine capacity – 1598 cm3
Power – 86 hp /5500 rpm Torque - 128 Nm / 3000 rpm Fuel - 92 Environmental standards - Euro 3 Fuel consumption - city 10 l. | track 5.8 l. | mixed 7.2 l/100 km Oil consumption - up to 0.5 l/1000 km Renault Logan engine oil: 5W-405W-30 Oil change every 7500 km.
Engine life of the Logan 1.6 engine:
1. According to the plant - 400 thousand (unofficially, according to plant tests)
2. In practice – 400 thousand km
TUNINGPotential - unknownWithout loss of resource - unknown
The engine was installed on: Renault LoganRenault SanderoLada Largus
Engine malfunctions and repairs Renault Logan/Sandero 1.6 K7M
Engine Renault Logan K7M 710 1.6 l. 86 hp nothing more than a regular K7J 1.4 liter, only with an increased piston stroke (from 70 to 80.5 mm), of course the height of the block has increased slightly, the clutch has a larger diameter, the flywheel has been enlarged and the shape of the gearbox housing has changed.
Structurally, Logan's 1.6 liter engine, like its low-volume brother, has the same archaic design from the middle of the last century with rocker arms and a strange oil pump drive system from lower-end Renault engines of the 60s. Despite everything, with careful attitude to the engine, service and maintenance, changing the oil 2 times more often than according to the instructions, it is very, very reliable; according to internal factory data, the service life of the Logan engine is 1.
6 about 400 thousand km, in practice the engine traveled a little more. In 2021, the K7M 710 was replaced by the K7M 800, the engine was strangled, brought up to the Euro-4 environmental standard, the power decreased to 83 hp, there were no design changes. Disadvantages K7M are the same as the K7J 1 engine.
4, high fuel consumption, often at idle the speed starts to float, constantly (once every 20-30 thousand km) you need to adjust the valves, there were no hydraulic compensators and there are no hydraulic compensators, the timing belt drive, if the belt breaks on the Logan 1.6, the valve bends, Therefore, we change the belt every 60 thousand km.
Still the same crankshaft oil seal leaks. The motor is noisy and there are vibrations. On the design of the Renault Logan 1.6 engine and where the engine number is located, information is presented in the article “K7J engine”, which, apart from the volume and accompanying changes, has no other changes.
All malfunctions and the reasons for their occurrence are also described there. Speaking about which engine for Renault Logan is better, 1.4 or 1.6 8 valve, take 1.6... the engine is the same, but the small volume is very weak. Also on the basis of the K7M, the K4M engine was created with a 16 valve cylinder head and other significant innovations, power such a motor is significantly higher and if you choose (for example, Logan, Sandero), always take it, you won’t regret it.
Engine tuning Renault Logan K7M 1.6
Chip tuning of Renault Logan engine
For the Logan K7M 800 engine, you can remove the catalyst, return it to its original power of 86 hp, install an exhaust and flash the sport firmware, maybe add a couple more horses, but nothing will change significantly, except fuel consumption, now your engine will eat more))
Compressor and turbine for Logan 1.6
The installation of turbocharging and compressor is described HERE using the example of a 1.4 liter engine and all this is applicable 1 in 1 for a 1.6 liter. The power of the Logan 1.6 engine will be on average 5-10 hp. more with a similar approach. Looking ahead... you won't be able to achieve high power.
ENGINE RATING: 3
The reason for the cap. repairs resulted in increased fuel consumption - 10-11 liters. on the highway and up to 14 hp. around the city, increased oil consumption, strong oil deposits on the spark plug of the 1st cylinder. Compression measurement: 10-8-8-9 (not enough!).
Technique for installing a tow bar to the body
You need to make four bushings, such as in the drawing. The towbar from any project is assembled using M12 bolts and nuts. Well, they secure it with M10
x90 screws.
By the way, it is advisable to use lock nuts and washers.
Additional fasteners
It is important to follow one rule: all nuts are first tightened. When the towbar is assembled, you need to forcefully pull the beam back. And at this time, without releasing the beam, tighten the M10 nuts one by one.
It seems that it will still be impossible to do without an assistant.
Work on installing a tow bar on a car
Muffler, plug, bracket installation
The result of all efforts is shown in the photo. Self-locking nuts (both M10 and M12) are used here.
We wish you success.
How to connect power
To connect the wire and the trailer socket, you need to find a special hole in the bottom of the trunk. If this is not the case, then we do it with a drill. At the same time, think carefully about this issue so that you don’t have to make another hole later.
Next, we fix the socket on the towbar, then we pull the wire through the drilled hole at the bottom of the trunk and connect it to the socket.
That's all, now we have finished the work of installing the towbar. Now you are the owner of a tow hitch that you made yourself. And now you can easily use a trailer to transport heavy and bulky cargo in your car outside the city, to the country.
Meet the Logan family and their relatives
First of all, decide what kind of car you are dealing with. This is largely influenced by the choice of trailer hitch and connection. And the actual installation of a towbar with a trailer on a car will be different.
You may have:
- Renault Logan first generation;
- new generation of Logan 2nd generation from approximately 2012 to 2017;
- A variation of Logan with the MCV index, that is, a station wagon;
- Dacia Logan.
The differences between the old and new generations are more serious than between Renault Logan and Dacia Logan. In fact, these are two identical cars, only with different nameplates on the hood and trunk.
The 1st generation model began to be produced in 2004, and in 2008 there was a restyling. Already in 2012, the second generation was released. By 2013, the car reached Russia, and in 2014 it was already setting unique sales records.
Everything is clear here. If you have a car before 2012, then you are dealing with an old version. Everything released after 2012 is already classified as a new generation. The most significant distinguishing feature is that the new Logan has an on-board computer and an electronic control unit, and therefore, when installing a trailer hitch, you will definitely need to purchase an additional coordination unit.
Recommendations
Comments 15
I didn’t buy the car from scratch, but the previous owner said that there was no towbar! So I took care of the towbar back in the fall - I took www.mnogofarkopov.ru/94-logan! The load on the ball is 65 kg, the trailer is 900 kg without removing or cutting out the bumper! Installed it myself. It's simple, you didn't have to finish anything. I also connected the electricity myself. I had to tinker a little with the wires, but everything worked out. I connected it without a matching block, everything works. The documents (certificate and installation order) were prepared by kind people. The installation itself took 2-3 hours! The GAI guys have never found fault with the towbar yet, although there is no mark on the PTS
I’m also happy with my towbar, I’ve already run 1000 km with the trailer, and the mechanics and electrics are working properly
Good afternoon. Question about documents if you do the installation yourself. What documents are needed for the traffic police if you know
No documents are required, because if the installation of a towbar does not imply a change in the design of the vehicle (welding, drilling, etc.) and does not cover the license plate, then it can be installed independently without additional registration. Those. if the towbar is installed in standard places, then this is not a design change.
What will suit the car
When choosing a towbar that you want to buy and install on your car, you need to start from your goals. That is, what types of cargo and what mass are you going to transport using the machine and the trailer installed through the trailer hitch.
All available towbars can be divided into several types.
- Type A. Such towbars are used when transporting cargo in a trailer weighing up to 1.5 tons. The simplest designs, the price of which is minimal;
- Type B. Load capacity parameters are similar. In this case, the equipment additionally provides for the presence of a semi-automatic device on the nut;
- Type C. This is a semi-automatic design with an eccentric, which has a load capacity of up to 1.8 tons;
- Type G and F. They are characterized by a different number of mounting holes for connection to the body, have a forged iron structure and have a load capacity of 2 tons.
From the factory, the car can be equipped with a standard trailer hitch, which has decent characteristics and the advantages of factory assembly and fit. But if you were initially confused by how much the kit with a trailer hitch costs and you didn’t take it, then over time you’ll have to choose a towing device yourself.
If we consider manufacturers, then for Logan you can take excellent devices from the following companies:
- Leader-Plus;
- VFM Bosal;
- Thule (Brink);
- Imola;
- Leader;
- Trailer.
I will not give specific advice about this or that manufacturer. All of them are of quite high quality, they have excellent wiring, reliable sockets and other components.
It is better to focus on the type of trailer hitch design.
- Removable. The easiest to install and operate. The price is approximately 4-7 thousand rubles. This depends largely on the manufacturer;
- Electrically driven. Their design is usually reinforced and designed for installation on large machines. Although it will fit on Logan. But you can transport more than 2 tons. The purchase will cost at least 10 thousand rubles;
- Flanged. It has 4 or more mounting holes. During installation, you will need a special landing pad and a set of tools. They are rarely installed on passenger cars.
You can purchase any option that suits you in stores or online in St. Petersburg, Moscow, any other city in the country, and even from foreign sellers. Although I don’t see the point in bothering so much and ordering goods from abroad. Find the required trailer hitch article and place an order.
What I don’t recommend doing is buying a trailer hitch on the secondary market, that is, used. The same Internet platform Avito offers a number of much more interesting and rational solutions among new towbars.
Choosing a tow hitch for Renault Logan
The automotive goods market offers a wide range of towbars for Renault Logan and its generations. Towbars differ in the maximum traction force, frame type and method of attaching the ball assembly. For Renault Logan, a class “A” ball hook is used. This design is especially reliable and unpretentious in operation. Maximum load level – 1500 kg.
The automotive goods market is filled with offers from domestic and European manufacturers:
1. Galia (Slovakia).
2. Enganches Aragon (Spain).
3. “Bosal-Autoflex” (Russia).
4. Thule (Sweden).
5. Auto-Hak and Imiola (Poland).
Towbars from the above-mentioned reputable manufacturers practically do not differ in load level. The main differences are the included electrics and the need to remove/cut the bumper. Everything is not so clear here. The same manufacturer equips one generation of towbar with a socket, but does not do the same with the second generation. Thus, the Bosal-Autoflex tow bar requires the additional purchase of a socket and cables for Renault Logan 2014-2015, but for Renault Logan 2004-2013, this equipment is included in the general kit.
Dismantling and cutting out the bumper is necessary when installing Spanish Enganches Aragon and Russian Leader-Plus towbars.
We recommend Slovakian Galia towbars to our clients. Among other TSUs, these data differ in that they are additionally galvanized - this increases the service life of the equipment. They also do not involve dismantling and cutting out the bumper, and their cost is low.
We do not recommend purchasing used towbars. Saving on such an important element of the car can come back to haunt you at the most inopportune moment. In addition, when you buy a used product, you do not receive a warranty.
Installation Features
Now let's talk about how to install a towbar with your own hands. There is nothing particularly complicated about this procedure. Logan is perfectly adapted for mounting a tow bar. The greatest difficulty for an inexperienced car owner will be wiring and electrics.
But having at hand the necessary drawings with dimensions, factory diagrams and instructions, the work will be fun, fast and end with pleasant fatigue.
Let's assume that you have a 2014 Renault Logan, that is, a new generation. And you have chosen a suitable towbar with all the components that come with the trailer hitch upon purchase. All that remains is to drive the car into the pit, collect a set of screwdrivers and keys, and get to work.
Photo and video materials will help you. I propose to consider step by step the features of self-installation of a towbar on a Logan.
- Read the towbar manufacturer's instructions, take the factory diagram and always keep it in front of your eyes so that you can monitor the correctness of the operations;
- Clear the trunk of anything unnecessary. You don't need a mess there. And to eliminate it all, you can choose an organizer. I have already written about them;
- Remove the hangers of your muffler from approximately the middle of the car, including the fasteners near the exhaust. Lubricant may be required to remove stuck elements;
- Disconnect the muffler. There is no need to remove it completely. Just leave it on the rear beam;
- There should be technological holes on the side members inside the trunk. Renault specifically provided for them. Pull out the plugs from there with a flat-head screwdriver;
- The spar has holes covered with a protective film. Use a Phillips screwdriver to press them down. The film was torn. A similar procedure is done on the opposite side;
- Assemble your purchased towbar according to the manufacturer's diagram. Assembly begins with the side plates. Don't over-tighten all the bolts yet;
- Select the optimal position for the hitch ball. It must be placed so that it is parallel to the longitudinal axis of the car;
- Now it's time to install the tow hook. Nothing complicated here either;
- Next, the platform required for the towbar socket is installed;
- Walk through the entire structure with your eagle eye. If everything is smooth, then feel free to tighten the bolts;
- Return your muffler to its place;
- Disconnect the negative terminal from the battery as it is time to install the electrical component;
- To do this, the spare tire is removed, and under the trim there is a hole for the wires. It is closed with a plastic plug;
- Connect the cable through the plug socket to the connecting terminals in the trunk. Here, do everything according to the wiring diagram of your car. By mixing up the wires, you risk a short circuit, and not only that;
- Having fixed the contacts on the terminal block, connect it to the on-board network, following a certain sequence;
- Do not forget about the coordination unit for the trailer hitch for new versions of Logan, otherwise the on-board computer will generate constant errors and you will not be able to control the trailer lighting equipment.
In general, each trailer hitch comes with detailed and understandable instructions. There are no universal connection guidelines as such.
The tow bar for Renault Logan can perform several tasks. Many motorists attach additional towbars and other movable structures to the car for transporting goods.
alin3000 comments:
Please tell me. Where can I get a drawing according to which I can make a towbar? thank you10/28/2015
Everyone - HOY
!It’s been a while since I wrote or posted anything, etc. I decided to write/show the process of installing a tow bar on a car, maybe my visual aid will help someone. Let's skip the lyrical introduction and get started.
I bought a tow bar. It is sold in a compact package in the form of a “assemble it yourself” construction kit. The set consists of iron, fastening, and electrical parts. (Photo 1)
Photo No. 1 Composition of the fastening part. (Photo No. 2)
Photo No. 2.
Composition of the fastening part. (Photo No. 3)
Now let's move on to installation. First the preparatory work. We empty out all the contents of the trunk; for the lazy, we just free the “cheeks” from things, because the main work will be there. We climb under the car and remove the muffler from the rubber hangers, first in the middle of the car, then at the muffler. (Photo No. 4)
Photo No. 4.
To avoid tearing the rubber hangers “in the heat”, you should press the muffler down with your hand. A hole will appear in the stretched suspension, where you need to insert a slotted screwdriver generously lubricated with salidol. After which the rubber suspension can be easily removed from its seat by hand. (Photo No. 5)
Photo No. 5.
The removed muffler is placed on the rear wheel beam. He doesn’t bother us now. (Photo No. 6)
Photo No. 6.
Field for removing rubber hangers.
It is MANDATORY
to wipe the seat and the suspension itself from salidol because it is mounted “dry”. Now let's get into the trunk. We are interested in the plastic plugs on the side members on the inside of the “cheek”. (Photo No. 7)
Photo No. 7.
Use a slotted () screwdriver to pry up the plugs and remove them. Photo #8
Photo No. 8.
The plugs hide the factory process holes. (Photo No. 9)
Photo No. 9.
Don't let it scare you
absence of plugs or holes on the side member under the car (Photo No. 11). They are hidden by the factory behind self-adhesive tape.
Photo No. 10.
After all the plugs have been pulled out, take a Phillips screwdriver () and insert it into the hole formed and press it inside with your hands. A screwdriver easily and accurately breaks through the protective film. (Photo No. 11) We repeat the same support with an M8 bolt from the mounting kit.
None in Photo No. 12,13 the assembled tow bar is visible.
Photo No. 12
Photo No. 13 After everything has been assembled, we tighten all the nuts and install the apple (eldak).
Now about the electrics. From my own experience, I know that an outlet is only needed when transporting a trailer. On rough terrain or when parking, the first thing to suffer from mechanical damage is the socket.
That's why I didn't specifically install it in its regular place. The socket connected to the on-board power supply lies in the luggage compartment next to the spare tire. If necessary, the socket is connected to the trailer fork and secured with one nut to the standard installation location (later a quick release will be made).
The trunk lid does not press down the wiring; there is enough space for the cable between the closed trunk lid and the bumper. Now about the electrical wiring. It's simple.
The socket wiring diagram is shown in the “electrical part” (see above). We take the fog light, left turn signal, dimensions, brakes, license plate light from the left headlight.
To figure out what goes where and where it comes from, just look at the disassembled “board” of the rear left light. (Photo No. 14)
Photo No. 14.
Back side of the lantern (Photo No. 15)
Photo No. 15.
I took the license plate lighting from the dimensions. The wire from the right turn signal was laid around the perimeter of the luggage compartment behind the trim. This was done in order to protect the wire from mechanical damage from the load.
By the way, it’s worth saying that the suspension on the Logan is “solid”, so this car is not afraid of difficult country roads. All that remains is to choose the same reliable and high-quality tow bar.
Preparatory procedures
We are considering installing a tow bar with our own hands on a Renault Logan car. First, the car enthusiast needs to decide on the choice of towing device. If you have welding skills, you can make the part yourself, having a welding machine and steel. There are many videos and photos on this topic on the Internet. These videos for Renault Logan describe in detail the process of welding a towbar from several components. The positive aspects of making a towbar with your own hands include:
- saving money, since this procedure will require a welding machine, steel fasteners and a pipe bender, the financial costs will be minimal;
- the quality of workmanship and the strength of materials are on the conscience of the owner of Renault Logan. With the proper level of skill and the presence of good steel, this is undoubtedly a plus, but otherwise it can result in dire consequences in the form of a traffic accident.
Disadvantages of self-installation
The negative points when making a towbar with your own hands include the following:
- installing homemade fasteners with low quality workmanship may require additional time;
- the total time for manufacturing and subsequent installation may increase in proportion to the degree of poor quality of manufacturing, and in general, even with good welding quality, it will take a lot of time;
- The owner will have to think through the wiring diagram along with the drawings independently, which in the absence of proper experience is fraught with difficulties (shorting of contacts in the presence of poor wiring, short circuit when making an incorrect circuit, other negative consequences).
What you need for work
If you don’t have a welding machine or desire, the part can be purchased. How much does a new towbar cost? Its price varies depending on the area, but does not exceed the limits of 4 to 15 thousand rubles. The cost depends on the type of new tow bar.
Removable devices for transporting cargo weighing up to 1 ton will cost around 5-8 thousand rubles. Electrical products, differing in their manufacturability and increased load weight, will accordingly cost more (in the range from 10 to 15 thousand rubles).
The most popular manufacturer of parts for this model is. The products are deservedly in demand due to their good price-quality ratio.
Fortunately, specialized stores offer a wide selection of models for the Renault Logan car. Using the factory article number (for example: 9010), the owner of a Renault Logan will be able to choose a part that is suitable in its characteristics for this car (before purchasing, you still need to check the dimensions and places of fastening of the part to the body, which is why it is necessary to take measurements of the original fasteners before going to the store ). The advantages of a purchased part are obvious:
- the connection diagram was developed by the manufacturer taking into account the characteristics of the Renault Logan car for any type of towbar;
- at the manufacturer’s factory, the part undergoes repeated tests for strength and reliability, for which specialized services have a certificate of conformity;
- the owner does not need to personally develop wiring drawings for installing the tow bar.
Connection process
It takes place in several stages:
- first you need to drive the car into the inspection hole;
- then additional supports must be placed under the front wheels (this is necessary to give the car the necessary stability);
- then proceed to the installation of the transverse beam, as the basis of the entire structure: the beam is attached to the body through special holes using bolts;
- Next, you need to install fastening plates and washers with nuts on the beam for subsequent fastening;
- then the clutch ball is adjusted, its position should correspond to the longitudinal axis of the car;
- then the towing hook must be installed on the pre-installed brackets;
- after completing the mechanical part of the installation of the structure, it is necessary, guided by the diagram, to connect the element to the car;
- To do this, you need to disconnect the car battery;
- It is necessary to route electrical wires through a special hole in the trunk and connect the towbar to the standard on-board network.