In modern kitchens you can increasingly see built-in appliances. And this is not surprising. Integrated stoves and refrigerators, washing machines, dishwashers, microwave and UHF ovens into the kitchen unit allow you to save the work surface and manage the interior space of the cabinets more functionally. And, of course, they give a more holistic and harmonious look to the overall kitchen design. How to build an oven with your own hands? You should start with the correct layout of the kitchen unit.
How to make a stove with a hob and an oven with your own hands
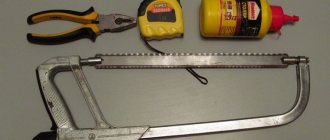
We tell you how to make a universal cooking stove with your own hands - with a hob and an oven.
This idea was shared by the author of the YouTube channel mansoo lee.
To make a homemade stove with an oven, you will need sheet metal 3-4 mm thick.
First of all, we decide on the dimensions of the stove - if possible, it is better to make a drawing. Use a grinder to cut sheet metal blanks.
First we weld the oven, then the oven body itself. There will be a combustion chamber under the oven - cut out a rectangular hole on the front side for an inspection window. And the opening of the combustion chamber is on the side.
Next to the main oven there is another top-loading compartment - you can use it to bake potatoes or eggs in foil.
You might also be interested in another cool idea: how to make a sauna stove from a channel.
Options for installing a stove in the house
The placement of the stove depends entirely on what exactly the owners expect from it. If it is installed in a small house and will be used as a fireplace for friendly gatherings, you can use the first scheme. This stove is a good option for cooking barbecue on the grill or kebabs.
Brick kiln placement options
The second scheme is for a house of solid square footage. In this case, the front side of the fireplace stove opens into the living room, the stove walls heat both bedrooms, and the heat in the remaining rooms is maintained using heat exchange.
Main stages of work
The next step is to cut a round hole in the upper part of the stove for the chimney pipe.
We weld the legs to the base of the stove. They can be made from a profile pipe. We weld metal washers (thrust bearings) to the bottom of the legs for better stability.
Install the combustion chamber door. We attach a hinged lid to the top of the second oven. We paint the stove with heat-resistant paint.
For more information on how to make your own stove with a hob and oven, watch the author's video.
Source
Video description
How to lay a small stove, watch the video:
Direct flow type
There is nothing particularly difficult about how to make a direct-flow furnace. But it is very important to strictly adhere to all requirements and be sure to choose a quality stone.
Used for heating small rooms. A strong foundation is needed. Design dimensions 51x64 cm (WxD).
The arrangement of the furnace is as follows:
- For the foundation, crushed stone is poured into a layer of up to 20 cm and filled with mortar. Each stage must be carefully aligned. You can lay the stone only after a few days.
- The depth of the structure is 2.5 stones, the width is 2. There is no blower chamber; instead, holes are drilled in the door.
- Only the 6th row will cover the door. The general procedure is very simple, you just need to observe the dressing.
- From the 8th row, the structure is narrowed using halves of ¾ pieces of stone. Firebox outlet 12.5x25 cm.
- The 9th row is laid with a whole brick, similar to the 7th.
Laying a direct-flow furnace Source blog-potolok.ru
- The next row is placed edge flush with the inner edge.
- Then again, flat (4 pcs. ¾ and 2 pcs. whole), narrowing the smoke channel.
- Next, the stones are edge-on, there is a brick in the middle of the channel, the structure rises 5 tiers.
All other channels are laid flat. On the last 2, the channel is narrowed in halves to dimensions of 12x12 cm. The valve and pipe are installed last.
See also: Catalog of companies that specialize in the installation of stoves and fireplaces, grill houses and gazebos.
For heating
Let's look at how to build a brick stove for heating. For example, let's take a stove 51cm x 90cm x 2m 38cm (WxDxH).
The following materials will be required:
- sand/clay/brick (18/9 buckets/390 pieces, red, solid);
- doors (cleaning and blowing doors);
- roll of waterproofing roofing felt (60cm x 1m);
- one valve and grid 40x25 cm;
- one pre-furnace steel sheet 70x50 cm.
Brick stove-fireplace for heating Source svoimirukami.lesstroy.net
The masonry process is as follows:
- The base protruding in the first row is laid. Be sure to check the horizontal level with a level. The hardest thing to work with is the corners. It is recommended to install template posts at the corners from bottom to top.
- Two stones with beveled edges are placed at the end.
- The air vent door is installed and secured.
- On the next 2 tiers an ash chamber is made.
- The fire chamber is laid out and a grate is installed.
- The firebox door is placed from the 7th to 8th tiers, beveled bricks are placed at the back (they improve the draft inside the stove).
- At 9 the firebox door is closed.
- The smoke exhaust and fuel chamber are placed from rows 10 to 16.
- The cleaning door is installed on the 17th row.
- Smoke circulation channels are made on 18-30 rows. The walls must be smooth; the inside of the walls must be rubbed with a wet rag.
- On the next two tiers, the roof of the furnace is made.
- The last 2 tiers are laid out for the chimney.
Laying a heating stove Source eurolain.ru
How to make a brick stove for your home with your own hands, if the room is small, is described above. The main thing is to adhere to all requirements and rules. Upon completion of the masonry, the structure must be left to dry. After seven days, a test fire is required.
Economical option
If your budget is limited and the room itself is small, then such a design will be a real salvation. There are many fairly simple designs for economical stoves. You can try making them yourself or order installation. But in any case, you need to understand how to lay a brick stove with your own hands. Even if you don’t do the masonry yourself, knowing how to build a stove will allow you to control all the work.
Heating stove Source i.ytimg.com
Making a mini oven from a gas cylinder
On our website there are many options for homemade stoves made from gas cylinders, sheet metal and corrugated pipes. However, many people may not need a stove at all - they only need an oven.
In this review, the author will show the process of making a mini oven from a gas cylinder. An excellent option for a summer cottage and vacation outside the city.
To make an oven you will need a refrigerant bottle. It can be cut with a grinder without filling it with water. We cut off the handles, unscrew the valve, and then clean the paint from the can.
If you wish, you can make a combined version with your own hands - a compact oven with an oven - you can boil water and bake potatoes. For its manufacture you will need square profile pipes.
We weld nuts to the cylinder so that later we can screw the legs into them, which are played by long bolts.
Selection of bricks, sand, mortar
In order for the stove to serve for a long time, you need to select all the materials correctly. There are three types of bricks:
- Ceramic - can be used to build a stove.
- Silicate ones are generally not suitable in this case, even double M150.
- Fireproof - ideal, but they are often used only for fireboxes and fireplaces, varieties: fireclay, refractory bricks, etc.
Advice: when choosing a brick for a stove, you need to completely abandon the hollow types.
The solution is made from clay. Red clay is suitable if the stove is made of red brick; when using fireclay, special fireclay clay is required. Some stove makers still make their own mortar in the old fashioned way from river sand with a grain size of 1–1.5 mm, clay (in a ratio of 2.5:1) and water. It is advisable to use angular quarry sand without foreign inclusions and the so-called fatty clay. However, it is easier and more reliable to buy a ready-made baking mixture in the store, preparing it according to the instructions.
From the accessories you need to purchase grates, blower and combustion doors, soot cleaners, valves or dampers.
Main stages of work
At the next stage, we cut out part of the wall in the cylinder. We weld it onto the hinges - this will be the door of our homemade oven.
Next, cut out a rectangular window in the cylinder. We weld a piece of profile pipe, and to it a piece of round pipe, which will serve as a combustion chamber.
You will also need to cut another hole in the cylinder on the opposite side to install the chimney pipe. We clean all welded seams with a grinder.
Optimal cabinet height
Even at the stage of choosing a location for installation, you should decide on the nature of the control of the equipment. In addition to the structural nuances of oven placement, there is also a significant ergonomic aspect. It determines at what height it will be more convenient to use the equipment. Actually, there are two options: either the classic floor model of placement in the same box on wheels, or installation in a pencil case at a height. The second option is considered by many housewives as the most convenient, but it also has its own nuances. In the question of how to build an oven into a pencil case, the issue of reliability is important. As a rule, in this configuration, the equipment is installed on the second level of the kitchen unit. Again, from the point of view of reliability and safety, it is advisable to leave the lower tier free from household appliances, but in this case you will either have to initially put the necessary safety margin into the pencil case and adjacent modular blocks, or during the installation process include reinforcing elements in the design to give rigidity to the walls .
Blueprints
In the accompanying documentation, manufacturers usually indicate the dimensions of the built-in oven and hob. If one is not available, take a tape measure and a ruler and measure the equipment yourself. Write down the data on a separate sheet.
Find a drawing of the cabinet on the Internet. Print it on a printer. Compare the dimensions on the plan with your measurements. Usually the standard dimensions are the same. Otherwise, adjust the cabinet dimensions to fit your equipment.
Equipment inspection
After connecting the equipment, it is necessary to check its functionality, including at loads that are critical for the available power. The promotion allows you to find out the quality component of the wiring.
Equipment check:
- we activate the unit responsible for the equipment;
- the LEDs or screen on the oven should light up;
- turn on the heating elements at maximum power;
- We calcine the chamber with active exhaust (>250⁰С).
It is useful to wait until the factory lubricant burns out completely, otherwise the dishes will be saturated with an unpleasant technical smell during cooking. If the verification procedure passed without any problems, then you can permanently secure the cabinet in its place.
Controlling the oven operation
Material
It is important to determine what you are going to assemble the cabinet from. For the manufacture of kitchen furniture, laminated chipboard sheets (LDSP) are usually used. But I recommend taking MDF. This is somewhat more expensive than laminated chipboard, but the modified boards are covered with a more durable and heat-resistant film.
For side racks and drawers, a sheet thickness of 10–12 mm is quite suitable. For shelves, due to the high load, it is better to take 16 mm sheets. Having different thicknesses of material in your workshop will save money. Otherwise, it is better to purchase sheets with a cross section of 16 mm.
Video description
For a clear overview of laying and applying mortar, watch the video:
- Duplicate row, but the stones are laid flat.
- The brick is on edge, the walls are wiped with a wet rag.
- The brick is laid flat, and on the back side - on the edge.
- Next, the firebox is closed, 2 bricks should hang over the chamber (if the structure is planned to be used as a fireplace and the firebox is not covered), the flame will be directed to the middle of the structure.
- The stones are moved a little to the back side, they will support the door. Before laying the brick, wet strips of asbestos are laid to seal it. The panel cannot be placed on the mortar - cracks will appear due to the difference in thermal expansion.
- A pipe is formed to remove smoke. A smooth expansion is made towards the back. Stone is used for the base; light metal is used for everything else.
- A valve is installed, it is necessarily sealed with asbestos, first coated with a solution. This completes the construction of the structure.
Decorated stove for cooking and heating Source mainavi.ru
At the end, several tiers of the chimney are made, and a pipe is inserted into it. The brick (installed without mortar) and all debris are removed. The joint of the structure near the floor is closed for decoration with metal. The structure will dry completely after 1-2 weeks.
How to build a simpler type of oven if you don’t have the time, necessary materials or skills? Take advantage of the following structure, which can be erected in just a few hours. It has the simplest operating principle.
Fuel is placed below, which burns there, and where it settles. The draft is created by temperature changes. This design is characterized by a minimal amount of smoke and almost complete combustion of fuel. For this option, two half stones and 20 whole bricks are enough. There are five rows in the stove, the stones are tied together with mortar, but you can lay out the stove without using it - it will be a temporary structure.
Parts calculation
Based on the drawing, determine the dimensions of the furniture parts. Let's take a standard example:
| № | the name of detail | Quantity, pcs. | Size, mm | Material |
| 1 | Sidewalls | 2 | 704x560 | MDF |
| 2 | Bottom | 1 | 600x560 | — |
| 3 | Oven base | 1 | 568x560 | — |
| 4 | Tabletop | 1 | 600x560 | — |
| 5 | Back wall | 1 | 550x129 | LDVP |
Separately, we fix the dimensions of the box parts:
| № | Drawer parts | Quantity, pcs. | Size, mm | Material |
| 6 | Side bars | 2 | 560x90 | MDF |
| 7 | Cross members | 2 | 518x90 | — |
| 8 | Facade | 1 | 129x600 | — |
| 9 | Bottom | 1 | 560x518 | LDVP |
But these dimensions are not a dogma. Check with your calculation data. To make the most economical cutting, you need to determine the total area of the MDF. According to the specified specifications, you will need: 2(0.7 x 0.56) + (0.6 x 0.56) + (0.57 x 0.56) + (0.6 x 0.56) + 2(0 .56 x 0.090) + 2(0.52 x 0.09) + (0.6 x 0.13) = 2.3 m2.
Draw a rectangle on a sheet of paper at a convenient scale and place the contours of the detailing areas in it. This must be done so that the fragments fit on the plan. MDF sheets are sold in retail chains measuring 2800 x 2070 mm, with an area of 5.8 m2. Therefore, you will have to buy the entire panel. MDF is a more durable material than chipboard.
According to calculations, from one sheet it will be possible to cut parts for two oven cabinets. Use one set for its intended purpose, and the rest of the slab can be used to make the same or other furniture.
What kind of pizza is there?
Pizza can be very different: vegetarian and with meat ingredients, yeast and without yeast, with thin and fluffy dough, with milk or water, or kefir. But the greatest variety is achieved in the ingredients for the filling. It’s not for nothing that there are more than 100 pizza recipes in the world, in which only the composition of the filling differs. But now let’s look at ways to prepare dough for the pizzeria version.
What is pizza dough made of?
Homemade pizza dough consists of flour, salt, and butter. In addition, water, milk or kefir is used. There is also the question of using yeast - you can use it or prepare the base without it. At home, additional ingredients are sometimes used, such as eggs, sugar, butter, and so on. But these ingredients are not used in pizzerias.
What flour is used for pizza
Usually at home they use common wheat flour, which produces delicious baked goods. However, it will not produce pizza like in a pizzeria, since it requires flour with high gas retention and high protein content. It is recommended to buy special Italian pizza flour. If it is not sold in stores in your city, you can always order it online.
What kind of oil is added to pizza dough?
Olive oil is most often added to Italian pizza. This ingredient is not difficult to obtain even in a small town. Therefore, it is better to use it rather than butter or sunflower oil. Since these oils will give the wrong flavor, and it takes much longer to cook pizza with them. And in oven conditions the dish will be completely dry.
What kind of sourdough is used for pizza?
In Italy, special flour is sold with leaven already added to it. But despite this, pizzerias still add a little yeast. Therefore, the best option for pizza as a starter is yeast. If you use regular wheat flour, then you need to add 8-9 grams of starter per half a kilogram of flour. If you use special flour with added starter, then you need to use 1-2 grams of yeast.
Marking, cutting
After laying the MDF sheet on a workbench or on a clean floor, transfer the markings from the drawing to the slab. To do this, it is better to use a measuring rod or a long ruler. Use a square to draw perpendicular lines with a pencil. Double-check all marking dimensions before cutting.
If you do not have experience with a jigsaw, then do not start cutting parts right away. Practice on unwanted pieces of chipboard. Achieve precision cutting and only then start cutting cabinet fragments. The work requires extreme precision, otherwise you can simply ruin the material and have to buy a new MDF sheet.
Useful tips
If there are no electrical problems in the house, then you can do without grounding, but in some buildings it is required.
At the end, a few more recommendations from the masters:
- If the power cord is very long but has a molded connector, do not cut it. This part comes with a warranty.
- If the plug is detachable, you can change it.
- Due to the increased heat from the appliance, you should not place the equipment near the sink or dining table.
How to properly check the performance of equipment
And the final stage of installing any furnace is checking its operation and starting it up for the first time. You just need to connect the oven according to the instructions and make sure that everything works. You need to run the equipment at full capacity. They indicate the temperature on the sensor and wait until the factory grease burns out from inside the oven. Most likely there will be smoke. There is no need to be afraid, this often happens when you first start. The oven is ready for use.
Tool
To assemble the oven cabinet you will need the following tools:
- jigsaw for smooth cutting of chipboard without burrs;
- clamp for fixing parts;
- tape measure and square for marking holes for fasteners;
- screwdriver;
- screwdrivers;
- confirmat drill (countersink) and driver for installing euroscrews (confirmat).
Content
- Requirements and functionality
- Gas built-in oven and methods for cleaning it Traditional
- Catalytic
- Electric ignition
- Requirements for the dimensions of the oven and the niche for it
- 10. Korting OGG 5409 CSX PRO
Fasteners
To connect the cabinet assembly elements you will need the following fasteners:
Preparatory work
To make furniture, it is advisable to have a workshop. You can use a large table in a free room. Make sure there is an outlet within walking distance to connect power tools and stock up on an extension cord. Organize your workplace lighting correctly.
If you are going to make a closet in a non-residential area, then take care of heating in winter and forced ventilation in hot summer. Large window openings will save energy consumption during the daytime. A workbench equipped with stops, sockets, vices and clamps will be a good help for assembling the cabinet.
Telescopic guides and what are they?
A few words should be said about oven grates. More expensive models are represented by telescopic guides - metal runners that extend outside the oven together with the baking sheet. Thanks to this, there is no need to go deep into the oven chamber behind the grate: the guides move out smoothly and softly, and the enamel is not scratched as a result. Accidental falling out also cannot happen - the grilles are securely fastened and equipped with back stops.
Important: A disadvantage of the design can be considered difficulty in maintenance - after several preparations you will have to wash the frame from grease, otherwise the rails may begin to move out poorly. This work requires quite a lot of effort, but it is rewarded a hundredfold with the direct use of the guides.
Telescopic guides
Step-by-step instructions for assembling an oven cabinet
When the pieces of the cabinet are cut, start making the cabinet:
- Glue the ends of the parts that will be visible with end tape using an iron.
- On the sidewalls, mark the holes for confirmations and dowels.
- Use a drill to drill holes for the dowels.
- Using a confirmation drill, make sockets at the junctions of the side posts with the horizontal panels.
- Attach ball retractable consoles to the sides.
- Screw in the confirmations with a crank, connecting all the fragments into a single body.
- Close the Euroscrew heads with plastic plugs.
- On the back side of the cabinet, nail the HDF strip into the drawer compartment.
- Screw the legs to the bottom of the cabinet.
Connection procedure
Regardless of the type of device, connecting the oven occurs in several stages:
The existing wiring needs to be assessed. You can only connect the oven if:
- Physical condition is good.
- The conductor cross-section is not less than required.
- There is a circuit breaker or at least a switch on the line. They are needed to de-energize equipment in an emergency.
If the existing wiring does not meet the requirements, it is necessary to lay a new route from the panel to the intended installation location of the oven. On this line you will need to place a machine of a suitable denomination. We will talk in more detail about the cross-section of wires and the ratings of the machines for them later.
What to do
First you need to prepare the oven for connection to the mains. The oven may have a power cord. Sometimes it ends with a three-prong plug (grounding), sometimes there is no plug. Depending on the connection method, you can install a plug on the cord, or you can do without it. You can even change the cord - this does not even affect the warranty.
It's all about what connection method you choose. You can - traditionally through a three-pin socket with a plug. You can use one that is not so convenient, but is considered more correct. Through the terminal block. Depending on the chosen connection method, connect the electrical wires (more on this below).
In some cases, a power cord with a plug is already connected to the oven
Prepare a place for installing a built-in oven. Manufacturers usually recommend that cold air flows from behind and from below for ventilation. If the furniture has a back wall, make a hole in it or even cut it out as much as possible
To ensure air flow from below, you can lay pads a few centimeters high on the sides (it is important that there is also an air gap at the top between the oven and the countertop. In addition, the side racks of the cabinet must be adjusted to the size of the oven - it must be secured to the sides with screws
A picture of this type will be in your instructions with exact installation dimensions. The built-in oven is installed in place, we check the vertical and horizontal installation using a building level, and adjust if necessary. We open the door, there are holes on the side strips, we install screws in them that will hold the oven in place
To prevent the furniture walls from breaking when screwing in the screws, first make a hole using a drill with a diameter slightly smaller than the diameter of the screw.
We open the door, there are holes on the side strips, we install screws in them that will hold the oven in place. To prevent the furniture walls from breaking when screwing in the screws, first make a hole using a drill with a diameter slightly smaller than the diameter of the screw.
That's all, actually. The oven has already been connected, but not everyone fully understands some of the nuances and, most likely, there are a lot of questions about the electrical part. Let's talk about them further.
Hob installation
The manufacturer usually includes metal sealing springs, as well as heat-resistant double-sided tape or special plasticine in the delivery package. If there are none, then apply a line of silicone sealant along the edge of the opening in the countertop. Vyacheslav Gerasimov uses several layers of PVA glue instead of sealant. Watch the video for more details.
After this, thread the wire and plug into the opening and connect it to the outlet. Carefully lower the hob console. Use a damp cloth to remove any remaining silicone from the countertop. The stove is ready for use.
Advantages of a simple stove
All simple type ovens have many unique advantages. For example, a minimum of time is spent on their construction. Some models can be erected in just an hour, while others take 1-2 days to install. Small structures are lightweight, which means they do not require a foundation, which saves time, money and effort. You can choose any place to install the structure; if mobile versions are made without using a binder solution, then it can be disassembled at any time, moved and installed in a new location. Any materials can be used for fuel - pine cones, logs, stems of large plants, and so on.
Option for decorating a fireplace stove Source o-remonte.com
It is also important that such designs have lower fuel cell consumption. For example, compared to potbelly stoves, you will need several times less firewood. If you use the simplest stove without binding stones with clay, you can increase the heat transfer, which will be greater than from an open fire. This is a great option for hiking, but not very convenient if you travel without transport. Since the brick is heavy and capacious, it is inconvenient and difficult to carry.
An additional big advantage is the minimal level of smoke, and the fuel itself practically burns without waste. After good heating, the temperature of the stones can reach 1 thousand degrees, which guarantees not only good and fast heating, but also quick cooking of various dishes.
Expert advice
To ensure that the cabinet sits against the wall, make cutouts for the baseboards at the bottom of the cabinet sides. Leave a few millimeters of clearance for natural ventilation of the cabinet interior.
If you can’t make an even cut of an MDF sheet with a jigsaw, then go to a construction hypermarket. There is usually a department for cutting chipboard and MDF panels. According to your drawing, they will cut the cabinet parts and glue the ends with polymer tape.
To store heavy kitchen utensils (frying pans, pot lids, etc.), it is better to assemble a box with a bottom made of more durable materials than HDF. Use a sheet of plastic or aluminum. Do not fasten it with screws. Use a router to cut grooves around the perimeter of the sides of the box and insert the bottom into them.
Source
How to choose?
To make the right choice, you need to take into account not only the descriptions of specific models, but also other nuances.
The narrowest ovens (up to 0.45 m or less) are suitable for families of two or three people. However, they will not allow you to bake large portions. In most cases, preference should be given to models of classic width. And the widest versions are needed by those people who cook a lot often. Traditionally, most gas ovens are equipped with hinged doors. This solution is convenient. But you should choose it only if there is enough free space in front of the kitchen appliance. Based on reviews from a large number of consumers, we can confidently conclude that a good gas oven:
- illuminated from within;
- has protection from children;
- automatically cuts off the gas supply if the flame goes out;
- ignites gas using an electrical impulse;
- allows you to use food heating from above and below, both together and separately;
- has a timer (which turns off automatically or gives an audible signal).