No matter how a person uses paper for his own purposes. Fibrous material with mineral additives is needed for writing, drawing, printing, packaging, origami and much more. Recently, it has become fashionable to make 3D crafts from paper. What is 3D? Literally translated, these are “three measures.” The point of this process is to move from a rectilinear space to a volumetric, realistic one. Thus, you can make any type of equipment: cars, planes, ships, etc.
The easiest machine to make
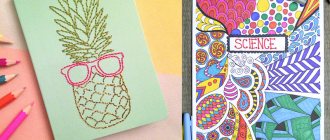
Paper crafts are in no way inferior to ready-made factory models. You can also play with them, they also look believable, any boy can paint it at his own discretion.
For the product you will need:
- A4 paper sheet;
- scissors;
- colored markers.
Having prepared everything necessary, we begin to make the simplest model of the machine. Instructions on how to make a paper machine will help you with this.
The process of assembling a simple machine
- cut out a square from the sheet;
- bend in the center;
- turn the edges over and bend them towards the center;
- bend the extreme sides in the reverse order; bend the figure in half;
- on the resulting figure we draw lines reminiscent of a car, after tucking the upper corners into the center;
- fold the small corner into a large one;
- we bend the lower corners back and cut them in a semicircle to create wheels;
- We bend the corners in the area of the headlights and complete the missing elements.
In a short time, the easiest version of the machine is obtained.
Automotive equipment
The paper car “park” is regularly replenished with new models. Most of them are folded according to a universal pattern with minimal differences in details. To make an origami car or bus look realistic, the finished figures are completed without relying only on silhouette similarity. In some cases, this technique allows you to get two vehicles that are completely different in function from one model.
School bus
School buses come from the USA. Since 1915, they have been used in rural areas to transport children to school. Even earlier, in the 19th century, horse-drawn carriages known as kid hacks served the same purpose. Unlike regular carriages, they were loaded from the rear to prevent noisy children from spooking the horses. With the advent of the first trucks, kid hack carts began to be mounted on a chassis instead of a standard body. As technology progressed, vehicles with removable passenger compartments evolved into stationary school buses.
In 1939, a unified standard for children's vehicles was adopted. In total, it contained 44 points, including instructions to paint the body a bright yellow color, which is clearly visible even at dusk. The main entrance to the cabin was now located not at the back, but at the front, next to the driver’s cabin, so that he could monitor the loading. The rear doors were also left, but only for emergency egress.
The American school bus, thanks to its attractive design and high degree of safety, has taken root in many countries. Since 1999, its analogue has appeared in Russia. True, except for the yellow color, buses for transporting children are no different from other passenger transport.
Making an origami school bus is not difficult. For it you will need a square of paper measuring 15x15 cm with one yellow side, as well as black and colored markers.
Step-by-step instruction:
- Let's start from the inside out. Fold the bottom edge 1/3.
- Fold the rectangle in half from left to right. Let's reveal.
- We lower the corners down.
- We turn their tops to round the shape.
Turn the workpiece over.
Fold the left corner as shown in the figure.
Fold the top edge. In this case, we bring the corner from the previous step to the top using a reverse fold.
Using a black marker we draw the details of the bus: window frames, doors, wheels, headlights. We apply an identification inscription and badge. We use colored markers or pencils to depict the driver and young passengers. This origami bus can be used to decorate a postcard for September 1st or Teacher's Day.
Once upon a time, the first school bus was created on the basis of a truck. The art of origami seems to turn back time and offer the opposite option. The model of a school bus can easily be turned into a truck, all you have to do is... change the color of the paper. And, of course, abandon the completed details:
Second option
An alternative bus model is made even simpler:
- We mark the vertical axis of the original square.
- Fold the sheet in half horizontally.
- We bend the top edge, aligning it with the bottom.
- We lower the corners diagonally.
- Turn the workpiece over.
To complete the model, all that remains is to draw the windows and doors:
Origami car
The Japanese art of origami is the process of creating original shapes from pieces of paper. Among these figures there are also cars.
Using this technology, making a machine will take longer than the simplest craft. Step-by-step instructions on how to make a machine with your own hands will help you with this.
We recommend reading:
DIY polymer clay jewelry: review of the best master class with step-by-step instructions for beginners (150 photos of original ideas)- DIY polymer clay flowers (120 photos of the best ideas) - simple instructions with full description + master class and video tutorials
- Quilling for beginners (200 photos) - step-by-step instructions with description. The best master class on creating quilling crafts with your own hands
Origami assembly technique:
- cut a sheet from a piece of paper in a ratio of 1 to 7;
- bend the right corners;
- bend the top of the sheet where the corners are bent;
- bend the protruding triangles towards the center;
- bend the sides and fold the remainder at the bottom;
- bend the figure in the center and draw the necessary parts.
This type of craft does not require templates and diagrams of paper cars; even a child can assemble it.
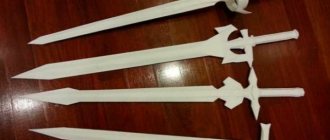
Passenger plane
From paper you can make an origami air transport that is quite suitable for flying. True, only during the game. For example, some fighter models can fly up to 3 meters and are even capable of performing aerobatic maneuvers. The passenger plane from the following video lesson is not far behind them:
For the little ones
In conclusion, a few simple diagrams of various origami transport for preschoolers:
Yacht:
High speed train:
Truck:
Underground carriage:
Volumetric retro car:
Sports car
This type of machine is more complex than making a regular one. Its main function is the ability to move on a flat surface by blowing.
Sports car assembly technique:
- bend the sheet diagonally;
- bend all corners to the center;
- smooth it thoroughly;
- bend the resulting triangles towards the center;
- bend to the middle of the side;
- bend the bottom of the workpiece upward from the triangle and bend the entire figure in the center;
- We put the remaining corners into pockets.
We paint the finished product at our discretion.
We recommend reading:
- DIY paper orchid - a review of the best ideas and tips from craftswomen. Step-by-step instructions + master class (photo + video lessons)
- DIY paper hyacinth: the best master class for beginners with step-by-step instructions and diagrams from A to Z (130 photos)
- Paper stars - instructions on how to quickly and easily learn how to make beautiful stars with your own hands (100 photos of finished works)
Crafts from bushings
To assemble such a machine, a regular toilet paper roll will do. You will also need:
- watercolor with brush;
- scissors;
- compass;
- cardboard;
- glue;
- two toothpicks.
Assembly technique:
- We apply one color of paint to the bushing, paint on the elements of the racing car with a pen;
- Using a compass on cardboard, draw four wheels and cut them out, painting them black;
- make holes for toothpicks on the belly of the sleeve;
- at the top of the sleeve we cut a semicircle and raise it 90°;
- if desired, glue a paper man into the middle of the sleeve;
- we thread the toothpicks and put the wheels on them, fixing them on the outside with a drop of glue.
The machine made from the hub is ready, with spinning wheels.
Truck
A three-dimensional cardboard model will look more realistic.
For the truck you will need:
- cardboard;
- scissors;
- glue;
- wooden skewers;
- Double-sided tape;
- plastic container;
- compass;
- pin.
Truck assembly process:
We recommend reading:
A paper crown is a simple instruction for creating original jewelry with your own hands. Templates, diagrams, master class, exclusive design (110 photos)Weaving from newspaper tubes for beginners: the best free master class, with step-by-step instructions. Photos, diagrams, unusual ideas, videos
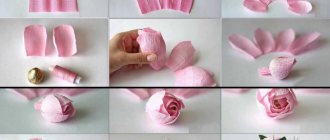
- Paper rose - how to make it yourself? Step-by-step instructions, original ideas, photos, videos, master class
- cut out four squares for the cabin, three rectangles and two squares for the body from cardboard, and assemble them, securing them with tape;
- in the cabin we cut holes for the windshield and side windows; we use pieces of plastic containers as glass;
- We draw eight wheels with a compass, glue them together in pairs for strength and make a hole in the center of each with a pin;
- Using skewers, we attach the wheels to the cabin and body.
For greater stability, wheels can be made from several layers of cardboard. We decorate the finished truck at our discretion.
Required materials and tools
Initially, it is determined what the truck model will be made from. For these purposes, materials that can always be found at home are suitable.
The basis for the craft can be:
To make wheels, a piece of dense foam or plastic bottle caps are suitable. You will need steel or aluminum wire to connect the wheelsets.
The use of additional materials is creative improvisation. Buttons are used to highlight the wheel rim and headlights. A beverage can can become the prototype for a truck tank.
Varieties of layouts and crafts
In order to make a craft, you need to decide which model to make. Select the pattern you are interested in in the gallery, print it out and cut it out. Or use ready-made templates for making crafts, purchased in specialized stores.
There are different models of trucks, flatbeds, vans. The main parts of tractors are a body and a trailer on a supporting frame.
Types of car bodies:
Templates for crafts differ according to the specification of materials. You can make a truck from cardboard, plywood, colored paper, or foam plastic. This fact is taken into account when choosing a layout scheme. The instructions for the models indicate what materials the model is made from.
Military type machine
Military cars also look natural from paper and are sure to become favorite toys of little boys. To make a military machine you will need:
- cardboard or match boxes;
- wooden skewers;
- juice tubes;
- compass;
- ruler;
- pencil;
- glue;
- scissors;
- black watercolor.
Assembling a military vehicle:
- By analogy with a truck, we make a cabin and a body, but in this case the cardboard should be green;
- draw three rectangles, cut them out and glue them into a base for the rockets;
- we cut out doors or windows on the cabin, if desired, you can simply draw them;
- we glue the base for the rockets into the body;
- we make wheels the same way as for a truck;
- We make rockets by cutting a juice tube into pieces, decorating them like rockets and gluing them to the base.
We decorate the finished model with military camouflage. This design also has rotating wheels, which makes the military vehicle more realistic.
How to make a dump truck from plasticine with your own hands step by step
Ask any boy what equipment is needed to move bulk cargo to construction sites. Of course, they will answer that it is a dump truck. Boys also want to have similar cars in their arsenal, in which they can transport virtual objects. We invite you to sculpt a dump truck from plasticine. This lesson will definitely be useful for boys. And girls can create such a craft as a gift for dad or brother, because sculpting from plasticine is always interesting.
Other car lessons:
There is no universal color for sculpting a dump truck from plasticine. You can choose absolutely any bar. The more material you spend, the larger the craft you will end up with. We decided to go with dark, nondescript shades – dark green and gray. But the dump truck can be more colorful. Roll into a rectangular block.
Turn the block into a dump truck body by adding tall, thin sides. Pull the front part, which will be adjacent to the driver’s cabin, slightly forward and bend it.
Apply stripes in a stack, showing the relief of the body.
Make a gray blank for sculpting the cab hood.
Form the cabin into the appropriate shape.
Stick glass from blue or white plate.
Form four black balls. They must be large enough, because the wheels for the truck will be made from them.
Press each ball with your palm to form a round cake. Apply a pattern to the center of each wheel using the flat side of the stack.
Attach the wheels to the body and to the cab, and also fasten these two components to each other. To do this, you can use matches, but there should be several of them, especially if the figurine is large.
Stick the headlights onto the front of the bumper and attach the rear view windows to complete the car's sculpt.
A plasticine dump truck is ready to perform its functions. If you freeze the craft in the refrigerator, then for some time you can play with it as if it were plastic, because the plasticine will harden.
Fire truck made of cardboard, large size
For a large cardboard machine you will need:
- 5 bushings;
- 2 spools of tape;
- cardboard boxes;
- adhesive tape;
- 4 juice tubes;
- old newspapers;
- matches.
Fire truck assembly technique:
- We connect two cardboard boxes of different sizes using tape;
- divide the reel of adhesive tape into four parts;
- seal the sleeve at the ends with masking tape;
- we cut wheels from toilet paper rolls, fill the insides of the wheels with crumpled newspaper and cover the sides with adhesive tape;
- cover the product with napkins;
- we make a staircase by gluing steps from matches onto guides from juice tubes;
- we connect all the structural elements together, fasten the wheels using wooden skewers.
We paint the finished product like a fire truck.
Papercraft toy cars
Quite a popular method of assembling products. It consists in the fact that all structural elements are cut out according to prepared templates.
Special books with ready-made templates are sold, or these templates can be printed or copied from the World Wide Web.
Let's look at how to assemble a machine using this technology.
- We find a ready-made drawing of the machine elements on the World Wide Web and print it out.
- Carefully cut out the templates, strictly along the lines, so that the finished product turns out without distortions. It is important to know that the drawings show in white special valves for connection, to which glue must be applied during the assembly process.
- We assemble the cut out templates along the fold lines, glue them along the flaps and assemble all the parts into a single structure.
It is worth noting that PVA glue or office glue is suitable for such products.
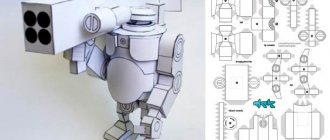
Papercraft machines
Boys often have a desire to design cars using papercraft techniques. This is a technique in which blank parts are cut out according to a ready-made template. But it is not always possible to purchase a book from which car elements are cut out and glued together.
Don’t be upset because modern technologies, such as the Internet, make it possible to find options for cars, transfer the image to paper and make yourself a car. Many people are interested in how to make a toy out of paper using the papercraft technique without having special books with details? Yes, everything is simple here.
The first thing you need to do is find and print a drawing of the car. This could be a sports car, a racing car, special construction equipment and many other options.
The assembly diagram is carried out according to the layout, but in order for the design to turn out correctly, you have the task of cutting out all the parts evenly from the printed image. After printing, you should pay attention that the white elements are the junction points of the parts. Glue is applied to them and the parts are fixed together.
(2)
It is recommended to choose glue for this type of activity, one that does not leave marks, but holds the paper well.
For kids, such a hobby is very interesting; it can captivate him for many years, while he will collect more and more new car models. And who knows, maybe after growing up, childhood fun, he will be attracted to a similar type of activity in the field of mechanical engineering.
Photos of paper cars
Did you like the article?
1+