Simple products
The easiest way to make flowers is from colored paper - it can be corrugated or ordinary, and if you plan to make strictly decorative flowers, you can take paper with a mother-of-pearl or metallic effect. You shouldn’t make a tulip or a rose as your first experiment - try something very, very simple first.
Decorative crafts
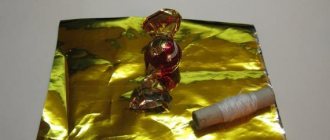
In order to make simple and spectacular flowers you will need:
- double-sided colored paper (corrugated paper is also suitable);
- thin wire;
- sharp scissors and a pencil for marking.
It is better to take colored paper of several shades, so your flowers will look impressive and attractive - for example, it can be shades of yellow or several tones of red. Don't try to mix cool and warm colors if you doubt your taste.
For beginners, the easiest way to do this is to fold colored paper several times so that you get a stack of squares approximately 6*6. Then mark the shape of the future buds on the top square with a pencil - it can be a smooth rounded figure, regular circles, or whatever your imagination suggests.
Then, with scissors, you need to carefully cut the stack according to the shape of the marked sepal and disassemble it into components - for each flower you will need three to five blanks. The wire needs to be cut into pieces of approximately 15-25 centimeters, twisted on one side so that a decorative center is formed, then the previously obtained “petals” are put on each wire, after which a stand is made at the bottom of the wire (a stable ring is twisted).
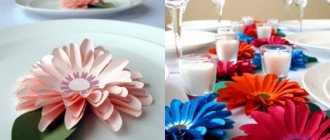
With such crafts you can decorate a table for a holiday, or use them for a photo shoot or interior decor, or you can simply attach them to the wall in the nursery or in the hall near the mirror - a good mood is guaranteed.
Or this simple option:
From what is at hand
Old magazines or newspapers are used to make these products. This way you can make large flowers out of paper - the technique is simple, and paper crafts turn out to be quite impressive.
What you will need:
- unnecessary magazines (absolutely any);
- green adhesive tape;
- sharp scissors;
- large barbecue skewers;
- paper glue or regular hot melt glue.
How to make voluminous paper flowers easily and quickly? I'll tell you step by step.
- Disassemble the magazines into pages and choose the brightest and most colorful ones - these are the ones we will use to make decorative paper crafts.
Each page must be folded four times along its length, cut with fringe from the fold side, not cutting to the edge about one centimeter.We begin directly making the buds - you need to take the resulting fringed ribbon and wrap it around the top of the skewer, securing it with glue or adhesive tape. This is how buds of voluminous flowers like asters and chrysanthemums are made.
Then you need to make several turns around the skewer with a fringed ribbon so that the bud turns out lush and beautiful. When there are enough turns, you can glue the free edge of the fringe so that the bud holds on.
Wrap a skewer with adhesive tape, cut out plant petals from magazines, shape them and glue them. Your beautiful and fluffy flowers are ready.
By the way, these recommendations can also be used for beginners - they are quite easy to do. If you want to make such flowers with children, then make sure that they have safety scissors, or cut the fringe yourself.
Origami violets
Parisian streets are full of violet bouquets sold on every corner. Origami paper violets follow the exquisitely simple shapes that have won the hearts of Parisians. The violet is a symbol of modesty and innocence. Those who choose violets are capable of wonderful and pure feelings at any age.
Following the instructions below, you can make a violet out of paper, simply and quickly.
Violet diagram
Take a square sheet of paper and bend it twice diagonally. Next, each corner of the square is bent towards the center, resulting in a smaller square.
We bend the corners of the resulting workpiece to the outside. It looks like a square within a square. We make several folds so that they intersect exactly in the center of the future flower.
Depending on how clearly and evenly the folds are made, the folds of the petals will be easier to move towards each other.
The petals are folded towards each other until a compact quadrangle is formed:
Then, the acute corner of the resulting quadrilateral is bent towards itself, then in the opposite direction. Thus, you will get the core of a violet. The core is set inward.
Then the workpiece needs to be straightened and folded onto a plane. Three interpetal spaces are formed as follows:
Pay special attention to the fact that there are only three of them, the fourth corner will be a petal and will be different from the rest. This will be visible in the last photo. Then we will form five petals and clearly fix the folds.
The flower is ready! You can add a poppy or lily to the bouquet, the composition will be more original and beautiful.
Sakura
Sakura translates to “love” and “beauty”. It is also a symbol of purity and innocence. Japanese sakura is a source of inspiration for origami lovers and masters. Everyone tries to create their own flower, according to their own design. Below is a method for collecting cherry blossoms by Hikari Kimiko.
We take a small square of paper, since sakura flowers are quite small. The smaller the square, the more elegant the flower will be. Bend the square in half twice.
We bend the corners of the square towards the center, carefully aligning them in the center. Turn the workpiece over.
And again fold it in half twice. We take the figure by the opposite corners and combine them in the center, tuck the side corners inward.
As a result, we get a double square. We place the square with its non-opening corners down. We bend the side corners of the top layer of the square towards the center and thoroughly iron the folds.
We turn the figure over and fold the corners of the second layer in the same way. To tuck the corners inward, you need to bend them back.
Unfold it slightly and press with your thumb, pushing it inward.
We repeat the same steps with the remaining three corners. The result is a hexagon. We bend its lower corners of the top layer towards the center of the figure.
Turn over and bend the corners of the second layer. The flower is almost ready. Now you need to straighten the petals. To do this, you need to stretch the central upper corners in opposite directions, slightly bending them outward.
For more naturalness, you can make stamens for sakura and insert them into the middle. For them, a thin wire is taken and plasticine balls are strung on it.
Small flowers can be used to decorate a tree branch.
Decorative flower garlands
Want to make chic garlands? Use giant paper flowers for them. By the way, making paper flowers for garlands with your own hands is very simple - you only need beautiful, spectacular paper and a little skill. No flower templates for cutting out or diagrams are required; the main task of such large products is to look bright, unusual and attractive; large paper flowers do not have to be realistic.
What you will need:
- scissors;
- corrugated paper of two or three colors (it is better to take bright and light);
- thread or fishing line;
- stapler or glue.
You need to cut rectangles out of corrugated paper and put them in a stack of five. If you want to get flowers of the same color, then fold them by color. And if you want to make original flowers from paper, then put several shades in one pile - pink, white, light red and yellow will look chic.
You can choose the size of the rectangles yourself; you just need to remember that the flowers will be the same diameter as the rectangle on the narrow side.
Each pile is assembled into an accordion (look at the photo on how to make flowers from such accordions, if it is not too clear from the description).
Each accordion of five sheets of paper must be fastened in the center with a stapler or glued with a paper ring. It is best to round the edges of the accordion - cut out something like a petal.
Now each blank needs to be turned into a bud - straighten the buds from the accordions you made. The accordions need to be straightened in different directions, and you will see how you can create beautiful paper flowers in just a few seconds.
Then cut the required length of fishing line or thread and string the buds - your garland is ready.
Another garland option:
Rose Kawasaki
The rose has always remained the most exquisite gift; presented roses, no matter live or paper, will always tell about the special feelings one has for the person to whom they are presented.
Making a rose is not always easy for a novice artist. There are a lot of options for assembling such a flower. A special feature of paper roses is the ability to combine the effectiveness of a flower with ease of execution.
Scheme for assembling a rose flower from paper
Origami for beginners does not involve assembling Kawasaki roses, but it is no more difficult to assemble than daffodils.
To begin, take a square sheet of paper. Depending on its size, you will get a large or small rose. The sheet is folded diagonally twice.
Then, bending the corner of the square to the center, you need to find the middle of the distance from the edge to the center. We combine the bent corner with the found middle.
Fold the resulting square with truncated corners in half and unfold the sheet. We bring together the opposite midpoints of the sides. The result is the following figure:
Next, we bend the open edges of the workpiece towards the center, the fold must be ironed. We unfold the workpiece. The side corners must be bent as shown in the figure and tucked inside the workpiece. Raise the small triangles to make a square in the center. Subsequent actions will be performed directly with it. We bend the small square, straighten the pockets and tuck it inside the workpiece. They will perform the function of attaching the petals of the future bud.
We turn the workpiece over and do the same actions on the reverse side. It turns out this is the figure. Turn the workpiece over.
We repeat all the previous steps on the other side. The result should be a template like this:
The upper corner must be bent first towards you, then in the opposite direction. This will create the core of the bud. The core of the bud must be carefully pushed deep into the workpiece, thereby forming it.
We fold the figure into one plane and iron the fold lines. Then you need to give the bud volume, at the same time shaping it: scroll it relative to the center. Particular attention is paid to the correct shape of the rose petals.
Then, the bud must be squeezed, with the center twisting in one direction and the petals in the other. The whole rose needs to be rotated, holding the indentations of the bud with your fingers so as not to inadvertently crush it.
The beautiful rose is ready!
Useful information and several step-by-step master classes
At the very end of the article, download patterns and color templates for cutting. By the way, if you want to make origami out of paper, it is best to use special double-sided paper.
Watch a detailed master class on how to make flowers and plants out of paper using the origami technique - it’s not only interesting, but also quite difficult, so don’t expect perfectly made flowers right away, you’ll have to work a little to make paper flowers with your own hands.
Also, flower stencils will be useful to you if you make large paper flowers of complex shapes - the same tulip or rose is more convenient to assemble from a special shape of petals.
Try making large paper flowers from corrugated paper - just assemble a huge rose bud according to this master class (see photo below on how to make flowers lush and beautiful).
Here are templates of large flowers for cutting out of paper:
And here are the step-by-step photos:
How to make flowers for children? Try to minimize any risks - for example, do not let children work with adult scissors, prepare the wire in advance and make sure that children are disciplined.
Learn how to make paper flowers with your own hands using coffee filters or napkins - a thin and fragile napkin looks almost like a real petal, you just need to give it a shape and collect the bud.
This video shows how to make a paper flower for beginners.
A few inspiring photos - see how beautifully you can decorate your holiday with camellias or roses.
Try making voluminous paper flowers with your own hands using cardboard or thick paper - even a child can handle this technique.
Another option for a simple flower:
Learn how to make flowers out of paper, a master class on the technique of soaking paper - such products look almost like the real thing!
Now you know several ways to make spectacular and expressive flowers from colored or even regular glossy paper, which means you can easily put together a chic bouquet, make accessories for a photo shoot, or even just decorate a room for a party.
Use the diagrams to make a tulip or other flowers - you need to print them out, cut them out, and then trace them like a pattern.
Templates of leaves and petals for different flowers:
If you want to show your imagination, then try tinting the finished products with a thin brush using the watercolor technique - with veins, the flowers will look even more elegant and interesting.
Violets made of corrugated paper. Master Class
Galina Shinaeva
Violets made of corrugated paper. Master Class
A bouquet of beautiful flowers is the best gift.
Every woman, girl, girl loves flowers. But, unfortunately, they wither so quickly. You can make beautiful flowers from crepe paper or crepe paper. Buying this type of paper is not at all difficult. You can make various flowers from corrugated paper: crocuses, hyacinths, daffodils, roses.
I chose violet.
I bring to your attention one of the options for making violets from corrugated paper.
Such flowers can be made with children of senior preschool age during manual labor or design classes for March 8 or for Mother's Day.
Children will be happy to give such a bouquet to their mother, grandmother, family and friends.
Paper crafts lift the mood and develop fine motor skills of preschoolers.
So let's get to work!
For work we will need:
Corrugated paper or crepe paper (purple, pink, beige, green).
Sheet of corrugated colored cardboard (A 4).
Let's start by making a vase.
We make the vase from yellow corrugated cardboard.
Fold the cardboard sheet in half (horizontally).
Draw the silhouette of the vase (where the fold line will be the bottom of the vase).
Cut out the silhouette of the vase along the contour.
Bend the silhouette along the dotted lines.
The vase is stable.
Apply glue to the side edges of the top of the vase and glue it together.
Let's start working with flowers
Fold purple corrugated paper like an accordion
and cut out the blanks of violet flowers.
For one flower you need two blanks.
Use a toothpick to curl the edges of the flower blanks.
Use the same method to cut out the green leaves.
Cut squares from a narrow strip of beige corrugated paper; these are the stamens.
We begin to collect the flower.
Place a beige square on a skewer.
Then we put on two purple blanks.
Coat the toothpick with glue and glue on the green piece - a leaf.
In this way we collect the required number of flowers. I have eleven flowers in my bouquet.
We collect several violet flowers on a thin wire. The wire can be replaced with a paper clip. It bends easily, unlike a toothpick, and the stems can be bent beautifully, imitating the natural tilt of the flower.
We compose a composition.
Corrugated paper violets in a vase are ready.
The second option is simplified.
Instead of using a corrugated cardboard vase, which takes time to make, you can use a dish sponge.
In this option, you can only use toothpicks.
Flowers made of corrugated paper. Master class: fold corrugated paper and cut out a circle. Then each circle is assembled separately. The more circles, the more voluminous it will be.
Master class “Christmas tree made of corrugated paper” To make a craft you will need: 1. Green pink corrugated paper 2. A4 or A3 cardboard 3. Scissors 4. Glue gun.
Master class “Bouquet of roses from corrugated paper” To make flowers we will need: Corrugated paper Scotch tape Scissors Wooden skewers (long) Take 3 skewers and connect them.
Master class “Crocuses from corrugated paper” Dear colleagues, I would like to present to you a master class on making my favorite early spring flowers - crocuses. Such flowers.
Master class in the preparatory group “Crocus flower made of corrugated paper for mom” Municipal budgetary educational institution secondary educational school No. 1, Skovorodino (branch of preschool education) Master.
Master class “Snowdrops made of corrugated paper” The snowdrop has blossomed. He is good. You won't find anything like this anywhere! He is so beautiful, fragrant, pleasant. It attracts with its smell. And whoever has a soul without stains...
Master class: “Rose made of corrugated paper” For work we will need: red and green corrugated paper, green paper tape - 1 cm wide, scissors, glue.
Master Class. Technique “Cutting from corrugated paper” Master class: technique “Cutting from corrugated paper” Purpose of the master class: creating compositions using the technique of cutting. Tasks:.
Master class on crafts from corrugated paper “Owl” To make a craft you need to prepare: 1. A toilet paper roll 2. Corrugated cardboard 3. Black and white paper 4.
Roses made of corrugated paper for March 8th. Master class On the eve of March Eighth, I decided to give a small gift to my son’s favorite teachers. Last year it was a bouquet of dahlias.
How to make paper violets with your own hands.
Violets made from colored paper are often used to create fun miniature arrangements. They can become an original decoration for your home. You can also form a bouquet from paper violets and give it to a loved one. Today we will tell you how to make violets from paper and then assemble them into an interesting mini-composition.
Let's prepare everything you need for work:
- colored paper of any violet shade;
- green corrugated paper;
- yellow crepe paper;
- glue;
- egg cells (polystyrene);
- scissors;
- spoke;
- wire pieces 5-6 pcs;
- small scissors.
Step 1.
Cut a small strip of lilac paper and fold it in half. By the way, we also have a master class on making wonderful lilacs from paper on our website. Then cut out oval flower petals along the fold line. One blank should yield two paired parts, from which we will assemble one violet flower.
Step 2.
Next, using a metal knitting needle (you can also use a toothpick, skewer or thick, even wire), we twist the side parts of the petals inward.
Step 3.
Glue the two parts of the flower together as follows. As a result, we got the first violet bud.
Step 4.
We will make the center of the flower (its stamen) from yellow crepe or corrugated paper. Cut a thin strip and roll it into a miniature ball. Glue the resulting part to the center of the violet using a drop of glue.
For one violet bush you will need at least three buds. Make the desired number of flowers.
Step 5.
Now for each flower you need to make a peduncle. To do this we will need several short pieces of thin wire. Using green tape or corrugated strips we give them a realistic look. Then glue them to the back of the buds.
Step 6.
After creating the flowers, we move on to cutting out the leaves. Any type of paper can be used to create them. We decided to use light green crepe paper. Cut out 8-10 oval leaves from it. We stretch their centers a little to form a shallow bend. Then we glue them to the top of the peduncle.
Step 7
And all that remains is to create the last detail of the composition - a mini-plant pot. Cut it out from the cell of the egg tray. On the outside on the side we draw a simple pattern with paints or felt-tip pens. We complement the flower pots with a couple of corrugated strip bows.
Place the cut out bottom of the second cell in the middle of the cell.
Now we fix the violet sprigs in the bottom.
The arrangement of paper violets is ready! If you liked this lesson, then please pay attention to the next master class, which will demonstrate how to make a chrysanthemum.
If you find an error, please select a piece of text and press Ctrl+Enter.
Olesya Selikhova
About the author: Psychologist, specialist in the field of family relationships and raising children. I love drawing, modeling, needlework and any interesting creativity. Mother of two children and a wonderful wife!
paper flowers
Share with friends:
We also recommend watching!
How to make daisies from corrugated paper with your own hands.
DIY paper lilac.