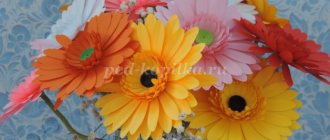
how to make origami paper flowers
Origami flowers are popular as home decor, wedding decorations, or gifts for special occasions. In order to make an origami flower out of paper with your own hands, you need to master the art of origami, learn the basic basic folds and methods. There are techniques suitable for any skill level that even a beginner can their own origami flower
In this article you will find origami flowers with step-by-step photos of different types of models with links provided to detailed instructions for each project. These are mostly flowers with traditional designs made using basic origami folds. Almost all examples are suitable for advanced beginners, so you can choose origami flower models for children to introduce them to this interesting art.
History of origami
As you know, Japan is considered to be the birthplace of this art. It was here that art reached a significant level of development. But the Chinese, Germans and Spaniards also sometimes used origami. The traditions of paper folding in these countries have not received such development. And therefore, when mentioning the homeland of this art, everyone remembers Japan.
It is noteworthy that origami became a significant part of Japanese culture already in the Heian period. Samurai used origami as a meaningful gift to their comrades, and beautifully folded sheets of paper were actively used during wedding celebrations. And already in 1960, origami was elevated to the rank of international art.
Before you start
Before making a flower or any other model, you need to select the correct module sizes. The best option: 1/32 or 1/16 A4 sheet. It is difficult to work with a size of 1/36 or 1/64 - the products turn out too small, they are difficult to see in all details. Large modules, on the contrary, emphasize the slightest imperfections, so they are best used for large-scale compositions that are perceived from a great distance.
Origamists working in 3D technology prefer office paper with a density of 80 g/m² - colored or white. You can take a traditional “kami”, but the square format will not allow rectangular modules to be placed compactly. There will be trimmings left, which can easily be avoided by using A4 or A3 format. To divide a sheet, it is not necessary to use a ruler or other measuring instruments. It is enough to know the basic techniques of classic origami:
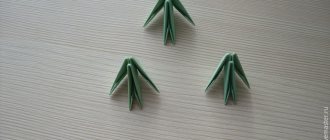
For three-dimensional figures, triangular modules are usually used. In design, they resemble a classic network adapter: on one side they have two protrusions, and on the other - the same number of depressions - “pockets”. The parts are inserted into one another and held by friction. Therefore, origamists try to use paper with a rough surface, which enhances adhesion. Experienced craftsmen work with floral crepe and thin foil. But these are capricious materials, you need to find an approach to them.
Triangular module assembly diagram:
Useful tips
Colored office paper differs in hardness with the same density. The softest and most comfortable to use are white and pastel sheets. Paper in bright, saturated colors is a little more difficult to bend, and your hands get tired of it faster, especially if there are a lot of modules. And the most difficult thing to work with is new paper; it is not recommended for beginners. The difference between the three varieties is small, but makes itself felt. The price also varies: light sheets are the cheapest, neon ones are more expensive.
Besides:
- The appearance and durability of decorative products directly depends on the quality of the modules. Any negligence - distortion, asymmetry, size differences - violates the strength of the joints. A careless movement is enough for such a figure to fall apart, and it looks sloppy.
- If you want to leave the finished product, it is better to immediately assemble it with glue.
- You can coat the models with varnish, preferably an aerosol one; it can penetrate into the most inaccessible places. Then the paper will not be damaged during wet cleaning and will be protected from fading and abrasions on the folds.
- You shouldn’t take on complex work right away. They start with simple models that have a laconic shape and color scheme. Vegetables and fruits, hearts, letters and so on are suitable.
Among flowers, chamomile is considered the simplest. It can be not only white, but also polychrome, it all depends on the author’s imagination. The most popular among beginners are models with five petals. They will require only 210 modules.
Of them:
- 162 purple:
- 24 yellow;
- 24 red.
The stem and leaves of such a flower can be made not from modules, but from wire and a sheet of paper. This will simplify and speed up the assembly process as much as possible:
Yoshizawa Akira: the story of the famous master
People who are seriously interested in origami simply cannot help but know this name. This man is an outstanding master who made a truly great and significant contribution to the development of the art of folding paper figures.
Mr. Yoshizawa is rightly considered the pioneer of most of the methods used for folding figurines. Because it was he who had to prove from his own experience that all of them could be used in the future. The master was able to achieve the greatest success in a technique called wet folding.
Types and techniques of origami
The process of folding any model must first be recorded. Of course, we are not talking about writing in words. For designation, certain signs are used that are universal. It is with their help that it is possible to record the folding process in the form of drawings, which should then be used for work.
This system of signs was invented by Mr. Yoshizawa. And today, types and patterns for folding flowers are actively used. The following paper folding techniques are widely known:
- modular origami;
- simple origami;
- pattern folding;
- wet folding.
It is noteworthy that only a few craftsmen know about the existence of the last mentioned method of folding paper. Because most people who are interested in this art prefer to use simple or modular origami.
Lotus
Lotuses come in different designs. But what I like most about lotuses is not the design feature, but the use of designer paper, velvety or patterned, or even vintage newspaper.
Pictures-schemes enlarge by clicking
An unusual lotus that is very easy to make:
A very lush lotus, even looks like a chrysanthemum:
Origami paper: the importance of choice
Before you start folding the figures, you should choose the paper with which the master will work. After all, the question arises: what can you use to make an origami flower? This is a very important point.
Because the choice of paper directly affects the final appearance of the model. The modeling process itself can also be simplified or complicated by choosing one or another paper.
For beginners, it is enough to remember only that for folding they will use paper that is usually used for a printer. Paper over 100 g/m2 is necessary for those who plan to work using the wet folding technique.
To make your work as easy as possible, you can purchase kami paper. It is sold already cut into squares. This paper is lighter than printer paper, so it can be used to model many figures.
Making flower bouquets
Flower bouquets are often made using candy.
To make a simple flower, you need to cut out a rectangle of corrugated paper measuring 9x8, cut off the bottom corners, and give the top corners a rounded shape. Then stretch the resulting part from the middle and wrap it around a round candy, which was previously connected with tape to a skewer. You will get a closed bud. Secure it at the bottom with thread.
For an unblown bouquet, you will have to make many of these blanks and fasten them together. To make the blooming flowers, prepare 8 3x8 pieces for each craft.
Do it in the same way as the previous version, only stretch it in the center and on top. Using a thin stick, bend the slightly cut ends in the other direction. The petal will look like a real one.
To obtain an open flower, glue new petals to the blank with a closed bud. Place each next one on the previously glued leaf. To form the trunk, take a 6x8 piece of paper, which you then cut into the shape of a fence. Then twist the cut parts and glue them to the flower base.
Next, wrap a green corrugated ribbon around the skewer and you will get a charming bouquet with which you can decorate your interior.
Additional materials for work
Typically, folding figures using the origami technique does not require additional materials. But flower figures are an exception. Because in this case there is a need to create a figurine that will be as similar as possible to the original. Therefore, you will have to stock up on everything you need in advance:
- gerbera wire with a cross-section of at least 0.5 mm;
- tape;
- scissors;
- wire cutters;
- pencil or toothpick.
Please note that it is important to choose the right wire so that it is comfortable to work with. It shouldn't be too thick.
Stunning flower with swirls
And now it’s time to learn how to make not a simple origami flower from multi-colored paper, but a magical one with curls in its beauty. This craft has no equal. It is advisable to use several colors of paper to get a brilliant result. For production you need:
- paper squares of two colors with sides 5 by 5 centimeters;
- toothpick.
The technique will include both modular use and quilling elements. If you are ready, then you can figure out how to make an origami magic flower from paper squares according to the following scheme:
- We take the first square, ours is pink, and fold it to form a triangle. After that, we make a smaller triangle out of it. Iron and open. Now we fold the straight edges towards each other.
- Let's reveal. The next step must be done carefully. On both sides, the central parts need to be bent inward so that the workpiece forms a triangle with a pocket at the bottom.
- Using a toothpick, carefully draw along the petals. Now each one needs to be tightened. We do this in one board. One piece is ready. Six elements of this color need to be made. Twelve pieces of elements of a different color should be made.
- Let's start putting everything together. Take two pink parts. We connect them by twisting curls together and help ourselves with a toothpick. Gradually add the remaining elements, adding one new one to the first curl. There should be one large spiral inside the product. After that, we connect the parts below.
- Now we add details of a different color along the edges. Their curls need to be intertwined not only with the top color, but also with each other. You will get a neat transition between shades.
Notice the amazing result obtained by combining the origami and quilling techniques.
Chamomile: the secret of a beautiful flower
Step-by-step instructions on how to make a flower with your own hands are quite simple. But now there is one more small detail to know. To make a paper daisy really beautiful and look like a real flower, you need to provide it with a large number of petals.
It is necessary to fold the rhombus into a triangle so that the base of the figure is at the top, and then you need to bend its sides in the direction from the top - this will be the petal. The more such petals, the better. Then you can use glue to fix the figure on a solid base so that it looks three-dimensional.
Flowers for children's creativity
And flowers are especially popular. They are used to decorate gifts, cards, crafts for kindergarten, school, and home decoration.
Tulip
Each schoolchild during the labor lesson folded a tulip as a gift to his mother on March 8th. This lightweight bud is suitable for beginners.
This video will help you understand it better visually.
Lily
If you can add simple shapes using diagrams, then move on to more complex ones. Using step-by-step instructions with photos, try to make a lily, lotus or forget-me-nots.
Well, and of course, also a short video on creating this flower.
Step by step, increasing the complexity, raising the level of skill, learn how to create paper masterpieces.
Perhaps the most difficult way is to create modular flowers. One flower may require up to several hundred parts. And the instructions for such a craft take up dozens of sheets.
Rosette
Origami, as a hobby, is a way to escape and relax. With just 10 minutes of free time, a 15x15 cm sheet of paper, step-by-step instructions to make the queen of flowers - a rose, without using glue or scissors.
or like this:
Try easy assembly patterns first. And when you gain experience, try to make the famous Kawasaki Rose model. It is considered to be the most beautiful rose model, but also very complex.
I also found a video tutorial for you on how to create a rose.
Lotus
Have you tried this? It's easy enough to do. Look.
Simple flower
And according to this scheme, you can collect a beautiful simple flower with your child.
Paper tulips
- Mark a square piece of paper with folds and center lines to form a triangle.
- Bend the corners located at the base on both sides.
- Flip one of the segments from right to left.
- Fold the sides of the resulting diamond towards the middle, tucking them in first.
- Unfold the second layer of the diamond and do the same with this part of the figure.
- Form a bud and bend the petals to the sides.
Peony
To create your own peony flower from corrugated paper you need:
- cut sheets of the same size from rolls of paper of different colors;
- fold each into an accordion of the same width;
- measure all the workpieces, starting from small to large with a distance of 3 cm;
- pry each folded part with a paperclip exactly in the middle;
- cut the ends of the blanks in the form of petals, or simply remove the corners, forming a triangle;
- arrange all the blanks from larger (which is lower) to smaller, aligning them in the center;
- all the leaves are connected into one motley accordion and wound in the middle with thread;
- form a bud, giving the resulting craft the shape of petals, turning them upward and bending them to the sides.
If you use many different colors, you will get a lush, attractive peony. For example, taking 7-8 shades, make a gradual transition from a light tone to a darker color. To create the finished look of a flower, during the process of forming a bud, place green corrugated paper in the very bottom layer.
Paper figurine "Iris"
A hexagon should be cut out of paper. Make diagonal markings on it, and then fold it into a quadrangular petal. Its corners must be bent inward.
Form petals by straightening each triangle. Turn it 90 degrees downward so that you can place the bud vertically, which must then be straightened.
Rose
Three wonderful roses - I like them all. Click on the photo to see the full MK
The simplest rose, but very beautiful, especially if you make it small. Mk is in Italian, but everything is clear. Enjoy watching. If anything, turn on Russian subtitles in the settings
Another no less simple rose, I would say, not even a rose, but Eustoma Almost like a real one and not the most complex Beautiful rose - bud Volumetric rose for the most patient Magic ROSE CUBE made of paper - MOVING ORIGAMI
Paper violet
- Cut out a pentagon from paper.
- Mark its center and diagonals.
- Collect a petal that is shaped like a diamond. Assemble it in such a way that there is one internal bend on the left side, and two on the other.
- Fold the right edge 1 cm across all layers.
- Do the same on the other side.
- Pinch the base of the flower with all the petals facing down.
- Roll the flower while holding the base to give it shape.
- Fold the outer and inner corners to give the petals a beautiful shape.
"Poppy"
The poppy concludes our article. This flower will fit perfectly into a panel or for applique. The Mac is assembled from several parts, but this does not prevent it from remaining very light.
To make a poppy you will need 4 red square blanks and 1 green one.
Step 1. Making the stem. It is necessary to mark the sides and diagonals according to the diagram.
Step 2. Assemble the rhombus along the outlined lines, placing the side corners up.
Step 3: Fold in the bottom sides and fold the stem in half so that the narrow part is on top.
Step 4. Move the stem to the side, open the leaves.
Step 5. Making the flower. The first thing to do is mark the diagonals and sides according to the diagram.
Step 6. Fold the side corners to the center twice and immediately fold them upward. You will get a petal shape.
Step 7. Turn the piece to the other side. Approximately mark the place of the fold and fold the corner to it, fold it again.
Step 8. Fold the bottom right corner toward the center to create a pocket. You will insert the next petal into this pocket.
To make a poppy you will need 4 petals.
Lily: a simple diagram of a complex flower
To make the flower even more beautiful and without having to paint it, you can use kami paper painted using the ombre technique in the process. The technology itself is quite simple:
- form a multilayer diamond out of paper;
- expand the side corner;
- do this with all parties;
- turn the workpiece over with the flat side facing up;
- bend the top corner down;
- bend the long “legs” up;
- fold their sides and bend the upper part from below;
- straighten the bud.
To make it easier to straighten the bud, you can use a pencil or toothpick. Using these simple flower designs for beginners, you can even create a beautiful lily.
Aster
Several options for its manufacture are offered.
1st method:
- take a white sheet of paper, fold it in half 3 times. You should get a plate of 8 layers. Cut this strip with teeth from one edge and cut the folds;
- in the same way, make a yellow blank half the width, and from green paper form two strips with teeth of different lengths;
- screw the yellow edging onto a narrow stick and secure with glue;
- in the same way, screw 8 white rectangles on top, followed by green ones;
- straighten the resulting flower, while bending the outer leaves from the center.
Thanks to step-by-step instructions, you can very easily and quickly make a paper flower with your own hands.
2nd method (basket of asters):
- for the base, cut out the foam of the required size and insert it into the cake box;
- secure the candies to toothpicks with tape;
- make 6 strips measuring 25x7 cm from corrugated paper and fold them lengthwise 4 times;
- make cuts in the form of teeth on one edge;
- round off the fringed ends with scissors, and stretch the solid edge, giving it a rounded shape;
- wrap the candy structure with the resulting blank, so that the cloves are inside, and connect with tape at the bottom;
- thus wind 2 more pieces. paper strip;
- screw the next three edges with curled teeth outwards;
- make a sepal from green raw materials, with the ends rounded;
- wrap the toothpicks in green corrugation, securing with glue and wrap the bud with a sepal, also gluing them together;
- Decorate the box with corrugated material and stick the created flowering plants into the foam.
Decorative paper bouquets
Having learned to arrange flowers using any of the proposed technologies, the master will be able to try his hand at making compositions from them. Such crafts can be used not only as souvenirs.
A paper bouquet can be presented as a gift for any occasion. But it is necessary to work out this composition and decorate it so that it looks more beautiful and resembles a real bouquet.
Kusudama
Another way to skillfully decorate the interior of your home is kusudama floral arrangements. Ball-shaped paper bouquets can be hung from the ceiling or look beautiful as a decorative element anywhere in the home. Despite the apparent complexity, making origami kusudama flowers from paper is possible for beginners. As in the case of modular technology, a volumetric composition is made up of individual elements, only this time entire buds and leaves are made. Using glue, a sphere-shaped composition is created, which, if desired, can be decorated with ribbons and beads.
Panel of flowers
Another way to use paper crafts is as a decorative panel. But you should remember that it will require a large number of crafts. While composing a bouquet may require only a few flowers, a panel requires several dozen.
In addition, it is important to outline the location of all the figures in advance. Therefore, this option for using paper flowers is suitable for advanced craftsmen who have already learned how to make panels.
Origami in the shape of an Easter egg
To create an egg you need to make about 1000 modules. They will be attached using grooves. Colors and patterns are limited by your imagination. Assembly starts from the top, take 8 modules of the same color and make a circle out of them, add another module between the rows. It turns out two rows of 8 modules. In the next row, two blanks are added between the rows. To increase the volume, it is necessary to add modules in each subsequent row. There should be 32 modules in the middle. The bottom is assembled in exactly the same way, but the number of modules will be reduced.
Once the egg is ready, you can begin making the stand. We take 18 modules and form a circle from them. Modules are inserted into unoccupied spaces in the row. We come up with a pattern by selecting blanks by color. The parts for the central axis of the stand consist of two rows of 12 pieces. To start row number 3, you need to move the modules towards the center, turning them slightly inside out. We lay the finished parts up. We have formed a column. In the middle of the stand there will be 7 rows of modules. The top is assembled in the same way as the bottom.