DIY paper gerberas. Master Class
Paper gerberas. Master class with step-by-step photos.
Author:
Stepanyuk Olesya Aleksandrovna, teacher, MDOAU “Kindergarten No. 3”, Shimanovsk, Amur Region
The master class is designed for school-age children, teachers and creative parents.
Purpose:
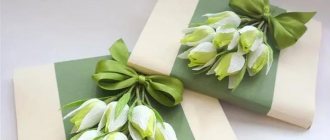
flowers can be used as a gift, decoration for a group or music room for the holidays.
Target:
making gerberas using the paper-plastic technique.
Tasks:
- teach how to make flowers from paper;
- develop interest in working with paper, creative imagination; - cultivate accuracy, perseverance, sense of taste. This amazing and mysterious flower comes from South America. The uniqueness of the gerbera is given by its light green foliage, a bright, beautiful flower with star-shaped inflorescences. Gerberas are flowers of joy and fun. They give us laughter and smiles. In general, everything that is sometimes so lacking in life. One of the meanings of gerbera in the language of flowers is mystery. The mystery of the flower is associated with a legend that tells that the gerbera is not a flower, but a beautiful nymph. The modest nymph, in order to avoid too much attention to herself, turned into a simple wildflower. Outwardly resembling a daisy, gerbera could not escape attention to itself. For the joy and warmth that it gives, gerbera becomes a welcome guest in every home. Smiling mysteriously, she seems to be flirting with you. In this flower you will find amazing simplicity combined with modesty, and extraordinary elegance.
Open as the sun - they have nothing to pick! Anyone can draw a circle with petals. A similar chamomile compared to a gerbera Well, just a mess compared to the queen! Their petals are like velvet, warmth comes from them, and your soul is calm, solemnly bright. And with flirting, faith will not fade into love and strength, Let the luxurious gerbera give it to you! (Belova Anna) I adore gerberas, but, unfortunately, no one gave them to me.
The decision came naturally. Now these cute flowers will stand in my vase and delight me regardless of the time of year. I offer you a master class on creating gerberas using regular office paper. Required materials and tools:
• colored office paper • scissors • PVA glue • quilling strips 3 or 5 mm • templates • plastic ruler • stapler • quilling tool • single-core aluminum wire • hot glue • tape tape
Progress:
1. Cut out templates from cardboard and transfer to a sheet of paper. You get 2 large and 2 small flowers, but they differ in size. One is smaller than the previous one. For one flower we need one large flower and two smaller ones. Three medium ones and three smallest ones.
2. Then I scanned the resulting sheet. I printed the templates directly on colored paper.
3. At the same time, I fold three sheets of office paper and secure them with a stapler. I cut it out. Thus, you will get blanks for three colors at once. Saves a lot of time.
4. Remove the staples from the stapler. For large flowers, I press a straight line in the center of each petal with a plastic ruler. Place a mouse pad or something similar under the bottom of the workpiece. For small pieces, I twist the petals using the rings of scissors.
5. Add glue to the center of the flower and glue the blanks together so that the upper petals are located between the lower ones. In the same way we glue the medium-sized blanks and the smallest ones. 6. Collect everything into one flower.
7. From 3 quilling strips we twist into a tight roll. We use a quilling tool. This is our core. Glue it to the center of the flower.
8. Using a template on a sheet, make several blanks. Print on green paper and fold the sheet in half. We receive several blanks at once.
9. Glue the resulting sepal in the form of a cone. Pre-cut a hole for the wire.
10. Thread the sepal through the wire. Remove the unnecessary winding from the tip and bend it a little.
11. Using hot glue, attach the wire to the flower. We attach the sepals to PVA. Wrap the resulting stem with tape (can be replaced with corrugated paper).
We put the flowers in a vase and admire them. Now closer. View from above
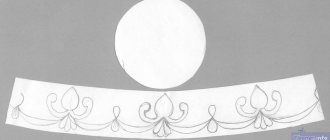
Templates used
Thank you for your attention!
We recommend watching:
Daisies using quilling technique. Master class with step-by-step photos Volumetric applique made of colored paper for March 8 “Flowers for Mom” Do-it-yourself chrysanthemums. Master class with step-by-step photos DIY postcard for mom
Similar articles:
DIY flowers and floral arrangements
Spring crafts with children 6-7-8 years old
Volumetric applique for children master class. Summer water lilies
Paper daisies. Master Class
Chrysanthemums made of paper. Master Class
Ball of Thread
A holiday dedicated to all women of our planet is coming up. Complement your main gift with a postcard with voluminous gerberas or a timeless bouquet, and even if they are made of paper, but with a successful selection of material, they look like they are alive.
To make gerberas you will need:
— Paper (thin cardboard or watercolor paper); — Scissors with thin sharp blades; — Wooden skewer or pencil; — Tweezers and a knitting needle (or awl); - PVA glue; — Wire for stems and floral tape (or corrugated paper).
1. First, draw a stencil of the size you need for future petals and cut it out. Cut the cardboard for the petals into rectangular pieces, fold them into a stack (as much as your scissors can cut), then cut a sufficient number of petals using a stencil. 2. On each petal, make several long cuts along, but not all the way through. 3. Then make very frequent cuts along the edge of the petals. 4. Using a wooden skewer or a simple pencil, give each petal a bend. 5. Cut out a small circle from cardboard to match the petals. Coat the base of the petals with a thin layer of PVA glue and, holding the petal with tweezers, carefully glue it onto the base circle, lightly press the base with a knitting needle or awl. 6-7. Gradually glue the first row of petals to the base.
8-9. Also gradually glue the 2nd and 3rd rows of petals (for the 3rd row you can use slightly smaller petals). If you plan to make a bouquet of gerberas on stems, then at this stage make a small hole in the center of the circle-base of the flower, wrap the wire with floral tape (or corrugated paper cut into thin strips, and glue the ends with PVA glue), bend the end of the wire with a snail or loop , coat the circle base in the center with glue and insert the stem into the hole. 10-12. Cut the remaining petals completely lengthwise, bend them and glue them to the base of the flower. 13-14. Cut a strip of paper of a contrasting color (for example, 3 cm by 15 cm), fold the strip in half (receiving a strip of 1.5 cm by 15 cm), make frequent cuts along the fold to approximately half the width, apply a thin layer of glue along the other edge and roll the workpiece into a snail. Let the glue dry and then glue this blank in the center of the flower.
Gerberas without stems can be used to decorate a postcard or make a panel.
All photographs were found on the Internet, all copyright logos were preserved.