It is impossible to imagine playing with dolls without a certain set of furniture. And, of course, the bed is an indispensable attribute of a doll’s life. What to do if you can’t buy toy furniture? Your own imagination and skillful hands come to the rescue. This is exactly what is needed in order to cope with the task of making a bed for a doll out of a box.
Making a crib for a doll will not take you much time. But what you will definitely have to tinker with is choosing the appropriate model. The main selection criterion in this case will be the material. The most popular option is cardboard. Every home has a couple of unnecessary shoeboxes or a couple of sheets of packaging cardboard (like the kind that household appliances are packaged in). Having decided on the material, you need to choose a model. It could be:
- classic single bed;
- ottoman bed;
- sofa;
- bunk bed.
But, before you start making furniture, take measurements from the doll for which the bed is intended. To the obtained values, add 3-4 cm to the length and width.
DIY crib: step-by-step master class
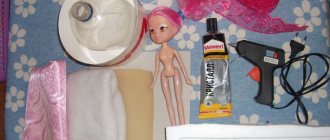
To make a beautiful bed for Barbie, you will need:
- cardboard (preferably corrugated);
- album sheets;
- PVA glue and Moment;
- scissors;
- cable;
- regular and double-sided tape;
- self-adhesive fabric or colored paper.
Decorating a baby crib consists of several stages:
1. On a landscape sheet you need to draw a model of the future bed and decide where the headboard will be. The sizes can be any and depend on the size of the wrist.
2. Cut out some details from ready-made corrugated cardboard templates. The strength of the future product depends on the number of elements.
3. After this, using Moment glue you need to connect all the parts together.
4. Next, you need to take 4 pieces of wire of the same length (about 50 cm, but this depends on the size of the crib), lay them on cardboard glued in layers and secure with tape.
5. Then fill the surface with the wire with PVA glue.
6. After this, place the remaining cardboard on top and glue it.
7. The product in a semi-finished state must be subjected to pressure (by any heavy object).
While the cardboard is drying, take the cardboard blanks under your back and also treat them with glue (three pieces each), and then place them under the press.
8. After some time, the components will dry and they can be attached to each other, and then mark the points of contact.
9. These points should be pierced with an awl or thick needle.
10. Wire is inserted into the resulting holes.
11. The joints are treated with glue.
12. Tie a cord on the back of the cardboard and cut off the large ends.
13. After this, the frame and back are glued together.
14. The product can be covered with paper, fabric or viscose napkins.
15. The napkin must be attached to the finished structure and carefully trimmed, leaving 4 cm on each edge.
16. The bed can be decorated with floral appliqués.
For greater realism, you can sew a mattress, a blanket, a pillow, and a sheet.
Cabinet
Cabinet furniture made using the origami technique is no different from the real thing. The cabinets or chests of drawers are equipped with convenient drawers, and the closet is equipped with a real barbell. An ideal place to store your collection of origami clothes.
For an original cabinet based on the model of origamist Fumiyaka Shingu, you will need three squares measuring 21x21 cm.
Step-by-step instruction:
- Divide the first square into 3 parts vertically and horizontally.
- Bend the top part back. We fold the bottom one forward.
- We mark the fold lines with dotted lines. Open the sides, flatten and smooth.
- Fold the sides along the dotted lines.
- The first piece of furniture is ready.
For the second one you will also need a square of 21x21 cm.
- We divide the workpiece into three parts and roll it into a strip.
- We make vertical folds - 1/3 on each side.
- We connect both parts together.
All that remains is to put the boxes in place:
Instructions for assembling the box:
- We divide a square of 21x21 cm into 3 parts in both directions.
- Fold the top and bottom edges.
- We make folds along the dotted lines.
- Fold the top and bottom edges again.
- We outline the diagonal folds.
- We open the workpiece from the inside according to the arrows.
- We form a box by stretching the side walls. We glue the product for strength.
- Repeat steps 1 – 7 to make another box.
We make handles so that the cabinet can be easily opened.
Instructions for the pen:
You will need a strip of golden or dark brown paper 1x1.4 cm.
- Let's start from the inside out. We bend the strip in half along the long side.
- Fold the product along the dotted line.
- We repeat the action in the other direction.
- Glue the handles in place.
Model selection
Before we get started, we need to agree on what we want to see as a result. A bed for dolls can be made in different versions, but the main condition is its environmental friendliness, safety and fun.
The second condition is that it must be reliable, easy to use and always brilliantly designed. During construction, it is possible to use any variety:
- single and double models;
- rocking cradle;
- bed;
- four-poster bed;
- hanging hammock
You can choose from a variety of styles: with a headboard, backrests, panels, with legs or with a rectangular base.
In addition, it is worth considering the possibility of making bedroom set items. For example, if it is a Barbie bed, a trellis, or at least a nightstand. If it's a baby doll, you'll need a changing table. For a closet you will need at least a couple of drawers under the bed.
Before starting work, you also need to correlate the dimensions of the bed with the parameters of the toy, so as not to be disappointed in the finish when the bed for the doll suddenly becomes small.
Piano
This model can also be used as a desk. If you take a square for it, measuring at least 21x21 cm and stop at step 6, you will get a decoration-house for a puppet show.
Step-by-step instruction:
- Connect the top and bottom edges of the square sheet.
- We mark the center of the figure.
- We add the right and left sides to it.
- We make folds along the dotted lines. We open both parts from the inside according to the arrows.
- Flatten the resulting folds.
- We get a decorative house. However, we don’t stop at this point and continue assembling the piano. Raise the central part of the workpiece.
- Bend down the top edge.
- We fold the sides at right angles.
- We give the central part a horizontal position. Paste on a pre-printed image of the keys.
Manufacturing process
Creating beds for dolls is an interesting process that opens up a wide field for the implementation of original creative ideas. There are plenty of step-by-step instructions online to help you get the job done right. The choice of a suitable model and design should be made together with the child. Novice craftsmen will be able to make cardboard structures, shoe boxes, popsicle sticks and plywood with their own hands.
From cardboard
A simple but elegant bed for Barbie doll can be made from ordinary corrugated cardboard. In addition to the main material, you will need: album sheets, wire, tape, pieces of fabric, scissors, glue. The whole process is carried out according to the instructions:
- The desired bed model is schematically depicted on a sheet of paper. Design parameters depend on wrist size.
- Based on the finished template, the necessary elements are cut out of cardboard and their side edges are glued together.
- Two pieces of wire 50 cm long are laid on pieces of cardboard, fixed with tape and the surface is filled with glue. The workpiece is placed under a vice until completely dry.
- The elements of the body and head are pierced with an awl, and wire is threaded into the resulting holes. The fastening points are coated with glue.
- Pieces of wire are tied on the reverse side, and the long ends are cut off.
Popular crib models for children of different ages
At the final stage, the cardboard doll bed is covered with viscose, paper or fabric napkins. The sleeping place will become even more attractive with decoration in the form of floral appliqués. Miniature bedding will add realism to the product: mattress, pillows, blanket.
Decor variations
The first decorative element for a doll bed is bed linen. Manufactured furniture is decorated with colored paper, buttons, beads, beads, ribbons, colored cardboard, dried flowers, sparkles, stars and so on.
The best option to decorate a bed for dolls made of cardboard is to make patterns with paints. Children are involved in this part.
As can be seen from the material described above, creating unique furniture for children's dolls requires time, effort, skill, materials, decorative elements, and tools for work. Any parent can create a bed for dolls with their own hands. Girls should be involved in the work of creating furniture for her doll. The work will develop fine motor skills in the child, speed and clarity of work, knowledge of numbers, and will involve fantasy and imagination. The child can decorate the furniture he has made himself. All work is carried out under adult supervision.
Using cardboard box
Any parent can make a crib for a doll out of a box. On the mezzanine or balcony you can always find one or two shoe boxes or unnecessary household appliances.
To make such a bed you will need the following materials:
- cash machine;
- wooden pallet;
- universal glue;
- colored paints;
- brushes;
- sheets of paper of different colors;
- fabric patches;
- beads and ribbons.
To build such a bed, take a box that is the right size for the dolls, take a wooden pallet the same size as the box. And the box is glued to the pallet with universal glue. The outside of the box is covered with multi-colored paper, the palette is painted with colored paints. The inside of the box can also be covered with fabric or painted. You can decorate the headboard along the edge with beads, gluing them to ribbons with glue. For such a crib, a mattress, blanket, pillow and bed linen are also sewn.
Plywood crib
Plywood has sufficient strength and an affordable price; products made from it are easy to maintain and assemble. The manufacture of the crib is carried out in several stages:
- All elements are precisely sized on a sheet of paper, cut out, and then transferred to plywood and cut out.
- The finished fragments are sanded, painted in the desired colors and dried, after which they are assembled into a single structure.
NOTE. The glue is first applied to the joints, which need to be allowed to dry a little, and then the pieces are clamped and pressed firmly for several seconds.
Plywood opens up wide possibilities for decoration. In addition to simple painting, patterns can be burned, cut, engraved, painted, etc.
We use matchboxes
In addition to several matchboxes, you will need colored paper. The boxes are glued together, placed vertically on the sides, forming the wrong sides, and then covered with plain paper, which will give the product strength and stability. Finally, the entire structure is covered with colored paper, decorated with buttons or rhinestones, after which the mattress and bed linen are laid.
Furniture made from wooden panels
Versatile and environmentally friendly, as well as high-strength material, the bed will be strong and durable. To the tools listed above you will need to add a drill, sandpaper, and a jigsaw. The procedure is as follows:
- All drawings are transferred to wood and then cut out with a jigsaw. A drill is needed to make holes if necessary.
- The finished elements are checked for compliance with all dimensions and then thoroughly rubbed with sandpaper until completely smooth.
- The places of future fastenings are marked with a pencil, the entire structure is bent and fixed with self-tapping screws.
At the end, the finished bed is varnished and allowed to dry completely, after which the bed linen is laid. It will be especially successful to use varnish that shows the structure of the wood - such furniture looks incomparable.
Foam products
Cheap and cheerful. For the crib you will need a piece of foam rubber, which is used to make the base, and the fabric with which we then wrap it. The material can be given any shape as desired, after which it is necessary to make a colored blanket, pillows, and lay a rug against the wall on the bed; It will look like you have a backup.
Bed made of polystyrene and toothpicks
To make it you will need a piece of foam plastic, toothpicks and a piece of fabric. The process looks like this:
- We cut out a piece of polystyrene foam to the size of the future crib, which we wrap in fabric.
- If desired, you can put a thin layer of quilted polyester on top, which we secure with a needle and thread, creating the shape of a real mattress in miniature.
- For the frame we take foam plastic, cardboard and toothpicks. We cut out pieces of cardboard and fasten them into a single structure, along the edges of which we place toothpicks that act as legs. They can be decorated with various curls and spikes, which are also applied to the back side, on the surface of which patterns are easily applied using a stencil using glue.
Finally, the entire structure must be painted or varnished and allowed to dry completely.
Assembling the paper structure
This is not the most durable piece of furniture, but it is quite suitable for decorating a dollhouse. To make it you will need thick paper with landscape sheets, masking tape, ribbons and thin wire. First, the elements of the future bed are cut out of paper, according to the diagram, which are double-fastened with strong paper for rigidity. During the gluing process, we place a thin wire between the layers of paper, which will hold the entire structure and prevent it from falling apart. All elements are carefully attached to each other and left until the glue dries completely.
Tags
from paper.from paper with yoursfrom paper.from paper with yoursfrom paper with yoursfrom paper with yoursfrom paper from paper with yoursfrom paper with yoursfrom paper papers. Origami paper bed. Origami bed Origami mouse Origami paper origami Origami bed Origami beds Origami bed Origami beds origami patterns How to make a bed How to make a bed made TRANSPARENT How to make a snowflake How to make a snowflake How to make a mouse How to make a snowflake How to make a snowflake How to make a snowflake How to make a snowflake furniture items and Paper furniture also Furniture Origami furniture for Origami furniture for Furniture from
bedspaperdollsofaviewedgesdetailedorigami-likecreationwilldiagramsbased
What material is best to make it from?
The material from which the doll's bed is made can be absolutely anything. It all depends on what is currently available at home and on the imagination of the parents and the child.
Wooden shields
If you approach the issue thoroughly, then such furniture can be made from wooden panels no more than 2 cm thick so that the product is not too bulky. The advantage of wood is that the resulting bed looks neat and beautiful and is likely to last a long time. Panels are sold on any construction market at a very reasonable price.
Plywood
If you can’t buy a wooden board or don’t have woodworking skills, you can make a bed out of plywood. Plywood is affordable and easy to cut and glue. The resulting furniture can be quickly painted in absolutely any shade or decorated with inserts of beads, beads or shells.
Cardboard box
Cardboard is a universal material for children's crafts, as it is accessible to everyone. It can be easily obtained from common household items: shoe boxes, household appliances and even food. Cardboard boxes are often available for free at the supermarket.
It's easy to make a doll bed out of a box, but it won't be difficult to break it either. For a bunk bed, it is better to use cardboard and plywood at once.
Matchboxes
It’s easy to make a frame from matchboxes - to do this, just glue them step by step with PVA glue. Externally, the structure will not look very beautiful, but it can be covered with fabric or covered with self-adhesive paper. Before you start assembling, it is better to take used boxes and draw a diagram.
Polystyrene
If you've recently purchased a home appliance, you may have saved a box from the store along with some foam that you can use to make a sofa bed for your doll. Polystyrene is not very strong, but its solid structure makes for interesting products without glued parts.
Foam rubber
It is better to use foam rubber separately as a component, since it is too soft for the frame. But in the absence of an alternative, it can be mistaken for the entire product. By the way, ordinary dishwashing sponges, pre-covered with fabric, are ideal for such a soft sofa bed.
Toothpicks
Sticks are found in almost every home, so they are ideal for a doll's crib. The legs, frame and headboard will be made from toothpicks, and the inside can be filled with foam rubber or a strip braided with beads can be placed to recreate the springs. Bamboo straws, sold individually or as part of a sushi mat, are suitable for the same purpose.
Old newspapers
Old newspapers are a rather unusual building material, but they make interesting pieces of furniture. In addition to them, to create a doll bed you will need PVA glue and wire. In this case, the product itself will be constructed from newspapers rolled into identical tubes and fastened at the sides with wire.
School rulers
Old rulers can be a great base for a doll's bed. To do this, you will need products of the same length. If you don’t have identical rulers at home, you can buy them in the store; The cost of the rules is quite cheap. The advantage of using them is that this material is easy to paint and decorate.
Wire
Using a simple cord, you can recreate a Soviet bed with an elastic mattress and metal legs. If your child wants something more sophisticated, you can use wire to fashion a bed in a Gothic style. Due to its flexibility, wire allows you to create a wide variety of unusual shapes.
Egg tablets
Pallets on which eggs are stored can be useful for creating the base of a doll's bed. To do this, you need to put something on top of the tablet - a small sheet of wood, cardboard or foam rubber, and then cover the entire structure with a cloth.
Other materials at hand
The number of options for creating furniture for dolls is limited only by imagination. Here is a partial list of what else can be used for assembly:
- plastic jars for cosmetics;
- viscose napkins;
- upset; upset
- plastic bottles;
- ballpoint pens and gel ballpoint pens;
- disposable cups;
- plastic dishes, etc.
You can use anything for the doll's bed frame (even metal objects), but you need to remember that the furniture should be as safe as possible for the child. There should be no sharp corners or roughness. All potentially hazardous parts must be removed, hidden or covered with a cloth.
Sources
- https://babyplayroom.ru/igry/krovatka-dlya-kukly.html
- https://tandem-psy.ru/biseropletenie/krovatka-dlya-kukol-svoimi-rukami.html
- https://svoimirukami.guru/krovatka-dlya-kukly-svoimi-rukami/
- https://valis-mebel.ru/krovati/razmery-kukolnoj-krovatki.html
- https://fidexpo.ru/krovatka-dla-kukly.html
- https://camodelkin.ru/hozpostrojki/krovatka-iz-kartona.html
- https://ardo-dez.ru/podelki/krovat-iz-kartona-dlya-kukol.html
- https://natrukodel.ru/podelki/krovat-dlya-kukol
- https://mblx.ru/kojka/malysh/1032-kak-sdelat-krovat-dlya-kukol.html
- https://VegaMebell.ru/myagkaya-mebel/kukolnye-krovatki-svoimi-rukami.html
- https://setafi.com/mebel/krovat/krovat-dlya-kukol-svoimi-rukami/
- https://vibiraite.ru/krovatka-dla-kukly.html
- https://AmiPlus.ru/zona-otdyha/kak-sdelat-krovat-dlya-barbi.html
Modeling principles
Any thing (even metal objects) can be used to frame the doll's sleeping area, but remember that the furniture should be as safe as possible for the child. There should be no sharp corners or irregularities. All potentially dangerous parts must be removed, hidden or covered with a cloth.
Advice: whatever material is chosen for production, it should be understood that children need as much realism as possible.
The crib for your favorite doll should be similar to the real one, but smaller. When sculpting, it is better to discuss with the girl what kind of furniture she wants to see. She may want to recreate her own bed or her parents' bed. This issue should be discussed before construction begins.
Modeling Table
Let us have a square table on four cylindrical legs. We take plasticine and divide it into pieces - for the tabletop and for the legs:
Nothing like pieces, huh? Children are usually amazed by the size; everyone, out of kindergarten habit, wants to sculpt something extremely tiny. I would sculpt the furniture even larger than what I’m showing you, but I know from experience that the legs will not hold a very heavy product.
We flatten one of the pieces and give it a square shape:
We carefully flatten this tabletop, trying to maintain its shape - we increase the area and reduce the thickness of the part. We divide the remaining piece of plasticine into four parts and roll them into ropes:
You will have to work hard to ensure the uniformity of the thickness and length of the legs, but the eye will train:
We connect all the parts - here you have a table made of plasticine:
Half an hour of silence: simple and complex crafts for children made from plasticine
Reading time: 8 minutes No time?
Mastering plasticine most often occurs at the age of 1-2 years, but some never develop the skills to work with this easy-to-handle material. This is mainly due to the lack of knowledge and methods of modeling, lack of understanding of the basic processes of creating plasticine objects. HouseChief.ru magazine today offers help in making beautiful crafts for children from plasticine and suggests different modeling methods.
Read in the article
Conclusion
What can you say about the above models? They are quite simple to make, even though they look very similar to the real thing. Most likely, the child will like them, and he will play with them much more often than with purchased options.
These original models will certainly meet all environmental requirements, so you will not need to worry about the health of your baby. The video in this article will provide additional information on the above topic. If you have questions about the article, we will be happy to answer them in the comments.
Making sandwiches with sausage
In addition to scrambled eggs, you can serve the doll a couple of sandwiches for breakfast. Any doll will like this plasticine food.
1. Take some brown plasticine. If the color is too rich, you can add white or yellow plasticine to the brown and mix it repeatedly to make the color more bread-like. Roll out this piece into a small layer and cut out a square using a knife. Cut it diagonally.
2. Roll out the pink plasticine into a layer and cut out a square slightly smaller than the brown one. Cut it diagonally. If you don't have pink plasticine that imitates sausage, you can take a little red and add white to it. Then mix repeatedly. You can put tiny pieces of white plasticine on the rolled out layer and press down. You will get “sausage with lard”.
We create a masterpiece - a plasticine cake
How to make food from plasticine for older girls? After all, they are no longer interested in making bagels and pretzels. There is a great cream cake recipe for them. To do this you will need white, pink, yellow, red, green plasticine, stacks and a round mold to cut out the layers of the cake.
The technology for its preparation is a little complicated and requires attention, but such plasticine food will undoubtedly delight both the doll and its owner.
1. Roll out three thin layers from pink plasticine.
2. Using a mold, cut out three circles.
3. Roll out three layers of white plasticine slightly thicker than the pink ones.
5. Lay alternately a white circle, a pink one, and a white one again - and so on all the prepared circles. We can stop here and start decorating our cake. Or you can make a thin pink plate and cover the “cakes” with it to make it more beautiful.
6. Roll two thin sausages from white plasticine and twist them into a flagellum. Decorate the cake with it on the top and bottom.
7. Make flowers and berries from plasticine of different colors and decorate the top of the cake with them.
Baking cookies
The simplest plasticine food that even the smallest housewives can “cook” is bagels. They are prepared simply. You need to take several pieces of yellow plasticine, roll each into a thin sausage and connect its ends. To make pretzels, you don’t need to connect the ends of the sausages, but make different squiggles out of them. But you can try and “bake” very tasty cookies for your doll.
1. Add brown plasticine to a small amount of yellow plasticine and mix repeatedly. The color should be like the real dough.
2. Roll it into a thin layer.
3. Cut out cakes from it using any round mold.
4. Squeeze each cake with your fingers to form a bow. You can also roll it up like a rose. You can decorate these cookies with a red plasticine berry.
Step-by-step photo lesson:
First, we will make a bed frame from an orange sheet of paper 20 x 20 cm. We bend the lower part in half.
We bend the upper and lower parts to the resulting vertical line.
To the same line, bend the sides in half again.
We open the bed blank, but not completely.
Turn it over. We bend it. Leave 1-2 cm.
Bend the upper side corners down without going beyond the line.
The ends of the bent corners will become the fold line for the first layer of the workpiece. Bend upward.
Then fold the first layer of paper towards the horizontal fold line.
Bend the lower side corners up.
We open the bottom part of the workpiece.
Using the side fold lines, we fold our workpiece, as shown in the photo.
To keep the craft in place, bend the top part into the middle.
We bend the upper corners on the sides.
Let's bend the top line of the workpiece down a little. The line width will be 0.5-1 cm.
We pull the two pockets with our fingers and turn the blank into a voluminous paper bed.
The origami paper bed is completely ready, but we will complement it with a sleeping set, which will be made from a square sheet of blue paper 10 x 10 cm.
Open it and bend the top and bottom sides to the resulting line.
Turn the square sheet over so that the fold lines are vertical.
Bend the bottom side of the sheet up 1 cm.
We bend the sides down.
We put the bed linen into the pockets.
The origami bed is ready.
Paper dolls and accessories
Paper dolls can be a good component of exciting play. Here everything is limited either by your imagination, or on the Internet you can find a large number of samples of dolls of various shapes, hair and eye colors.
Clothes for paper dolls are very easy to make. A variety of ideas can be found on the Internet, magazines or books. Rectangular grips are used for fastening to clothing.
To work you need paper, scissors, glue, colored pencils, markers or pens. The paper doll needs to be placed on a sheet and traced along the outline. It is important to outline the shoulders, waist, hips, as well as those parts on which the outfit will be “put on”.
Origami bed
Prepare a square sheet of paper 20x20 cm and another 10x10 cm. To prevent the craft from falling apart and moving apart, you should use paper of medium or high density.
- Fold the sheet in half from bottom to top.
- Expand.
- Bend the top and bottom sides to the marked line.
- Bend the upper and lower parts again to class=”aligncenter” width=”680″ height=”444″[/img]
- Partially open the workpiece.
- Rotate 90 degrees. Bend from top to bottom, a couple of centimeters short of the edge.
- Fold the top corners down, focusing on the nearest fold lines.
- Lift the top layer of the workpiece, focusing on the edges of the triangles formed in the previous step.
- Fold the bottom part to a horizontal line.
- Bend the bottom corners upward, focusing on the nearest folds.
- Unfold the bottom of the craft.
- When forming reverse pleats, fold the middle section toward a horizontal line.
- Fold the protruding rectangle inward.
- Bend the upper side corners down.
- Bend the top edge down a centimeter.
- Pull the workpiece to the sides, forming a voluminous bed.
- Fold the small square in half from bottom to top.
- Open, fold the top and bottom parts to a horizontal line.
- Open all folds.
- Unfold the workpiece so that the folds are vertical.
- Bend the bottom edge up 1 centimeter.
- Fold it again.
- Bend the sides down vertically.
- Place the bedding on the bed.
Franz Schubert wrote many of his works in bed. He spent a lot of time in it, since he didn’t have money for firewood, but he needed to warm up somehow.
Decoration methods
Decorating finished products is a separate stage in the production of paper furniture.
For finishing you can use:
- self-adhesive paper for furniture (it is easy to cut, and the adhesive layer will help you decorate the surface without any problems);
- acrylic, water-based or gouache paints mixed in a 1:1 ratio with PVA glue;
- fabric imitating the structure of furniture;
- glitter and stickers;
- colored tape;
- templates;
- ribbons, lace.
You shouldn’t limit yourself to just the options listed; to create truly original furniture you need to give free rein to your imagination.
Progress of the lesson:
At the last lesson , we made dolls, today I suggest you furnish their room with furniture so that our girls can relax. Tell me, what kind of furniture do you know ? What kind of furniture can be in the room?
Today we will all together make the following furniture for our dolls : a sofa, a wardrobe, a dressing table, a floor lamp, a table, chairs, a rug (we consider what parts it consists of, what shape it is)