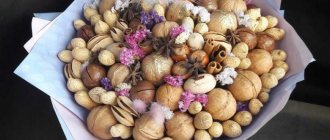
Bouquets of chocolates are beautiful, original and edible gifts that you can make yourself and present to relatives/friends for the holiday. Relatives will remember such a gift for a long time, they will be surprised by its uniqueness and such attention to their person.
Today there are many master classes for girls and boys, where children learn to create masterpieces from sweets. Such an exciting hobby helps children and adults to relax. And one of the advantages of this activity is that even if the process of making a bouquet turns out to be a defect, you can eat it with a cup of tea and not be upset about the failure.
The benefits of homemade bouquets
For the hero of the day or other gift recipient, such a gift will be very pleasant. For the master there are a number of other advantages:
- Possibility of adjusting financial investments as a gift.
- The master has the opportunity to independently determine the composition of the sweet bouquet.
- The choice of decorating part also belongs entirely to the owner of the original gift.
- A large assortment of models, as well as step-by-step instructions for creating a bouquet of sweets with your own hands for beginners.
- There is no need to study in special courses - a little dexterity and skill, improvised materials, office supplies.
Bouquets made independently will be appreciated by any birthday person.
Materials for work
It is better to carry out the work in a well-organized place where there is a source of high-quality lighting. You also need to prepare:
- Metal wire.
- Wooden skewers.
- Corrugated paper of various colors for decorative purposes.
- Adhesive tape.
- Wrapping paper.
- Cardboard or felt for making a flower pillow.
Candies, chocolates, lollipops - this component is chosen directly by the master, depending on the wishes of the hero of the occasion.
Practical tips for creating a bouquet
The decorative part of the gift bouquet got its name for a reason. There is no need to strictly observe the proportions and ornament of the flower bud. The most important principles to work with are to firmly secure the sweet surprises in the packaging, and also to give the bouquet a compact and stylish look.
You can use any material for decoration, but crepe is the most popular and accessible. Corrugated paper makes realistic buds, petals and inflorescences.
Corrugated paper roses: step-by-step manufacturing algorithm (2 methods)
The good thing about corrugated paper flowers is that they can be made in different ways. The material is very plastic and easily changes shape because there are several ways. Some people want to achieve more “naturalness”, while for others speed is important.
1 way (natural look)
For corrugated paper roses, it is better to choose paper of two or three very close shades. This will make the flower look more natural. For example, for the flower in the photo, white and crepe paper was used. The number of petals of different shades is arbitrary, as is their placement in the bud.
This is what you should get: very beautiful flowers made of corrugated paper
The manufacturing procedure is as follows:
- Cut out 8 small, 10 medium and large petals, and 8 more super-large petals. The quantity of pure white and crepe is halved.
- From green paper we cut out a long ribbon to wrap around the stem, several (4) leaves - long and narrow, which in real roses are located at the bottom of the flower.
- Use your fingers to give the petals a rounded shape. We straighten it from one edge, even turning the edge back a little. On the other hand, on the contrary, we twist it.
- We wind the tape on the wire. If flowers will be used in the arrangement, leave about 1/3 without ribbon - this will make it easier to insert them.
- We take the smallest petal and twist its lower edge around the wire. It should wrap the stem completely. The petal will be almost curled. Apply glue to the bottom part and glue the next small petal. Approximately half press one to the other tightly. From the second row, the force can be slightly weakened - the bud gradually opens.
- Next, using the same technique, add all the other petals in order: medium, large and very large. When we glue large petals, each of them covers only half of the “stem” with the petals twisted onto it.
- Glue the leaves last.
As a result, we get a beautiful rose made of corrugated paper. In this design it looks like a real flower. There is an easier and faster way (pictured below).
Method 2 (simple and fast)
We cut out a strip of paper 7-8 cm wide. You can make it uneven - narrower on one side, wider on the other. We fold it, starting from the narrow edge, like an accordion. The width of the “accordion” is 3.5 -4.5 cm. Cut out petals from the resulting stack at 2/3 of the height.
We wind the petals onto the wire (you don’t have to wrap it with green tape yet) starting from the narrow edge. As we roll, we give them shape with our fingers - stretch them on one side, press them at the stem. Having installed all the petals, we secure them with a thread (simply winding a certain number of turns). We adjust the petals, forming a bud.
You can quickly make a rose from corrugated paper
From green paper, folded like an accordion, we cut out long and narrow petals. Please note that their ends will need to be twisted, so they should not be so narrow (approximately 1 cm). We wrap the cut out petals at the bottom, under the petals, twist the leaves with our fingers, and then shape the stem.
Methods for assembling sweet buds
Working with crepe has a number of advantages, and one of them is the ease of assembling parts. There are several options for the master:
- Using a topstitch stitch. A long strip of paper is prepared from the crepe and a stitch is laid in the center. The blank is wrapped around the candy, forming a bud.
- Stitching petals around the surprise.
- Sewing the petals to the base (in the form of a cardboard circle or felt pillow) to which the candy is glued.
Sometimes in practice there are other methods: mounting on foam plastic, screeding with adhesive tape.
Note!
- DIY fruit bouquets - TOP-200 photos with instructions for creating a bouquet of fruits with your own hands. Unconventional ideas with simple diagrams and work overviews
Crocheted flowers: TOP-160 photos and step-by-step knitting pattern, review of finished products with your own hands. Crochet master class for beginners
- Paper lily - TOP 100 photos of the best product options. Master class with step-by-step diagrams and drawings for creating an origami lily with your own hands
Master classes on making bouquets
Any birthday person dreams of receiving an original gift, and the master has the opportunity to realize this dream using his creative potential. For those whose needlework experience is limited, there are detailed instructions and video tutorials on how to form bouquets with sweets.
The most famous models of gift items are:
- Bouquet of lollipops.
- Chocolates in packaging.
- Bright pineapple on the bottle.
- DIY gift bouquet of sweets and tea in a basket.
- Bouquet of roses with Raffaello.
- Tulips with truffles.
Each presented bouquet is beautiful in its own way, and delights the owners with bright colors and unexpected surprises inside the bud. Instructions for pleasant and high-quality work can be found freely available on various web resources.
Sweet card
Necessary materials:
- Glue
- Thick cardboard
- Sweets and chocolates
- Colored paper
We select the size of the postcard ourselves, fold the cardboard in the shape of a book. For the base, instead of cardboard, you can use the cover of an old book. We write wishes on two sheets of paper of the required size and glue sweets; you can use white or colored paper.
We wrap the card-book with colored or wrapping paper, secure everything with glue, and paste sheets of wishes and sweets inside the card. We decorate the outside with beads and appliqués.
A postcard can be given not only for birthdays, but also to coincide with a themed holiday. Candies can be wrapped in colored paper, then they will resemble gift boxes.
Handmade gifts always delight the heart and eye; they speak of a special reverent attitude.
Bouquet of lollipops
Everyone loves small delicious lollipops - from a child in kindergarten to an adult in the office. Giving a box of chocolates is too simple and does not have a festive spirit.
It’s a completely different matter to present a lush bouquet with a whole collection of fragrant candies. To work you need to prepare:
- Wrapping paper.
- Satin ribbon.
- A piece of foam.
Step-by-step guide on how to make a candy bouquet:
- The foam acts as a support in which the candy sticks are located.
- Plastic sticks are dipped into a small piece of foam, placing the elements of the bouquet close to each other.
- The sweets are wrapped in wrapping paper and tied with a satin ribbon with a bow.
In practice, another method is used - plastic sticks are tied with adhesive tape without using foam.
Note!
Crochet rose - diagrams and descriptions of how to crochet a rose with your own hands. Crochet technology + interesting craft ideas
- DIY edible bouquets - TOP 130 photos with instructions for creating a bouquet with your own hands. Creative ideas with simple diagrams and photos of finished works
- Craft primroses - simple instructions for creating crafts from scrap materials. Schemes of beautiful DIY products + photo reviews
Which bouquet is suitable for a newborn baby
When a baby appears in the family, relatives and friends congratulate the parents and give flowers. You can use an original idea and make a sweet bouquet. The composition will be intended for parents, or serve as a decoration for a nursery.
For a boy, you should choose light blue, blue and green colors for packaging the bouquet. Sweets can be chosen based on the preferences of the parents; some choose suitable sweets from the photo.
A composition of baby food (sweets that the baby will soon be able to try himself) will be unusual and practical.
To get a beautiful gift, you need to follow the step-by-step assembly instructions:
- Packages with fruit purees for children, marshmallows, and cookies are attached to the skewers using tape.
- The bouquet should be secured with ribbon;
- You can decorate the composition with a balloon; large helium balloons decorated with feathers or confetti look beautiful;
- Multilayer wrapping paper will add volume and make the composition solid.
A bouquet for a newborn boy should be delicate and made only from environmentally friendly materials. It is important not to take packaging materials with a strong odor; it is better to buy odorless components.
It is important to keep the bouquet in a cool place so that the components do not deteriorate or melt (if the bouquet is dominated by chocolates.
Multi-tiered bouquets are made using wooden skewers of various lengths. The short skewers are placed at the top, and the longest ones are left at the bottom.
Bouquet of chocolates
Birthday people with a sweet tooth will be very pleased to receive a real bouquet made from candy bars or chocolate bars. Instructions on how to make a beautiful bouquet of sweets with your own hands:
- Place a sheet of wrapping paper in the shape of a diamond on the table.
- Chocolate bars are placed on the bottom corner of the paper sheet.
- Wrap the bouquet, securing the edges of the package with a glue gun or tape.
For strength, you can wrap another sheet of crepe or illustrated paper over this base.
Step-by-step instruction
So, to make a candy piano, you will need:
- Actually, the candies themselves. For keys, oblong candies in white and black packages will be good. It’s great if there is an element of gold on the candy wrappers, then the festive piano will look more luxurious.
- For the base of the piano you need polystyrene foam (you can take regular polystyrene foam), superglue, thick and loose cardboard, self-adhesive paper (Oracal), or better yet, double-sided tape.
- Empty Actimel yogurt jars are best for piano legs.
- As additional decorations, you can give free rein to your imagination. Anything goes: flowers (real or artificial), ruffles, printed miniature notes.
Bright pineapple on a bottle
To create this masterpiece you will need a more extensive list of materials:
- Old glass bottle made of durable glass.
- Decorative mesh for attaching candies.
- Glue gun.
- Satin ribbons for decoration.
- A sheet of green corrugated paper.
- Scissors, needle, thread.
As a sweet part, Ferrero candies are perfect, the packaging of which is quite bright and suitable in color. Operating instructions:
- A circle of cardboard should be glued to the bottom of the bottle, slightly larger in diameter than the circumference of the bottle.
- Place the candies in rows around the glass base, attaching them using a glue gun.
- Place a decorative mesh over the candy rows. Its color and diameter of the elastic thread will not stand out against the background of yellow candy wrappers.
- For pineapple leaves, templates are prepared in the form of a narrow, long layout.
- Leaves are cut out from green crepe using templates.
- Using thread and a needle, sew the leaves into a small bundle.
- Place a bunch of leaves in the area of the bottle neck (on the cork or directly at the mouth of the bottle neck).
The pineapple can be complemented in an original way with a beautiful ribbon with a curly bow.
Christmas tree
With your own hands, you can create 2 main options for the base of a New Year tree bouquet: a cardboard cone and a bottle of champagne. Making a cone is simple: cut out a semicircle from thick cardboard, its radius will be the height of the finished spruce. Roll it into a cone and secure the edges with hot glue.
You can decorate the spruce with paper flowers, sweets and tinsel.
There are many options, but the materials are basically the same:
- sweets in bright wrappers;
- glue gun and rod;
- threads of artificial beads;
- green tinsel;
- figured caramel for the top.
The bottle should be wrapped in organza for better adhesion, and a piece of paper should be glued to the place where the sweets are attached with double-sided tape.
- The easiest option is to take a bottle and candy in a green wrapper. Starting from the bottom, attach them in a circle using hot glue. Place a caramel or a Santa Claus figurine on top.
- Place candies on a cone or bottle in the same way, alternating them with layers of green tinsel, which also needs to be placed on glue. It should look like this: a circle of sweets - a circle of tinsel.
- Attach the candies to the cone in a chaotic manner. Wrap the tinsel in a spiral around the cone, slightly covering the candies. Decorate with a string of artificial beads. Place the “Christmas tree” on top of a decorative bucket, the opening of which will be a couple of centimeters wider than the base of the cone.
- Take the jelly candies and remove them from the wrapper. Using an awl, make holes in the cone at a distance of one and a half times the diameter of the candy. Place the jellies on toothpicks at one end and secure them to the cone with the other. Do not use glue or tape.
Using the same scheme, you can make a Christmas tree from lollipops.
Bouquet of roses with Raffaello
A lush bouquet of crepe roses will delight any girl as a present. To work, you will need red or pink crepe, wire to create a stem, glue, thread, needles, and candy.
Instructions for making a simple bouquet of sweets with your own hands:
- For rose petals, you can use the bud rolling technique.
- A long strip 5-6 cm wide is cut out of red or white crepe.
- Line stitches are laid in the center of the paper tape and a free thread is left.
- Pulling the thread gives the tape a corrugated appearance.
A strip of crepe is wrapped around the prepared candy. The finished buds are placed on a wire stem. The bouquet is collected together, the lower contours are wrapped with adhesive tape. The last step is to wrap the bouquet in beautiful paper.
Simple tulip from Raffaello
A bouquet of tulips is a traditional gift for March 8th. However, their beauty quickly fades. To avoid disappointment, try making these elegant flowers from delicious candies.
To work you will need:
- candies;
- corrugated paper;
- floral wire;
- scissors;
- double sided tape;
- threads;
- tape.
Bend the end of the wire into a loop so as not to accidentally damage the candy.
Wrap it with tape and attach the candy.
Cut the paper into strips approximately 3 cm wide.
Cut each strip into 3 parts. Cut a thinner hole in the middle of each strip; this will make the petals more realistic.
Twist the strip in the middle. And then fold it in half, stretching it a little in the middle. Make 2 more petals this way.
Wrap the finished petals around the candy, placing them on top of each other. Secure them with thread and trim the ends. Wrap the base of the bud with tape for a more secure fixation.
For leaves you will need 2 rectangles 10*3cm. Cut out leaves of the desired shape from them; you can use a cardboard template.
Start wrapping the wire with tape.
Attach the leaves opposite each other and secure them with tape.
It turns out to be a beautiful tulip.
Using the same principle, make the remaining flowers in the quantity you need.
Sweet tulips can be collected into an elegant bouquet and decorated with ribbons, paper, bows - the perfect sweet gift is ready.
photo: Tatyana Riske
Tulips with truffles
The principle of making a sweet bouquet of sweets with your own hands is similar to the technique of creating a present of roses.
The method of assembling the bud is significantly different: instead of a single ribbon, parts for the inflorescence are prepared. The lower edges of the petals are sewn together with a thin thread, and the upper edges are glued together after attaching the candy.
