Lovers of needlework will appreciate such a necessary device as a pincushion. When working, it is important that everything you need is always at hand.
A convenient and functional needle bed will help you complete any work faster and more comfortably. Even those housewives for whom sewing is not a favorite pastime will appreciate a comfortable needle bed.
In addition to the fact that you will save money and time on searching for and purchasing a ready-made needle bed, you will be able to decorate your desktop with a convenient device.
By choosing the appropriate size and shape of the needle bar, you can make your work much easier.
The simplest pincushion-cushion
Do-it-yourself pincushion, photos, diagrams, master classes, very easy and beautiful - the Internet is replete with such headlines. Before mastering the production of complex models, you need to try your hand at something simple.
We suggest making a small pillow like this for storing needles. Procedure:
- Cut two square blanks from scraps of fabric you have lying around.
- Sew them together, remembering to leave a gap.
- Turn out the accessory, having previously made 1-2 notches in each corner.
- Fill with filler and sew up the remaining gap.
- Decorate the craft to your taste.
Other ideas
There are other needle beds that are no less original visually, but more complex in execution. Here are a few such examples:
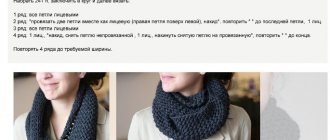
- Knitted. That is, instead of fabric, a knitted fabric is used, which is also created by hand.
- Cross stitched. An option similar to the previous one - a canvas is used on which a pattern or design is already embroidered.
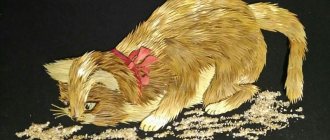
- Made in the form of any objects. For example, food, flowers, household items and the like.
- Rounded. The needles are stuck opposite each other on the sides of the product. This is convenient because as a result of storage they do not fall out.
It is recommended to use those materials to create the product that are convenient to work with. It is advisable to give preference to fleece, cotton, linen and avoid silk and acrylic. The fabric should not be too dense, otherwise it will be difficult to insert the needles. Instead of regular threads, you can use floss. It is worth choosing decorations so that they do not look bulky; this will interfere with the storage of needles.
There are many drawings and diagrams that tell you how to make a beautiful and comfortable needle bed yourself. You should not be afraid to experiment in your work. You can move away from any plan, bring in something of your own, embodying your own ideas and desires. It is not necessary to try to do what is shown in the pictures and photographs. It’s unlikely that you’ll be able to make something identical to someone else’s work, so you shouldn’t try to make a complete copy.
- Author: admin
Rate this article:
- 5
- 4
- 3
- 2
- 1
(2 votes, average: 3 out of 5)
Share with your friends!
Simple wrist pincushion
This is another easy pincushion. To create it, you will need:
- chintz or cotton;
- threads to match the fabric;
- Velcro;
- button;
- holofiber.
Follow the following instructions:
- Cut from the prepared fabric 2 circles with a radius of 5 cm and 1 strip 10 cm wide and a length equal to the arm circumference +3 - 4 cm.
- Place the pieces together and sew, leaving a hole. Trim the seams.
- Turn the product inside out and fill it with filling. Sew the gap by hand using a blind stitch.
- Using a needle and thread, pierce the center from the face of the craft, throw it over the edge and stick it into the center, but from the inside out, tighten it tightly.
- Repeat step 4 until you divide the workpiece into 8 segments. Decorate the center with a button.
- Fold the rectangle of fabric in half along the long side, tucking the edges inside, and sew it on a machine.
- Sew on the Velcro and the round pad you made earlier. A simple hand pincushion is ready!
Craft sewing techniques
A handy velcro pincushion is sewn quickly, in 30 minutes you can complete:
- Cut two identical circles according to the template and a rectangular strip of fabric the length of the wrist circumference with allowances for seams and clasp, approximately 15 cm, and a width of 6.5-7 cm.
- Sew from the wrong side, leaving an opening for filling.
- Turn right side out, fill with sealant, sew up edges.
- Forming a pumpkin. From the center, divide the pillow into 8 equal segments using a needle and contrasting threads. Make seams over the edge as shown in the picture.
- Sew a button in the center. Secure the end of the thread with a knot.
- Sew a rectangular piece of fabric from the wrong side. The result should be a fabric bracelet 2-3 mm wider than the bodice.
- Insert the grosgrain ribbon using a pin and sew along the edges.
- Sew Velcro on the ends of the bracelet. Instead of Velcro, you can make a bracelet with an elastic band.
- We attach the pumpkin pillow to the bracelet. You can sew it on, or you can use Velcro. In this case, the pincushion can be used separately.
- If desired, the pillow can be decorated with buttons, beads, ribbons, and bows. Our craft is ready.
Tip: if you use a sewing machine, sewing will take no more than 15 minutes.
Round pincushion in retro style
To create this item:
- Cut out a round piece of cardboard to the size you require.
- Attach the template to the selected fabric and trace with a pencil.
- Embroider the piece with thread or beads.
- Cut the fabric, not forgetting about the allowances.
- Pass the workpiece around the perimeter with a “forward needle” seam and pull it slightly.
- Fill the future product with padding polyester.
- Cover with a cardboard base, tighten the thread a little more and secure with a knot.
- Run stitches for extra strength. Cut a circle from fabric with a diameter equal to the diameter of the future accessory and glue it to the cardboard.
The photo of a retro-style pincushion shows that it can be decorated not only with embroidery, but also with lace.
How to make a “mannequin” pincushion: patterns, photos, job description
- The biggest problem is the stand. She must be persistent! You can use a thread spool, but only a wooden one. Or even metal lids for preservation, furniture handles with a thin hole diameter. In the latter case, then you should use a rod with the appropriate diameter, but you can take a pencil, a Chinese stick or a knitting needle for the axis.
Mini mannequins
Alternatively, use a candlestick. But take into account the dimensions of the future mannequin and the stand itself. Their length should be approximately the same - then the pincushion will stand and look harmonious.
- Let's start cutting out our mannequin.
Mannequin pattern
Note: To improve the aesthetic appearance of the mannequin, make a base for it. Cut out an oval corresponding to the bottom from thick cardboard and cover it with fabric. Then you sew it to the mannequin itself using hand stitches. And do not forget to first make a hole in the cardboard according to the size of the axis.
- We cut out the material according to the pattern, leaving seam allowances. You need to sew very carefully. First connect all the side seams, then sew the bottom. The product is turned inside out through the neck. Fill it with padding polyester, but not completely - before final stitching you will adjust the density.
Pincushion mannequin
- We thread our axle through the hole at the bottom. You can also secure the neck with cardboard or a cut pipe from a skein of thread (if it is made of paper). Another idea is to use a thimble covered with fabric. It is inexpensive, but it will significantly improve the silhouette itself. But consider the size of your mannequin.
- Be sure to fold the fabric! The easiest way is to tighten the neckline with thread. But in this case, it will need to be covered with tape or any decorative elements.
- You can decorate it at your discretion - for example, cover it with beads, ribbons, feathers, or make a hat, skirt, etc. Or you can even make an outfit. By the way, if you made the pincushion large enough, then you can show your clients your work in a miniature version.
Mannequin ideas
Important: To prevent the mannequin from sliding along its axis, wrap a thread or piece of fabric itself onto a stick (rod or knitting needle) in the chest and hips area! And be sure to apply glue!
Pincushion “Pumpkin”
Consider a master class on making a pumpkin-shaped pincushion:
- Cut two circles with a radius of 6.5 cm from the material, stitch, leaving a gap.
- Turn the piece inside out, fill it with stuffing and sew up the hole.
- Thread a needle and thread into the center of the pad and form 8 identical sectors, pulling the product.
- Decorate the middle of the craft with a button, a composition of flowers or beads.
Pincushion bracelet
Below is a simple technique for making a wrist pincushion from a plastic cover and elastic band:
- Make slits in the lid of a 5-liter canister according to the diagram.
- Insert the elastic, twisting the seam inside the lid and secure with glue.
- Secure the beautiful pincushion by sealing the side of the lid with braid.
Just three steps – and the needlewoman’s irreplaceable assistant is ready!
Note!
DIY gifts for February 23rd - a large selection of ideas for creating unusual gifts for Defender of the Fatherland Day
What to give a 2-year-old boy - a list of the best options for an interesting and useful gift (120 photo ideas)
- Papier-mâché - TOP 120 photo reviews of original products. Detailed instructions for beginners on creating beautiful crafts
What material to make the craft from?
The question often arises of what a pincushion can be made from. Any dense material will do. Agree that organza or silk, no matter how beautiful they look, will not work.
The reason is simple, we need a functional thing that we can use and admire. Therefore, we choose a durable, dense fabric so that thin and sharp objects do not fall through, but are securely fixed.
You can choose from calico, cotton, linen, flannel, jacquard, thick burlap of any color, depending on the chosen model.
Pincushion in the form of a sewing machine
Manufacturing instructions:
- Make a pattern for a fabric pincushion.
- Sew both base elements, attaching a piece of fabric to the upper edge of one of them - the core of the sewing unit.
- Sew one side first, then the other. Sew the stand.
- Turn the machine blank inside out and insert cardboard cut strictly to the size of the pattern.
- Fill the bottom and top of the product with filler.
- Sew the top of the pincushion to the stand.
- Insert one toothpick in place of the needle, place the second in the area where the spool of thread is attached. Sew the button in the area where the wheel would normally be placed.
Pictures of a homemade pincushion clearly demonstrate what beauty can be achieved with due diligence.
Ideas for inspiration on how to make a pincushion
The old life of the service Seamstress's notebook
Houses
Heart Cup of tea Cookies You can also make a miniature version of the sewing machine Masterpiece!
Pincushion hat
This work requires the use of the following things:
- cardboard;
- a piece of knitwear;
- holofiber type filler;
- vintage style ribbons;
- artificial flowers;
- glue, scissors, thread.
To get a hat pincushion with your own hands, you need:
- Cut a circle out of cardboard. The optimal diameter is 10.5 cm.
- Cut the fabric by cutting out two circles. The diameter of one is 22 cm, the second is 14 cm.
- Connect the fabric parts of a larger circle by inserting a cardboard blank between them and stitch, carefully draping the edges.
- Take blanks of a smaller diameter and place holofiber in the center. Next, first sew 4 edges that are opposite to each other, then all together.
- Connect the 2 parts of the product together.
- Decorate the hat with vintage ribbon and flowers, placing the entire decor on glue.
Pincushion “Donut” made of felt
“Donut” is a bright representative of do-it-yourself felt pincushions. To make such a thing, you need:
- Using the template, cut out the outer and inner circle in three pieces (two for the donut, one for the frosting).
- Make the frosting with a slightly larger inner cutout and rounded edges.
- Run a blanket stitch over all parts of the product.
- Using colored thread, run wide stitches across the glaze, imitating shavings.
- Using a joining stitch, connect the pieces together, fill with filling and sew up the remaining hole. The accessory is ready!
Types of seams
Several types of seams are used for hand sewing. They perform different functions. What seams are suitable in the process:
- straight stitches. Used for temporary connection of fabric. Indicate allowances;
- Bias stitches are suitable for temporary and permanent fastening. More durable;
- The lower parts of the products are hemmed with cross stitches. This preserves the appearance of the fabric;
- loop stitches for overcasting;
- special stitches for attaching buttons, loops, buttons.
Complex projects may require all types of stitches and lines.
Types of seams for hand sewing
Knitted pincushion in the shape of a cactus
Below we will outline the process of creating a crochet “Cactus” pincushion with a description and diagrams. Any knitted item has the ability to bring comfort to the interior. The accessory for storing needles is no exception.
A cactus made using knitting will be an excellent decoration for your workplace. It is crocheted, which must match its number to the selected threads.
For work, it is worth preparing yarn of 4 colors: green, brick, sand and black.
A small container for the cactus is knitted with brick and sand-colored threads. First, double crochet a circle that fits the size of the bottom of the pot. Next, the pot is tied along the side (without increases), which is knitted, alternating two rows:
Note!
- Kinusaiga technique - TOP-140 photos of the best ways to create crafts using the Kinusaiga technique with your own hands + instructions for beginners
- Do-it-yourself passe-partout - a master class with step-by-step do-it-yourself schemes. Making tips + photos of the best examples
- Decoupage with napkins: TOP-150 photos of ways to decorate with napkins. Simple instructions for beginners at home
- Row 1 consists of 3 sts. p., double crochets and a connecting post (knitted with brick thread);
- Row 2 consists of 1 st. p., double crochets and a connecting stitch (knitted with sand-colored thread).
Having finished knitting the pot, they begin to knit the cactus. Knit it crosswise according to the following pattern:
- 1st row – 20 in. P.;
- 2nd row – 1st century. p., art. b. n., half st., 2 tbsp. s n., 10 tbsp. from 2 n., 2 tbsp. s n., half st., st. b. n.;
- Row 3 and subsequent ones - knit with relief stitches similar to the previous row.
If you knit rows back and forth with embossed columns, you can observe the appearance of voluminous ribs, similar to those present in a living plant. The different heights of the columns serve the following purpose - to give the craft a spherical shape.
Having knitted the 28th row, the cactus knitting is completed by sewing the initial and outer rows. The product is filled with padding polyester through the bottom hole. Next, the plant is sewn to a knitted circle made of black yarn. Cotton wool is placed in a previously made pot and a blank with a cactus is sewn on. For greater effect, the pincushion is decorated with knitted flowers.
Pincushion made from CDs
This accessory looks incredibly interesting. At the same time, it is not difficult to make it at home. Everyone has unnecessary CDs. You will need two of them. The algorithm is as follows:
- Cut circles from the material. Their diameter should exceed the size of the disks by 2.5 - 3 cm.
- Sew the fabric blank to the disc using darning stitches.
- Embroider a flower arrangement on the second piece. Place the padding polyester between the disc and the material and sew as in step 2.
- Connect the covered discs, hiding the seam behind the decorative cord.
Although creating such beauty takes very little time, it takes some effort to ensure that the item turns out to be of high quality and neat.
Making a needle bed with your own hands is something any needlewoman can handle. You can use leftover materials, lace, braid, felt, yarn.
In other words, a variety of things can be used. By using your imagination, you can create not just a necessary household accessory, but a full-fledged work of art.