Every home has at least a couple of business cards. Various important can be recorded there , for example, the phone number of a friend, business partner, information about a taxi or a beauty salon, which a person can often use. In order not to waste a lot of time searching for the necessary cards, you should always store them in one place.
A business card holder is perfect for such purposes - it’s not for nothing that smart people invented it in their time. Some have an ordinary box adapted for these purposes - as well as for storing discount cards. Of course, both business card holders and credit holders are available for sale in many stores, but homemade things are always sweeter to the heart. It can be a beautifully designed box, or you can make a stylish little thing that will not just work as a stand for cards, but will also become a fashion accessory. It’s not difficult to make it yourself – the pattern is the simplest.
DIY desktop business card holder
On our website there are many master classes devoted to making various beautiful crafts from plastic bottles.
However, this is not the only material from which you can create decorative, as well as necessary things for home and everyday life. In this article we want to tell you how you can use old vinyl records and make an unusual desktop business card holder out of them. Agree, today almost every person has his own business card, making a wide variety of business cards in St. Petersburg (find out more, for example, at copy.spb.ru) and other cities is quite common and in demand. And all this is not accidental, because thanks to a business card, we manage to learn and remember a lot of useful information about its owner, and also easily contact him at the right time. However, a lot of business cards usually accumulate, and each time we start going through stacks of identical cards to find the one we need. To make this task easier, a do-it-yourself universal business card holder
, which is not difficult to create. To create it you will need:
- one vinyl record;
DIY business card holder
- description of work.
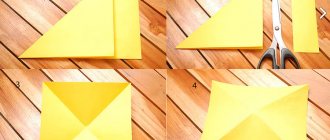
First step. To begin, use a ruler and color to divide the plate exactly in half and draw a corresponding line.
Second step. Next, using a hacksaw, carefully cut the plate into two parts.
Third step. Using a ruler and marker, make identical marks on both parts of the plate, approximately five centimeters long, at a distance of at least two centimeters from each other.
Fourth step. Then carefully make the cuts.
Fifth stage. All that remains is to connect the two parts of the plate to each other at a distance of four to five centimeters from each other. To do this, you can use any suitable parts made of wood, plastic or another plate. Just cut out two identical strips from it, one centimeter wide and eight to ten long, and bend their edges up, after heating them in boiling water.
You can also make your own phone case using one of our master classes.
Step-by-step description of different stands
Making a cardboard stand yourself is not difficult. If the material is not very dense, several sheets are glued together. Micro-corrugated cardboard is most suitable for such an accessory.
Corrugated cardboard is a packaging material consisting of glued layers of paper.
For pencils
Such a stand is a useful and necessary item for a desk so that office supplies do not get lost or scattered around the table.
You can create an individual pencil holder to suit your taste in an exclusive version with your own hands.
"Penguin"
A small cardboard box is required (volumes and sizes are determined at will): you can take a suitable one for juice (it is washed and dried). Cardboard cylinders will also work.
Next, the package is covered with paper of the appropriate size (black color - this will be the penguin’s body).
Pencil holders are a necessary and useful item for a writing interior.
Then templates are cut out of paper:
The eyes are also made from black paper and the beak from yellow paper.
All elements are sequentially glued to the appropriate places. The penguin pencil is ready.
Such beautiful products will decorate any surface and will keep your writing instruments in order.
From paper tubes
First they need to be prepared. For this purpose, newspaper or magazine sheets are taken. Using a regular knitting needle, twist the tubes. There should be a lot of them. Then the ends are secured with glue.
Next, the tubes are painted in the intended color and left to dry. The juice packaging is cut to the required height. The tubes are cut to the height of the future stand and glued along the perimeter of the blank box.
The stand for pens and pencils, which is shown in the photo, can be made in just a couple of hours.
Important! It is necessary to glue tightly, without gaps.
Allow the product to dry and then it is ready for use.
Pencil with flowers
A pencil stand can be made with flower decoration. To do this, you can take napkins (color - optional).
The napkin is folded in half twice. It is fastened in the center with a stapler. Using scissors, make the edges of the napkin wavy. Each layer must be lifted upward, while at the base you need to press a little.
A pencil stand will allow you to always keep writing objects at hand, rather than looking for them in the corners of bottomless desk drawers.
You can make several multi-colored flowers and decorate a ready-made paper pencil holder with them. Flowers are “planted” on glue, or secured on the bottom with tape.
For phone
It is not difficult to build such a stand. Such work will not take much time. This is a practical and easy option to make the device yourself. And, besides, do it - at any time.
The following is a step-by-step guide to the most interesting ideas.
Shell
No special instructions are needed in this case. The main thing is to get a suitable, large enough shell.
To work, you need glue, which, when hardened, turns into a plastic tight mass - the so-called. rubber or liquid nails. There's no such thing? Then acrylic plasticine is used, which does not stain anything.
A layer of glue is applied to the area where the phone will come into contact with the shell surface. If the “workpiece” is not stable, glue is also applied to the lower part for a stronger fixation.
The main thing is to find a suitable shell from which you will make a phone stand.
Additional Information! This hand-made gadget stand looks great and fits into any interior.
Wine corks
This is an excellent material for creativity. Therefore, you should not throw them away.
A smartphone stand made from this material will be environmentally friendly, comfortable, durable and very original: thanks to the unusual design itself and the decor.
If you have a few wine corks, a little glue, a knife and some free time, you can make a smartphone stand.
The corks are lined up and glued together.
First, the back wall of the gadget stand is made (the corks are glued together in a row, and the “second floor” is assembled in the same way). One “floor” is pasted onto the other. The back wall is ready.
Next, glue the front one. The bottom part of the stand is glued gradually. The plugs are placed one at a time against each other. Then the back wall is attached.
As a decoration, you can add thin twine or lace to the stand. Floss threads and other cute little things will also work.
You will get a unique stand for your mobile phone.
Bamboo chaise lounge
To make such a stand you need:
How to make such a stand step by step can be found here:
Upon completion of the work, you get a stylish and unusual accessory that no one will have. The stand can be presented as a present or to decorate your desktop.
The stand is made of bamboo - a beautiful and pleasant to the touch material.
Easy way
You will need a thick sheet of paper. Squares of 15x15 or 10x10 (cm) will fit a standard smartphone.
You must proceed as follows:
Now the stand is ready.
For the Easter egg
Now you can insert the Easter egg.
DIY business card holder: ideas and master classes
Do you have a lot of cards and want them to always be in order? Then they need to be organized by putting them in a place specially designated for them. We are talking about a business card holder. You don’t have to buy it for a lot of money, but you can make it yourself. In addition, a handmade item will be a wonderful gift for a dear person. A DIY business card holder can be made from fabric, leather, paper and other interesting materials.
Other ideas
It's easy and simple to make a pencil holder from toilet paper cylinders.
The advantage of paper coasters is that they can be made at any time, if necessary.
In this case, you will also need corrugated colored paper.
You must proceed as follows:
Now you need to work on the “platform” for the stand:
To decorate a stationery stand, you can cut out small flowers and glue them to a pencil holder.
You can make a phone stand out of paper and cardboard from any available materials.
Today in stores there is a huge selection of stands of different functionality: for paper, pens, pencils, phones, photos, etc. Of course, you can purchase them, but a more interesting option is to make a stand from paper, cardboard, other materials with your own hands and, thus way to express yourself creatively.
The manufacturing technique is simple, you just need to be careful and be patient.
We sew a business card holder
From thick fabric you need to cut out two rectangles the size of business cards (about 10 by 5 centimeters) and iron them. Now along one wide edge we bend the material a little and sew a stitch by hand or on a sewing machine. These will be pockets for business cards.
We cut out the front part of the fabric (about 13 by 10 centimeters) and iron it with an iron. We attach the pockets to it with needles on the sides. We sew a button on one side and a loop on the other. Now you can stitch the product along the edges. We straighten the corners from the inside, helping ourselves with a non-writing pen or pencil. To ensure that a hand-made business card holder folds well, we make a seam in the middle. If necessary, decorate to taste and place the cards in their rightful place.
Fabric business card holder without sewing
First, let's make blanks for the case.
- Two cardboard rectangles - one 13 x 9 centimeters, the other 13 x 3 centimeters.
- Fabric pattern (27 by 18 centimeters).
- Two pieces of foam rubber 13 x 9 centimeters and another 13 x 3 centimeters.
- Two double-sided scrapbooking sheets.
- Two narrow satin ribbons about 19 centimeters long.
You can also prepare decorative elements to make your own business card holder for discount cards more beautiful and original.
Let's make a crust for the crust. We glue the foam rubber and cardboard together. Place the resulting parts on the fabric with the soft side down so that there is a small distance between them (about 3 millimeters). We coat the cardboard with glue and fold the edges of the fabric over it, after cutting off the corners a little. The wrong side should be covered with scrapbooking paper. It should be two millimeters smaller than the crust. Therefore, if necessary, we cut and glue.
Now let's move on to the inside, where business cards will be inserted directly. We cut the scrapbooking paper into two strips and glue them together. There should be one long one. A handmade business card holder can be larger or smaller, just adjust the length of the strip in the desired direction. We fold it into an accordion with six sections, leaving reserves on each side. If you made a different strip length, then the number of pages will change accordingly. On each section we glue pockets or envelopes where the cards will be placed.
Now take the ribbons and trim the edges with a lighter. Glue them to the outside of the business card holder and cover them with a decorative element (a piece of colored cardboard, brooches or something else). The card case is ready.
Wooden business card holder
If you need all your business cards to be kept in a visible place at home, you can make a special desktop holder . You won’t be able to carry such a thing with you, but all the cards will be stored at home in a safe place. The best material for such holders is wood; a business card holder made of wood will not only serve its owner for a long time, but will also fit well into the interior . The next master class will tell you how to make an original wooden business card holder in the shape of a mouse with your own hands.
- Use a shovel handle or other rounded stick. Cut the stick to the required length. On the other side, cut off the rounded part.
- Along the body of the future mouse, make several holes at a short distance from each other. This is where business cards will be placed. Sand the holes with sandpaper to make them smooth.
- Drill a small hole in the rounded part with a drill, and then glue it to the sawed-off part of the body, making it completely oval.
- Cut out the wooden ears, making semicircular notches at their base, and sand the parts. Using a glue gun, attach the ears to the base.
- Make holes at the bottom of the body and insert four screws into them. These are the mouse's paws on which it will stand.
- Make a thin strip of wood, dip it in glue and insert it into the hole drilled in the back of the body. Now the mouse has a tail.
- If desired, paint the animal with acrylic paints.
To become the owner of a business card holder, you don’t have to buy it in expensive stores . There are many options for business card holders that you can make yourself, and often such products turn out to be more original and interesting.
DIY business card holder made of leather
We cut out a rectangle from leather, which, when folded into three times in size, is suitable for business cards. Unfold the piece and draw a line in the middle with chalk along the long side. Mark the location of the rivets on this line. Attach them to the skin.
Mentally divide the business card holder into three rectangles. Fold two of them together and make holes along the edges with an awl. Using a thick thread, sew one side and then the other. Secure the stitches well so that nothing comes undone during use. The business card holder is ready.
DIY express business card holder made from paper
Take a square sheet with a side of 20 centimeters and fold it in half. Now do the same with each half. Unfold the piece of paper; there are three fold lines on it. Bend all four corners to the sides. Now fold each half towards the center line.
Turn the sheet over to the other side. Along the bottom line of the triangle, fold the paper from one edge, then from the other. Slightly insert one half of the sheet into the other. Run your hand along the lines. The result is a square. Now fold the paper perpendicular to the inserted halves. You should get a rectangle, when you open it you will see pockets. You need to put cards in them.
Business card holder from a video card
If you are thinking about how to make a business card holder with your own hands in an unusual format, look for the part among the spare parts from an old computer. For example, you can use a heatsink from a non-working video card. Simply disconnect it from the motherboard and remove the thermal paste. Now the radiator can be used as a card holder. If you also decorate this creation, then no one will distinguish it from a purchased business card holder.
Something as simple as a case for cards will save you from constantly searching for them in your bag, apartment or office. Therefore, be sure to make your own unique business card holder.
DIY business card holder with wooden files: master class with photos
Of the countless options for a gift, the best will always be the one that is presented with love and will definitely come in handy in life. This is why handmade products have become very popular today. Simple things, for example, a business card holder, sewn and decorated with your own hands, can become not just a pleasant souvenir, but also a warm memory of the one who gave it.
Leather cardholder
Business card holders can be different; depending on your choice, they can have an insert with files or just compartments for cards. A stylish minimalist option that will surely appeal to both women and men is a leather “envelope” business card holder.
Working with leather can be daunting due to its apparent difficulties, but in reality everything turns out to be quite doable. A master class on making a cardholder from thin leather will help you understand all the stages of work. To work, you will need a rectangular piece of leather, which, when folded into three, is suitable in format for cards and business cards.
You can use any leather of your choice, the main condition is the softness and pliability of the material.
In addition, for work you may need tools that, if desired, can be replaced with those available at home: a mallet (hammer), a round chisel or a hole punch for leather and a soft lining, which, in turn, should lie on something hard, for example, on a cutting board.
Directly for sewing you need to prepare a rectangular piece of leather, two large needles, thread for stitching, a leather cord - it will serve as a fastener, double-sided adhesive tape, a stamp for embossing leather and a lighter. A leather embossing stamp is used to mark stitching lines. You can do without it if you secure the skin firmly so that it does not move and draw a line with chalk.
First you need to draw a center line along the leather blank and punch three holes for the future fastener, as shown in the photo:
Next, you need to fold the workpiece the way it should look in the final version. You will need double-sided tape to secure it in this position.
At a distance of 2-3 mm from the edge of the workpiece, stitching lines are drawn. This is done using a leather stamp or chalk.
The next step is to make holes along the stitching line; they can be made with a special chisel or, if you don’t have one, with an ordinary awl. In the latter case, you will have to ensure that the distance between the holes is equal, approximately 5 mm.
How to sew a convenient and cute holder for cards and money
Spring has come, just wait a little longer, be patient, work, and the time for vacation will begin.
To ensure that all documents, money and cards are in order and in their place during the trip, this holder will come in handy. The model is quite simple, it took me a little over an hour to do everything.
— fabric for the outside of the holder;
— fabric for the inside of the holder;
- fabric for the edging (maybe the same color as for the inside);
— leather clasp with a button;
The size of the finished holder when folded is 10*20 cm, when unfolded it is 20*20 cm.
For the outer part of the holder, we cut out a 20*20 cm square from thick fabric, dublerin and voluminous non-woven fabric.
We compact the fabric first with doublerin, then with bulk interlining. If the duplerin or interlining extends beyond the boundaries of the square of fabric, cut off the excess.
Now you need to sew two fastener parts on two opposite sides of the holder.
And a small detail with a button on the other side:
At this stage, you need to check that the fastener is sewn symmetrically. And the holder closed conveniently. That is, you need to sew not too far and not too close to the edge of the part.
Now let's start with the internal part of the holder. It is made from a single piece of fabric, measuring 20*101.5 cm. You can seal the part with non-woven fabric, then the pockets will better hold their shape.
All card and cash compartments will be created by folding the fabric according to the pattern shown on the pattern sheet. The solid line is the fold toward us, the dotted line is the fold away from us. Iron the folds.
The end result should be something like this:
That is, a square of 20*20 cm has folded at the very bottom, lies on the table, and the remaining folds have formed pockets.
We form compartments for credit cards, sew a part with pockets in the middle. At the beginning and at the end we secure the seam.
Now you need to sew the outer and inner parts of the holder. So that the inside does not “float” and the pockets do not move. Sew the piece around the perimeter using basting stitches.
Simultaneously with stitching the parts, we will sew on the binding. Since the piece is square, I cut out the trim not on the bias, but in a straight line. The length of the binding is the perimeter of the square 20*20 cm, that is, 80 cm + an allowance of 10 cm. I love double binding, so I take the width 5 cm. That is, the size of the binding is 90*5 cm
Let's prepare the binding for work. Cut a triangle at one end at an angle of 45 degrees. Iron the fold.
In order to hide the tip of the binding at the end, we sew, as shown in the photo, 4-5 cm from the beginning of the binding.
Then I fold the binding in half.
And we’ll start the main seam (which will run along the entire perimeter of the part) from the place where the front part of the fabric begins.
The end of the binding should go under the bevel, as in the photo.
From the inside, the stitched parts will look like this:
You can sew the trim on the inside using a machine; I sewed it with a blind seam.
Source
Decorative item
The beauty of decorating a business card is that you can let your imagination go free and create a real work of art with your own hands. Scrapbooking today is a very fashionable trend, which began to emerge in the 18th century as a way of designing personal albums. Modern scrapbooking is not limited to albums, and this can be seen in the example of making a cover for a business card holder.
To get started, you need to prepare the materials: thick cardboard for the cover, a sheet of paper for decorating the endpapers, fabric measuring 20x30 cm and a strip 7x15 cm. If you want to make the cover soft, you can take fleece or padding polyester; decorative elements of your choice.
The cover can be decorated using decoupage technique, it will look no less bright.
To begin with, prepare the base of the cover - two rectangles made of thick cardboard measuring 11x13 cm and one of less dense paper - 7x13 cm, for the spine of the business card holder. Processing of the spine begins with creasing about 3 cm wide, that is, with the application of longitudinal grooves, so that in the future the fold of the spine will be beautiful. Creasing can be done with a knitting needle.
Next, the parts that do not have creasing are coated with glue and fastened to cardboard rectangles, the base of the cover.
The upper part of the cover, on which the parts will be attached, is made from a rectangle of cotton with a print; if the cardboard is translucent and gives a dark tint, you can put a layer of white cotton or paper under the main fabric.
The fabric must be cut in such a way that there is an allowance of 3-4 cm. After this, you can decorate the prepared fabric to your taste.
Once the fabric is decorated, you can begin to combine the cardboard base and fabric cover. You can use double-sided tape to secure the fabric.
The cardboard base is placed exactly in the center of the fabric, the allowances are turned up so that the corners lie flat and do not stick out.
A narrow strip of fabric covers the spine of the future business card holder. For gluing, any transparent glue is used.
To begin working on the endpapers, you can secure the glued edges with paper clips.
Decorative paper with a pattern is used for the endpapers. Four rectangles are cut out: two measuring 11.5x10.5 cm are glued to the endpapers immediately. Holders for the insert of the business card holder are made from two 14x9 cm rectangles. To do this, fold 1 cm wide folds on the rectangles on three sides.
The resulting parts are glued to the endpapers like small pockets.
After the glue has dried, you can add files to the cover, and the business card holder is ready!
Business card stand: lesson idea
I can’t say that such a thing had any significant impact on sales. Yes, people noticed it, many liked it, especially children))) But it seems to me that such little things create an entourage, people remember them, and then, when they see such a “beast” somewhere again, they remember. In addition, in terms of time and materials it is not that expensive. But now a little ewe with horns looks at me every day