Many adults, thinking about their childhood, can smile remembering how much time they spent on creativity. Many parents are creative with their children and are constantly looking for new ideas to create the next masterpiece with their baby.
In order to have a great time with your child, or to prepare for an exhibition for a garden or school, you can create a charming penguin with your own hands.
There are a great many ways to make this northern resident. If you decide to diversify your leisure time by creating interesting and beautiful crafts, then this article is just for you.
What can you make a penguin from?
A craft or postcard with a picture of a penguin can be made from almost any materials:
- Colored paper;
- Cardboard;
- Plasticine;
- Plastic bottle;
- Clay;
- Empty cone cases
The easiest option is to find a penguin craft template, cut it out and glue it according to the instructions. You can complete the work with paints, felt-tip pens or colored paper.
Let's look at several options for beautiful crafts.
Paper penguin
If you like paper penguin crafts, then check out several ways that are available for everyone who wants to have fun with their children or on their own.
You don’t need to spend a lot of money to spend your time like this. The work does not take much time, but it is captivating and promotes friendly communication.
Making a penguin
- Draw an even circle on a black sheet. You can use a compass or a regular plate, turning it upside down. Place the plate on the sheet and simply trace it in a circle.
- Cut out the resulting shape with scissors. Then we divide the circle in half and divide it into two semicircle figures.
- From white paper we cut out 2 even small circles for the eyes. The pupils can be drawn with a felt-tip pen.
- The penguin's chest is white, so we take another piece of white sheet and draw a template on it: a rectangle with a rounded shape on one side. The white “apron” should not be larger than the black circle and slightly smaller in height.
- Cut out a small triangle from orange paper. The beak can be yellow, red or pink - depending on the mood.
- Wings for the penguin can be cut out from the remaining semicircle or take another sheet.
Important: Because The prepared template turns out to be even - two identical halves of the circle. Then you can make two birds at once.
Materials and tools for work
Craftsmen use a variety of materials to create crafts. You can always choose the option that does not require a trip to the store, because all the available materials can be found at home. These cute birds are made from gumboil, kinder surprises, egg trays, walnuts and much more.
Assembling a penguin from a template.
- We roll the black semicircle into a bag - a cone, so that the cut flat side serves as a support for the future toy. Glue the paper together.
- On the resulting “cap” we glue the prepared template of the breast, eyes and beak. Glue the wings along the edges of the cone.
Now you know how to make a penguin with your own hands.
Lesson #5
You will need:
- plastic yogurt or milk bottle;
- black spray paint;
- white self-adhesive film;
- acrylic paint black and orange;
- a piece of felt fabric 1.5 cm wide and approximately 30 cm long;
- rice or any other grains.
1. Coat a plastic bottle with black spray paint.
2. From an old newspaper or cardboard, cut out a template for the belly and muzzle of a penguin (a part in the shape of a number and redraw it onto a white self-adhesive film. Glue the film, in turn, onto the bottle. Make sure that the film sticks evenly. If bubbles form air, they can be pierced with a thin needle and then smoothed out.
3. Paint the eyes and nose with acrylic paint and tie a scarf around the penguin's neck.
4. Fill the bottle about a quarter full with rice or any other grain to give the toy stability.
Bottle craft option
For those who like DIY crafts, bottle penguins will appeal.
Perhaps these wonderful birds will decorate a child's bedroom or dining area. Craft material:
- 2 identical plastic bottles;
- Scotch;
- Scissors;
- Glue;
- Paints;
- Doll clothes, woolen threads, pompoms (optional)
A fun penguin craft from a bottle can be organized even at a children's party.
We recommend reading:
- Craft bullfinch: detailed description of how to make a bird with your own hands (115 photos)
Crafts from vegetables: 100 photos of the best crafts for children and a review of recipes for adults
- Craft ship: 120 photos, templates, drawings and step-by-step instructions on how to make a boat
This activity develops imagination and lifts your spirits. The description gives instructions on how to make one little penguin.
Lesson #1
In the first lesson we will learn how to make a funny penguin in a hat and scarf. You can knit them, make them from pieces of fabric, or just paint them!
You will need:
- 2 plastic bottles of the same volume;
- hot glue gun;
- acrylic paint (black, white and any other colors you like);
- primer;
- black CD marker;
- clear nail polish;
- wool thread and a piece of woolen fabric.
1. Wash and dry the bottles thoroughly. Take one of the bottles and cut off the bottom. Cut the second container in half. To work, you will need the bottom of one bottle and the lower half of the other.
2. To fasten the parts, insert one part into the other to a depth of approximately 2-2.5 cm. Mark the edge that needs to be coated with glue. Disassemble the parts again, grease the edge of one of them (the larger one) with glue (up to the mark), and “put” the bottom of the second bottle on top again.
It will be enough to apply only 4 drops of glue, while monitoring its temperature so that the plastic does not melt.
3. After this, apply a primer to the part and distribute it thoroughly over the entire surface - the primer is needed so that the paint adheres better.
4. Draw a penguin’s belly on a piece of cardboard and cut out the resulting template. Place it on the bottle and outline it with a black CD marker. Paint the belly white - work carefully so as not to smear the black outline. Apply 2 or 3 coats of paint.
5. Paint the penguin’s body and legs black. Wait for the paint to dry. If necessary, use a thin brush to correct the contour of the abdomen. Choose paint of any color you like and paint the penguin's cap with it, then decorate it with polka dots, snowflakes, stripes, etc. After that draw the eyes and beak.
6. Once the paint is completely dry, apply a thin coat of clear varnish to seal the result.
Make a pompom if desired. To do this, wrap several layers of thread on two fingers folded together. The more revolutions, the fluffier the pompom will be. Carefully remove the skein from your fingers and pull it through the middle with thread. After this, cut the loops and trim the protruding threads.
The finished pompom can be glued onto the penguin's hat. For the scarf, use a narrow piece of wool fabric - simply wrap it around the penguin's neck and tie it.
We sculpt from plasticine
Another masterpiece of a plasticine penguin craft will delight little artists with great possibilities.
First of all, these birds can be made in different sizes and colors. Secondly, plasticine penguins are bright and flexible. Thirdly, this is an excellent time for the whole family.
What do you need for sculpting?
You will need plasticine, a divider (plastic knife) and a craft board.
Don't forget to be in a good mood. Maybe you can invite your friends for this game and create a whole flock of funny penguins.
How to sculpt a penguin from plasticine
Prepare plasticine for modeling. You need 2 black buns of different diameters. More for the body and less for the head.
- Flatten the white plasticine and make a thin cake. It will be needed to indicate the breast.
- Orange triangle for beak
- The smallest “pancakes” are the eyes.
- Don't forget the wings. They will be 2 flattened sausages made of black plasticine.
- The hardest thing for a child is to make eyes for a penguin. It is best to press white plasticine directly into the black bun, rather than sculpting small buns separately. Glue black pupils on top of the white eyes - the eyes are ready.
- Between the eyes we designate a beak made of yellow, red or orange plasticine.
Take a larger bun and slightly stretch it to indicate the body.
Next we try on a white flattened “apron” on black plasticine.
Now you can connect the head and torso.
All that remains is to attach the wings. If you want to complement the picture, attach the penguin's paws to match the color of its beak.
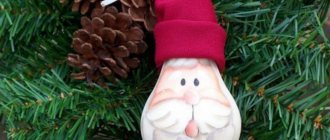
Master class No. 4
The fourth penguin is the most elegant and festive. It can become a New Year's decoration for your apartment and can be hung on the Christmas tree!
You will need:
- Aqua Pod plastic water bottle;
- glue;
- black glitter;
- an orange pom-pom with a diameter of approximately 1.5 cm and a silver pom-pom with a diameter of 2.5 cm;
- red and black felt fabric with glitter;
- two plastic oval eyes (20mm);
- acrylic paint (white and orange);
- hot glue gun;
- brush.
1. Using a brush, coat the surface of the bottle with glue. Leave the bottom of the bottle, the two “legs” of the bottle and the place where the belt will later be glued uncoated (approximately 5 cm in height and 4.5 cm in width).
While the glue is still wet, sprinkle black glitter on the toy.
Paint the belt and paws (“legs” of the bottle) white and orange, respectively, and wait until the paint dries.
2. Cut out two wings from black glitter felt and glue them, shiny side out, to both sides of the body using PVA glue or a hot glue gun.
3. From red glitter felt, cut out two pieces for the penguin's hat and glue them together. Glue the hat, bend the top corner as shown in the picture. If necessary, secure with a drop of glue. Glue a silver pompom to the tip of the hat.
4. Glue on the eyes and an orange pompom as a beak, first giving it a triangular shape.
Photos of penguin crafts
0