Many owners of suburban areas and summer cottages are faced with the fact that by the end of the season they accumulate a lot of unnecessary canisters and plastic bottles.
Such things should not be thrown away : from them you can create a wide variety of crafts for the garden, cottage or garage, which can perform both practical and decorative functions.
Most of these items can be built with minimal effort in 10-20 minutes, and they can make the area more interesting and original .
What canisters are suitable for crafts?
Depending on the characteristics, such containers are classified according to the following parameters :
- Volume – from 1-2 to 50-80 liters.
- Form. Canisters can be flat or rounded, oval, rectangular or square in cross-section, and have a handle with a lid.
- Color. Plastic products are most often white or translucent; there are also canisters in green, blue, red and other shades.
Containers for food products, water, fuels and lubricants, fertilizers, and other liquid products are suitable for creating decorative items and practical devices
Before you start making a craft, it is advisable to inspect the canister for damage, thoroughly clean and degrease it.
Preparation of material
The first thing to do is prepare the container. It doesn’t matter whether the canister is plastic or metal, it can be washed with detergent and plenty of water.
If there was oil in the container previously, you should add laundry soap and leave it overnight.
As for painting, acrylic is best. If you come across a durable container with thick walls, then you can use enamel. Paints such as spray paints are ideal for using patterns and various decorations.
Type of canisters
How to make a washbasin?
A 5-liter plastic container is optimal for creating a country or camping device for washing .
The filling hole of the canister will be used to fill it with water, and in the bottom you need to make a hole and insert a tap or valve.
To do this, you need to use a pair of seals in the form of rubber gaskets and a fastening nut so that water does not leak out and the tap is firmly fixed.
A finished washbasin or washstand can be hung on a crossbar , a hook, or attached to a vertical surface with a belt or even tape. You can insert a funnel into the filler hole for convenience: this way, when filling the canister, water will not spill onto the ground.
If you install a simple tap, you can adjust the pressure by turning the handle.
Mosquito trap
We make a mosquito trap from a two-liter bottle . The trap will attract small insects with the results of fermentation processes, namely carbon dioxide. To make it you will need:
- 1 gram baker's yeast
- two liter bottle
- dark fabric
- 50 grams of sugar
- 200 ml of water with a temperature of no more than 40 degrees
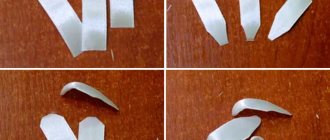
We begin production by cutting it so that the neck, upside down, fits tightly into the bottle and does not reach the water. Now that the container is ready, pour in sugar, yeast and fill it with forty-degree water, it should not be warmer or hotter. If the liquid is too hot, fermentation will not begin due to the death of the yeast bacteria. Pour the water slowly and stir the mixture. Now we insert the neck into the bottle like a funnel. To catch mosquitoes, the trap must be covered with thick fabric that does not allow light to pass through or with paper. Once caught in such a trap, mosquitoes will not escape. Insects will be caught in such a trap for up to a week, after which we will change the mixture.
Tip: After preparing the mixture, place it in a warm place.
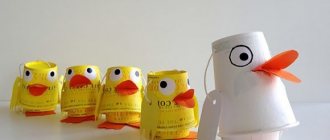
Master class on creating a swan
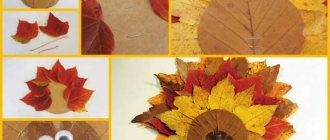
Bird sculptures for decorating suburban areas are often made of plastic. We present to your attention a small master class on making a swan from an old canister.
For this purpose you will need 5 liter containers . It is necessary to cut the product so that the body, tail and long neck are immediately cut out.
Then you need to prepare the wings from thick cardboard.
The neck should be covered with newspapers and tape , then do the same for the entire workpiece.
Afterwards you need to apply a layer of simple napkins and coat the future sculpture with plaster mortar.
As the surfaces dry, they are sanded, painted and decorated with additional elements (for example, the eyes of a bird can be made from colored stones or glass).
Lamp
You will need a little imagination. Add a regular canister and you have a beautiful, practical item that will look perfect anywhere.
Additional material:
- cartridge;
- cord for table lamp;
- Super glue.
First you need to cut off the top of the canister; it will not be needed later, but the bottom is a good blank. Choose the height of the product yourself and note in advance which one suits you. Next, your imagination should come into play. The container can be covered with: transparent fabric, lace, decorative flowers, or any other decor. You can also make several small holes in the plastic itself, thanks to which the light will become brighter. At the bottom in the middle, cut a slot for the cord to which you will need to glue the cartridge. That's all, the unique lamp is ready.
Flowerbed for the garden
Many owners arrange flower beds in the garden or front garden, and plastic canisters can be used for two purposes :
- Container for planting flowers . You will need to cut the product, turning it into two halves, and dig it into the ground, then pour the prepared soil with fertilizers inside and sow flowers. The canisters themselves can be decorated with colored paper, paint, or other methods if desired. In addition, the mini-flower beds themselves can be raised above the ground , as shown in the photo below: this is especially true if the soil is initially not suitable for specific varieties or is too wet.
- Fencing for a finished flower bed. This option is great for large flower plantings: canisters are dug in around the perimeter, blocking the plants. This design is more of a decorative nature . It is better to use colored containers of the same shade or alternate 2-3, then the fence will look aesthetically pleasing.
Separate the yolk from the white using a bottle
In the process of preparing dishes, the white or yolk of an egg is required separately . But they are not easy to separate, the yolk is very fragile and if you puncture it, it will mix with the white. You can cheat with a bottle. Crack the egg onto a plate, squeeze the bottle and bring it to the yolk. By unclenching, we will draw the yolk into it without damaging it. The method is suitable for preparing dishes whose recipe includes a lot of eggs, for example, the common French meringue dessert “Meringue”.
Tip: Rinse the bottle before use.
Plastic scoop
If the canister is small in size (1.5-2 liters), it can be used to make a scoop for cleaning or garden work .
You will need to mark the future product on the surface and cut it out; the handle matches the handle of the container. The bow can be made either triangular or square.
In the first case, the scoop is convenient to use for digging up plants with a small root system from soft soil, and in the second, for collecting debris.
Method number 4 - Using special attachments
The last method of creating a drip irrigation system will require you to spend a little more money, but at the same time it will save you from digging holes and working with nails and bottles. At your local garden supply store, you can purchase special dispenser attachments that can be screwed onto bottles (except five-liter bottles) instead of regular caps.
Watering cone on a plastic bottle
Prices for watering cones for bottles
watering cone for bottle
The container with such a nozzle is turned upside down and inserted into the ground at some distance from the plant stem.
An example of using a nozzle for drip watering indoor plants
This method is especially convenient when working with small crops or flowers.
Another variation of drip irrigation: only one hole is punched in the bottle, and a ballpoint pen is inserted into it. The writing tip is first removed, and the remaining ink is washed out with alcohol. The rod is directed to the area to be watered and fixed with garden varnish or simply plasticine.
Irrigation from below using a 2-liter plastic bottle
The original option is drip irrigation using droppers
As you can see, setting up a drip irrigation system from bottles in a greenhouse will not require much time and effort, and the results of the work will save you from a lot of hassle in caring for greenhouse plants.
Sprayer
A large capacity (10-30 liters) can be used for spraying plants with chemicals that protect plantings from pests.
The canister is equipped with a manual or electric pump for easy spraying. For carrying, you can attach a handle or straps to carry it on your back.
The hose, spray nozzles and boom can be purchased at any hardware or plumbing store.
A rubber nipple can be used to install the valve.
This sprayer is suitable for processing small vegetable gardens and front gardens; for larger areas an extension cord may be required.
Most often, a device made from a plastic canister is used to spray chemicals against pests, cabbage beetles, as well as mold and mildew. You can also use products prepared according to folk recipes, from soap solution to urea.
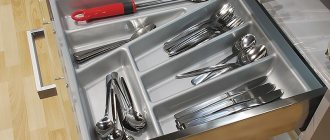
Tool box for garage
To create such a device, you can use canisters of different sizes; the choice depends on how many things you plan to put inside.
The most commonly used containers are 10-20 liters for water, food, chemical, and flammable products. The shape should be rectangular, with a handle in the middle at the top.
Manufacturing instructions:
- make a vertical cut on the side of the neck and handle, leaving the wall of the narrow part of the canister intact;
- bend the resulting “door”, opening the container. Inside you can place sections of plastic cups or boxes, or any other fasteners. In such a box you can store small items (nails, screws, paper clips, electrical tape, etc.) or tools directly (hammer, pliers, pliers, etc.).
To make the tool box more durable and airtight, the sides can be reinforced with metal plates , for this the walls will need to be drilled and secured with bolts and nuts.
Advantages and disadvantages of bottled drip irrigation
The structure of such a system is as follows: a plastic bottle with small diameter holes is dug in near each individual plant in the greenhouse. The bottle is filled with water, which seeps through small holes and nourishes the roots of the plants.
Organization of drip irrigation of tomatoes using plastic bottles
Important! Sometimes the bottles are not dug into the ground, but are suspended under the roof of the greenhouse near each individual plant. In such cases, it is important to ensure that most of the moisture does not fall on the leaves, but on the ground, directly at the roots.
The individual advantages of drip irrigation are discussed above, but what are the advantages of the scheme using bottles? They are as follows.
- Cheap . In fact, the system using plastic bottles is free - the main material for arranging drip irrigation can be found at home or purchased at a nominal price.
- Easy to create . Setting up drip irrigation from plastic bottles does not require any technical knowledge or special skills from you; absolutely anyone can do it.
- Simplifying the care of seedlings and plants in greenhouses - with such a watering scheme, there is no need to frequently visit the garden plot. Now you can go on trips for work and other needs, without worrying about the condition of the future harvest.
- When bottles are dug into the ground, water will not get on the leaves or flowers , which means that the problem of sunburn of plants is solved.
- Autonomy - unlike other drip irrigation systems that require a water supply and more or less constant pressure in it, drip irrigation from bottles only requires the water itself.
- supplied to vegetables, fruits and flowers has the same temperature as the air in the greenhouse, which has a positive effect on the condition and yield of some crops.
- Easy to repair or dismantle . If for some reason one of the elements of the system fails, then it is very easy to replace it - the bottle is dug out, and a new one is dug in in its place.
Methods for arranging drip irrigation from plastic bottles and other containers
But the system also has its drawbacks. The disadvantages of drip irrigation using bottles are presented below.
- The difficulty of creating such a system over a large area. Therefore, if you have many greenhouses, then it makes sense to think about another, more advanced method of drip irrigation.
- There is a risk of bottle holes becoming clogged, especially when used on soils containing large amounts of clay.
- Due to its primitiveness, such a system is not capable of completely replacing irrigation, so sometimes it will be necessary not only to add water to bottles, but also to supplement drip irrigation with the same watering can. For complete watering that requires a minimum of effort from you, it is preferable to use specialized drip tapes and dropper dispensers connected to the water supply.
Example of a simple drip irrigation system
Watering can
For such a product, it is optimal to take a canister of detergent or other products that has a slightly flattened shape and a comfortable handle .
It is necessary to thoroughly wash the internal parts from any remaining liquid, then drill thin holes in the lid. The optimal size is 1-1.5 mm. Just above the handle you need to make a larger hole for air supply: if this is not done, watering the beds will be more difficult due to the pressure difference.
If necessary, you can equip the watering can with a plastic tube, which can be purchased at hardware or plumbing stores: it will increase the spray range.
Filling the water is done through a plug; for this it is convenient to use a funnel or hose so that the liquid does not spill.
You can also cut a wider lid, then using a funnel when filling with a regular bucket is not necessary. However, in this case, you should ensure that when watering the plants, water from the watering can does not flow onto the ground through the lid.
Humidifier.
With the onset of cold weather, all possible types of heaters are turned on in every home, and at the same time the air in the rooms becomes dry , and we begin to experience discomfort. Headaches, skin problems, irritation of the mucous membrane and other inconveniences can be avoided by making a silent, simple, convenient and reliable room humidifier. For this you will need:
- Adhesive tape
- Scissors or knife
- Strip of fabric or lace
- Two liter bottle
- gauze fabric
Tip: By pouring essential oils into a container, we get an air freshener.
Instructions
- We make a 5×10 centimeter slot in the side of the bottle; errors are acceptable.
- Using strips or string, we hang the resulting bottle on the straight upper pipe entering the battery with the hole facing up and secure it tightly with tape so that the bottle does not jump out and spin.
- We fold the gauze several times to form a rectangle 10 centimeters wide and a meter long.
- We place the middle of the folded fabric in the hole, and wrap the ends around the battery pipe.
- Pour water into the resulting container and moisten the wound gauze, this is the maintenance of the device.
Creating a flowerpot
Hanging or stationary flower pots can also be made from plastic containers.
The canister can be cut in half horizontally , then process the edge with a medium so that it is not sharp: grinding will be required. After this, holes are made 0.5-1 cm from the edge into which a cord or rope of small thickness is inserted, fastened together, making an allowance of 20-40 cm (the size depends on what plant the pots will be used for).
Then a single suspension is formed; it can be made in the form of a loop. Flowerpots can be hung on hooks, wire, or nails.
If you plan to place the products on a stand, it is not necessary to make holes for fastening .
In any case, small cuts are needed in the bottom: they allow you to create a proper soil microclimate and remove excess moisture.
The surface of the finished flowerpots can be woven into knitted covers, decorated with applique or painted - an example of such a craft is shown in the photo below.
Drip irrigation - what is it?
Drip irrigation refers to a special crop irrigation system in which moisture drops into the ground to the roots of plants grown in a greenhouse. You can organize drip irrigation in the following ways.
DIY watering system
- Specialized droppers dug into the soil in the root zone of each individual plant.
Accessories for drip irrigation
- Drip tape spreading along plants in a greenhouse. One side of the tape is connected to the water supply, the other to the plug. When water is supplied, it slowly, in separate drops, seeps through the tape material.
- Sprinklers are special equipment that is not cheap.
- A homemade drip tape made from a rubber hose, in which many holes are made using an awl or something similar.
- Improvised droppers made from plastic bottles with many holes.
Scheme for using drip tape
Example of using sprinklers
Homemade drip tape from a hose
Drip irrigation from plastic bottles
In our case, the last option will be considered as the simplest and most inexpensive to manufacture. The creation of such a system will be described in more detail below, but now we will consider the general advantages of all drip irrigation systems.
- Saving water . Compared to a conventional hose or watering can, drip irrigation systems use significantly less liquid with equal or even higher irrigation efficiency.
- Reasonable moisture distribution . By overdoing it with watering the plants with a hose, a summer resident can turn the soil in a greenhouse into a marshy swamp. With drip irrigation this is not possible.
- Saving time . Any drip irrigation system - both connected to a water supply and autonomous - requires less maintenance time compared to traditional irrigation methods.
- By delivering water directly to the roots of plants, their growth is accelerated , and with such a system, the harvest in the greenhouse can be obtained faster. In addition, the roots of vegetables and other crops are not washed away.
- The ground remains mostly dry , and the air humidity in the greenhouse remains normal. As a result, the likelihood of weeds appearing and diseases developing in plants is reduced.
- Reducing the rate of soil depletion and erosion.
Wetting area for drip irrigation on different soils
Fishing box
For this purpose, you can use 20-liter oil cans; side pockets, if necessary, are made from smaller containers.
The canister is cut, leaving a height at which the fisherman can sit comfortably for a long time , and the cut is reinforced with an aluminum strip fastened with rivets.
Inside you need to place a partition made of thick plastic: it not only divides the item into compartments, but also serves as an auxiliary stiffener and prevents the lid from deforming.
The lid is cut out of a thick plywood sheet and attached to hinges. The upper part is usually covered with soft material for comfort .
A strap is attached to the sides of the canister so that you can carry the fishing box on your shoulder. The internal compartment for tools can be divided into smaller segments (for equipment, rods, donks, circles, etc.).
Basket
- Mark the height you need in advance and cut off the top of the canister.
- Then it is advisable to cover all the edges of the lower part with paper tape.
- In two walls closer to the top you need to make a couple of holes for handles from simple ropes.
- You need to stick ice cream sticks on the entire container except the bottom.
- Wrap the inside of the basket with cloth.
- Afterwards, cut out the bottom from plastic, which should also be wrapped in fabric and placed inside the product. For greater reliability, it is worth gluing it.
- Decorate the outside with any decor: flowers, beads, stones and whatever your imagination comes up with. Thus, you will get a beautiful and unique product that will be useful everywhere.
Final result
In this article, we looked at what crafts you can make from canisters with your own hands for your garden, cottage or vegetable garden. These homemade products are very simple and necessary for each of us in everyday life. You will not waste any of your efforts or additional resources during production.
It is important to remember that plastic is very harmful to the environment. Giving him a second chance is better than throwing him away.
In this list of ideas, anyone can choose the right solution for themselves. Try to do something with your own hands, because such a process is not only very exciting, but will also help develop the hidden creative talents inside each of us. Give free rein to your imagination, and you will come up with original products that will decorate your home and bring you benefits.
Related publications
- Read
Crafts made from cement - beautiful and unusual garden design
- Read
The most creative ideas for decorating your garden and vegetable garden - not like everyone else
- Read
Autumn treatment of the garden with urea
- Read
DIY garden decoration
- Read
DIY garden design
- Read
Drinking bowl for chickens
A device for providing poultry with fresh water can also be made from a 20-30 liter canister.
You will need to prepare a wide tray that does not allow moisture to pass through. Make slits in the bottom, then place the canister in the tray, leaving a gap of 1-2 cm between it and the bottom (for this you can make stands along the edge under the container).
The structure should be secured so that the water container does not overturn from an accidental push.
After filling, the liquid will flow evenly into the tray , from where the chickens can drink.
This drinking bowl for chickens is good not only for its simplicity, but also for the absence of the need to manually regulate the water flow.
Flowerpots
It is very easy to make such products: just cut off the top part and make holes in the bottom to drain excess moisture. The canisters are placed on stands, soil is poured inside and seeds or flower seedlings are planted.
Such flowerpots can be decorated or treated with moisture-resistant paint, or decorated with appliqué.
Most often they are placed on terraces and in gazebos, turning the resting place into a paradise filled with living greenery.
Laminating a glass jar.
We use glass jars for various purposes and have to mark them in all ways, but the inscription on the glass does not stick well, and the glued pieces of paper quickly become unusable, and to laminate them . With an industrial hair dryer, this problem will be solved forever, and the strength of the cookware will increase. If you break it, you won't have to pick up the pieces and cut your hands. Using your imagination, you can decorate the jar well. It’s easy to do, you just need one bottle of suitable size and color and a piece of paper with an inscription or design that we want to attach. However, there is a way to do without an industrial hair dryer.
Method one.
Cut off the top of the bottle and place it on the bottom with the cork facing up, then place the jar with the inscription on the cork, put on gloves and start heating the industrial hairdryer. When the hairdryer is hot, you can begin to gently heat the jar in a circle, without stopping in one place. You need to take a reserve, the plastic will settle both in width and height. When the jar is tightly sealed with plastic, cut off the excess and heat the angular parts again, if all parts have become even, the jar is ready.
Tip: Start heating the plastic from the bottom, gradually rising.
Method two.
Cut off the top of the bottle and place a jar with an inscription glued to the bottom. To heat the plastic in this case, we need a tall pan of water and a stove. The pan should not be full, otherwise water will splash onto the stove. When everything is ready and the water is boiling, we lower the bottle into boiling water and begin to turn it slowly, holding the neck of the glass jar with tongs.
Tip: Holding the jar at an angle will achieve the effect faster.
Raft of empty containers
This design is suitable for crossing a river, fishing, and mobile bridges on a pond.
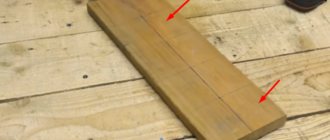
The frame of the raft is made from a 3-mm board, knocked down using nails or self-tapping screws .
A raft is made from empty canisters with a volume of 40-50 liters, they are attached to the frame with packing tape or a special darkened film.
The second option is interesting because it protects plastic surfaces from fading under the rays of the sun. The frame must first be coated with antifungal agents and varnish to protect it from rotting when in contact with water.
The finished structure can be equipped with the following equipment :
- mooring ladder;
- feeders for luring fish;
- seats, loungers;
- shelter from the sun;
- anchor.
Sprinkler for the garden.
One of the simplest ways to usefully use a bottle in a vegetable garden a garden sprinkler out of it , it couldn’t be easier to make. We attach a plastic container to the garden hose and make several small holes, then tightly seal the hose with the neck. This is how we made a garden watering system.
Tip: For convenience, use a square container or secure a round one with a weighty object.
Shower for the cottage
The procedure for creating such a design includes the following steps:
- Creating a pen . To do this, you can use a simple rope, passing it through the handle of the container and tying it around a tree or other structure where the shower will be attached.
- Installation of the nozzle . You should make many small holes in the lid, blow them out, then insert it into the container tap. The joint should be sealed to prevent moisture from leaking.
- Creating a shut-off valve that regulates water pressure. This product can be found in the plumbing department. Rubber seals will be required for installation.
- Arranging a lid where water will be poured. It is better to make it closed so that dirt, leaves and insects do not get into the canister.
- The side parts are covered with black electrical tape so that the water inside warms up faster: black walls absorb ultraviolet radiation better.