Tulips made from plastic spoons
You will need: 4 pairs of plastic spoons (for one tulip), cocktail straws, a disposable plate, a green plastic bottle, a wooden skewer, a candle and scissors.
Master Class
- Cut off the top of the spoon.
- Place the spoons overlapping each other over the candle.
- Form the bud in the same way.
- Cut out the blanks for the stamens from the plate.
- Attach them to a skewer.
- Cut a hole for the stem.
- Thread a cocktail tube through as a stem.
- Thread the skewer through the stamens.
- Cut a leaf from a plastic bottle and attach it to the stem.
- Make a whole bouquet of these tulips.
Let's make a rose together
Now we can begin. Work in a ventilated area.
- Light a candle, or work with a lighter, but this is not very convenient. Hold the spoon over the heat until it becomes soft and starts to become misshapen. Don't overdo it.
- Do not touch the hot part of the spoon with your hand. Use pliers. Shape the plastic into a rose petal shape by bending the top. Roll it almost like a tube, as this will be the middle.
- Melt the next spoonful. Make another petal. Each next one should be wider than the previous one.
- Shape all the spoons.
- Cut off the handles of all the petals except the very first one.
- Using glue, connect all the petals in the desired sequence.
Your rose is ready. You can paint it any color you like or leave it white.
Materials for working with crafts
If you have disposable spoons, forks or any other plastic utensils lying around, you should not keep them until a future picnic or throw them away because they may not be useful. It’s better to sit and think about what you can do with disposable tableware. Simple crafts for kindergarten can become your child’s first masterpiece. And family members certainly won’t be bored with such an activity. In addition, you can keep the product with your own hands and use it as some additional element to the interior or give such a creation to your loved ones on their holiday. All you need is:
In addition to the above examples, you can make other crafts using your imagination. The easiest way is to make flowers from plastic spoons, but if you decide to make your own invented masterpiece, then you won’t have to look for a photo of a sample, and this is already harder. You can make it using ready-made templates, for example, a lake with one swan or a whole family of these wonderful birds. By the way, your imagination can be completely unpredictable, so turn your ideas into reality!
All the characters you see in the photo have one thing in common - they were created using plastic spoons. This one for creativity allows you to work wonders!
What material is most practical?
Manufacturers offer a large selection of ready-made cutlery stands. They can be:
Each option has its own pros and cons. The plastic looks stylish, it washes well, and greasy stains are easily removed from it. The material is durable, resistant to moisture, and therefore does not deform. Among the disadvantages are fragility, rapid loss of presentable appearance, short service life. In addition, cheap plastic products can smell unpleasant. Only food grade plastics are suitable for making kitchen utensils.
Wooden boxes are environmentally friendly, durable, reliable, look aesthetically pleasing, and fit perfectly into the design of any kitchen. Their disadvantages are a decent cost and a high probability of deformation under the influence of constant moisture. Stands made not from wood itself, but from layered plywood, get wet and very quickly lose their shape.
Metal products are characterized by increased strength, resistance to mechanical damage, and are protected from corrosion, but they are an order of magnitude more expensive than their plastic counterparts.
Panel of forks
Fans of unusual decorative items will appreciate this craft. The panel looks like a flower, looks stylish and will decorate the interior.
@svoimi-rukami-club.ru
To work you will need:
- disposable forks (from 20 pieces, depending on the planned distance between them);
- old music records or CDs;
- colored cardboard;
- ribbons and lace, beads and artificial flowers for decoration;
- glue gun;
- scissors;
- acrylic paints (optional).
Making a frame is not difficult. The work consists of several stages:
- To see how the panel will look, it is recommended to place the forks around the entire circumference of the plate/disc before work. You can mark with a pencil the places where the forks will be glued. Only after this should you move on.
- The most important and painstaking task is gluing the forks onto the plate. This must be done carefully so as not to smear the glue on the surface of the future craft.
- When the previous stage is completed, you can begin decorating the panel with lace and ribbon. This is not difficult to do: one end of the tape needs to be secured with glue and intertwined with all the forks.
- Then the second plate is applied to the cardboard and traced along its contour. Next, a circle of cardboard is cut out and glued to the plate.
- The resulting blank is decorated as desired. After that, it is glued to the plate with forks.
You can glue an artificial flower or beads to the center of the finished panel, and on the wrong side it is recommended to make a loop from a thin satin ribbon.
Decoupage
This decoration technique is now experiencing its rebirth and is actively used almost everywhere, from furniture to accessories. Dishes are no exception, however, if during the Victorian era the most popular were sentimental stories about the love of a shepherdess and a chimney sweep, now the topic has expanded greatly. The decoupage technique is quite simple - you find a suitable paper image, cut it out and paste it on the desired surface. After this, you will need to “walk” over it with several layers of varnish. That's all, actually.
Of course, if you have the right desire, you can study various techniques of aging or imitation to suit any style - it all depends on how widely your imagination can swing. Decoupage will be an excellent solution if the interior of your kitchen is made in Provence or shabby chic style. And who knows, maybe you’ll start with dishes and end up, unexpectedly, with a cupboard...
DIY crafts from plastic bottles for the New Year
If you have accumulated a large number of plastic bottles, then they can be used as material for crafts for the New Year. You can make simple and original things with your own hands that will help you decorate your home in an original way for this beloved holiday.
By using your imagination and the additional decoration materials available in your home, you can create beautiful New Year’s crafts from plastic bottles.
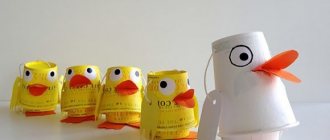
You can get these cute penguins from two plastic bottles
We use the bottom of one bottle as a hat for our penguin. When working, it is better to use acrylic paints, which will adhere better to plastic.
Using multi-colored plastic bottles, you can make beautiful apples, which can be used both for the New Year as decoration and on any other holiday.
Snow globe: craft from a plastic bottle
This beautiful and original New Year's craft can be made at home, all you need is the necessary materials.
You will need:
- Smooth plastic bottle
- Styrofoam
- Brush, glue
- Sequins, beads, sequins
- Acrylic paints
Cut off the top and bottom of the bottle. Leaving only a straight section of the container.
We prepare a composition that needs to be placed on foam plastic, pre-cut to the diameter of the bottle.
We carefully fix the foam with our composition at the bottom of the bottle using glue.
The upper part can also be covered with foam plastic and decorated with artificial snow, sparkles, and ribbons.
These funny snowmen can be made from kefir bottles
If you have a lot of identical plastic bottles, then you can use them to make an original wreath for the door. In this case, you will only need the bottoms of the bottles. in which you need to make holes and string them on a tight rope.
If you want an original decoration for the holiday table, then you can make these beautiful candlesticks using plastic bottles. If desired, they can be painted with acrylic paints.
You can make a fabulous New Year's house from a 5-liter plastic bottle. painting it completely with paints.
Interesting candlesticks for a romantic dinner
Candlesticks are rarely found in modern apartments. And the candles themselves have been on the shelf since Soviet times, rather out of habit, in memory of those times when power outages for 2-3 hours were the norm. But for such cases, an ordinary jar lid is also suitable, which cannot be said about a romantic evening. If you are planning one, but the candlesticks in your apartment are bad, you can make them. 3 forks are used for these purposes (per 1 candelabra). Using pliers, we bend the utensils at an angle of 90º at the base of the teeth, after which, putting all three forks together, we tighten them (not very tightly) using any thread. It is best to use wool threads of different colors if more than one candlestick is being made.
Curved forks are stacked and tied with woolen thread
Now, if you turn them towards each other, you will get a very interesting candlestick that clamps the candle with its own weight. At the same time, the product does not look ridiculous. Rather, on the contrary, the candlestick will be regarded as an unusual and stylish designer accessory.
Stylish candlesticks that can compete with designer items
Crafts from plastic spoons and forks - Manual “Theater on Spoons”
Publication “Manual “Theater on…” Manual “Theater on Spoons”. Goal: introducing preschoolers to theatrical activities. Puppet theater plays a huge role in the moral and aesthetic education of preschool children. Theatrical and play activities of children are important both for the development of cognitive activity and...
Image library "MAAM-pictures"
Master class from waste material “Fan of forks”
Today I want to tell you how you can make a fan from disposable forks. Such a fan can be used as a gift for any holiday or to decorate your home interior. The word “fan” comes from the verb “to win” - “to blow, to blow with a breath.” There are several legends...
Master class “The second life of waste material. Making dolls from plastic spoons" Master class "The second life of waste material. Making dolls from plastic spoons" Hello dear colleagues! I would like to share my experience of making dolls from plastic disposable spoons. We all know very well the enormous harm plastic causes to our...
Master class on crafts made from a plastic spoon “Funny Bunny”
Master class “Funny Bunny” Subbotina Tatyana Mikhailovna. On the topic “Wild Animals”, I propose to make a funny bunny with children 3-4 years old. For this craft you need: plastic disposable spoons, cotton pads (three for one bunny, scissors, glue - pencil, marker,...
Crafts from plastic spoons and forks - Master class on plasticine printing on spoons
Article “Master class on plasticineography on...”
Modeling is one of the favorite types of visual arts for children of all ages. Modeling develops imagination, fantasy, fine motor skills, spatial thinking, develops coordination of both hands, helps to understand and remember colors, shapes of objects, obtain...
Master class “Teaching playing on spoons” Master class by Liliya Gennadievna Gudzenko, music director of the highest qualification category “Teaching playing on spoons” Introduction of innovative experience “Teaching playing on spoons as a means of developing the speech motor sphere of children” Form of delivery: pedagogical workshop….
Master class “Teaching playing on spoons” Master class by Liliya Gennadievna Gudzenko, music director of the highest qualification category “Teaching playing on spoons” Introduction of innovative experience “Teaching playing on spoons as a means of developing the speech motor sphere of children” Form of delivery: pedagogical workshop….
Master class “Theater on Spoons” for children of the first junior age
Master class “Theater on Spoons” Master class of didactic games for theatrical activities based on the fairy tale “Zayushkina’s Hut” for children of the first junior age Albina Nurpeisova Master class is designed for educators and parents Purpose: for theatrical…
Pages: …
The process of creating kitchen utensils
How are spoons and forks made? To answer this question we need to understand what we are dealing with. Production stages:
- Multi-cutter. The first step is to select the thickness and type of future blanks. Next it is cut out. In most cases, stainless steel is used.
- Stamping. Next, the main goal is to give the final shape and finish.
- Polishing. Finally, ideal smoothness of surfaces is achieved. First, the product is polished on machines and then by hand.
Tulips
The easiest way to make tulips. Especially if you are new to such experiments.
You will need:
- Plastic spoons (5 spoons for 1 product);
- Colored paper (corrugated);
- Glue, scissors;
- Green electrical tape;
- Cocktail tube.
Cut equal, even squares of colored paper. Wrap spoons in them and seal them so that they resemble tulip petals. Pre-cut the legs of the spoons.
Even a child can do what is described. Save all children's crafts (even unsuccessful ones) from plastic spoons: over time, you will be curious to track the progress of the little inventor.
Pineapple made from plastic utensils
An original piece of decoration in a child's room. It is easy to make, practical and fits into almost any room interior. To make it you will need: an oval lamp, a glue gun, spoons, yellow gouache, a knife, green cardboard, a bottle.
We cut out a cylinder from the bottle, cutting it off on both sides. We paint the devices in a yellow shade, after cutting them and leaving only the top side. We take the deep sides of the tools and attach them to the bottom row.
Glue another layer to cover the gaps between the petals. Thus, we glue the entire bottle. We make leaves from green cardboard and glue them to the base of the bottle. Finally, place the pineapple on a suitable lamp.
Tips for choosing
Of course, each kitchen has its own organizer for storing all kinds of utensils; in this matter, the housewife is guided entirely by her own taste. However, there are general rules for selecting the optimal liner for cutlery:
Drawers containing technical oils and chemicals cannot be used for kitchen utensils. It is unacceptable to purchase products that emit a persistent unpleasant odor. It is also hazardous to your health to store cutlery in sections painted with toxic dyes.
Interior decoration
To make these decorations look better, you need to purchase colored devices or paint them only with spray paint. This way there won’t be streaks left on the spoons from the brush. Below are described in detail 2 options that are easy to implement.
Sunflower mirror
This craft is suitable for decorating a kitchen, bathroom or nursery.
What materials and tools are needed:
- small round mirror (10-15 cm in diameter);
- thick cardboard (a box from under household appliances will do);
- pencil;
- scissors;
- glue gun;
- glue Moment;
- yellow and black spray paint;
- 80 white spoons or 16 black and 64 yellow;
- screwdriver.
Crafts from plastic spoons, forks - a mirror in the shape of a sunflower
Step-by-step instruction:
- Draw 2 circles on cardboard: 25-30 cm in diameter and 5-7 cm in diameter. Cut circles with scissors. Determine the center of the large circle and glue the small one to this place, then find the center of the small circle and glue the mirror evenly.
- Paint 16 spoons black and the rest yellow. If the dishes are already painted, then simply cut off all the handles under the base.
- With the concave side up, the black petals need to be glued to the cardboard with a glue gun so that the bases of the spoons fit into the gap under the mirror, which was formed due to the small cardboard circle.
- Glue all the yellow spoons in a circle in a checkerboard pattern so that they cover the gaps between the petals in the previous rows. The bases of each of them should not be visible.
To hang a mirror on the wall, you need to make a hole on the back side with a screwdriver, closer to the center. The cardboard is thicker in this area due to the small circle. Now you can “stick” the mirror onto the nail.
Clock for the kitchen or cafe
For this craft, disposable utensils do not need to be cut or deformed. It is the original shapes that will help you create a kitchen-themed watch.
Crafts from plastic spoons, forks - watches
What you will need:
- a small round watch with a flat frame around the dial;
- A4 office paper;
- compass;
- pencil;
- scissors;
- 10 disposable forks, 10 knives and 10 spoons;
- glue gun;
- a handful of small pasta in the shape of a wheel;
- spray paint.
How to design a watch:
- First of all, you need to protect the dial glass from glue and paint. Using a compass on paper, draw a circle equal to the diameter of the glass. Cut out and apply to the dial.
- Glue cutlery to the frame in a circle, alternating them (fork, knife, spoon).
- Glue the pasta in a circle, separating the handles of the cutlery from the glass.
- Hold a piece of paper and spray paint onto the clock.
It is important that all parts are well coated with paint, so 2 cans may be required
Vases, candlesticks, lamps
Crafts made from plastic spoons can be not only decoration, but also become part of a functional and useful item in everyday life.
Such products can be given to friends and family as gifts. Below are 3 interesting ideas described in detail.
Multi-colored flower vase
You can put artificial and fresh flowers in such a vase.
Materials and tools:
- stationery knife;
- scissors;
- transparent plastic bottle;
- 75 spoons of different colors;
- spray paint in 3 or more colors (if only 1 color is available);
- glue gun.
Crafts from plastic spoons, forks - vase
Step-by-step instructions:
- Paint all the spoons different colors and cut off the handles, leaving 1 cm.
- Using a utility knife, cut off the neck of the bottle so that a straight part remains.
- Cover the bottle with spoons in several rows, from bottom to top. Devices should be placed with the convex side outward.
In the last 2 rows, spoons need to be glued with their concave side facing outward. You should end up with a vase with widened edges.
Candlestick in the shape of a water lily
A craft made from plastic spoons will serve as a candle holder for mini-candles in an aluminum sleeve.
What you will need:
- 1 tin can;
- small saucer;
- scissors for paper and metal;
- hammer;
- green spray paint;
- 5 large spoons and 5 small ones;
- glue gun;
- 1 candle in a sleeve.
Crafts from plastic spoons, forks - candlestick
How to make a candlestick:
- Cut off the neck and bottom of the tin can. Then cut it lengthwise on one side, turn it over with the curved side up and beat it with a hammer to get a straight sheet of tin.
- Place the saucer on a tin sheet, open the scissors and circle it with the sharp end. Carefully cut and paint from the balloon.
- Cut off the handles of all spoons, leaving 1 cm ends.
- When the paint on the tin circle has dried, you need to place a candle in the center and paste large spoons around it. Their concave side should face up. The handles of the spoons are the bases of the petals. They need to be positioned so that there is about 5 mm of free space left before the sleeve.
- Glue small spoons on top in the same way.
The candlestick is ready. The distance between the sleeve and the plastic is necessary so that the spoons do not melt from the heated candle.
Pineapple table lamp
This craft is much more difficult to make than the previous ones. You will need at least minimal skills in working with wood and electrical appliances.
Crafts from plastic spoons, forks - table lamp in the shape of a pineapple
Materials and tools:
- a circle cut from a thick plywood board (diameter 10-15 cm);
- a piece of plastic pipe (15 cm) or an aluminum sleeve from a cartridge from a toner printer;
- wire with a 1.5 m plug (can be cut from an old extension cord);
- drill and feather drill equal to the diameter of the pipe or sleeve;
- lamp socket;
- LED lamp;
- transparent bottle with a volume of 3 liters;
- sandpaper;
- wood varnish;
- 4 silicone legs for the stand;
- green felt;
- thread and needle;
- 100-150 yellow plastic spoons;
- yellow spray paint;
- glue gun;
- thick wire 50 cm.
Step-by-step instruction:
- Drill a through hole in the center of the wooden circle with a feather drill. Use sandpaper to sand the edges and entire surface of the future stand. Cover the circle with varnish on top and let dry. Glue silicone feet to the bottom.
- Paint the pipe or bushing from a can and let it dry. Then coat 1 end with glue and insert it into the hole on the stand. It is important that the edges of the tube do not stick out from the back side.
- Cut off the bottom and neck of the bottle. Make a frame from wire. Which will hold the bottle in a canopy. It can be shaped into a spiral and fixed with glue on the tube so that the hole remains open.
- Pass the wire under the stand and pull it out of the tube. Connect to the cartridge. Glue the cartridge to the tube with hot glue.
- Place the bottle on a wire frame and secure it with glue, coating its lower edges on the outside and inside.
- If the spoons are white, then they need to be painted. Cut off all handles to fit the base. Then glue them onto the bottle in rows, staggered. The convex side should be the front side. It is important to attach each spoon with an overlap. In the widest part of the “pineapple” they should overlap each other more strongly, and when the shape begins to narrow, on the contrary, you need to glue them a little further.
- The leaves are made from felt. First you need to cut out a circle with a diameter slightly larger than the bottle and trim the edges so that they resemble sharp pineapple leaves. Make a small hole in the center.
- Cut long leaves separately (5-6 pieces) and sew them at the bottom, gathering them into a bundle. Insert into the hole on the circle from the previous point and carefully glue the ends.
The felt should form a cover that can be removed and replaced with a lamp if necessary. It is important to use only LED lighting, otherwise the plastic will heat up and deform ; besides, ordinary lamps are a fire hazard, as they get very hot. All that remains is to screw the lamp into the socket and the lamp can be used.
You can make simple crafts from plastic spoons and forks with your own hands. The material is very cheap and easily available. If you use your imagination, you can come up with an endless number of useful things that will decorate your home and more.
Other options
If your CD is not scratched, then you can not hide it in cardboard and glue it entirely, and then simply decorate it.
You can use satin ribbons more densely, and fill the free space with them in a checkerboard pattern.
By the way, here is another version of the New Year's fan. A typical attribute of this holiday is used - tinsel.
There are colored forks in stores, so if they match the chosen color scheme, feel free to use them.
In general, when it comes to decorating the fan itself, you can use all the techniques you know. For example, very elegant flowers are made from satin ribbons; the method of creation is called kanzashi. If you have the skills to work in this technique, you will find another use for it, and if this is new to you, you will acquire new knowledge.
As you can see, creating the base of the forks is, in principle, simple and monotonous. But decorating the product will allow the craftswoman to demonstrate all her knowledge, skills and imagination. Ribbons, lace, various yarns, beads, beads, rhinestones, feathers and much, much more - everything that is at hand can become part of amazing creations. And believe me, no one can pass by such creativity indifferent.
New Year's panel on the window
Usually, such words usually mean plot compositions on the window, where a whole New Year's fairy tale is played out. Here is Santa Claus riding in a sleigh, here are cheerful snowmen frolicking, and the Christmas tree is covered in snow.
You can decorate the window with snowflakes, hand-cut from paper or an entire New Year's composition.
How to glue such a panel onto a window:
- Arm yourself with an ordinary brush and liquid soap; you can simply smear the parts on the back with soap and glue them to the window;
- There is another interesting method where milk is used instead of glue;
- As an option - starch paste;
- If all else fails, you will have to use narrow tape.
And the snowflakes themselves and other New Year’s figures can be printed on a printer by downloading a sample from the Internet, and then cut out with a stationery knife.
Ladybugs made from plastic spoons
You will need: plastic spoons (3 spoons for one cow), black, white and red paints, brush, black buttons or lids, plastic bottle caps, glue gun, scissors.
Master Class
- Cut off the handles of plastic spoons.
- Paint one spoon black.
- Paint 2 spoons red and draw black dots.
- Paint the eye buttons with white paint.
- Glue 2 red spoons on top of the black spoon.
- Glue the button.
- Make the required number of ladybugs.
I recommend watching the video master class!
How to make a pineapple from plastic spoons to decorate your summer cottage
Watch this video on YouTube
Components of decor
Shade
We take an old lampshade as a basis and hang the devices on thin chains.
dream Catcher
Spoons and forks must be fastened with threads. To make the product beautiful, it is better to organize two rows - top and bottom. Each row consists of six starting materials.
Panel
Kitchen utensils are painted in a bright, rich color and are also attached to the canvas.
Chandelier
This product requires a large amount of raw materials. They are connected at the edges of the chandelier thanks to pendants.
Kitchen wall decorations
It is necessary to apply matte paint to the dishes. Fix the composition on the canvas.
Elegant forks
The basis for the work is the cutting. Care and skill must be exercised when producing the product. The idea is to twist the teeth with pliers.
What to stock up on and where to go next
There are a lot of ideas for making various crafts from plastic spoons. As a rule, most of these products will require basic elements: the spoons themselves, cardboard, glue, sometimes paints or colored paper, scissors.
You can start making crafts without worrying about where to “attach” the craft later - thanks to the convenience of the material itself, any product will be so cute and original that acquaintances, friends and relatives will be happy to receive such a gift.
In addition, such crafts are often used in everyday life, to decorate a house or a summer cottage. On a well-kept lawn or vegetable garden, crafts made as flowers are most often used - this way you can give the plantings a beautiful accent. And for the New Year holidays, plastic spoons will provide limitless scope for creativity.
Separately, it is worth noting those types of crafts that can be functional in nature and useful in the household. Perhaps this is a significant advantage for any craft, because usually the result of creative success does not find a place in the house and is safely forgotten or thrown away.
Drawing cutlery
Many people love to draw, so why not depict on canvas or paper what surrounds us every day. The drawing of a fork and spoon is another option for the flight of creative thought. Pens, pencils, crayons, markers. You can take all this in your hands and depict what is part of our life, what we encounter three times a day, at breakfast, lunch and dinner.
Making fans and plastic forks
In order to make a fan from plastic elements, you must first make crafts from spoons and forks with your own hands, at least in the amount of 2-3 copies. As a result, you will gain basic skills in working with plastic, which will allow you to make very complex products from it in the future.
Necessary elements for making a fan from plastic forks
In order to make a fan from plastic forks, you will need the following set:
- plastic forks including 30 pcs.;
- ribbons and lace;
- cardboard;
- glue, scissors, and a used CD;
- glue or glue gun.
Glue must be applied only to the part of the fork handle that will be glued
Appropriately, such crafts from disposable forks can be made using various techniques. So, such fans can be decorated in the kanzashi style, which will make them unique and original. As a result, you will be able to use them not only to decorate the premises, but also, for example, as an accessory at a carnival.
So, for the base you will need to take cardboard and cut a circle out of it to the size of a CD. Then it is cut in half into 2 equal parts, which are then glued together with the support of glue or a glue gun.
You can decorate the fan using satin ribbons
The next step will be to outline a semicircle inside the disk on cardboard. It will base the border up to which the plugs will stick. First, they are glued to one part of the semicircle. To do this, take twenty-four disposable forks, which are first glued together with their lower parts. From above, the body part of the forks is closed by the second part of the semicircle.
A lace ribbon is attached to the edge of the fan
In order for crafts made from plastic forks made in this manner to look good, you will need to decorate them. To do this, take 2 satin ribbons in number and intertwine them, threading them through forks, tying bows at their ends. After this, you will need to take the lace ribbon and secure it with glue on the outermost element - the fork. Subsequently, it is threaded between the teeth of the forks, forming the edge of the fan.
The next step could be to secure the lace ribbon to a cardboard semicircle. You will first need to tighten it using a needle and thread to the size you need. The remaining disposable tape must be glued so as to cover the tines of the forks from the bottom.
A fan of plastic forks will attract the attention of those surrounding
Such crafts made from forks can be completed with the help of roses arranged from satin ribbons. To do this, they are attached to the surface of the fan at your discretion. It’s appropriate that you can use it not only for decorative purposes, but also for its intended purpose - for the war against stuffiness.
Don't be afraid to experiment when creating a fan from plastic forksCrafts from spoons and forks provide wide-ranging opportunities for creativity, so don’t get hung up on the products you’ve already mastered, but improvise. Try, for example, making a bracelet or ring out of plastic. This will give you the opportunity to master new techniques and techniques, and will also expand your range of work as a handmade artist.
Why are such crafts needed?
With this simple method, using the master class discussed above, you can quickly make a wonderful decoration with your own hands , in the manufacture of which you can use your imagination and available tools available to everyone. Thanks to your imagination, you can make magnificent items that will decorate your interior, and no one will guess that your chic craft is made from ordinary plastic forks.
Such decorations are unique and can give the interior of an apartment a special style.
Children love to participate in the process of creating crafts. Be sure to involve them in such an interesting activity that will help develop hand motor skills and imagination, in addition, it will give them a good mood. Good luck in your work and creativity!
Originally posted 2018-08-29 11:04:48.
Steps for creating ladybugs from disposable spoons
Performing such crafts will certainly be very interesting for children, but some manipulations can only be done with adults.
- All spoons need to have their handles cut off, but it is best to do this after the spoons have been painted and the paint has dried.
- One spoon should be painted black, and two should be painted red. For red spoons you need to add black dots.
- To create the “head” of a ladybug, you need to put 2 white dots on the lid or button.
- We glue the “insect” - two red spoons are glued onto a black spoon in an A-shape - the “wings” of a ladybug.
- Glue a button or lid to the base of the structure. And here we have the cutest craft, which will take no more than 10 minutes to make.
Any craft made from plastic spoons is always attractive for its simplicity and at the same time beauty. No special tools are required for production, and almost every craft can be completed even by the youngest inventors.
You can absolutely not limit your imagination and go beyond the master classes you study, creating unique products. In addition, such crafts can be incredibly useful in everyday life, which makes them especially valuable.
https://youtube.com/watch?v=hMNGw4PaAUs
https://youtube.com/watch?v=VJS1rjKZMxw
Long earrings
You can also make beautiful earrings with stones, engravings or original carvings from forks or spoons. To do this, the craftsman needs to have a special tool that will allow him to cut various patterns and notches on the metal.
Here is one of the sets of beautiful fork earrings, made in completely different styles:
There are those decorated with flowers, those that are suitable for lovers of abstract patterns, and even those that can be worn under an evening dress. As you can see, the main thing is to show your imagination, and the decoration will look completely original, regardless of what it is made of.
Palm tree - an exotic garden decoration
A palm tree made from plastic bottles will help add a touch of the tropics to your dacha. Making such a garden decoration item is not difficult, the main thing is to follow the sequence of steps. First you need to prepare the materials: a large number of brown and green plastic bottles, a stationery knife, tape, a tube for decorating the barrel and a thick rope. The master class looks like this step by step:
- Creating leaves.
- Creating a trunk.
- Assembly of all parts of the structure.
To make a palm tree crown, you need to cut off the bottom of green bottles, and cut the upper part into small strips and bend them in the other direction. There is no need to touch the lid and neck. Depending on the number of bottles, the palm will be thicker or vice versa. After this, you need to take brown bottles, cut off the bottom and make stripes from it towards the neck. There should also be a lot of bottles. To assemble the tree, a rope is tied to each lid, secured inside. The palm tree will serve as an excellent decoration for an inconspicuous corner on the site.
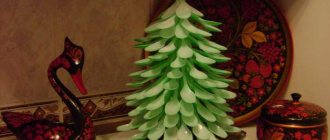
New Year's crafts from plastic spoons
When the New Year's mood is clearly expressed in the house and you want to fill the whole house with holiday, release your energy while spending pleasant time with your little family members by making wonderful Christmas trees from disposable spoons.
This is one of the simplest products; you will need plastic tools, a paper cone, special strength glue, and watercolors. We cut the devices, leaving only the oval parts.
We glue the frame, placing rows on top of each other. At this stage, everything is ready and, if desired, you can decorate the Christmas tree in any shade. The toy is suitable for a school project or home decoration.
Snowflake
An ordinary snowflake will become a New Year's toy made from disposable spoons, which will decorate the apartment and give it a winter atmosphere. To make such a craft from disposable spoons you will need: a rosette core, a specially strong adhesive, scissors, and a small circle of cardboard.
We cut off the ends of six scoops, place them on a cardboard circle, and glue them together. We take three ladle, cut off everything except the oval component, connect them with the already glued devices.
Glue the core into the center. If possible, decorate with snowflake stickers. Such snowflakes will look great on the New Year tree and add white shades to the apartment.
Tablecloths
Setting for a festive dinner Table setting" href="https://www.novate.ru/files/u31123/Table-Setting-12.jpg" target="_blank"> Table setting Table setting for dinner
Tablecloths can completely change the mood, immediately creating a festive mood. Now there is a huge selection of all kinds of tablecloths, napkins, runners, which must certainly be of different colors, textures and patterns, preferably so that they are all combined with each other. In addition, there should be themed sets that are suitable for certain holidays.
Autumn decor on the table Original table setting
Festive table setting with name cards
Table runner - a tablecloth in the form of a narrow strip running across the entire table. This is one of the most modern ways to decorate a table, especially if you don’t want to hide a beautiful wooden or glass tabletop completely under the fabric. Such paths are universal. They can be easily laid out on top of a regular tablecloth along the table, you can put them across and designate places for guests. Tablecloths are a must on the holiday table, especially if you want to emphasize the theme or color scheme of the set table.
Table setting for lunch Table setting for every day
Asian style table setting
Napkins. There is no need to give up cloth napkins in favor of disposable ones. They are an integral part of the table design. If you really don’t want to wash them after the holiday, then you should take a closer look at banquet-style paper ones. A placemat for cutlery defines a place for each guest. They can be not only rectangular, but also square (give a modern look) and round (break the angularity of the table).
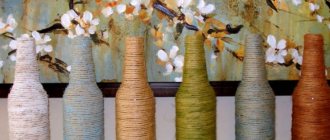
A garland of spring flowers and other flowers made from plastic spoons.
You will need:
- multi-colored plastic spoons (in this example, pink and blue)
- thick cardboard or fiberboard
- acrylic or spray paint
- brush
- pom-poms (you can buy them or make them yourself)
- super glue or hot glue gun
- thick thread.
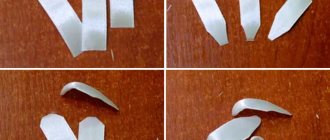
1. Prepare cardboard or fiberboard and cut out three identical triangles. If you wish, you can color each triangle.
2. Cut off the top part of each spoon - these are the future petals of your flower. This can be done with scissors or by heating a knife so that it smoothly cuts the plastic - this method is dangerous, so it is better to have an adult handle this step.
3. For one flower you will need 6 spoons, and there are 3 flowers in total in the garland. Mark the middle of each triangle and begin gluing plastic petals in a circle.
4. Glue one pompom into the center of each flower.
5. Make two holes in each triangle and thread a thick thread through them to create a garland.
Patterned bracelets
One of the most common and easiest to make are bracelets made from forks and spoons. To make them, just cut off the handle from a spoon or fork and bend it with an arc of the required diameter. Then drill small holes at both ends, and then fasten them together using an ordinary connecting ring.
If the length of the spoon or fork is not enough, this is not a problem. An empty space can easily be hidden with a few centimeters of chain or beads strung on a strong thread or fishing line.
If desired, the base of the fork can not be cut off at all. If your hand is thin, the entire length of the fork is enough to form a full-fledged bracelet, closing in a tight ring around the wrist:
If you wish, you can also work with teaspoons made of silver or cupronickel. If they have a nice thin handle with flowers on the base, it can be used to make a cute bracelet with mother of pearl beads:
If you bend the silverware into an arc with a hook at one end, it can be combined with a leather loop enclosed in metal holders:
This is roughly what the process of professionally making a bracelet in a workshop using special equipment looks like:
Watch
A wall clock in the shape of a sun will look very beautiful and impressive.
To create them you will need:
- Three hundred pieces of plastic spoons.
- Hot glue gun.
- Styrofoam.
- Scissors.
- Watch.
- Screwdriver and bolts.
- Knife (preferably stationery).
How to proceed:
- Cut out a foam circle in the shape of a clock.
- The middle needs to be marked so you know where to attach the clock. Make special holes for changing batteries, winding watches, etc.
- The bottom of the spoons should be cut off to leave just the cups and painted orange or yellow.
- Paste the clock in a circle, leaving no empty spaces.
Water lily
What is needed: spoons (twelve pieces), green and transparent plastic bottles, yellow paint, brush, glue, scissors.
How to do:
- cut off the handles of the spoons;
- glue three cut spoons together;
- glue four cut spoons together;
- Glue three glued spoons to four;
- glue five spoons together and glue the previously glued spoons to them;
- from a transparent plastic bottle, cut out a long strip about 2 cm wide, paint it with yellow paint, let it dry, cut the fringe on one side;
- we fold the resulting fringed strip into several circles and secure it with glue, glue what we got into the middle of the previously made water lily;
- cut out a leaf from a green bottle (you can use a transparent bottle painted with green paint);
- glue the water lily to the leaf.
Tip No. 5. Filling glasses
Tip No. 5. Fill the glasses
Any meal is not only about food, but also about drinks. Glasses and wine glasses should be combined with the overall color scheme and style of table decoration. For bright liquids (lemonade, juice, champagne), it is better to use transparent glasses. Engraving or a printed design will add sophistication to transparent glassware, and antique cut glassware, which is now in fashion, goes well with both classic and unusual designer table settings. The minimalism in the design of glasses and jugs, which was in fashion in the last decade, has been replaced by fancy shapes combined with the addition of colors. The combination of transparent and colored glass in glasses is the best solution for serving non-alcoholic drinks, and transparent champagne flutes with colored or mother-of-pearl stems will look noble and modern. Another trend is frosted glasses that create the illusion of “frozen”: the perfect solution for summer dinners in the fresh air. By the way, ideally, soft drinks should not only be served with ice, but the glasses for them should also be pre-cooled.
Flowerbed: how to make a basis for growing flowers
The simplest option for making a garden flower bed is to use a tire from a wheel. The result is a large flower bed in which you can plant flowering plants. To work, you will need a large number of small bottles of the same type, glue for plastic, and a tire from a wheel. Paint can also be useful if you want to change the color of the bottles.
The prepared wheel is installed in the desired location of the future flower bed or in the garden. The tire can be painted any color, or left black. Bottles are gradually glued to the top of the wheel, row by row. Toward the top, the throat of the flowerbed will be a little narrow, so you will need to properly pour the soil for future plants. If you don’t want to leave the bottles transparent, you can paint them in the chosen shade before work.