When it comes to a homemade felt bag , we most often imagine a variety of mini-formats: all kinds of cosmetic bags and other tiny bags, purses, chests, in which funny shapes, animals, flowers and other cuteness are played out. However, felt is also about large shapes, and often it is also about convenience, versatility, and originality. Don't want to dream in a given direction? Felt is a wonderful material, and working with it is a pleasure, so if you decide to sew a felt bag with your own hands , you are guaranteed to receive not only a cool product that will highlight your individuality, but also a lot of joy from the work, which, agree, it is no less important than the result itself.
How to sew a felt bag with your own hands - 5 master classes:
We sew a lightweight felt bag with our own hands with patterns
To make a simple accessory, just have a piece of felt on hand.
It is best to take it with a high density, this will avoid processing the edges of the product, because there will be no shedding of the material. In addition to this, you will also need a ruler, a thimble, round-headed pins for fixing the material, a fabric pencil, thread, scissors and a sewing machine.
Fold the piece of felt in half so that the front side is on the outside. We fix the aligned edges with pins. From one edge of the workpiece you need to cut a strip, the width of which will be equal to the side of the bag. At the bottom of the fold, you need to cut a strip with a width equal to half the desired bottom thickness. When straightened, it will acquire its true size. After the edges of the bottom are aligned, they need to be fixed, like the top edge.
Next, cut the cut piece in half for the side. Now we combine the stripes with the main parts of the bag using fastening elements.
The parts are sewn together along the right side of the material. When one side of the bag is sewn to the main parts, we proceed to the second similar part.
It is necessary to sew the bottom to the resulting workpiece using the same principle as before. The bag is almost ready. All that remains is to sew on the handles, which you can make yourself from any material that matches the color scheme, or use store-bought ones: leather, wood, fabric. Their number depends on how you are used to wearing accessories. It can be one long or two short handles. To have an additional opportunity to see the options, you need to use clothespins. With their help, the material for the handles is attached to the bag blank.
The accessory turned out to be roomy, durable and bright, you can safely go shopping with it.
What a master needs for the creative process
Preliminary preparation for the upcoming work includes several simple steps that will help you stock up on all the necessary materials:
- selection of the necessary and most liked pattern;
- choosing or purchasing material for making a spectacular backpack;
- determining the need to use functional decor;
- selection of stylish and bright jewelry, decorative style elements.
In addition to the main material, it is important to choose a fabric for sewing the inner lining, with the ability to easily process it.
There are always a lot of personal items and small accessories inside the backpack, so you need to carefully consider the organization of the internal space, with several lockable compartments.
Note!
Wood burning for beginners: tips and secrets for burning pictures
Plasticineography - interesting options for creating pictures from plasticine on cardboard for children
DIY scrapbooking for beginners: what it is and how to do it. What you need to create a beautiful album or notebook (photo + video)
Let's make a children's version of a handbag with our own hands from high-quality felt
A beautiful and delicate model can be sewn for a girl from felt. The work is very simple, so you can involve your child in sewing.
For work you will need: felt, 2 strips of fabric for handles, materials for applique, threads, measuring tape, scissors, blocks and equipment for their installation.
The bag pattern is a long rectangle with rounded corners on one side - this will be the bag flap. We mark the fold lines of the bag and begin making the appliqué. In this case, it will be a heart made of fabric reinforced with fleece.
Let's start sewing. We turn the bottom part of the pattern up, pin the sides together and stitch at a width of 0.5 cm. The edges of the bag lid need to be processed with a special thread at a width of 3mm from the edge; for this, decorative stitching is used.
We attach the applique immediately after decorating the edge of the valve. The paper base is separated from the fleece fleece, the part is placed on the bag and ironed in the center. The edges of the heart should be sewn along the contour.
Using special pliers, two blocks should be installed on the fold of the lid, the distance from the edge being 1 cm.
To sew handles, you need to align the parts with their right sides inward, sew long sections and turn the resulting handles inside out. Lightly iron them to fix the shape. The ends should be threaded into the prepared elements and secured with a knot at the end.
Consider a master class on making an original bag. For it you will need to purchase four pieces of felt in different colors. Select the main one. It is from this that the pattern of the main parts of the product is cut out. Next, take one of the parts of the bag and cut it into strips in the transverse direction (from bottom to top).
We also cut the remaining pieces of material into strips approximately equal to the width of the bag. Then we proceed to stitching together all the elements. Pass between the stripes of the main color in a checkerboard pattern and fasten a ribbon of a different color at the top of the product.
After this, we change the additional color and make the next row, changing the threading order. Where the main color was visible, draw an auxiliary color along the top and vice versa. We start the work from one of the edges; when we reach the opposite edge, we can cut off the excess length and then secure the strip.
To make the work easier, you must first sew all the strips along the edge, and then start weaving.
Make the second part of the bag in the same way, and then sew the bag. The handles can be made from wide pieces of felt, and the upper edge of the product can be decorated with roses to hide the places where the strips are attached.
Schemes and templates of original DIY felt crafts
Felt is a unique material that is widely used in needlework. Its fairly dense structure allows the production of a wide variety of products. Once you try to make felt crafts with your own hands at least once, it’s impossible to stop. This activity is very exciting, you want to create again and again.
So where to start? What felt products are easiest to make and what can you do with kids? For beginners, we advise you to choose the simplest schemes for creating hairpins, brooches, and bags. You can easily make felt patterns yourself. Pay attention to the master class containing step-by-step pictures and templates, this will make it easier to understand the sequence of actions.
You can purchase felt for making felt crafts in special craft stores. With your children, choose beautiful and bright materials; using felt, crafts will turn out original, very unusual.
Denim backpack
If you have old jeans lying around at home that you don't wear, you can turn them into a fashionable backpack. It has long become popular to sew a backpack from jeans with your own hands. It is not only economical, but also convenient and beautiful.
To do this you will need:
- old jeans;
- cord, buttons;
- needles and threads;
- metal rings;
- sewing machine.
For this option you don’t even need a pattern. Just cut the jeans correctly and take the necessary pieces of fabric. There is an alternative when the backpack is made straight from whole pants. It looks very cool and unusual.
What you need for work
Before you start crafting, we recommend purchasing the necessary materials:
- Felt of different densities. For voluminous felt crafts and toys, choose a thinner material. It can be sewn together without any difficulty and subsequently filled with holofiber or padding polyester.
- Threads. Choose colors that best match the color tone of the felt or contrasting shades.
- Needles. Take several different needles; you will need them to work with felt of different densities.
- Pencil. It will be necessary for cutting the material.
- Awl. This auxiliary tool will help you make small and neat holes in the felt.
- Scissors. Use sharp and large ones.
- Glue gun. It will be useful for beginning needlewomen.
- Elements for decoration. All kinds of pebbles, buttons, fasteners and beads will help give felt crafts a special appearance.
So let's get to work. Let's start with children's crafts made from felt.
Crafts for kids
A variety of toys, educational books, which are created with your own hands, turn out to be special and arouse great interest among children.
Make unique easy felt crafts for children, every day you will improve your acquired skills!
Letters
Soft felt letters can be used first for playing with the baby, and later for learning. Use simple patterns, carefully cutting out the outline of each letter of the alphabet. After the work with scissors is completed, you can begin the longest stage - sewing together the parts of the letters.
Well, then the best part is filling the products with synthetic padding; you can do this together with your child. By the way, using the same principle, you can make a mobile from felt.
Exciting activities with children can be done using fabric books. Making books from felt is not as labor-intensive a process as it might seem at first glance.
Children's handbag made of felt - how to sew a fashionable accessory for a girl
A hand-sewn felt handbag for a girl will be a wonderful gift and favorite accessory.
Materials for a children's handbag
To sew an original handbag, prepare:
- soft felt in bright colors: yellow, purple, lilac, pink, green;
- threads in yellow, green and beige shades. Beige is needed for hemming parts with a hidden seam; instead, you can use matching threads;
- scissors, chalk;
- floral print buttons;
- rhinestones for needlework.
Such a list of materials will cost much less than buying a factory kit for sewing a felt bag with your own hands. Immediately take a look at our other master classes on felt crafts to get your bearings and buy sheets with a supply.
How to make a handbag from felt
Transfer to paper and cut out the pattern of the handbag and flap. Bag dimensions : 16 cm by 12 cm.
Cut out two base pieces from purple felt and one for the clasp from purple felt. Separately cut out two strips: one for the handle, the second for the middle part of the bag. In this MK, the dimensions of the handle are: 30 cm length and 2 cm width. Insert dimensions (middle): 36 cm long and 2 cm wide. The insert is equal to the length of the bag on the sides and bottom. If your sheets of felt are short, the insert can be cut out from two components and then joined together.
Make a lining from yellow felt: two main parts, one each for all the rest (valve, middle part, handle).
Cut out small flowers and leaves from paper.
Cut out inflorescences of different shades and green leaves from felt - they will be used to decorate the facade of a children's handbag.
Take a pink flower and embroider rays coming from the middle. To do this, pierce the flower with a needle and make stitches in the direction of the petals.
You will get a flower like this.
Embroider rays on all inflorescences. If you want, you can make a more complex volumetric decor in the form of a peony or violet using other lessons.
Before sewing flowers to the base of the bag, lay them out on the surface to create a composition. Please note that there will be a clasp in the middle of the top. Draw its location with chalk.
Sew all the flowers and leaves to the main part of the product using blind stitches.
Fold the base with the lining, align the edges. If there are uneven spots, trim off the excess with scissors. Take yellow threads and connect the lining and the main part with an overlock stitch.
You need to sew on all sides, in a circle.
This is what the other side looks like.
Sew the insert parts end-to-end or using an overcast stitch. Fold with the lining and sew on all sides in the same way as the main piece.
Process the remaining elements in the same way: valve and handle. The result should be five pieces with a yellow lining on the wrong side.
Now you need to make a loop on the clasp. Measure the diameter of the button.
Draw the resulting value with chalk, not reaching the edge of the fastener 1.5 cm.
Using scissors, carefully cut the area where the loop will be located. Then sew the edges of the felt with the same stitch you used to sew the girl’s purse. At the end and beginning of the loop, make a backtack using several stitches.
Place the middle of the felt bag against the edge of the base. The blanks are folded with their front sides facing inward.
Sew the elements with a seam over the edge, making small stitches. You can use an overlock stitch or a butt stitch.
Connect the middle with the main part on three sides.
Then sew the second part of the base to the middle part on the other side.
Turn the bag inside out and straighten the seams.
The yellow lining is on the inside.
Sew a clasp on the back side in the middle of the top.
Sew a button onto the front side of the product, having previously outlined its location.
Place the handle on the side of the bag and attach it to the base using buttons. Sew buttons on both sides, making through stitches.
Using colored rhinestones for needlework, decorate the front of a felt handbag. You can call your fashionista! We also have a tutorial on crocheting a baby bag, be sure to watch it if you know how to crochet.
A master class on sewing a felt handbag with your own hands for “Women’s Hobbies” was prepared by Zhanna Galaktionova. Visit us more often to diversify your life with creativity and handicrafts.
How to use the pattern
If novice needlewomen don’t know how to sew a backpack with their own hands, they simply need step-by-step instructions and patterns. They will help bring your plans to life. There are ready-made patterns of backpacks with dimensions; they can be easily transferred to a sheet of paper in full size.
To create your own pattern you will need the following materials:
- a sheet of paper (you can use tracing paper or newspaper);
- pencil;
- meter tape;
- ruler;
- square
You can make a pattern for rounding corners yourself. To do this, you need to draw a circle with a radius of 18 or 20 cm on cardboard and cut out one third of the circle. Using this device, rounded corners are symmetrical.
For a basic backpack pattern, two measurements are enough:
- shoulder width;
- height of the back from the waist.
You need to draw a rectangle on a piece of paper, the width of which is less than the width of your shoulders. It is important to note that the backpack should not fall below the lower back, this will be uncomfortable. Then you should draw a vertical line through the middle of the rectangle - the central axis. Next, bend the sheet of paper along the axis and draw the contours of the desired shape of the backpack. You should cut along these contours, you will get a symmetrical pattern. If additional details are planned, such as pockets, a lid or a sliding bottom, they can be easily marked according to the basic pattern, matching the sizes.
To decipher the pattern, you need to know the basic symbols:
- line with arrow – lengthen;
- a line with small triangles is a connection line;
- identical numbers inside the pattern - places where the parts match;
- cross lines – registration marks;
- the arrow between the lines is the place of the fold;
- cross – a place for sewing on a button.
If you decide to cut according to a ready-made, but more complex pattern, you will have to convert it to natural size. It shows the dimensions in centimeters. In this case, it is more convenient to replace the paper with thick fabric. The cut out parts are laid out on the material and outlined with a pointed piece of soap. Before cutting out the parts, you need to find out whether the pattern is given with a seam allowance or not. More often it is given without an allowance, then the elements should be cut out with an indent of 1-1.5 cm. Sometimes the seams on the back are processed with a double turn - first the seam is sewn open, then it is brought out inside out and stitched again. These seams are neat and serve as additional support for the backpack. More allowance should be given for them when cutting.
DIY felt bag with patterns for beginners in needlework
Today, there are many models of bags made from various materials: denim, leather, leather substitute, linen, knitted threads, beads, etc. Durability and appearance depend on the material you choose. Today we want to share with you the technology for sewing a felt bag with your own hands using the patterns provided in this article. The manufacturing technology is quite simple, even a novice craftswoman can handle it.
Felt is wool fabric with the addition of down, viscose or synthetics, obtained by felting. The method of its manufacture was known to nomadic peoples 2 thousand years ago. Even then, felt was used in various industries: they made household items, equipment for the military, clothing, shoes, and hats. As you can see, the fashion for things made of felt is still relevant.
This master class will tell you how to make a stylish felt bag with your own hands.
Sewing materials
Experts recommend choosing two different types of materials for sewing a backpack, necessary for the outer and inner covers.
For different models, you can use leather and thick or soft fabric; for children's backpacks, soft felt is perfect, and for youth backpacks it is better to opt for practical jeans.
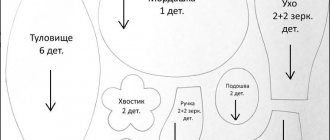
Tools and materials Time: 2-3 hours • Difficulty: 6/10
- bag patterns for printing (presented below);
- black felt - 10 sheets (23 cm x 30 cm);
- white felt - a small piece for the eyes;
- yellow felt - a small piece for the eyes;
- pink felt - a small piece for the nose;
- adhesive interlining;
- silver felt or silver-colored heat-insulating material - a small piece for the ears;
- floss threads in black, white, yellow and pink;
- metallic silver floss for the mustache and mouth;
- sewing accessories - scissors, needles and pins.
This cute felt Halloween bag is perfect for a little girl, especially if she has a black cat costume! But even without a costume, she is also very relevant!
We made this handbag small and it looks more like a clutch or a large wallet. It is comfortable for a child's hand and will not drag on the ground when the child walks down the street with it.
We bonded the felt in 3 layers in this Halloween treat bag, so you don't have to worry about it tearing under the weight of them! You can download the free patterns below and create your own handbag! You are ready? Then let's begin!
What you will need:
What equipment is needed?
To make your own backpack you will need the following things:
- needle;
- threads of the corresponding color;
- thimble;
- tailor's scissors;
- soap for marking;
- textile.
The material for the backpack must meet the requirements of strength and wear resistance. It should also not pose a risk to human health. Aesthetic appeal will also be useful. Most often, accessories like backpacks and bags are sewn:
- From jeans. Use fabric that does not contain elastane.
- Made from cotton. It has the ability to hold its shape and has the advantages of breathability and tactile pleasantness.
- Made from synthetics. It arouses interest with its variety of shades and patterns. Bags made from it often do not require additional decoration. The disadvantages are insufficient air and moisture permeability, as well as the ability to absorb odors.
The backpack lining can be:
- Satin. Characteristic features: density, reliability, wear resistance.
- Viscose. It is more reliable than the satin version.
- From cupro. Externally, this material is similar to natural silk, it is soft and elastic.
- Made from polyester. Advantages: durability, ease of maintenance, resistance to dirt.
- Mesh. It consists of cells and has good breathability properties.
- Made from taffeta. Pros: rigidity and ability to hold shape.
Step-by-step instructions with photos
So, let's quickly start sewing, because this felt bag is perfect for a fun holiday that is just around the corner.
Step 1: Cut out the pieces
Download the pattern below and print it out on A4 sheets of paper.
Felt bag - pattern
Carefully cut out all the parts from the paper.
Place the paper pieces onto the felt of the desired shade. Use pins or double-sided tape to attach the paper to the felt.
Cut out all the necessary parts from felt and adhesive interlining in the quantities indicated in the pattern. When cutting out interlining pieces, leave a small space around each piece.
Step 2: Attach the interlining
Once all your pieces are cut out, place the interlining pieces onto the matching felt pieces.
Using a hot iron, iron the interlining over the felt. After this, trim each piece along the actual design line. Now your parts are ready.
We attached interlining to all the felt pieces except the inside of the cat's ears, where we applied a silver glitter insulating material. This bag could use a little sparkle!
We made this purse from three pieces of black felt. For two pieces you will need adhesive interlining so you can fuse all three layers together. This applies to the front and back, as well as the handle. The handle is made of two parts, each measuring 7.5 cm x 42 cm. Both parts are made of three layers.
Step 3: Make a Face
Now you need to give the cat a face.
Place the white eye pieces on the black base in the desired locations.
Iron them so that the white parts stick to the felt. After this, sew around the eyes using a running or overlock stitch and white floss threads.
Next, place the yellow circles inside the white parts and iron them. Using a running stitch, additionally sew the irises around the white felt. Finally, place the black pupils inside the yellow circles, then iron them and sew them on.
Place the pink part for the nose in the middle of the face and also iron it. Using a back-needle stitch, sew the nose to the muzzle.
Step 4: Shape the Mustache and Mouth
Using a white pencil, draw a cute mustache and mouth on the cat's face. After that, using a chain stitch and metallic silver floss, embroider neat mustaches and a mouth on the black face.
Step 5: Pack your bag
Initially, you need to sew the handle together into a ring, and then symmetrically sew on the details for the muzzle on both sides of the ring.
We melted three layers of black felt together and created two handle pieces to each measure 7.5cm x 42cm. We used 23cm x 30cm felt sheets to create strips that were 42cm long. We marked the seams at the top of the bag in the middle and at the bottom of the bag in the middle. We distributed the seams so that all three layers did not have stitches in the same places.
So now you have two handles and ready-made pieces for the face.
Sew the arms together using a blanket stitch. The handles are now ready to be sewn to the front and back of the face. Start at the front and sew it to the handle using a loop stitch and white floss. Make sure your seams are symmetrical at the top and bottom. Once the front panel is sewn to the handle, repeat for the back.
A wonderful hand-sewn felt bag in the shape of a black cat is just what you need to complete your Halloween look. We love how it turned out and are excited for our little daughter to walk around with it during the holidays and cheerfully shout, “Trick or Treat!” as she stuffs the sweet spoils into her new purse.
And as a bonus for the cat handbag, we offer a video with a master class in which a professional accessory designer will tell you how to sew a bright felt bag with floral appliqué. Happy creativity!
Features and advantages of the material
Felt is a type of felt made from wool, animal down, and synthetic fibers. The density of the composition is achieved through steam treatment. Available for sale in sheets or rolls.
Felt material is becoming popular again. It is used for upholstery of furniture, car interiors, clothing and accessories. Widely used in handicrafts due to ease of processing. Among the advantages of felt are:
- many colors, rich shades are well painted;
- the edges are smooth, do not crumble, and can be easily processed with a decorative seam;
- takes any shape when steaming and ironing;
- double-sided painting (the back and front sides are the same), which is convenient when cutting parts;
- easy to sew by machine, by hand, glued.
Felt is classified by thickness, from 1 mm to 5 mm. Thin sheets are used to create appliqués and crafts; thick sheets (3-5 mm) are used to sew felt bags. As a result of long-term use of products, some problems may arise:
- the material is soft and wrinkles easily, so it does not hold its shape for a long time;
- Over time, the felt becomes shaggy and pellets appear;
- The loose composition gets dirty easily and is difficult to clean and wash.
Washing at high temperatures deforms the product and reduces its size. It is better to subject the bag exclusively to dry cleaning with a brush. In extreme cases, hand washing at 30 degrees is allowed.
Depending on the composition of the felt fabric, its area of application differs. Some types of felt are only suitable for creating appliqués and voluminous decorations, while others are used for making accessories (bags, cosmetic bags). Natural fabric (100% wool) shrinks after washing, becomes shaggy, but easily wrinkles, which is suitable for creating designer elements. You can also work with wool blend materials (50-60% wool, 40-50% acrylic, viscose).
Popular models
Before sewing a felt children's handbag or an adult version, you need to think about the purpose of the future accessory. The classification of bags is quite wide:
- A felt clutch bag is a small ladies' accessory with a rectangular or square shape. Classic versions do not have handles. Sometimes straps and chains are used for convenience. The product is decorated with metal parts (buttons, clasps, buttons), floral appliqués, and felt patterns.
- Shoulder bag - a rectangular model with external pockets for storing small items. The top closes with a flap and clasp. The straps are made of leather or webbing.
- Shopper bag – small handles allow you to carry the bag on your shoulder, freeing your hands to select goods. Due to its medium size, it can accommodate small purchases.
- Basket Bag – The overall look is like a basket that tapers at the bottom. The front part is decorated with decor that makes the image gentle and playful.
- The pouch is a baggy shape with lacing at the top. The rope acts as a fastener. The handles are made of leather strap.
Felt is easy to use for creating unusual shapes. Women's models can be asymmetrical in shape, with spectacular decorative inserts. Children's handbags made of felt are sometimes sewn in the shape of animals, berries, fruits or flowers.
Color and decor options
The right bag should complement your look, not contradict it. It is not necessary to have an accessory in the same color scheme as clothes or shoes. The main thing is to create the impression that the chosen color and style of the handbag is not accidental. There are several combination options:
- To match the shoes. Possible incomplete match. According to the French, the same shade of a bag and shoes visually makes the owner look older.
- The color of the clothes. Select a compromise shade that will suit several things. A blue dress or jeans is combined with a blue, blue, gray-blue handbag. It is desirable that similarity, not identity, be traced.
- In one of the shades of the wardrobe. Clothes with prints and patterns can be complemented with accessories in one of the tones of this pattern.
- To match the accessories. The color of the belt, belt or tie will be highlighted by the bag.
- To match your skin color. A universal combination, no need to tie it to clothes.
- Contrasting bag. This can be a single accent in the image.
If items of clothing or jewelry are made in one color, for example, silver, then a bag with gold fittings will create an element of inconsistency.
The final step in sewing a felt bag with your own hands is decoration. Different fabrics are used for decoration. For example, felt in contrasting colors, thinner than the base itself. The applique is sewn or glued and can be flat or three-dimensional. Other materials are also used for decoration:
- bright embroidery with threads, ribbons, felting;
- leather elements, decorative inserts, straps, tassels;
- flowers made of felt, leather, knitted.
Handbags are also decorated with metal parts: rivets, buttons, carabiners. This will give the product a solid, expensive look. This laconic design is suitable for a small felt cross-body bag or clutch.
Selection of accessories
When sewing a backpack, be sure to use accessories. You can make it yourself or take it from an unnecessary satchel, windbreaker or blouse. Suitable decorations:
- buckles and clasps from out-of-fashion items;
- leather or textile fringe;
- original button design;
- beads, sequins, rhinestones, glass beads;
- braid, fancy goods;
- ropes of various colors;
- felt applique pictures;
- patchwork, ribbon embroidery.
When choosing decor, you should pay attention to the fact that any type of bag is exposed to mechanical stress and quickly becomes dirty. It would be irrational if an accessory becomes unusable due to such a small thing as a frayed applique or a torn button. Removable fittings will simplify cleaning the product and allow you to update it by replacing some decorations with others.
Stages of self-production
Before starting work, find a suitable model. Next, you should prepare felt bag patterns and material. We offer several master classes with interesting creative ideas.
Functional organizer
Convenient for storing important things. It contains the most necessary things: wallet, documents, phone, cosmetics. The handbag has 3 external and 1 internal pockets.
Materials and tools:
- felt 2-3 mm thick, size 30 x 90 cm;
- sublimation thermal stickers;
- 2 magnetic buttons;
- 3 holster buttons;
- matching threads;
- sewing machine.
- We cut out the details, without any allowances.
- We translate thermal stickers.
- Sew the edges of the flaps and the tops of the pockets.
- Sew in the inner pocket.
- Attach the outer pocket and its flap. First, we make a fixing stitch at the place of the side folds.
- We repeat the same with a double pocket. Sew the sides first, then the bottom.
- We install magnetic buttons on the main parts.
- We bend and secure the edge with the buttons with a stitch.
- Sew a rectangle between the buttons. We cut a hole in it for the handles.
- We connect the two main parts and turn them inside out.
- Installing holster buttons.
The organizer is ready. The entire process will take no more than 1 day.
Children's handbag
A felt handbag for a girl will be a wonderful gift. The baby will appreciate the small size and original decorations. Decorative details can be made using a different technique.
Materials and tools:
- felt in bright colors (2-3 for the base, several shades for decoration);
- matching threads;
- needle, scissors, chalk;
- 3 buttons;
- rhinestones or beads.
- We cut out 2 parts of the base, valve and handle from the front and lining fabric.
- Cut out leaves and flowers. In the middle of the inflorescences we embroider the stamens. We decorate the front part, leaving space for a button and flap.
- For all parts, we connect the front and lining parts using an overlock stitch.
- We collect all the parts of the bag and sew it over the edge from the wrong side.
- We turn it inside out and attach the handle, decorating it with buttons.
We cut a hole on the valve and stitch it. Sew on the clasp, the felt children's bag is ready.
On one shoulder
A small handbag with decorative elements in the form of droplets can be made in 2 hours. An accessory with a long handle is worn on the shoulder or thrown over the chest.
Materials and tools:
- thick felt for the base and 4 colors for the droplets;
- lightning;
- leather belt;
- carbines, half rings;
- matching threads, chalk, pins, needle, scissors.
- We redraw and cut out the pattern of the base and droplets.
- We arrange the decor in a checkerboard pattern, fix it and sew it with a decorative seam.
- We sew in the zipper.
- We connect the metal half rings along the edges to the handbag with a felt loop.
- Sew the side and bottom edges.
- Attach the belt.
This option is combined with a romantic style and minimalism.
In the form of a telephone booth
Original rectangular bag. It has a short felt handle and a long chain shoulder strap. Finished dimensions: 35 x 15 x 15 cm.
Materials and tools:
- red dense felt 3 mm thick, size 80 x 80 cm;
- white felt 1 mm thick for decoration;
- transparent plastic;
- zipper 20 cm;
- metal half rings – 2 pcs;
- chain or strap with carabiners;
- thermal stickers with inscriptions;
- sewing supplies;
- pins for fixation.
- Pattern of details.
- Cover assembly. Sew the handle to the top piece. First we thread the metal half-ring and secure it with two seams.
- We connect the felt half rings and the lid.
- We decorate the lid with thermal adhesives, glue the inscriptions onto white felt and red blanks.
- We connect all the parts of the lid.
- Assembling the side walls. We place the plastic and mesh part on the felt frame. Sew with two lines. These will be the windows of a telephone booth. We perform the other two parts in the same way.
- We attach a zipper to the fourth side part, attaching a metal half-ring.
- Sew the side parts to the bottom.
We connect all the parts with pins and sew them together. The accessory is ready, production time is 1 - 2 days.
Bag-package
Universal women's bag made of felt. Decorated with elegant decor in the form of a black cat. The accessory is suitable for daily use and trips to the store.
Materials and tools:
- dense gray felt, 3 mm thick;
- black felt for applique;
- cotton fabric for edging, fastening;
- lightning;
- padding polyester;
- threads;
- scissors;
- chalk.
- We cut out 2 side parts, a bottom, 2 handles from felt, not forgetting the seam allowances.
- We cut out 2 parts for the fastener. We fold them in half, stitch them, and connect them with a zipper.
- We fix the handles to the sides at a distance of 13 cm from the top.
- Cut out the cat applique and sew it with a zigzag to the front side.
- On the wrong side of the main parts we attach a fastener at a distance of 6 cm from the edge.
- Sew the sides and bottom.
- Attach the edge edging.
- We bend the handles in half, stitch them and fill them with padding polyester.
Felt has been popular for a long time. This velvety material is successfully used in the creation of women's accessories. The result is spectacular and unusual bags. Handmade models will complement the craftswoman’s wardrobe or become an unusual gift.
Decorating: the best ideas
Jeans in themselves are a beautiful material that does not require additional decor. But if you want to create a bright and unique thing, there are simply a sea of decorating methods.
The most popular ideas for decorating backpacks (not only denim ones):
- make scuffs and holes yourself (hooligan style);
- create an applique of rhinestones or small mirrors;
- metal rivets;
- embroidery, bright buttons.
It is also fashionable to decorate a girl’s backpack with drawings of cats and flowers. This is not the entire list of ideas circulating on the Internet.