The New Year is a reason to show your talents and start making gifts. Before the main winter holiday, stores are filled with shiny New Year's decorations, but making toys yourself is more enjoyable and interesting. Papier-mâché is the right material for the job. Even adults and children who are just beginning to do needlework can handle the technique.
Step-by-step master classes will tell you how to build Christmas tree toys from papier-mâché and give ideas for winter creativity.
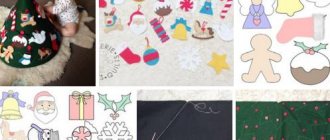
New Year's toys made of felt
To make a felt craft, you need to follow several step-by-step steps.
Bright flashes:
- Using a ruler, mat and cutter, cut multi-colored felt strips measuring 8x0.5 cm.
- Measure a thread about 20 cm long.
- Place cut beige trims on the thread, and place ribbons of other colors on top.
- Pull the strips tightly with fiber and secure with a knot.
- Fluff the pieces of felt like a ball, and tie the two thread ends together.
Valenok:
- Draw on the cardboard the contours of the felt boot and a long, narrow strip for the eyelet.
- Transfer the pattern to the fabric and cut out 2 identical parts (preferably red).
- Separately make templates for snowflakes and Christmas trees.
- Sew decorative elements onto one of the large parts and then sew them with another cut piece.
- Attach a loop.
Christmas trees:
- Cut 2 identical triangles from green felt.
- Sew multi-colored pieces of braid onto one of them, wrap the ends and sew to the wrong side.
- Sew the 2nd piece to the decorated part. Leave an unsewn edge at the bottom.
- Stuff cotton wool inside and sew it up, insert a brown trunk.
- Instead of ribbon, you can sew sequins or colorful buttons.
- Attach a loop of thin ribbon on top.
From paper and cardboard
For paper decorations, you can use any paper with different weights, even unnecessary printed matter.
Cardboard balls:
- Old thick magazines or bright candy boxes are suitable for the material.
- Using a compass, draw 21 identical circles on the cardboard, then cut them out.
- Bend each circle 2 times. in half on both sides.
- Bend the workpiece, after which the center of the part will be visible.
- Bend the circle again in one direction so that its edge passes along the marked center.
- Bend 2 sides in this way, you should get a triangle.
- Cut out the resulting triangle in 1 circle, this will be a template.
- The resulting stencil must be applied to the remaining round blanks, outlined and bent their edges outward along the contours.
- 10 cut out parts should be glued into strips in turn: 5 down - 5 up.
- Form a ring from the resulting strip and connect it with glue. This will be the basis.
- Divide the remaining 10 molds into 5 pieces. and secure it into a circle with adhesive. There will be 2 caps.
- Glue the bottom and top caps to the base.
- Attach a loop.
Corrugated Christmas tree:
- To base the winter beauty, you need to make a cone rolled out of cardboard. Secure its seam with glue or tape.
- In order for the workpiece to be stable, the internal conical space should be filled with some material.
- Cut strips of 10x3 cm from green corrugated paper.
- Twist each strip in the middle and form a loop, pressing with your finger.
- Attach all prepared parts to the cone with glue, starting the process from the bottom tier.
- The volume and fluffiness of the tree depends on the number of loops used.
- The top of the tree can be decorated with a bow or a large bead.
Christmas decorations papier-mâché using different paper-plastic techniques
DIY New Year's toys made using mashing technology are presented below.
Snowman example:
- You can use old balls or balloons of different sizes as a base.
- Use your hands to tear the newspaper into small strips.
- The finished strips need to be moistened in water and pasted over the ball, previously treated with rich cream.
- Soak layers 2 and 3 of newspaper with glue and let dry.
- In general, you need to apply 10-15 layers of paper, which should be dried periodically in a warm room. The entire drying process takes from 12 to 24 hours.
- Cover the remaining balls.
- Make handles for the snowman and a cone-shaped figure for the nose from plasticine, which are then decorated in the same way with newspaper strips.
- When the parts are completely dry, carefully cut them with a knife.
- Glue the resulting halves together and secure the seam with 2-3 layers of newspaper.
- Cut off the top of the 2 lower spheres and connect the entire product with glue.
- Paint papier-mâché with acrylic and dry.
- Draw the snowman's eyes and smile.
- Decorate the figure with a hat and scarf.
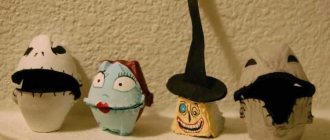
A bell made in the classic papier-mâché way:
- Cut any paper (optionally toilet paper, newspaper paper, or photocopier paper) into small pieces.
- Pour hot water over the paper stock and place it in a warm room for 24 hours.
- After the specified time has passed, boil the mixture, squeeze it out, then loosen and dry.
- Mix the resulting composition thoroughly with chalk.
- Starch paste and wood glue are gradually added to the resulting mixture.
- It must be stirred until an elastic, creamy dough is obtained.
- A bell should be fashioned from the formed raw material, and then dried for 24 hours.
- Finally, oil or acrylic paints are used to paint the New Year’s craft.
- It is advisable to first prime the product with white gouache diluted with glue in a ratio of 1 to 1.
Master class or technique tips
How to make crafts using the papier-mâché technique look beautiful?
During the process of creating a Christmas tree toy, the child develops fine motor skills and creativity.
To do this you need to know little tricks:
- Do not dry figures on a radiator or other heaters to avoid cracks;
- You can give the product ideal evenness and smoothness using sandpaper or additional layers of glue;
- To preserve the durability of the craft, at the end of the work it is necessary to coat it with varnish;
- Cotton fabric well soaked in an adhesive solution will help give the product strength.
From cotton wool
Cotton wool is a suitable material for making Christmas tree decorations.
DIY New Year's toys: step-by-step execution of the Snow Maiden from cotton wool
Snow Maiden:
- Lightly sprinkle the cotton mass with water and sculpt the face. To do this, you need to form a dense oval and make small indentations for the mouth and eyes.
- Uneven areas should be brushed with a brush dipped in water. Leave the doll's face to dry.
- Make a wire loop on the head, then use the wire to create a frame for the Snow Maiden.
- Wrap the base with cotton wool previously soaked in PVA.
- Glue the made head to the body.
- When wrapping a toy figure, you should try to form the lower and upper limbs.
- Place a cotton scarf on your head, giving it the desired shape.
- Then you should form a sheepskin coat and felt boots.
- Then the drying process begins. First 10-15 minutes. The toy must be dried in the oven, then left to dry naturally.
- Finally, the figurine is covered with watercolors. The face is painted a light beige color, a blush should be painted on the cheeks, and it is better to paint the eyebrows, nose, mouth and eyes with acrylic dye.
Bunnies:
- Take cotton pads pre-treated with paste and draw small parts of the hare on them.
- Each detail must be painted with colors at your discretion, then cut out.
- For the body, take a cotton ball and draw a muzzle on it.
- Then glue the pre-prepared tail, paws and ears to the body.
- Attach a loop of thin braid to each bunny.
Preparation of the adhesive composition
Before you start making Santa Claus, prepare the adhesive.
To do this, dilute 2 tablespoons of flour in 250 ml of cold water. Stir so that there are no lumps left in the mixture. Boil 1 liter of water in a convenient container and, while boiling, add the resulting solution in a thin stream. Stirring constantly, cook for 3-4 minutes. You can use starch instead of flour. Pour 2 tablespoons of starch into a saucepan with 250 ml of cold water. After stirring well, add 750 ml of boiling water, put on fire and wait until it boils. If various types of manipulations with preparing the paste tire you, you can use PVA glue.
From foam plastic
It’s easy to make New Year’s toys from foam plastic with your own hands.
For example, a sheep:
- First, you need to cut out an oval from foam plastic for the body of the desired size.
- Another piece of foam plastic should be crumbled and the resulting shavings should be placed with glue over the area of the entire cut out part.
- Sew the head for the sheep from a piece of fabric (or make it out of cardboard). Its upper part also needs to be processed with shavings.
- The legs are made from satin ribbons, which are attached to the inside with glue.
- The eyes and nose must be drawn with a felt-tip pen or made out of colored paper.
- Cover the back of the figure with cardboard or paper.
- Finally, attach a loop to the sheep using a hairpin.
Merry snowman:
- Make 3 foam balls of different sizes. To do this, crumble a piece of material and roll them using glue.
- Glue the prepared PVA balls together in descending order (from smallest to largest).
- Attach rolled foam ears and arms to the figure.
- Eyes and a smiling mouth should be drawn with a felt-tip pen or glued on with beads.
- Make a bucket for your head from multi-colored paper or sew a hat and scarf from fabric.
Various figures:
- Cut out shapes from foam plastic in the form of a heart, bell, cube or oval.
- Decorate to taste.
- Rhinestones and beads will add shine and luxury to the tree.
- Crystal half-beads can be transparent or coated, and they will help the tree sparkle under the light.
- Lace, bows, artificial flowers or floral blanks are attached to the toy using glue.
Making a fur coat
While everything is drying, we take cardboard, fold it into a cone and cut off the top. This is how we got the lower part of the fur coat. We attach it to the waist of our body and glue the bottom of the fur coat to the stand we have prepared. A square cut out of cardboard will serve as a stand.
When the cotton wool dries, we begin to sculpt the neck and head from cotton wool with glue. Let's not forget that our Grandfather Frost wears a hat, fur coat and mittens.
We form the head in the form of a hat, which smoothly turns into the collar of the fur coat. Next we sculpt the upper part of the fur coat and sleeves with cuffs, mittens.
Let Grandfather dry for about 1-2 days and continue creating. On our lower part of the fur coat we lay out pieces of cotton wool with glue and smooth it out. Thus, we got Grandfather Frost in a fur coat. But also don’t forget about the edging on the fur coat.
From scrap materials
Using your imagination, you can make unusual toys from unnecessary things.
Snowmen made from bottle caps:
- Use white spray paint to paint the inside of the tires, after washing and drying.
- It is not advisable to do painting indoors.
- The paint should lie tightly on the surface; if necessary, repeat painting.
- Then form the body of a snowman from beer caps.
- After the parts have dried, you should place them 3 in a row, with the convex surface facing you.
- Then you need to calculate how much narrow tape (up to 1 cm) is needed to connect all the parts together with hot glue.
- Cut off a measured piece of braid, leaving a margin to form a loop.
- Glue the tape to the caps with hot glue, first grabbing the caps together to hold them tighter.
- To decorate, take a thin brush and draw a nose, mouth, eyes and buttons on the painted side.
- For the broom, take a toothpick and crush the edge to make a mini broom.
- Tie a scarf for the snowman using multi-colored ribbons and glue a button on top.
Penguins:
- Disused incandescent light bulbs must be cleaned and degreased.
- Then paint the back black, and the belly and muzzle white.
- You can do the usual coloring or draw arcs over the eyes and flippers.
- Then dry the lamps and use a thin brush to paint the eyes, nose and cheeks.
- You can dress the penguins in doll outfits or knit a scarf and hat from leftover yarn.
- To make a loop on top of the cartridge, attach a string or ribbon with hot glue. If you are wearing a hat, you must first leave a hole in it to thread the loop through.
Carnival mask
- We make a preliminary accurate sketch on a scale of 1:1 on thick paper. We cut it along the contour and get a template. Using it, we mark the contours of the mask with a pencil on a plywood tablet;
- To save plasticine, we place wooden or foam blocks in the center of the future model. They should not protrude beyond the model;
- We begin to gain volume to the desired size. Based on the sketch, we sculpt all the details;
- Important point! All parts of the model must work for the exit, that is, have no depressions or locks that will interfere with the removal of the product!
- When leveling the surface, you can use a piece of hacksaw blade, and for perfect smoothing, use Vaseline.
- After the model is ready, we proceed to the main part: collecting the paper layer. Now you need to choose which technique to use: sticker in pieces or in bulk? The fact is that when you type in pieces, the surface of the product turns out to be uneven. If it works for the image of the mask and enhances it, then good. But if a smooth surface is required, then after drying you will need sanding, and this is a very labor-intensive process.
- In this case, the mass that we kneaded will help us out. It will ultimately give a smooth and even surface!
- Coat the model with Vaseline. Spread the paper dough evenly.
- Important point! After drying the layer, we make slits for the eyes and holes for fastening until it dries completely! After the polymer dries, this will be much more difficult to do!
- Modeling using this technique makes it possible to immediately work out all the small details! After complete drying, carefully remove the mask from the model. If you can’t separate them in any way, then it’s better to sacrifice the plasticine base and remove it from the mask piece by piece;
- We clean the edges with sandpaper, removing all burrs.
- We paint with gouache with PVA or acrylic in the desired color. We add decorative and theatrical elements necessary to create a certain image, ribbons or elastic for fastening.
You can go to a masquerade ball!
From beads
New Year's toys are made from beads with your own hands.
Easy to make Christmas tree:
- Make a medium-sized cone out of cardboard.
- Wrap the cardboard base in a spiral with thin and dense wire.
- Bend the ends of the wire and string beads or beads onto it, then remove the workpiece and give the product a Christmas tree shape.
- If you do not make a base, then the metal thread with decorations strung on it should be twisted into a spiral, then pulled by one edge to form a Christmas tree.
- For the loop, attach braid.
Angel:
- You should start making toys from the head. White beads should be strung on a small piece of wire. At the end, fix it by wrapping a ring out of wire and press it with pliers.
- For the body you will need an elongated oval bead, which must be placed on a metal thread after the head.
- At the beginning of making the arms, it is necessary to fix the wire between the upper part and the corset and put beads on each upper limb in order: 1 round gold - 1 oblong white - 1 golden - 1 elongated milky - 1 gold. The tip of the wire should be threaded through the last bead.
- The skirt for the angel figurine can be made from pins, having previously strung various beads on them. Connect them together with thin wire.
- It is advisable to make the wings separately from golden beads and attach them to the back.
Creating a torso frame
While Grandfather's face is drying, we begin to make a frame from wire, that is, the base of the body. Divide the wire into 2 equal parts.
We twist one part of the wire into a ring - this will be our head, then we twist the neck and the ends of the wire diverge to the sides, like arms. And we attach the second part to the neck and lead it down like a torso and spread the ends of the wire to the legs. So our body is ready.
From plastic bottles
To make figurines of this type, plastic bottles of any size are suitable.
New Year's ball:
- For large balls, plastic bottles with a volume of 1.5-2 liters are suitable, and for small products, containers with a capacity of 0.5-1 liters are suitable.
- It is necessary to cut out the middle part of the flask to eliminate irregularities and bends.
- The middle of the plastic container needs to be cut into rings. To do this, pierce the wall with an awl and then cut with sharply sharpened scissors. Or preheat the flask in hot water, which will make the cutting process easier.
- After this, place the plastic rings one inside the other to form a transparent ball. This will be the base of the toy.
- You can make several of these blanks at the same time and decorate them in different ways.
- As an option for snow balls, PVA glue is applied to the surface, after which it is generously sprinkled with salt.
- You can put colored tinsel, crushed old Christmas tree decorations or beads on the adhesive surface.
Christmas tree:
- To work you will need 2-3 plastic green bottles.
- Cut off the bottom of the container. The length of each cut container should be different. This is due to the future size of the tree. Each subsequent plastic tier will be slightly shorter than the previous one.
- After adjusting the size, you should start cutting the needles. They are cut into thin strips, and then slightly curled up using scissors.
- There are two methods to collect the New Year's beauty. One of them involves gluing the elements together, and the second involves assembling the tree onto a base and a rod. An even branch or thick wire, which must be stuck into a container filled with plasticine, can be used as a stick.
- A ball or star should be glued to the top of the top piece.
- You can put small beads or crushed foam balls on Christmas tree needles.
Snowman:
- Take a plastic bottle consisting of 2, or preferably 3, solid spheres.
- Paint the container white.
- The hat and scarf should be made from felt of any shade. For a hat, a fabric rectangle should be sewn along the cut line, and the upper part should be tightened with thread.
- Then you need to glue the headdress to the bottle cap, and tighten the scarf around the neck - the narrow place between the spheres.
- For the hands, it is advisable to make tight balls of cotton wool, fix them with glue and glue them in the middle of the body. Instead of eyes, attach buttons, and depict the nose and mouth with dark paint.
Making a snowman
- We glue small pieces of paper in 5 or 7 layers onto an electric lamp and wait for it to dry.
- To give stability to the figure, we make the legs from foam plastic and glue them using the same technique, and if you want to hang the toy on the Christmas tree, we glue it with a strong thread.
- We paint the blank with white paint, draw eyes and a mouth.
- We also draw buttons on the stomach or use any available material, including black colored paper. To make the snowman look more festive and elegant, eyes can be glued on purchased ones, and buttons can be made from black sequins.
- We cut off a nose suitable for our snowman from felt or craft foam and glue it to the head.
- Take a red piece of fabric and cut off a piece of suitable size for the hat. We sew or glue its side surfaces to form a cylinder. Cut the top edge into strips. It is important that the fabric does not fray. We tie the cap with a narrow strip of red fabric just below the cut strips - we get a tassel on the cap.
- For the scarf, cut off a long, not wide flap, the ends of which are cut into “straws” similar to the brush of a hat. We tie a scarf around the snowman's neck, tying it to the side.
Christmas tree decorations made of papier-mâché (crafts for the New Year)
These papier-mâché Christmas decorations are very cozy and pleasant to the touch. Making them is not difficult, but the process takes a long time. Children don't like it. But this is even beneficial for busy adults. Today we soaked the trays (2 minutes), tomorrow we kneaded the dough (say 15 minutes), then molded them, and you can decorate slowly in the evenings - for some reason, preparing for the holidays is much more interesting than celebrating
You need: paper egg trays, paste, PVA glue. For decoration - corrugated paper, gouache, PVA, starch, semolina, wire.
You need to buy a large container of PVA at a hardware or construction store - it takes a lot. I did something like this.
Fill the trays with hot water.
When softened, tear into pieces and leave in water.
When the pieces have swollen properly, grind them using a mixer or food processor.
Squeeze out the water through a rag.
This is what happened.
Mix the squeezes with paste and a small amount of PVA glue, or just with paste. The result is modeling dough. But you can’t sculpt anything out of it, so you need to choose a simpler form.
I'll show you how I sculpted using the example of a mushroom.
Let's roll a ball in our hands.
Place it in a small round container. Roll the ball into the container. It will turn out even and smooth. It is then convenient to sculpt simple shapes from it.
We plop the ball onto a flat surface and get a mushroom cap.
Punch out the hole for the leg.
The hat can be made in another way. This makes it smoother. It must be dried directly in the mold.
Roll a leg from the same ball.
We dry the workpieces. You can do this on a battery.
The dry workpiece can be immediately covered with crepe paper. If it is very uneven, you can first stick on several layers of toilet paper.
The lower part of the cap is covered with crepe paper, and the upper part is painted with patina (see below).
The cream on the cakes is made using the technique (Country of Masters).
Semolina crumbs. Semolina can be glued on and then painted. Or prepare in advance as follows. Pour a few tablespoons of semolina into the frying pan and stir-fry. When the color changes, put some in a separate container. This is how we get different shades of brown.
Now about the stalemate.
Pat is a mixture of starch, PVA glue and gouache. It is used to make the stamens of the flower artist.
Pat will replace you with chocolate glaze, mushroom or apple peel. You can also use it to make cherries. You need to wrap cotton wool with PVA around a wire, form a berry, dry it and cover it with a mat. Can be done in two layers. If you need shine, then coat the top with more varnish.
How to cook.
Pour starch into a small(!) container and add PVA. Mix and achieve the desired consistency by adding PVA - if you need it thinner, or starch - if you need it thicker. We tint with gouache. It’s better to take the container with a lid so that you don’t have to use the whole mixture at once.
This is how the workpiece turns into an apple. Let's paint it with a stalemate. The tail is made of wire wrapped in crepe paper (we coat everything well with PVA).
Bon appetit creativity!
Christmas tree decorations made of papier-mâché: DIY Christmas decorations
Products made from papier-mâché are known for their durability and beauty: for example, you can make a New Year's toy for the Christmas tree. With the New Year holidays approaching, you want to add a little fairytale and magic to your life. To diversify your preparations for the New Year and Christmas, surprise your loved ones, and at the same time create a magical atmosphere in your home, you can create New Year's papier-mâché products.
From wire
If you have pieces of wire in the house, you can create a beautiful New Year's decoration.
Wire ball:
- Inflate a balloon the size of a New Year's toy.
- Take a coil of flexible wire and cut a piece 1 m long from it.
- String beads and pebbles of different sizes onto a wire. (40-50 pcs.).
- Form a wire frame around the inflated ball in one direction and the other, like meridians. Distribute the density of the beads at your discretion.
- When the wire is wound in the desired amount, you should secure it and form a loop. To do this, in the area of the top, you need to make something similar to a hook from the remaining wires.
- Finally, you need to pierce the inflatable ball and pull it through the resulting structure. Then finally distribute the pebbles around the perimeter of the product.
- Such toys are quite fragile, but if there is any deformation, it can be easily corrected.
Spring:
- Take a small medicine bottle and make 14 wire turns on it (the material should be 1 mm thick).
- Remove the spiral from the bottle.
- Stretch the spring slightly, carefully holding its ends.
- Form the desired number of blanks in this way.
- Insert wire pieces into the foam piece according to the number of spirals.
- Paint the products with spray paint.
- Dry the springs, remove them from the model, and tie hanging threads to them.
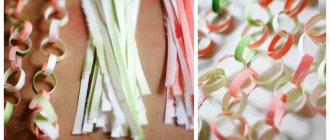
From bright shreds
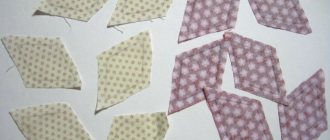
In order to make a multi-colored decoration, you will need bright pieces of fabric:
- Prepare your favorite fabric scraps. They must be carefully leveled and ironed.
- Cut out 16 squares with a side of 9 cm. You can decorate all the parts in different colors, or arrange 4 pieces each.
- From fabric of any color (it will not be visible in the finished work), make 2 circles with a diameter of 8 cm.
- Fold the squares in half to form a triangle and iron.
- Then fold the resulting figure in half and iron it again.
- Perform similar actions with all other squares.
- Sew 2 circles and leave a small hole for turning.
- Fill the product with padding polyester through the hole left, then sew it up.
- Place a triangle around the resulting workpiece with the corners in the middle and stitch it through.
- Repeat steps with all other parts.
- Using a heat gun, attach a button to the center, this will hide the sewing area. Place a ribbon underneath on which you can hang the toy.
Bright figures:
- You need to choose fabric with New Year's patterns or another bright one.
- Prepare different templates (star, hearts, boot).
- Make patterns using stencils.
- Sew identical parts in pairs, leaving a small gap to stuff the toy with cotton wool.
- It is advisable to push the filler with a pencil.
- If you sew crafts from thick fabric, then you should connect the parts with a decorative seam along the edge.
Technique options
Papier-mâché is made in two ways: by gradually gluing pieces of paper in layers and by fashioning figures from wet paper dough. The art of making such figures requires care and patience, the material takes 2-3 days to dry, and finishing takes up to 2 days.
Step-by-step gluing of pieces in layers (machining)
When mashing, the prepared form is pasted over with pieces of paper.
- You need to prepare soft paper, maybe newspaper.
- Tear the paper into small pieces with your hands.
- It is not recommended to use scissors, since the thick edges of the paper do not align in the dried product.
- The first layer of paper is applied and glue is applied on top.
- About 10 layers are required.
- After applying 2 layers, let the previous ones dry.
- The edges of the pieces should overlap each other, repeat the surface, and not form unevenness.
Machining can be internal or external. For external machining, the model is pasted over from the outside; for internal machining, the model is pasted from the inside. If the mold for the cast is supposed to be left inside the finished craft, it is covered with glue; if not, then with Vaseline.
Small parts of the craft are made from a mixture of glue and paper; when dry, they shrink in size. To achieve the desired size, you need to add the required number of layers to the parts.
It is necessary to dry the figures for 2 days at an air temperature of no more than 22-25 degrees. The product will crack if it is dried near heating devices that are turned on. The last layer is made from scraps of white paper.
Modeling from wet paper pulp
The peculiarity of production is that the crafts are sculpted and do not use models or shapes. For cooking, you can use any type of paper or cardboard, since during the cooking process the material softens and becomes homogeneous.
The quality and durability of the finished product depends on the degree of stickiness of the paper pulp, therefore, when preparing, you need to check the pulp for stickiness. Elasticity and stickiness are achieved by adding glue and paste. Chalk and alabaster in the mixture will make it smooth and durable, but such mixtures must be used immediately.
Three types of crafts can be made from paper pulp:
- crafts are empty inside;
- products with a frame;
- frameless.
In order to make a hollow figure inside, sample models are used, onto which the mass is glued or laid out, then the sample and the craft are separated.
When making the second type of crafts, they take the bases that remain inside the papier-mâché figures; plastic bottles, cardboard, and wire are used as frames. Frameless figures are made according to the principle of modeling from plasticine; there are no voids in the craft, and the frame is the paper pulp itself.
Salt dough toys
It’s easy to make New Year’s toys from salt dough with your own hands.
To do this, prepare a batch of the following products:
| Ingredient | Quantity |
| Flour | 1.5 tbsp. |
| Starch | ½ tbsp. |
| Salt (extra type) | 1 tbsp. |
| Water | ¾ tbsp. |
| To make the mixture sticky, you can add PVA | 3 tbsp. l. |
| For elasticity, vegetable oil | 1 tbsp. l. |
The dough ends up being elastic and does not stick to your hands. Then you need to roll it out to a thickness of 1 cm and shape the crafts using various molds. Alternatively, you can sculpt toys yourself, like from plasticine. Then the products are dried, painted and varnished for stability.
When drying, please note that salted clay takes too long to dry. In the open air, this process takes 2-3 days, and in a cool oven (no more than 500C) with the door ajar, from 6 to 12 hours. If you heat the oven to 1000C, the figures will acquire a golden hue. After drying, the products will become hard (stone).
The next stage will be decorating the toys. The best option would be to use acrylic paints. If you make an ornament on clay blanks in silver, they will look like New Year's cookies. You can also use dry pigments or water-soluble dyes that are used to color handmade soap.
Children decorate crafts with gouache, felt-tip pens or gel pens. Decorative elements (ribbons, rhinestones, lace, yarn, twine) are also used for decoration.
Methods for preparing the mass
The master class for preparing papier-mâché recommends that novice craftsmen use a mixture of glue and paste. The sticky mass cannot be frozen, but can be stored for several days. If the mass releases liquid, you need to squeeze it out and add glue.
Newspapers, toilet paper, and all types of papers that are easily saturated with water are suitable for preparing the mixture. The paste can be stored in the refrigerator, cover the container with cellophane.
| Preparation of the mass | 1. Tear sheets of paper, put them in a small container, and fill them with water. 2. Mix the paper and water thoroughly by hand or with a stationary blender, since it will not be possible to mix evenly with an immersion blender. If you knead by hand, add hot water and leave to soften for 3-4 hours. 3. Take a sieve (colander) and drain the water through it. 4. Mix the adhesive composition (a mixture of glue and paste) into the resulting mass. 5. Finish cooking when the mixture begins to stick to your fingers and looks like plasticine. |
| Preparation of paste | 1. Pour 2 tbsp into water. l. flour and starch (take 3 parts water for 1 part flour), mix in a glass. 2. Bring water to a boil, pour in the resulting mixture. If lumps form, crush them. Wait until it thickens. The density of the paste depends on the amount of flour and starch. 3. Use the mixture after it has cooled to room temperature. |
Crochet toys with diagrams and descriptions
Needlewomen can easily make knitted jewelry that is also suitable as a gift to loved ones.
Skates:
- To work with a thread, it is advisable to take a medium-weight thread, a hook No. 1.75, and for the runners use 2 large paper clips.
- First, tie one side of the stationery clip with 17 tbsp. double yarn over, finish row 1 tbsp. with 1 double crochet.
- From rows 2 to 4, knit st. used yarn over.
- At 5 p.m. make 1 tbsp. less.
- At 6 p.m. skip 9 stitches (knit with connecting columns). This is how the sock is formed.
- At 7, 8 and 9 p.m. it is necessary to perform a rounded lift of the skate by not tying or skipping 1 column.
- Then knit 4 more straight tiers.
- Tie the top of the finished skate with yarn of a different shade and decorate the lacing with a needle and thread.
- Tie the second skate in a similar way. Connect a pair of shoes with a knitted chain, by which the craft should be hung on the Christmas tree.
Snowflake patterns:
Knitted ribbon:
- Cast on a chain of air loops along the desired length of the ribbon.
- Knit 1 tbsp into each stitch. double crochet
- You can knit rows in low columns.
- Make the width of the braid no more than 2 cm.
- The length will be enough to form 5 turns.
- Roll up the finished ribbon like a tiered pyramid.
- Between the tiers you can insert small knitted balls or massive balls.
Bright and unusual New Year's toys, created with your own hands, will give the tree a unique look and will also delight your guests. If you involve children in the process of making jewelry, their imagination will help add creativity to the crafts, and joint creativity will bring a lot of positive emotions.
Article design: Natalie Podolskaya
Craft bullfinch
Options for any crafts vary in complexity, materials and abilities. Don't rush into a complex product in an attempt to impress your child with your skills. Firstly, perhaps there are no skills, which threatens the lack of pleasure from work.
It may not turn out as expected and you may be disappointed with the result. Secondly, remember: the bullfinch is made together with the child, and not to show off adult abilities.
Therefore, it is necessary to do a craft in accordance with the child’s skills so that the complexity is half a level higher. The child has to strive and develop, rather than using already developed abilities.
Start with ready-made diagrams so that there are no surprises at any stage of the work.
Start with materials. You can use:
- Plasticine
- paper
- Felt
- Cardboard
- Wool
- Textile
- Beads
Natural materials (For example, pine cones, twigs, spruce needles or dried berries.)
In fact, the choice of material is guided by fantasy or a ready-made scheme.