The interesting activity of making toys using the papier-mâché technique will allow children and adults to create interesting objects and have fun and usefully spend time.
Working with this technique, the child develops thinking, imagination, and creativity. The development of fine motor skills contributes to the mental development of children and the stability of the hand for writing. Using papier-mâché you can create a whole world of new and exciting crafts.
Basic principles of creating papier-mâché
Depending on the product, the work can be of varying complexity, and papier-mâché can be made on any base, which makes differences in the methods of making crafts. But the basic principles of creating papier-mâché with your own hands for beginners are the same in any method. Once these principles are mastered, papier-mâché can become a favorite hobby because it is actually an interesting and relaxing process. Here's how to make papier-mâché:
- Depending on what shape you want the product to be, you need to choose a base. It can be created from any available materials, as well as from paper, wire, plasticine or clay itself.
- The base needs to be protected from glue; to do this, you can cover it with adhesive tape, coat it with Vaseline or vegetable oil, or cover it with foil. All this is done if we are going to extract the base and use it further.
- At this stage, the process of creating papier-mâché begins. Pieces or strips of newspaper or paper are taken, dipped in glue and placed on the base, forming the first layer. Nothing complicated! When gluing the paper, you need to carefully iron it with your fingers, thereby eliminating unnecessary air bubbles, so the fake will be durable and will not get wet. When creating the first layer, make sure that all the pieces are fastened together and lie slightly on top of each other, this is important, because each subsequent layer will rest on this one. This creates several layers, each of which must dry well, otherwise nothing will work.
- When enough layers of paper have been created, the base is separated from the product, if necessary. For example, if a plate or any other important item was taken as a basis. If a balloon was taken, it needs to be deflated. Of course, if the base is wire or something similar, there is no need to remove it, and it won’t work, but the product will become stronger than empty papier-mâché.
- The final stage is painting the product. Not always mandatory, but very interesting, because on it you can show your imagination as much as possible. It’s not very scary to spoil papier-mâché, because it’s a fairly budget-friendly hobby, so you can be as creative as possible. To paint the craft, you can first prime it or immediately start painting the last layer of paper. This needs to be done in several layers so that the paint does not show through. First, apply a layer in one direction, then be sure to let it dry, and then apply paint in the other direction. We repeat this action several times, only in this way the surface will be monochromatic, opaque, and our creation will look as if it was created by a master of his craft.
Method 2
The second method of making papier-mâché is familiar to us from kindergarten creativity, when torn pieces of newspaper were glued to the base with glue, layer by layer.
The more layers, the stronger the product. With this method, glue can be diluted with water in a ratio of 2:1. This method is suitable for creating simple designs without complex relief lines.
The simplest craft made using this method is a paper plate. Take an ordinary plate and sequentially, layer by layer, cover it with pieces of paper, gluing each layer. The finished product can be painted as desired.
Creating a paste
To make papier-mâché with your own hands, you can use simple PVA glue or for wallpaper, after pouring it into a deep container into which you can easily dip and remove the paper. But real papier-mâché masters create their own paste, which can be prepared in different ways.
The simplest paste can be created with just flour, salt and water.
Sift a glass of flour to avoid unevenness, add a little water and half a teaspoon of salt. Then pour in 3 cups of hot water and mix well. Bring to a boil, stirring constantly, and then cook for another 10 minutes. The cold mixture can be used to make papier-mâché out of paper.
The emergence of art
The technique has French roots and dates back to the 17th century. Translated it means “chewed, torn paper.” But, according to researchers, the real birthplace of handicrafts is China. Combat armor was made from specially processed paper with an adhesive base.
Despite the apparent fragility and porosity of wet paper, the ammunition was very popular and withstood the blows of arrows and spears. The lightness of the uniform allowed soldiers to move at greater speed, which provided the troops with increased mobility.
Helmets and breastplates were mass-produced and reliably protected warriors. In contrast, metal armor was affordable, quick to create, and could be made with artistic designs.
Primer of the product
A primer is needed for better painting of the product, smoothing out unevenness and greater durability, although this item is optional. We prime the papier-mâché when it is ready. You can use ready-made primers from art or construction stores, or you can make your own.
The primer should be applied to the product in a thin layer so that it fills all the unevenness, and then allowed to dry. You need to do this several times, and then go over the craft with sandpaper - this will smooth out all the errors.
Manufacturing technology
There are several required steps in order to begin creating your masterpiece. This is a small instruction, consisting of the basics, for beginners to work with papier-mâché crafts.
Painting papier-mâché
To create papier-mâché with your own hands, you can immediately use colored paper or dye newspaper by dipping it in a solution with dye and then letting it dry. But it’s much more interesting to decorate the product yourself with paints.
Paints should be oil-based - this way our creation will look more expensive and brighter. In addition, such paint will protect against external influences and provide additional strength. At the end, the product can be varnished for greater shine.
But if papier-mâché is just fun for children and you don’t want to spend a lot of money, you can always use gouache and not bother too much.
You can paint products in different ways: with a spray bottle, with your fingers, with brushes - the standard method, painting with markers and much more. Everything depends only on your imagination, like everything else in such an activity as papier-mâché. That's why it's so exciting!
Craft design
Once the form has completely hardened, you can begin painting. Here you can let your imagination run wild and decorate it in all the colors you want, subtly drawing out all the details. Acrylic paint is best suited for decoration. It is sold in stores, has good stability, does not crumble or fade.
At the end, you can coat the finished product with varnish, transparent or with glitter, matte or glossy - at the choice of the creator.
Techniques used
For those who want to learn how to work with papier-mâché with their own hands, it is important to choose the most suitable technique. It is more convenient for an adult or a teenager to create masterpieces from the mass prepared with one’s own hands. It is preferable for young children to work with cut-up newspaper or ready-made paper clay.
Working with mass involves three directions:
- modeling a hollow figure on a template;
- frameless product;
- craft on a frame.
If you need to make a large figure or mask, then a template is used for this. Take a mask blank, molded to fit a person’s face, or some utensils, if you need to reproduce its shape. The mass is laid out on this template and hardens. To make it easy to detach, the template either needs to be greased with oil or wrapped very tightly in thin cling film. Sometimes you have to cut the figure after drying, and then connect its two parts with sheets of paper and glue.
The frameless product is molded from paper pulp, like plasticine. Since the figurine must be completely free of moisture during the drying process, it should not be too large.
If there is no template, but you need to achieve significant volume, you should use a frame. It is convenient to twist it from wire, use parts from plastic bottles where they fit the shape, etc. Any suitable material that is not subject to rapid deterioration is suitable as a frame, which is to be covered with papier-mâché paper and adhesive.
For children, the best technology is using scraps of paper. It’s better not to cut it into clear squares or rectangles, but rather to tear it so that you don’t get the characteristic “geometric” protrusions. The first layer of paper is placed on the template object. It can be held in place either by oil or Vaseline, with which the template is lubricated, or by sticking to cling film. The paper will not remain in this state for long, since it urgently needs to be coated with glue and a second layer applied. Every two layers need to be dried, and for strength they need to be applied at least 10. Pieces of paper in each new layer should overlap the joints of the previous level.
The final processing of papier-mâché products is maching, that is, pasting with a paper layer. Machining can be internal or external – as needed.
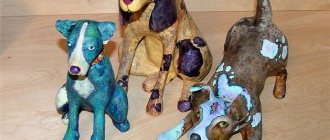
What can be made from paper
The papier-mâché photo shows samples of paper products. These can be children's crafts, dolls, decorative plates, cups, fruit dishes. Art can help you recreate your favorite cracked vase. It is enough to make a cast from paper dough and decorate it in the colors of the original.
Note!
DIY gifts for February 23rd - a large selection of ideas for creating unusual gifts for Defender of the Fatherland Day
What to give a 2-year-old boy - a list of the best options for an interesting and useful gift (120 photo ideas)
- Kimekomi: TOP 130 photos of creative crafts. Schemes for creating a kimekomi ball with your own hands. Step-by-step master class for beginners
Masks for theaters, attractions, street clowns and processions, all kinds of carnival paraphernalia. For designers, the pliable mass serves as the basis for creating interior panels, wall panels, decorative elements from small figurines to pieces of furniture: stands, tables, hangers.
This is a good opportunity to decorate the room in the same style. This is an excellent material for creating decorative jewelry, beads, bracelets, and earrings. Beautiful souvenirs are made from paper: boxes, vases, glass holders.
How to make papier-mâché paste with your own hands
Making papier-mâché mixture with your own hands is much easier than it seems. If you need to get it quickly, then you should not use torn newspaper. It is better to take something thinner - napkins or toilet paper. To make wetting happen faster, toilet paper should be torn into pieces. You can use the napkins whole or cut them into large pieces. You need to fill the container with paper and pour boiling water over it. While the boiling water cools, the papier-mâché mixture will swell and become soggy. It is convenient to stir it carefully at this stage with a long object so as not to burn your hands.
The mass that has cooled to room temperature or slightly higher should be crushed. Any mixer is suitable for this. Both construction and household appliances will cope with the task with a bang. It doesn't hurt to even pour the mixture into a blender and stir.
The finished mass should be placed in cheesecloth and squeezed thoroughly so that as little moisture remains as possible. Next, the mass must be mixed in a separate container with an adhesive composition - PVA glue or wallpaper paste. The papier-mâché mixture is considered ready.
Methods for preparing the mass
The master class for preparing papier-mâché recommends that novice craftsmen use a mixture of glue and paste. The sticky mass cannot be frozen, but can be stored for several days. If the mass releases liquid, you need to squeeze it out and add glue.
Newspapers, toilet paper, and all types of papers that are easily saturated with water are suitable for preparing the mixture. The paste can be stored in the refrigerator, cover the container with cellophane.
| Preparation of the mass | 1. Tear sheets of paper, put them in a small container, and fill them with water. 2. Mix the paper and water thoroughly by hand or with a stationary blender, since it will not be possible to mix evenly with an immersion blender. If you knead by hand, add hot water and leave to soften for 3-4 hours. 3. Take a sieve (colander) and drain the water through it. 4. Mix the adhesive composition (a mixture of glue and paste) into the resulting mass. 5. Finish cooking when the mixture begins to stick to your fingers and looks like plasticine. |
| Preparation of paste | 1. Pour 2 tbsp into water. l. flour and starch (take 3 parts water for 1 part flour), mix in a glass. 2. Bring water to a boil, pour in the resulting mixture. If lumps form, crush them. Wait until it thickens. The density of the paste depends on the amount of flour and starch. 3. Use the mixture after it has cooled to room temperature. |
How to make papier-mâché at home
You need to start working with papier-mâché with objects that are simpler in shape. A vase or saucer would be perfect. If you manage to recreate a saucer or vase from paper, then you should take on more elaborate figures: a dinosaur, a human head, a Christmas tree toy, etc.
From toilet paper and glue
We discussed earlier how to prepare a papier-mâché mixture from toilet paper and glue. The main secret is to squeeze the paper well before adding glue to the composition. Next, we take the vase, wrap it in cling film and begin to apply the composition. You need to completely cover the vase and make sure it is even. Now you need to leave it until it dries completely. Sometimes this takes several days. We take the dried workpiece and cut it into two halves with a stationery knife. We try not to damage the template vase. Both halves at the ends of the cut are coated with glue, and strips of napkins or other thin paper greased with glue are additionally applied on top to cover the places where the papier-mâché layer separates. The seam should also be allowed to dry before you begin painting the vase.
From the newspaper
Let's take a plate as a base. You need to apply a layer of Vaseline or cling film on it. Newspaper, torn into pieces, is dipped into prepared paste or PVA glue. The pieces soaked in glue are placed on the plate from the bottom, if you need to get a slightly larger craft, or from the inside, if the product is needed a little smaller than the template. A second layer is applied to the first layer of paper, after which the work is dried. Then you need to apply two more layers of newspapers, etc.
To make a papier-mâché object durable, you will need 10–12 layers, or even more. This depends on the original thickness of the newspaper sheet. Crafts made from thicker paper take longer to dry, so it takes more time to fuss with them. But thin material will require more layers to achieve suitable strength.
From paper clay
Working with paper clay is done in almost the same way as with papier-mâché from napkins. Only the stage of preparing the mass is simply omitted. Since paper glue is sold ready-made, you need to study the instructions for working with it on the packaging. In particular, if a template or frame is needed, how the mass will interact with it will become clear from the instructions.
If a figure is molded from paper clay, like from plasticine, that is, without cavities, then you need to pay special attention to the proper drying of papier-mâché. After all, moisture will evaporate from the depths of the product for a very long time. You may have to create the figure in stages, as if in layers. First, sculpt a certain frame, dry it, and then cover it with a new layer, giving it the necessary shapes and bends. Dry again, then apply the finishing layer with all the subtleties of the relief.
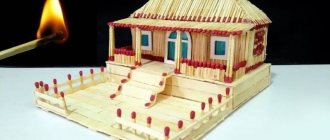
Houses
I'll start with the video of the master class - wonderful!
Now photo master class
To make a house, we need:
- Additionally, you may need foil to construct parts from it. But if the mass is elastic and is well attached to the base, then all the parts are made from it;
- instead of a balloon, use a jar for the base;
- not newspapers, but a mass of papier-mâché.
How to do it. Simple instructions:
- First, we cover the jar with “plasticine”, taking into account the doors and windows.
- Level the surface.
- We apply a pattern in the form of masonry or make convex “bricks”.
- Let's decorate.
- The author of the master class is Svetlana, she has her own shop at the crafts fair.
Do you want to make a two-story house?
After the figures are made, it is worth paying attention to alignment. To do this, you need to sand the craft. Then you can start painting. Otherwise, unevenness and bumps will be noticeable due to lumps in the mass or due to layers. Such irregularities can be disguised with decor.
How to dry the finished product
Making papier-mâché means not only sculpting a masterpiece, but also subjecting it to high-quality drying, which provides almost half the success. If ceramics need to be fired at high temperatures, then with papier-mâché everything is different. The material does not tolerate too rapid heating. It must be remembered that the base is paper, a flammable material, so the figures should be removed away from open fire. There are recommendations on how to dry papier-mâché in the oven of a gas stove, but it is better for beginners not to use this method.
The material dries well in the open air near the radiator, in the sun, next to (but not close to) an electric heater, in an extinguished but heated stove. The oven can be used if you have an electric or combination stove. You should first heat up the gas oven, turn it off, and only then place the papier-mâché product there. You should not close the door completely, because air circulation is important so that water vapor is carried away from the product.
If papier-mâché consists of many layers, then it is better to glue no more than 3-4 of them, and then leave the work for a day so that it dries completely. Only then is it possible to take on the next layers.
New Year's toys and papier mache
And again, we take a balloon as a basis, inflate it to the desired size and cover it with beautiful paper or napkins in several layers.
Even if this is your first experience, even if you have no artistic talent, you can handle it! The main thing is to start!
Egg Tray Craft Ideas for Home
By following the step-by-step guide, you can make beautiful items for your own use or as gifts to friends.
Egg Tray Frame
To make the craft, use a mass made from cardboard egg cartons; it must be fresh.
- Take a cutting board and wrap it in cellophane. This is necessary to separate the craft from the board without spoiling it.
- Using a rolling pin, roll out the wet cardboard mass to a thickness of 1 to 2 cm; the mass must be prepared in advance. Cut a rectangle with a width of 15 cm and a length of 21 cm.
- You can create a recess for a photo in a frame using a smaller box. Insert the box into the center of the mass, circle it with a plasticine knife. Pressing along the outlined perimeter, make a depression.
- If there is no box, you can use a ruler and pencil: draw a smaller rectangle inside and deepen it around the perimeter.
- When decorating, use the indentation method, for example, lace. Place the lace on the surface of the frame in the shape of a pattern, push it through, and remove it. You can use a knife for shallow patterns.
- The product must be dried at natural temperature; paints and varnish can be applied to the dry frame.
- To insert a photo, you can use double-sided tape.
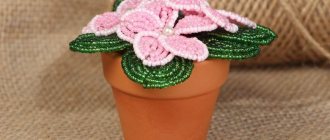
Christmas wreath of flowers
Papier-mâché (a master class for beginners will help you make a craft using maching methods and sculpting from wet paper pulp) is suitable for making a Christmas wreath. The wreath will consist of flowers and spruce branches, which will be attached to the base in the form of a ring, hollow inside.
Ring sculpting:
- Mix small pieces of cardboard boxes and boiling water and leave for a day.
- Twist in a blender, drain off excess liquid and add a spoonful of PVA glue.
- Roll out the resulting mass on a cutting board.
- Take a round tray or plate with a diameter of at least 30 cm, place it on the mass and trace it, cut a circle with a kitchen knife.
- Using a plate with a diameter of no more than 23 cm, make an impression of a circle and cut it out.
- Leave until completely dry.
Making flowers:
- Prepare small pieces of paper and tear them with your hands.
- The adhesive base is paste, cook as follows: dilute 2 tbsp. l. flour in a glass of water, pour into boiling water (2 liters), bring to a boil, breaking up small lumps with a spoon.
- Inflate a balloon with a diameter of up to 15 cm.
- Dip each piece of paper into the paste and cover the entire surface of the ball in 5 even layers.
- After drying, cut the ball lengthwise into 2 equal parts, paint it red, blue, yellow. This is what flower petals look like.
- Cut a circle with a diameter of 10 cm from cardboard and paint it in the desired color.
- Glue the petals to the circle with PVA glue with the addition of paint that is used to paint the circle.
Assembly begins with attaching spruce branches - artificial or live - to the ring, then flowers and ribbons are attached.
Papier-mâché vase
Papier-mâché (the master class for beginners advises starting with choosing a method: maching or modeling) is used to make a vase. If the vase is hollow inside, then you need to choose machining. If you need to make a vase without space inside it, turn to the modeling technique.
For sculpting a vase:
- Make a wet mixture from egg trays: soak the trays, squeeze them out and add 1 tsp. glue and 7-10 tbsp. l. paste.
- Make 2 balls of different diameters, one larger than the other at least 3 times. From one ball - sculpt the neck of the vase, from the other - the base. Connect the parts, adding more mass so that the lines are smooth.
- Apply a layer of putty and dry. Decorate to taste.
Making a vase using the mashing technique:
- Prepare an item that will be used as a base. The shape of the dishes should not be complicated, since after the work is done, the papier-mâché must be removed from the object.
- To avoid damaging the surface of the mold, wrap it with cling film.
- Place the base upside down and apply Vaseline to the cling film.
- Pour white PVA (good quality) into a small container.
- Soak the pieces of cardboard in glue and place them on cling film in layers, 10 layers, dry each well. After finishing work, dry the craft for a day.
- If the sample vase has a complex shape, cut the cardboard layer along the product.
- Glue the resulting halves together with several layers of paper, and after drying, apply a layer of putty.
Christmas angel
Let's try to make, first, a simple job - a Christmas angel!
- Torso and head. We choose the manufacturing method - from mass or in layers. If from a mass, then we form a cone and a ball from metal foil, completely covering them with our composition in an even layer. Let it dry and put it together using a toothpick coated with glue.
- We model the hair on the head and create the desired hairstyle. We do not sculpt the eyes, mouth, nose and ears!
- On the body we form the arms in relief: clothing sleeves and hands.
- We cut out two wings from cardboard, connected together by a partition. We cover them with our miracle composition, first on one side, then on the other. We imitate feathers with a stack and glue the wings to the angel from the back. We dry the product.
- Painting and decorating is a separate task! We decide on a color scheme: cold or warm. Cold colors include blue, blue, violet, and green. To warm: yellow, red, orange, brown. Cover everything except the face and hands with a dark tone! Then, using lighter paint and a wide brush, lightly touching, we emphasize the protruding relief: on the hair, wings, body.
- We put dots on our eyes and draw a happy smile!
- We glue an Easter cake, a Christmas star or a flower made in silicone molding to our hands. Ready-made moldings can be purchased.
Now our angel is ready!
Sometimes there is a need to use various masks: in a theater group, in a costume show, or you just want to decorate the interior of your apartment, but what you need is not on sale or is very expensive. No problem, now you will learn how to do everything yourself step by step!
Garden crafts made from egg trays
The technique is successful for the manufacture of objects that decorate the territory of the garden plot.
Decorative figures for the garden
Figures sculpted using the papier-mâché technique are suitable for decorating a garden: these can be fairy-tale characters, stones, watering cans, flowers, fountains.
Manufacturing stages:
- Since the figures for the garden are significant in size and weight, it is necessary to make a frame (wire, cardboard, bottles). The frame should resemble the outlines of the future product.
- Prepare the adhesive composition: glue and paste.
- Tear the trays into small pieces and, dipping into the adhesive base, apply 8-10 layers to the frame. After every 3 layers you need to dry the product.
- Make small parts of the figure from pieces of toilet paper soaked in glue, so it becomes more elastic.
- At the end of the work, cover the entire craft with toilet paper.
- Paint with gouache, apply a layer of PVA glue, and varnish.
Garland
To make lampshades for garlands, machining is used:
- Inflate balloons of suitable size. Attach the string of the ball to the table. Grease the ball with cream.
- Tear cardboard trays into small pieces.
- Boil the paste: for 1 liter of water – 2 tbsp. l. flour. Boil until the consistency of jelly. Add the contents of one jar of gouache to the jelly in the color of the lampshades.
- Dip pieces of cardboard into the cooled paste and lay them in layers on the ball, making 3-4 layers. Dry each layer. If the cardboard is very thick, it must be soaked in water for several hours.
- After the papier-mâché has dried, deflate the ball and remove it.
- At the bottom of the craft, where the tail of the ball was, cut a hole with a diameter of up to 1 cm.
From napkins
Figures from napkins are made using the technique of mashing and sculpting, so depending on the method, either the dough is made or the napkins are torn into small pieces.
Technology of sculpting from napkins:
- Preparing the dough.
- Prepare 2-3 packs of white napkins.
- Place them in a deep bowl and cover with water. The water should be at least room temperature.
- The wipes absorb moisture after 5-10 minutes.
- Squeeze out the mixture and add a mixture of glue and paste, mix.
- Knead like regular dough until the mass is homogeneous.
- Modeling of products.
- The product can be made with or without a frame. For napkin dough, cotton wool or wire is used as a frame. The frame is pre-treated with glue, the mass is applied in layers, and allowed to dry. Each layer is treated with glue.
- The surface of products made using the papier-mâché technique from napkins is smooth, even, the figures dry within 4-6 hours. The mass is not dense, but elastic, so the crafts are light.
- decorate the figures with gouache or acrylic in several layers and varnish.
Step-by-step master classes for beginners
If you do not have much experience with the papier-mâché technique, it is better to choose the layer-by-layer method. Choose simple base shapes, without significant irregularities or bends. Prepare all tools and materials in advance so as not to be distracted from the process.
Master class: how to make Christmas tree decorations from papier-mâché. For Christmas balls on the Christmas tree you will need:
- newspapers, glue or paste;
- paint, glitter, colored paper for decoration;
- varnish;
- thread, needle;
- Balloons.
Operating instructions:
- Inflate the balloon to the desired size. Cover with a layer of greasy cosmetic. Tear newspapers into small pieces measuring 1x1 cm, coat each piece with glue on both sides. Cover the ball in 3 layers, leaving a small hole near the knot. Dry the product for 6 hours.
- Repeat pasting the next 3 layers. Let dry for another 6 hours. Take the balloon by the tail and, without letting go, pierce it with a needle. Pull the rubber casing through the hole and seal it with several layers of paper. Try to ensure that the paper lies smoothly in this place (even with the previous layers).
- Paint the workpiece in different colors. You can draw patterns, decorate with sparkles, beads, or paste over pieces of colored paper. In order for the decoration to serve for a long time, cover it with two layers of varnish. Using a needle, thread a thread through the base of the product and make a loop.
We recommend watching the video instructions:
Master class: stand-holder for rings in the shape of a hand. Prepare for the craft:
- Rubber glove.
- Plastic paper pulp.
- Hand cream.
- Needle.
- Stationery blade.
- Paints, varnish.
Operating instructions:
- Prepare paper pulp for modeling. Apply cream to your hand and put on a rubber glove. This is necessary to apply the cream to the inside of the glove.
- Gradually compact the plastic composition into the glove. You need to start with your fingers. Make many holes in the rubber shell using a needle so that the liquid evaporates and the product dries.
- It may take several days for this craft to dry. Next, carefully remove the glove. Align the workpiece at the base with a stationery blade, paint and cover with two layers of varnish.
- Place the craft on a flat, solid base and secure it in a vertical position.
We recommend watching the video instructions:
Master class: decorative plate made of papier-mâché. Prepare for work:
- Plate.
- Polyethylene film.
- Scissors, blade.
- Newspapers, glue.
- Paints, varnish.
Operating instructions:
- Cover the plate with film. Cut the newspapers into pieces measuring 2x2 cm and sprinkle with warm water. Place an even layer over the entire outer surface of the plate and coat with glue.
- Lay layers of newspapers step by step, moisten and coat with glue. Use a spray bottle to evenly moisten the paper. After laying 4 layers, dry the workpiece for 3-4 hours each time.
- When the thickness of the product is 3–4 mm. Remove the workpiece from the base and leave to dry for a day.
- Trim the edges of the craft using scissors or a blade. Paint and varnish.
We recommend watching the video instructions:
Crafts: vase, house, plate for beginners
Papier mache plate
Any shape or plate will be suitable as a base. We use the 3rd option of papier mache - layers of newspapers. You can quickly and easily make a candy bowl or decorative plate
Vase
Video master class
We will need:
- Pieces of newspaper;
- Paste;
- Ball;
- Water;
- Paints;
- Tassels;
- Enamel.
Making:
- Moisten the ball with water. Place the first layer of newspaper pieces on the wet base. You can also lightly moisten the pieces themselves.
- Coat the entire layer with paste and apply a second layer. Now the pieces are already soaked in glue.
- Do this for each subsequent layer. The thickness of the product depends on your preference. For example, 10 layers will ensure the strength and lightness of the vase.
- After every 2 layers, dry the product well.
- Allow to dry completely.
- Deflate the balloon and remove it.
- Align the neck. Draw a circle and make cuts up to this line. Then cut off all excess.
- Strengthen the neck. Glue pieces of newspaper onto the edge so that the other end of the piece is folded inward.
- Apply enamel or 2 layers of acrylic paint at once.
- Decorate using any decor you like.
Specific Recommendations and Cautions
The following recommendations are made:
- In order not to get confused by the number of layers, you can separate them with colored paper. If you plan to make a white craft, finish with 5-6 layers of white paper.
- To prevent material from remaining on your hands while sculpting from the mass, use gloves and wet them periodically with cold water.
Dry the product under normal room conditions. Do not use a hair dryer or place the craft on a radiator. High temperatures can cause cracks.
- You can use any household items as a frame, or you can make it yourself in any shape. To make the base, use plaster or plasticine.
- To paint products, use thick paints: gouache, acrylic.
We recommend watching the video instructions:
Structural strength
To increase the strength of the structure, other ingredients are added. This can be plaster or putty, pre-diluted with water, the consistency of thick sour cream.
Any detergent or a small amount of vegetable oil will add plasticity.
In fact, any master has his own tricks, which he acquired through experience or experimentation. During the creation process, he modifies the recipe and improves the skill.
Useful tips
The mass of papier-mâché can be stored simply in a plastic bag for the first 5 days. Over the next week and a half, it is better to put the substance in the refrigerator. It is important to pay significant attention to drying the finished product. Since the figurine is made on the basis of paper, that is, a flammable material, it would be a bad idea to keep it near an open fire. In principle, there are instructions for drying in the oven, but this method is still intended for experienced craftsmen.
Papier-mâché will dry well in the open air near a radiator, in the sun, not far from an electric heater, and also in an extinguished heated stove.
If the product is formed from several layers, then it is recommended to dry it several times - approximately every 3-4 layers.
The easiest way to decorate the finished work is by brushing it with a layer of paint - variegated packaging or regular colored paper. A more complex, but also more attractive method is primer. The figurine is first sanded to make it smoother, and then covered with primer. When this layer dries, it can be coated with paints. A thick paper product can be painted with a marker or felt-tip pen, and then decorated with sparkles and rhinestones. It can also be decorated with pieces of fabric, braid or mesh. By the way, throughout the entire process it is preferable to work on a table covered with oilcloth. Since interaction with adhesives will be carried out with bare hands, you will need to prepare a piece of dry cloth for wiping.
Sources
- https://handskill.ru/479225a-pape-mashe-svoimi-rukami-dlya-nachinayuschih-opisanie-tehniki-foto-izdeliy
- https://AlfaLady.org/rukodelie/394-kak-sdelat-pape-mashe.html
- https://daynotes.ru/pap_e_mashe_svoimi_rukami_dlya_nachinayuschih/
- https://handsmake.ru/pape-mashe-master-klass.html
- https://VseProKley.ru/podelki/kak-sdelat-pape-mashe
- https://vplate.ru/pape-mashe/dlya-nachinayushchih/
[collapse]
Little secrets
What additional (optional) ingredients are used? There are a lot of secrets and subtleties that will help make products more accurate and parts small and thin:
- PVA construction glue (not ordinary office glue).
- Add putty.
- A little plaster.
- Construction adhesive (for tiles, etc.).
- Liquid soap gives greater plasticity.
- Sunflower oil - and the mass does not stick to your hands.
- Starch and/or flour. Then the desired viscosity appears and then it will be easier to knead the “dough”.
- Lemon juice. If you want to prepare the mass in advance and store it.
Important!!! If you choose method 2, I advise you to find suitable toilet paper. Don't be sorry! Buy quality! It is thinner, 2-3 layers. Dissolves in water without lumps.
Questions about the material
Under what conditions should it be stored?
Up to 5 days - just in a plastic bag. More than 5 days, a week and a half - in the refrigerator.
What consistency should the glue be (purchased and your own)?
You need a medium consistency. If the glue is too thick, you can stir it with water. More liquid means more dry ingredients are added.
Paper, newspapers or napkins?
The choice of one of the main ingredients is decisive. Then the way you will construct the toys and the opportunity to work out the finer details are immediately determined.