To many, the papier-mâché technique seems quite complicated and unrealistic. With its help, extremely interesting things are created, beautiful and similar to works of art. Only this technique is not at all exorbitant, but quite doable at home.
The papier-mâché technique itself, as a method of creating three-dimensional figures, involves working with hard paper mixed with plaster or glue.
A three-dimensional figure is created using the pressing technique, and this is done quite simply. A detailed master class with step-by-step instructions on how to create something unique will help you with this.
A papier-mâché dog would be an excellent start to such creative activity. After all, such a figurine will not only be a wonderful decoration for any interior, but will also help you have a great and exciting time, especially if you make this figurine with a child, developing his hand motor skills, thinking, memory and attention.
Papier-mâché technology
Many people remember how to make a homogeneous mass from glue and paper from childhood (in Soviet art schools, and sometimes in general education schools, they taught this art). Paper (for example, newspaper) should be torn into small pieces by hand and filled with water. If possible, boil it for half an hour over low heat. Otherwise, leave it to swell for an hour and a half. Then knead the mass thoroughly with your hands, trying to achieve maximum homogeneity. It is advisable to use medical gloves made of thin rubber, since both newspaper and glue have a negative effect on the skin. The resulting paper pulp is squeezed out. This can be done by hand or using a strainer. And then glue is gradually added to it, obtaining something similar to dough. As soon as the mass becomes obedient, it can be considered ready-made raw material for papier-mâché.
Suitable materials
All paper materials are suitable for papier-mâché: newspapers, paper towels, toilet paper, napkins, egg cartons. All paper for work is torn by hand or cut into pieces measuring 1.5 × 1.5 or 2 × 2 centimeters. Egg trays are used to create mass for modeling.
Newspapers
The most popular and classic material is newspapers. This is a fairly inexpensive and accessible material for making crafts and toys. Old unwanted newspapers will serve well for creating dishes, fruits, flowers, and toys for children. This is a soft, comfortable and high-quality papier-mâché material.
Paper
White paper is used in the papier-mâché technique to make toys that do not require painting or are covered with a thin layer of paint. Typically A4 size office paper is used. White parts of blanks or toys are simply coated with a thin layer of varnish.
You can use corrugated paper, but it is used to make paper pulp for sculpting three-dimensional figures. Colored paint can stain your hands, so you need to wear gloves when working with it.
Toilet paper
Toilet paper is a good material for creating a modeling mass. Its pieces are soaked in water, squeezed out and starch and PVA glue are added. The result is a good adhesive mass from which you can form figures of animals, birds, hearts, mushrooms, make paintings and much more.
Egg trays
Egg trays are used for sculpting large products. To obtain a good mass for modeling, pour hot water into the egg trays and leave for a day.
When the entire mass is well dissolved in water, squeeze it out well using gauze or cloth and add paste.
From this mixture you can sculpt mushrooms, stumps, trees and other large objects. Paint after drying with regular watercolors.
How to make a bracelet or beads?
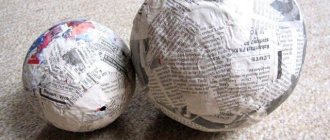
Having received the material, you can begin to create the simplest product. Beginners who are encountering this technology for the first time are advised to start with something simple. These can be Christmas tree decorations made of papier-mâché (the easiest way to make a ball), a bracelet or beads. In all of these cases, first roll a papier-mâché ball of the required size. Then, when a sufficient number of them have been made, through holes are made for the fishing line using a needle and left to dry. The final, most interesting stage of creating a decoration is its coloring. You can simply cover the beads with one color, or use a thin brush to paint flowers, stars, or some interesting ornament on them. It all depends on the skill and imagination of the author. After the paint has dried, they are strung on a fishing line and, depending on its length, you will get beads or a papier-mâché bracelet.
Pencil made from toilet paper
Using a sleeve and cardboard you can make a base for a pencil holder. Glue everything together using PVA glue, let it dry, and then start decorating. You will need to take a roll of toilet paper for decoration. Spread the glass with PVA, and then wrap it in a couple of layers of toilet paper. Make tubes out of toilet paper and start laying out flowers. In fact, you can make flowers in a variety of different ways, all techniques are available on the Internet, you can easily see how to make roses, daisies and other flowers from toilet paper.
Glue all the flowers you made to the cup, and then paint it.
What other interesting things can be made from toilet paper?
A roll of toilet paper can be the best material for creating a vintage rose.
To make a beautiful flower, you will need to prepare:
- A skein of twine;
- A roll of tape;
- Newspapers;
- Old wallpaper;
- A roll of toilet paper;
- Tweezers;
- Scissors;
- Cardboard;
- Stapler and staples;
- Pen;
- Cup;
- Paints;
- Glue.
When you have prepared everything, you can start creating crafts from toilet paper with your own hands. Take the reel and remove any tape that may remain. Place the spool on a cardboard sheet and trace the outlines with a pen. Cut out the round base and you will have a bottom for the future pot. Apply glue to the contours of the circle and cover the bottom of the spool with it, hold the product until it sticks. You have a base for a pot!
Make one large lump of old newspapers, which is larger than the dimensions of the pot, and then apply glue to the walls of the pot and insert the newspaper lump inside.
You have received a kind of mound in a pot, now you can start making roses.
Unwind the toilet paper from the roll and tear it into forty centimeter pieces. Fold the resulting cuts in half lengthwise, and fold the edge on the right side down. Now bend the same edge again, but towards the center of the cut, and then take the edge of the future flower in your right hand and begin to twist the rose. Make a couple of turns, and when you begin to wrap the product around the core of the flower, you will need to regularly bend the paper so that you get a lush and beautiful flower.
To secure the craft, you can use glue or a stapler with staples. Now you can make a couple more roses using the same technique to end up with a bouquet.
Dry the roses, and only then are you allowed to start decorating the pot.
Glue the roses onto the tubercle of newspapers, and then start decorating the pot. Use pearl stones, old wallpaper, beads and other decorative materials to get a beautiful product.
How to decorate a pot? Use your imagination; you can use decorative ribbons, stones, beads, and old vintage wallpaper. Can't think of anything? Then use the World Wide Web and find an interesting solution! The main thing is not to give up and show creativity.
Both you and your children will enjoy this pastime. Don't be afraid to take risks, give children the opportunity to express themselves and find their own talent!
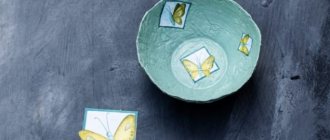
How to make a plate?
Usually, a different technology is used in the manufacture of dishes.
You will need the same ingredients: glue, paper (newspaper and thin white paper, for example, tracing paper, in approximately equal quantities), as well as paints, but you will need to proceed in a different way. Additionally, you will need a ceramic plate, by sticking it around it, you get the same one from papier-mâché. How to do things like this? Very simple. First, the newspaper is torn into small squares (2x2 or 3x3 cm). It is not recommended to use scissors, since the uneven edges provide an imperceptible border between the fragments. Then do the same with white paper. Glue is poured into a saucer or other dish so that it is convenient to dip the pieces into. The plate must be greased with something greasy to make it easier to separate the finished product from it. And then a layer of newspaper pieces is glued onto it, dipping each of them in glue. This must be done so that they fit tightly to each other, forming a homogeneous surface. As soon as the entire plate is pasted over, white paper is applied on top using the same principle. Thus, alternating layers, they are applied from 8 to 10. After this, the plate should dry. As a rule, this takes about a day. Another 4-5 layers of white paper are glued onto the dried surface so that the newspaper can no longer be seen through it. After another day, the ceramic plate is removed, and the finished product is covered with several more layers of white paper on the bottom side. After 24 hours, you can start painting, after which the craft is considered complete. If desired, the plate can be coated with a transparent varnish, which will make it stronger and the design more durable.
Tips and tricks
Such crafts are great for decorating apartments, country houses and plots. Using this technique, you can make original lamps, photo frames, figurines, garden decor and various figurines.
Helpful Tips:
- The material in any fake must be fixed and given strength. Since the technique uses paper as the basis, fixing it in this technology is very important for all figures.
- Fixation must be carried out in several layers: initially use a primer or glue, and then decorative varnish.
- Any paint is suitable for work - gouache, acrylic, oil versions or watercolor. The color scheme depends on the choice of the master.
- At the final stage, each work must be primed with a water emulsion, allowed to dry, and only then proceed with decoration.
- To make the varnish matte, you need to add a special mixture to it. You need to take a small piece of laundry soap, grind it and dissolve it with kerosene, and then pour it into the mixture with glossy varnish. Mix everything thoroughly.
Papier-mâché technology does not require large investments and is easy to implement. You can make crafts with your children - this will help develop their sense of taste and skills such as patience, perseverance and hard work. The papier-mâché mass is very plastic, so it is easy to work with.
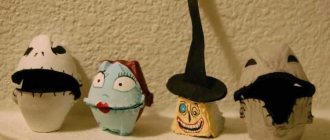
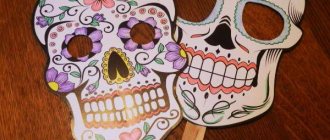
Papier-mâché masks
There is another popular souvenir made from this material.
Masks are usually created from pieces of paper, but they can also be made from previously prepared mass. Their making is considered more difficult than making beads or plates. So it’s not worth starting work without any experience. If you plan to sculpt the mask from papier-mâché (how to make the substance itself is described above), then besides it and paints, nothing else is needed. In this case, you just need to give it the required shape with your hands. To make this easier, you can use a mannequin or apply papier-mâché directly to someone's face while the cream is applied. The finished mask is dried and painted with acrylic paints as desired. Particular attention should be paid to the eye holes. If necessary, you can finally correct them with a stationery knife after drying. If you plan to use pieces of paper, then it is advisable to first fashion the base, for example from plasticine. It should be covered with pieces of paper, similar to a plate. It is better to remove the plasticine base after the mask has dried. So that it can be used for its intended purpose, and not just as a souvenir, small holes are made on both sides into which a ribbon or elastic band can later be inserted.
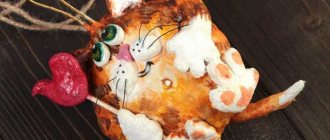
Master class “Dogs made of corrugated cardboard”
Master class on making a New Year's symbol for the "New Year's Craft" competition.
Author: Galina Suglova, Izhevsk, Harmony school.
The low complexity of manufacturing and accessible materials will allow the use of MK in working with children.
Materials and tools: - corrugated cardboard - acrylic or gouache paints - doll eyes - narrow ribbons or lace for eyelets - scissors - awl - eraser - crochet hook - brushes - foam sponge - dog template.
Trace a template of a dog and two ears onto corrugated cardboard. It is better to make the drawing simple so that there are no problems with cutting later.
Carefully cut, trying to get by with fewer creases. You can adjust the workpiece with nail scissors.
Using a foam rubber swab or sponge (you can use a dish sponge), apply paint along the edge of the workpiece. I used two colors: first a lighter one, then a darker one. It is more convenient to work with paint almost without adding water, then the workpiece will dry quickly and the cardboard will not be deformed by water. Do the same with the reverse side of the workpiece.
Finish the nose with a thin brush and glue on the eyes. If the eyes are not self-adhesive, then use Moment glue.
Attach and align the ears on both sides, and use an awl to make a through hole. When making a hole, it is convenient to use an ordinary eraser, then the awl will go in easily and softly.
Using a crochet hook, thread a narrow ribbon or lace through the hole.
Tie two knots above your head so that the ears move freely. Tie the ends together to make a loop.
The decor of the dogs can be easily changed and you can get toys in different styles. For decorative finishing you can use stickers, painting, applique, etc.
The manufacturing principle can be used for toys of other shapes.
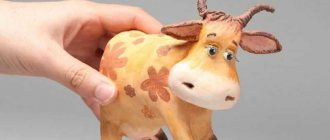
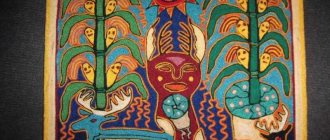
Papier-mâché figures
Such souvenir products are often found in specialized stores. But if you wish, you can create figurines of animals, mythical characters, dolls, flowers or fruits yourself. When it comes to small souvenirs, they are usually made from paper and glue. In the case of larger objects, a mock-up is first made, which is covered with pieces of paper on top. Animal figurines symbolizing the coming year are especially popular during the Christmas holidays. This is a dragon, snake or horse made of papier-mâché. Undoubtedly, to create such a creation, you need both talent and certain skills. After all, these are not simple balls or plates. But sometimes one desire is enough to build a funny (even if not very similar to the real) little animal and give it to a loved one. To make it more stable and strong, you can first make a wire frame. And only then cover it with paper pulp and decorate it.
How to store papier-mâché products?
It is well known that paper is a capricious material. It is easily destroyed by moisture, can change its properties from high or low temperature and direct sunlight, and is easily flammable. Knowing how to make papier-mâché (from paper in pieces or a mass mixed with glue), you should also understand how to properly store the products. Undoubtedly, the glue itself, the paints, and all kinds of frames used in the work make it somewhat stronger. But papier-mâché, like ordinary paper, is afraid of dampness. Therefore, products should be stored exclusively in a dry place. In this case, it is advisable to avoid extremely low and extremely high temperatures and open fire nearby. If stored properly, figurines, dishes and other figurines can delight the owner for many years.
Preparing material for work
For machining and modeling techniques, it is enough to tear the paper into strips or scraps, but for modeling you will need special paper dough. Let's take a step-by-step look at one of the options, suitable for large crafts:
Ready! Keep in mind that you can prepare a lot of this mass at once, and soak it with water before use.
Important! The prepared paper dough must be mixed with PVA glue immediately before modeling. Wallpaper glue can be added immediately after straining out the water, but this mass must be stored in the refrigerator.
Here is an option for making paper dough for small and thin elements:
Using technology for children's creativity
Preschool children and older children love to make things with their hands. This develops creativity and develops finger motor skills. As a rule, plasticine or clay is used as a material. But papier-mâché is no worse. After all, this is an absolutely natural, safe material (especially if it is made on the basis of paste), which children of any age will be happy to work with. Of course, it is better for one of the adults to prepare the mass itself. But everyone can sculpt it together: from the little ones to high school students.
Tame animals. DIY animals.
I started drawing animals back in school, a very long time ago. I really enjoyed learning about animals through drawing, and it also helped me learn about the natural world. Later, when I had children, I sold my pen and ink drawings of wild animals.
Now I work for myself, create websites and write books. I continue to create drawings and sculptures of animals. In my free time from work, I communicate with fellow papier-mâché lovers around the world and answer their questions.”
Snow leopard sculpture
Huge elephant
Old gray horse
Emperor penguin family
Chi-hua-hua. It took three days to create the sculpture. The master was in a hurry