It is no secret that in our country there are many craftsmen who are capable of creating all kinds of technological wonders from scrap materials. Of considerable interest are the capabilities of the engine from a walk-behind tractor, which can be equipped with a motorcycle, swamp vehicle, snowmobile and all sorts of other devices. Why are such solutions attractive?
First of all, its accessibility, not to mention the ability of talented mechanics, while doing interesting work, to find practical and original application for their efforts, creating things needed in the household. As for a homemade motorcycle with a walk-behind tractor engine, this solution can be called not only practical, but also quite simple to implement.
You can make a motorcycle from a walk-behind tractor yourself
Do-it-yourself minibike: photo and description of production
Homemade minibike: photo and description of making a homemade product.
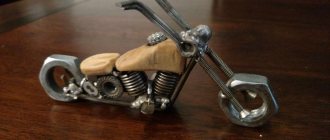
Several years ago, while scrolling through pictures of motorcycles on the Internet, I came across an American site dedicated to minibikes - small, homemade motorcycles with engines from various agricultural machinery. In my childhood, we also built something similar, as a rule, it was a children’s bicycle “Mishutka” with a D-6 engine.
Unlike our country, in America this entertainment is on a larger scale - kits for self-assembly, individual components, and tuning kits are sold.
Old minibikes and parts for them have significant value at online auctions. Having an ardent desire to someday do something similar, I began to look for drawings and came across an article in the magazine “Popular Mechanics” dated January 01, 1970 entitled “Tom thumb minibike” with instructions for self-assembling a small motorcycle.
The most valuable thing is that the article provided quite detailed drawings, all that remains is to convert all the dimensions from inches to metric, buy a welding machine, and you can start building!
From the very beginning I decided not to strictly adhere to the original design, retaining only the dimensions of the frame. The vintage Ohlsson and Rice engine from the article was replaced with an equally tiny but modern trimmer engine. In the photo you can estimate the size of the motor in comparison with a wrench of 10. At first, I did not believe that such a tiny unit would be able to move me.
The centrifugal clutch for it, as well as sprockets and chains, were purchased in China.
At first I wanted to buy a ready-made intermediate shaft; they are sold on ebay under the name “minibike jackshaft kit,” but in the end I decided to make it myself. At the same time I installed a small disc brake on it.
The overall gear ratio of both chain drives turned out to be about 16:1. 4-inch wheels, from a garden wheelbarrow. The axles are M12 bolts with adapter bushings for fitting into wheel bearings.
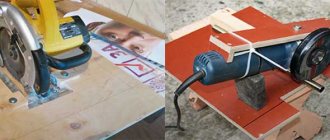
To make the frame, 5 meters of ordinary half-inch water pipe were purchased and a homemade pipe bender was welded.
Then, in one evening in the garage, the frame was bent and welded, the minibike began to look like what was seen in the magazine.
The steering column, like the original, does not have bearings, and a brass washer is placed to facilitate sliding. The axle is still the same M12 bolt. The platform on which the engine is mounted has oval holes for mounting to the frame, thus allowing the chain to be tensioned.
The gas tank is homemade, from a piece of thin-walled pipe, the seat is a piece of plywood, on top of which there are several layers of a fitness mat, and a leatherette cover on top.
The final version, after spray painting, looks like this
The tank volume is about a liter, the minibike weighs a lot, 20 kilograms.
From the moment all the necessary materials and parts were collected to the first test drive, about a month of weekend work passed. Despite the modest engine capacity of 33 cubic centimeters, the minibike gets off quickly and easily accelerates my 90 kg weight to an impressive 20 mph)))
Test drive a homemade minibike:
We are talking here about the iron creation of a member of the club dyr4ik.ru, who goes by the nickname chica. It’s good, after all, when people’s hands grow from the right place. The result of this is the birth of amazing homemade devices that delight their owner and the people around him. We admire the quality of workmanship and thoughtfulness of the design instead of the traditional “anyhow it went...”. However, this homemade motorcycle-scooter-moped is primarily intended not for riding, but for contemplation.
It started with a go-kart 4-stroke 2-valve Chinese engine, a go-kart wheel and an almost scooter-like frame. In general, initially it was something like a scooter with a motor.
In its very first incarnation, the still unnamed device had a “rear-engine” layout. It was assumed that other units such as the air filter and gas tank would also be located there.
However, after some calculations and sketches, the creator decided to move the engine forward for better weight distribution, and in addition, to make suspension for both wheels. The basis for the new concept was a 38 mm steel pipe, which took on the appearance of an unusual frame after close contact with a pipe bender.
Next, a miniature rear pendulum came out of the hands of the master, which got along perfectly with a small torrent wheel from a Soviet go-kart, a brake disc, a 2-piston caliper and a monoshock absorber.
And, of course, a rather rigid lever front fork with a wheel from a wheelbarrow saw the light of day. However, it was not possible to place the brake mechanism there - the disc diameter is too small.
The engine found its place in the middle. The rest of the vital units were also nestled there. But, after this, the question arose of how to transfer the rotation of the crankshaft to the rear wheel and make a clutch? – After all, the creator got the engine without a gearbox and even without a “centrifuge”.
After some thought, Chisa took the centrifugal mechanism from a chainsaw, equipping it with stiffer springs. Well, the bell came out half homemade, with a bushing welded into it for the key shaft. Further, from the bell, the torque was transmitted to the drive sprocket, then through a chain transmission to the intermediate shaft, and from it, again by a chain, to the rear wheel.
Thus, only two controls are located on the bicycle handlebar - the rear brake and gas, not counting the ignition on/off button.
In the process of modifications, the Pepelats received a wheelbarrow tire for the rear wheel (instead of a go-kart slick), a vintage bicycle saddle support made of polished stainless steel, a different color and a tractor headlight.
Well, with the arrival of winter, I also acquired a homemade moped... a ski))
We express our great respect to the creator for such an unusual and high-quality homemade device! 
How to make a homemade walk-behind tractor with a motorcycle engine, photo video instructions
When deciding to make a walk-behind tractor from a motorcycle engine yourself, you must be guided by an important condition - minimal overhaul and rework, as well as maximum use of used components. Of course, for full-fledged correct work you need to have experience and knowledge, patience and the desire to work. By applying these simple rules, the final product will be an excellent farm transport, adapted to all conditions. In case of problems and malfunctions, the main repair will be a simple replacement of the faulty part.
Making a homemade walk-behind tractor from a motorcycle engine
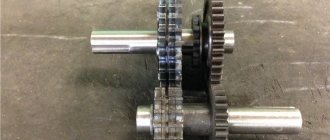
For normalized operation of the walk-behind tractor, it is necessary to develop a kinematic multi-stage transmission scheme. It allows you to increase the additional ratio, torque and tractive effort. Also, together with the gearbox adapter, the entire circuit provides for the presence of a main gearbox. The most highly efficient engine is obtained by combining the main gear with a geared wheelset.
Thanks to a specialized mechanism, the drive chains are effectively tensioned. This element is attached to the sliders using pins made of steel angles, which, in turn, are able to move freely, stretch, and also weaken the drive chain. A pair of adjusting screws with mounting bolts numbered M10 allows you to perform the above functions.
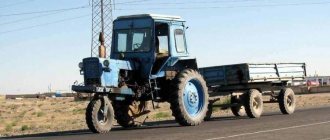
One of the most complex structures is the main gearbox, made of 10 mm steel plates. Reinforcing disks are located at the mounting bearing location. In order to eliminate the possibility of oil leakage, special continuous welding seams are made. The rear gear wall assumes in its structure the presence of a bracket - a bracket. It is capable of fastening both entire cargo trolleys and agricultural trailers. If you attach the cart to a walk-behind tractor, you will get a real miniature tractor.
The gear cover is made of a five-millimeter steel plate. Thanks to screws number M6, it is freely attached to the body. All straight gear gears are taken from agricultural machines.
Locking the wheels of a walk-behind tractor with a motorcycle engine
An important technical solution regarding the walk-behind tractor is the correct wheel locking. It is imperative to grind the cylindrical neck located on the right half axis next to the splined end. A threaded hole is made on the other axial side. During rotation of the screw number M12, a certain displacement is performed under the action of a cylindrical spring. After the specified moment, the axle shaft moves away from the gears. This is how the wheels are locked.
Motoblock wheels are made from electric car wheels. Sixteen grooves are cut in all disks. Steel plates are welded there. Then jumpers are added, which form the rim of the arable elements.
Plow for walk-behind tractor
The control unit, which allows the plow to freely enter fertile soil, consists of several important parts:
— Welded body type P;
It is into these parts that the direct heel of the plow is inserted. Thanks to technical features, it rotates on a vertical plane, using axial and bushing hinges. The rotation angle is set by the pin number M16. The channel of the particle in question is welded to the rotary heel. (See Do-it-yourself plow for a walk-behind tractor).
A cutting knife is attached to the immediate beam. Its normalized installation is carried out using a standard clamp with a cover plate and two bolts numbered M12 with universal nuts. A V-shaped bracket with an auxiliary wheel is installed on the front of the walk-behind tractor. The main purpose of this element is ease of transportation and unhindered reverse movement.
All direct control of the created transport, that is, the walk-behind tractor, is carried out using a walk-behind mower, a handle and two rods.
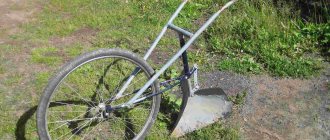
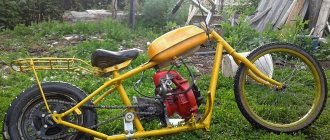
Homemade mini bike with a walk-behind engine
I made a homemade mini bike with an engine from a walk-behind tractor, below is a photo and description of the homemade product.
You can make a compact vehicle with your own hands. So, in front of you is a mini bike.
The homemade product reaches a maximum speed of 45 km/h, however, it is better to drive it on smooth asphalt, because there is no suspension.
Let's take a closer look at the design of a homemade mini bike.
The “heart” of the mini bike is an air-cooled gasoline engine with a power of 4 hp. Such motors are usually installed on walk-behind tractors and cultivators, but for other homemade equipment, such an internal combustion engine is quite suitable.
A drive sprocket and a centrifugal clutch were installed on the engine axis.
Gas tank - made from a fire extinguisher and welded directly to the tubular frame.
The wheels are taken from a kart, tread width: front - 128 mm, rear - 130 mm.
The frame and front steering fork are completely homemade, curved and welded from steel pipes.
The steering wheel has throttle and rear brake handles.
Additionally, the author installed a zero-resistance filter, the carburetor remained original from this engine.
The rear driven sprocket is turned on a lathe, and a chain drive is installed. Rear brake, drum, from the Alpha moped.
Also, there are removable footrests.
The homemade product weighs 33 kg, but together with an adult rider, it is capable of quickly picking up speed of more than 40 km/h.
You can make such a homemade mini bike with your own hands. Let's watch a short video review from the author of this homemade product:
How to make a walk-behind tractor with your own hands from the engine of the planet
The entire direct circuit of the walk-behind tractor fits perfectly for engines such as Minsk (see Homemade walk-behind tractor from a Minsk motorcycle), Voskhod and Ant. Of course, the favorite among all is IZH Planet number 3. To create a walk-behind tractor from this model, it is necessary to make small changes to the overall design.
The engine must be forced to cool. As for the connection, it must be done to its fullest extent through the ignition. The total power is equal to eighteen horsepower. There is a reverse gear, which is installed thanks to the gearbox.
Necessary materials
Let's start by finding spare parts for the future homemade walk-behind tractor. Every walk-behind tractor is equipped with the following technical components:
- engine;
- transmission;
- Control block;
- creeper (reducer);
- aggregation system.
The motor is removed from an outdated or faulty motorcycle. When choosing an engine, preference is given to two-stroke engines, but this does not mean that four-stroke engines are not used when creating a walk-behind tractor. A suitable option is a motor removed from the IZH PLANET motorcycle.
There are several types of transmission in walk-behind tractors:
- gear (standard tractor transmission);
- gear-worm;
- belt-gear-chain;
- hydrostatic (a new, expensive technical device that has recently appeared on the market).
The control unit consists of a set of levers that switch speeds, a button that increases or decreases the fuel supply to the engine, and brakes.
It is required that the structure be equipped with an aggregation system, which is an important design element, connecting a homemade walk-behind tractor and the attachments created for it with your own hands. Therefore, the bracket must be firmly attached to the supporting frame of the structure and equipped with a power distribution device when the load on it increases.
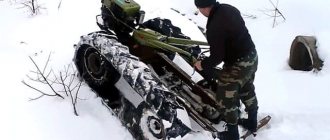
How to make a homemade all-terrain vehicle from a walk-behind tractor
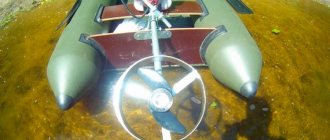
An all-terrain vehicle is understood to mean various means of transportation. These include tractors, snowmobiles, SUVs, and tanks. Today, most of the roads running through rural areas do not have asphalt surface. That is why those who have encountered such a problem are so interested in a homemade all-terrain vehicle from a walk-behind tractor. Having a walk-behind tractor, you can independently make a wheeled all-terrain vehicle that would have high cross-country ability, both over water obstacles and through snow.
We are assembling an all-terrain vehicle, the power unit of which will be a walk-behind tractor. This is the main idea: we remove the steering wheel and wheels from the walk-behind tractor, insert it into the frame, and the driveshafts of the walk-behind tractor go to the axles. One of the key requirements is to prevent a radical alteration of the walk-behind tractor. In other words, I installed the walk-behind tractor into the frame - it turned out to be a floating all-terrain vehicle. I took it off the frame and collected the parts and returned the walk-behind tractor. Here is the result of this idea.
Dimensions and dimensions of a homemade all-terrain vehicle
Overall dimensions of the all-terrain vehicle: length 3100 mm, width 1760 mm, height 1820 mm. Load capacity 200 kg. The maximum speed is from 8 to 12 km/h. The weight of the equipment is 530 kg. The single-level frame is made of profile pipe (60x40x2). The power unit is a MB-3 “Neva” walk-behind tractor with a 7 hp engine.
It also allows you to change three forward gears and one reverse gear. Installed M-412 bridges. Closed discs with bolted fasteners are used. Tires from KAMAZ all-terrain vehicle, tube version, are installed. Steering knuckle from UAZ with CV joint M-2141. Column steering is used - VAZ-1111 "Oka". A transmission and mechanical braking system is installed.
To manufacture the all-terrain vehicle, an MB-3 Neva walk-behind tractor was purchased. I was selected because of the three-speed gearbox, which has a very quiet first gear. The engine is also not very powerful.
Another reason for choosing a walk-behind tractor is the ability to disconnect one of the wheels from the transmission. As a result, we get the ability to disable one of the bridges on a homemade all-terrain vehicle.
The design of the all-terrain vehicle is very simple. All parts of the walk-behind tractor control are located on the rear semi-frame. This allows you to use the walk-behind tractor without modification. As a result, walk-behind control parts were used, which were installed entirely on the frame of the all-terrain vehicle. The exception is the cable and clutch control pedal. The cable along with the lever is removed from the walk-behind tractor, and the clutch cable from the all-terrain vehicle, which is connected to the pedal, is attached.
The principle of operation of the clutch remains the same as on a walk-behind tractor: the all-terrain vehicle drives after pressing the pedal, and stops when it is released. The engine has enough power to drive in third gear to climb steep hills.
In first gear, at minimum speed, maximum traction is achieved, thanks to which the all-terrain vehicle idling can overcome difficult obstacles without straining the engine too much. To increase the maximum speed of the all-terrain vehicle, you need to increase the diameter of the drive pulley by 50%, which will not damage the traction capabilities of the walk-behind tractor.
Simple technique
To assemble a walk-behind tractor for plowing ordinary soil with your own hands, use the engine from the Karpaty moped. To increase the power of the power unit, it is recommended to equip the equipment with an additional shaft. More powerful equipment can be made from a motorcycle Voskhod, Ant, Minsk.
Another interesting article: Options for tuning a walk-behind tractor with your own hands
A homemade walk-behind tractor, equipped with an engine from a Voskhod motorcycle, has a power of 13.5 hp. The ignition is removed from the Vyatka-Electron scooter. To maintain normal operation of the motor, forced cooling is installed. To do this, we use a supply type fan. The gearbox housing dismantled from the ZIL-130 is used as the base for the frame. We weld the power unit subframe struts to this structure. We cut the receiver itself to 243 mm. We install the carburetor and gas tank on the subframe.
To assemble the drive shaft, use pieces of splined shafts from the following units:
- gearbox from ZIL-130;
- transfer case from GAZ-66.
The crankcase is fixed to the gearbox housing, in which we cut out a window for fixing the gears. The next stage is making the wheels. Experts recommend welding steel wheels. We weld a rim to the disk, to which lugs (16 pieces) are welded.
To make motorcycle control levers, we use a steel pipe. We connect the levers at the top with a cross member, and weld the flanges at the bottom. To change gears, you will need a handle. It can be installed on the left control lever.
To attach attachments to a walk-behind tractor equipped with a motorcycle engine, suspension and adjustment units are made. A bracket is used to fix the first element. The disadvantage of homemade agricultural machinery is the lack of a differential. It will take extra effort to turn around. But such a design solution has its own advantage - the movement of vehicles without adjustments by the driver.
Powertrain cooling
Before making a mini tractor with an engine from a Ural motorcycle, a diagram of a forced cooling system is prepared. Without it, the engine will overheat. Experts do not recommend installing a liquid cooling system.
The principle of such a system can be taken from motorcycle technology (transfer of force from the crankshaft to the fan). We cut a thread at the end of the pulley. To fix it to the crankshaft, you will need an M7 screw. The supply fan is equipped with 4 petals cut from a steel sheet. The fan shaft is presented in the form of a structure with a driven pulley.
Another interesting article: Ideas for a summer cottage from IKEA
The shaft bearing is installed in the housing. To make the protective ring we use a steel sheet 3 mm thick. We mount the housing with bearings on 4 steel spokes in the center. To fix the ring to the motor, you will need 3 brackets. The guide casing is made of duralumin. This part reduces the dissipation of air flow from the fan.
The homemade mini tractor is equipped with a gearbox from Pobeda and a bridge from Moskvich 408. The wheels can be removed from the UAZ, and the rims from Volvo. To change the direction of rotation, rotate the gearbox on the bridge 180º. Using chains, you can get compact mini-equipment (as long as a Ural).
To assemble a heavy walk-behind tractor, an engine from an IZH motorcycle is used. Since the speed of movement of equipment during operation is low, a forced cooling system is installed. To do this, use an electric fan or a device with a drive. To direct the flow of air masses to the working cylinder of the power unit, a protective casing is installed.
Using a homemade walk-behind tractor from an IZH motorcycle, you can cultivate large plots of land.
Design Features
Such devices are considered universal, so more powerful machines are converted to small tractors. With this tool, the owner will be able to save money and get a practical and convenient device. In rural areas, as a rule, difficult roads predominate. And many owners love winter fishing, as well as hiking in the autumn forest to pick mushrooms .
Homemade transport devices consisting of walk-behind tractors have a wide range of types. The positive feature of a mini-tractor is its comfortable use. When creating such a vehicle, it is very important to take into account several features: a shift in the main center of gravity, an increase in the front axle, and the use of a new differential.
Currently, entire kits are available for sale that help increase the number of functions built into the device.
For those who want to drive on snowy roads in rural areas, this option is also well suited. Making a snowmobile with your own hands is quite simple. The most difficult thing in this case is drawing up drawings and mounting the chassis on four wheels. A feature of such transport can be considered the minimum pressure that falls on the surface of the earth. It is best to make specialized ground couplings based on the wheels of the walk-behind tractor.
For owners of heavy vehicles, everything is much easier. The structure of the transport device is almost invisible. In this case, the owner only needs to secure the lugs to the surface of the wheels of the transport model.
There are some features of creating an all-terrain vehicle. The main parts that you need to buy or create yourself for transport based on a walk-behind tractor :
- frame - needed to create mobile transport in difficult areas;
- It is important to use the rear axle when mounting the rear wheels;
- a place for the driver to sit - it should be protected from dirt and water getting from under the wheels when driving;
- lighting that will help you move safely at any time of the day.
An all-terrain vehicle with a base in the form of a walk-behind tractor is created as a single-seat vehicle. The total carrying capacity of such equipment should reach 200 kilograms. The width will be calculated based on the resistance to possible vehicle rollover; most often it starts from 1100 mm.
Modern MTZ, Ugra and Neva walk-behind tractors produced in production include a power exceeding 10 horsepower. This power is quite enough to move at a speed of more than 10 kilometers per hour. When driving through impassable places and swampy areas, the speed can decrease significantly and reach only 1-2 millimeters per hour.
How to make a homemade walk-behind tractor from a motorcycle engine, photo video instructions
If you decide to make a homemade walk-behind tractor from a motorcycle engine, the main condition is to make maximum use of used motorcycle components, with minimal modifications to them. This will require certain experience and accumulated knowledge, with a large supply of patience and labor. The result of the work will be a reliable farm machine, adapted to almost any conditions. If a malfunction occurs, the repair will be the replacement of a broken part or a failed unit.
For example, if you take a sub-motor frame or power unit: they are manufactured in production. If you look at the adapter gearbox, it is taken from the main gear of a motorized stroller.
How to make a walk-behind tractor with your own hands from the engine of the planet
The design of this walk-behind tractor is perfect for Voskhod, Minsk, and Ant engines. The engine from IZH Planet -3 has proven itself best. To make a walk-behind tractor with your own hands from the engine of the planet, you need to make small design changes.
The engine is forced to cool, connected via the ignition to a coil. Engine power 18 hp Thanks to the installed gearbox, there is a reverse gear.
Transport speed - up to 70 km/h. Minimum speed - 5-6 km/h. The cart is made from two old tarsion-type strollers and can withstand weights of up to 500 kg.
The frame is welded to the channel. When modeling a walk-behind tractor, it is necessary to take into account the engine mount, so we shift the longitudinal axis of the gearbox by 10 mm relative to the engine axis. The engine can be mounted in different ways. To increase engine power, an additional shaft is cut into the channel.
After this we place the fuel tank. Upon completion of assembly, we give the walk-behind tractor a beautiful appearance by painting it.
This walk-behind tractor is capable of driving 50-70 km per day. On asphalt you can maintain a speed of 50-60 km/h. It can be used as a vehicle and as a walk-behind tractor.
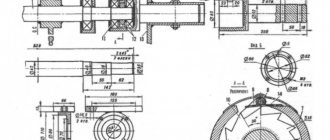
Drawings of homemade walk-behind tractors
Scheme of a walk-behind tractor based on a Minsk motorcycle
Drawing of a walk-behind tractor based on the Voskhod-3M motorcycle
Drawing of a walk-behind tractor based on a scooter
DIY ATV from a walk-behind tractor
It is quite possible to convert a walk-behind tractor into an ATV, but you will have to try hard to do this. To do this, you need to purchase some additional items and use special tools. So, in order to create an ATV from a walk-behind tractor with your own hands, the master must be able to handle a welding machine.
Like an ATV, a walk-behind tractor is designed for off-road driving, so converting it into a fashionable all-terrain vehicle will be relatively easy. The result is a powerful, high-speed vehicle that has high cross-country ability. At the same time, a homemade ATV will be light and safe; it will be much more difficult to fall out of it than from a motorcycle.
In addition, the functions of the walk-behind tractor can be preserved in the new design. But at the same time, the ATV can be used for off-road driving or trips into nature. But the economic functions of the all-terrain vehicle are preserved in the design.
A homemade ATV made from a walk-behind tractor will be slightly different from factory-produced models. Its seating position will not be that of a motorcycle, since the design will remain almost unchanged, like the saddle that was originally on the walk-behind tractor. In terms of power and speed, a homemade ATV with a walk-behind tractor engine will be inferior to popular models. But in terms of maneuverability and endurance, the new vehicle will be no worse.
Reviews
“The assembly took me three days (of course, in addition to it, I was doing other things). I didn’t make a drawing, everything was done by eye. I took the seat from the Ural, the wheels from the mini Riga. I ordered a gas handle and a shock absorber for the seat on Aliexpress, everything turned out very convenient. I use my new moped for rides and to quickly get from place to place. It’s a good thing – cheap and reliable.”
“I put three wheels on my homemade motorcycle, and installed the engine behind the seat. The design turned out to be stable and with excellent maneuverability, including off-road and snow. I equipped it with wheels with tractor treads, thus solving the issue of fast movement on the ground.”
ATV from a walk-behind tractor: stages of modification
The design of the walk-behind tractor requires minimal modification, since both vehicles are really very similar. But some changes will still have to be made. It is recommended to find or develop your own drawings of a 4x4 ATV with a walk-behind tractor engine. This will allow you to carefully consider all the details and avoid mistakes during the assembly process.
All work can be divided into 3 stages:
- First, the wheelbase of the walk-behind tractor is expanded.
- The frame structure is being arranged.
- Wheels of suitable size are installed.
motor from a walk-behind tractor | Topic author: Rastus
Hi all! Guys, I bought a 15hp Lifan engine with a gearbox and clutch.
Evgeniy (Haley) Eduard, talk to him, he has been driving this kind of modification for several years now. https://vk.com/abdullaev70
Andrey (Begona) Evgeniy, Hello. I found your photo of remaking an ant (installing an engine from a walk-behind tractor and using the original TMZ as a transmission). So here you can find the dimensions of the shaft and pulley you turned. There is also a desire to rebuild the engine, but I do not know the dimensions of the shaft and pulley. Answer please.
Andrey (Begona) Ruzal, Hello. Please describe how you remade the ant. 1. What was used to replace the crankshaft? 2. What engine was used (model, power). Answer please.
Ruzal (Jimm) Andrey, good afternoon! the crankshaft is my own, I just cut off the connecting rod with a grinder on the spot, without separating the box, the Lifan engine is 9 hp
Andrey (Begona) Ruzal, Thank you for your answer. It’s not entirely clear how they cut it on the spot. I mean, they simply removed the cylinder and cut the connecting rod perpendicular to the crankcase - i.e. the lower part of the connecting rod remained on the crankshaft. I understood correctly. Sorry if I didn't understand right away.
Ruzal (Jimm) Yes, I put a circle on a small grinder, half used/erased, cut it off on the spot, stuck a rag into the crankshaft hole
Ruzal (Jimm) Andrey, left the lower part of the connecting rod on the crankshaft
Andrey (Begona) Ruzal, Hello, thanks for the answers.
Ruslan (Hosea) how do traffic cops treat ants with such an engine?
Ilnaz (Girma) Leave the gearbox. Just weld the sprocket into the crankshaft and attach it with a flail. And it will drive and pull
Mikhail (Manali) Good day, the problem is this, the Lifan engine is 15 liters. It stands on the ants connected to the TMZ box with a belt, the pulleys are approximately the same diameter, the belt is 1000, at first it’s good, then the belt began to stretch, I installed a tensioner, it still stretches and slips, I’ve already killed 2 belts, what’s the problem? I haven’t carried loads yet, but the traction is crazy, the speed is maximum 30.
Vitaly (Alea) depending on what manufacturer the belts are, I have a 950 profile belt and one lasts for two months
Evgeniy (Haley) Vitaly, what is a belt for 950 profile? This is an ordinary belt used on a car to drive a generator and sometimes a pump. what do you want from him? It is necessary to use more powerful belts that can withstand greater loads.
Alexander (Bhishma) It turns out that the gearshift pedal rod was simply extended with a piece of reinforcement?
Alexander (Bhishma) Tell us how to attach the throttle cable to a walk-behind tractor.
Vitaly (Alea) [postga6966|Alexander], crepitza gas on the plate near the air, I drilled a hole for fastening, look at my photos, you can see everything there
Vladimir (Trenton) This is what a smart craftsman did for me, my hands don’t grow from there.
Ruzal (Jimm) Vladimir, EXCELLENT, CLASS.
Vladimir (Trenton) Ruzal, all the problems have disappeared, it starts right away, drives great, happy as hell. The hand has healed and started the original engine, otherwise if you pull it you will definitely hit the side!
Tags: Do-it-yourself minibike with a walk-behind tractor engine
Motor
It is best to create an ATV with your own hands from a Neva walk-behind tractor. This self-propelled vehicle has a reliable and fairly powerful motor. But this is the most important part of any all-terrain vehicle. Depending on the walk-behind tractor model, the engine can have a power of 6, 6.2 or 7.5 liters. With. This is quite enough to move over rough terrain, transport small and medium loads, as well as carry out business operations, cultivate the garden, etc.
The motor may be from a walk-behind tractor of a different model, but its power must be sufficient to perform all the functions assigned to the ATV.
Tractor from a walk-behind tractor
Few people will like the process of walking around the field for many hours behind the machine. It is much easier to mow the grass, plow or hill up the soil while sitting on a comfortable chair attached to a trailed cart. There are many branded adapters, trailers and carts available at retail outlets. But they have a considerable cost, which many cannot afford. You can make a mini-tractor from a Neva walk-behind tractor almost free of charge, using the tools and materials that you have at hand.
The following devices and materials are needed:
- differential from a passenger car;
- wheels from a small car;
- sprockets and chains from a motorcycle;
- hexagonal solid steel profile;
- steel corners 50 mm;
- tin for making wings.
The first difficulty that arises when making a homemade tractor with your own hands is a high center of gravity. It is impossible to lower it for purely technical reasons. The only way to increase the stability of a tractor is to expand its wheelbase. For this, a hexagonal profile is used, which is attached to the hubs with cotter pins. When the track expands to 120 cm, the walk-behind tractor will gain normal stability. Installing a differential will allow the unit to corner easily.
The mini-tractor is assembled in the following sequence:
- Welding the frame of the trailer part. Attaching the drawbar to the flange, making holes in it for the bolts (the connection must be made collapsible in order to be able to transport the walk-behind tractor in the trunk or trailer).
- Manufacturing of chassis. Wheels are installed on the trolley. To make all-wheel drive on both axles, sprockets are welded onto the axle shaft, and a tensioning mechanism and chains are installed.
- Assembly of body and seat. If necessary, a canopy is installed over the driver. The controls are being configured and adjusted.
- Electrification of the created machine. A tractor generator or battery is used as an energy source. For ease of driving, it is advisable to install 2 headlights - front and rear (for reversing).
During sea trials, the stability and maneuverability of the homemade product are checked. If the drive wheels lose traction with the ground, then they or the walk-behind tractor body are loaded with weights.
Frame arrangement
Next you need to weld the steel frame, which must be strong and reliable. But, according to experienced designers, this unit is the most vulnerable part of the ATV. It is assembled from a frame from a motorcycle or bicycle. If you have nowhere to take the workpiece, you can weld a structure from pipes whose walls are 3 mm thick. They can be either round or square.
Installation on wheels
To install the structure on wheels, you need to decide on the choice of wheel rims. The best option for this are parts taken from the car. They should be designed for tires with a low profile, since such rubber has a wide bed.
When choosing tires for wheels, you should give preference to truck-type tires with an aggressive tread. Such an ATV will be able to drive through mud, bad and uneven roads. Tire pressure should be low to ensure sufficient contact area with the surface. This way the wheels will be able to overcome various obstacles on the road, and the ride will be smoother. These tires increase comfort while driving an all-terrain vehicle.
In some cases, the use of soft rubber with low pressure allows you to do without installing shock absorbers, since the tires will spring directly. The disadvantage of this solution is the fact that soft tires are less durable. Without additional protection, they will not be used for long. After all, you will have to drive off-road, where you may come across stones, thorns, branches and other sharp objects. In this case, it is much easier to puncture a soft tire than a hard one.