If someone thinks that a fishing hook is superfluous in a fisherman’s equipment, then this will have to be refuted.
No, I completely agree that knowing fishing knots and knowing how to tie them are essential skills for an angler. However, circumstances may always arise to acquire an assistant. Physical data let us down or mutual “love” with small hooks. Doesn't matter. It's time. You can, of course, make a simple crochet stitch with your own hands. However, I took the easier route. On Aliexpress.
I didn't see a lot of variety of products. On batteries, the mechanism immediately disappeared. You buy it, and then periodically “dive” into the store for batteries. And the simpler the design, the more reliable it is. I took a 3 in 1 set - hook and loop knitting and connecting the two ends of the lines (shock leader with the main one). I thought that tying the hook to the fishing line would be enough.
However, the reliability of the latter is questionable. I trust nodes that have been tested in practice. For example, this one.
If you are interested, here is the link.
So.
Let me tell you, it’s an interesting thing, a fishing hook maker. There is nothing complicated in the design. As in use. Step-by-step instructions are included. Once you repeat it three or four times, everything gets stored in your head and hands. The reliability of the node has not yet given rise to doubt.
There’s nothing to shoot a video with yet, but photo manipulations are welcome. In a word, here is step-by-step instructions on how to use all the elements of the set.
Homemade crocheter
4 minutes Author: Yuri Polyakov 2
The ongoing debate about the use of the hook among domestic fishermen does not prevent home-made people from improving the design of the tool. Moreover, making such a device will not be difficult for a person more or less familiar with manual labor.
Making a crochet stitch with your own hands is not at all difficult; the Italian design is most often taken as a basis. You can read a description of this tool and how to properly tie a fishing hook with it in this article.
Manufacturing
Homemade hooker can be made from metal or wood. Their principle is the same, it’s just that different craftsmen prefer their favorite materials. There is no need to describe the technologies separately; they are similar. The nuances and details of production will be indicated in the text.
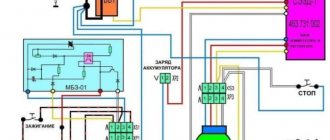
First you need to prepare a drawing or manufacturing diagram, as in the figure below.
You can also use a photo of a hooker from the Internet, but the dimensions are usually not indicated there, as in the diagram.
To make a tool, you can take several types of materials as a basis:
The length of any material should be approximately 90-100 millimeters.
We fold the flat pieces and fasten them together with a pair of bolts or screws. In the round sticks, approximately in the middle or with a slight offset towards one of the ends, we drill a hole, to which we make a cut from the long side.
At the working end of the future hook, you need to make three holes in increments of one centimeter.
Two of them should be slightly thicker in diameter than the future wire staple. The third will be used to install the screw that secures the hook.
If the hooker is made of aluminum, then you will need to cut a thread in the hole from the top side, and expand the hole in the bottom half so that it is wider than the bolt used.
In a wooden structure, a hole is countersunk on the upper side for installing a nut, which is then strengthened with glue, the lower half is prepared, as in metal - a little more spacious than the thickness of the screw.
After preparing the holes, we equip them with a screw and a metal bracket with two pins protruding from the top. The front one, closest to the end, needs to be bent.
After installation is completed, you can complete the final design of the tool by grinding and coating with finishing materials:
Other options
Based on this basic diagram, we get exactly the crochet maker, who is comfortable tying hooks with both a ring and a spatula. However, on the Internet you can find a device that ties the fishing line directly to the ring. Moreover, this ring can belong not only to the hook, but also to the spoon, fly, swivel, and other fishing elements. Therefore, they can be generally called knotters. Such devices are used mainly by fans of fly fishing.
Such devices are easy to make by bending an elastic wire in a certain way and holding it in a handle. A comfortable handle for knotting is made from various available materials:
Although such tools are not crocheters in the literal sense of the word, you can also tie a hook with them, just the type and location of the knot will turn out to be a little different. Another feature of the wire knot is the large role of handwork and increased complexity when tying a hook or bait.
Source
What is it for?
All anglers should learn how to knit with loop knitting. There is no specific direction in fishing where this tool is widely used. Spinners find use for it when tying leashes. When equipping a feeder rod with a looper, anglers create ready-made equipment. In fly fishing, such a tool is also needed for preparing spare rigs with flies.
Not only beautiful and even loops of the same diameter can be made using this tool. Also knitted with loop knitting:
- locking nodes,
- connecting two or more fishing lines or other threads.
This is the knot that will remain on the main line if you cut the loop
Fishing hooker: step-by-step instructions on how to tie a hook
If someone thinks that a fishing hook is superfluous in a fisherman’s equipment, then this will have to be refuted.
No, I completely agree that knowing fishing knots and knowing how to tie them are essential skills for an angler. However, circumstances may always arise to acquire an assistant. Physical data let us down or mutual “love” with small hooks. Doesn't matter. It's time. You can, of course, make crocheting with your own hands. However, I took the easier route. On Aliexpress.
I didn't see a lot of variety of products. On batteries, the mechanism immediately disappeared. You buy it, and then periodically “dive” into the store for batteries. And the simpler the design, the more reliable it is. I took a 3 in 1 set - hook and loop knitting and connecting the two ends of the lines (shock leader with the main one).
However, the reliability of the latter is questionable. I trust nodes that have been tested in practice. For example, this one.
Let me tell you, it’s an interesting thing, a fishing hook maker. There is nothing complicated in the design. As in use. Step-by-step instructions are included. Once you repeat it three or four times, everything gets stored in your head and hands. The reliability of the node has not yet given rise to doubt.
There’s nothing to shoot a video with yet, but photo manipulations are welcome. In a word, here is step-by-step instructions on how to use all the elements of the set.
How to tie a fishing hook using a hook tie
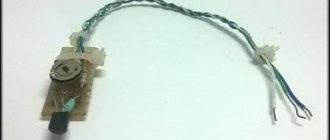
The fishing hook consists of a collapsible metal body, similar to a ballpoint pen, (1).
On one part there is a mechanism for connecting the fishing line with the hook. On the other are two needles of different lengths (2), which are used to create a loop on the fishing line.
The step-by-step instructions are as follows.
Insert the hook into a special slot on the body (5) and tighten it with a screw (4).
The included instructions indicate that the hook is inserted into the slot with the tip facing inward. Practice has shown that there is not much difference. The sting will stick out from the body or be in it. The point is different. How the fishing line is inserted into the fastening ring of the hook. It’s just that the end result will be that the line will be on the outside or on the inside.
We take the fishing line and thread it into the ring.
Having passed the fishing line through the ring, we wrap the free end around two clips (3) of the hook and hold it taut. As in the photo.
Now, rotating the hook between your fingers, we wrap the fishing line around the fore-end. 5 - 7 full turns are enough.
Throw the free end of the fishing line through the hook clip closest to the edge.
We completely recess both clips into the body and carefully pull the length of the leash.
When the loops around the fore-end are formed, loosen the grip of the hook with the screw and continue to pull out the fishing line. The hook is then released.
We wet the resulting joint and tighten it with force. Trim off the excess end of the fishing line.
Now let’s give the leash its final look - we’ll form a fastening loop.
A hook with a spade is tied in the same manner, where there is no step of threading the fishing line through the ring.
Main types of offset printers
A hook that has a Z-shape with a bend in the fore-end at the top is called offset. This hook was first used in the USA at the beginning of the 20th century. Since then, it has been continuously improved for use in combination with other equipment. What motivates anglers when using an offset hook in fishing?
The big advantage of using them is:
- The hook allows you to use it for catching fish in dense thickets.
- It allows you to reliably attach any bait, while preventing it from slipping off the hook. This is convenient when fishing with heavy weights over long distances.
- Its shape allows it to easily penetrate the side of the prey's mouth.
- Allows you to firmly hold prey when fishing.
Offset hooks are divided into two types:
These two types are very different from each other. Their differences lie in the dissimilarity of the design and the type of bait used.
Large-faced offset baits are used to attach massive silicone baits. Moreover, the size of the hook itself is selected so that there is a reserve so that during the bite the bait does not slide down and at the same time the sting is exposed.
If a fisherman uses silicone worms as bait, and they have a thin body, then it will be rational to use worm offsets.
When using offset baits in fishing, most fishermen adhere to the rule that the width of the hook in the hook should always be about 2 times greater than the width of the bait itself.
The invention and the beginning of mass use of these hooks gave impetus to the creation of new types of baits and equipment.
Fishing looper, photo diagram of use
The looper in our case is represented by a plastic device. On the one hand (1) there is a looper directly. On the other, there is an extractor (2) to release the hook from the mouth of the caught fish. Color and size varies.
Using the device is as easy as using a crochet hook.
We take the fishing line and create such a loop.
We hook the folded fishing line with the tooth of a looper.
Make 2 - 3 turns with a looper, twisting the line
Without removing the loop from your finger, we put it on the looper hook.
Now, with the movement of our hands, we remove the turn of the fishing line from the looper tooth. In this case, the formed loop remains on the inner hook.
We remove the loop, trim off the excess and that’s it. As a result of the simple work of a fishing hook, looper and your hands, we get approximately this type of leash.
Source
Where can I buy?
This joke, which is necessary for fishing, is sold in almost all fishing stores, and you can also order it on Aliexpress. The simplest plastic loop knitting costs no more than 50 rubles. Improved “gadgets” are made of more durable materials and are much more expensive.
Most often, high-quality devices combine several auxiliary fishing tools, for example: a looper and hooker, or a looper and an extractor. For fly fishing, there are also options for combining a looper with a device for tying flies.
One end of the tool is for knitting loops, the other is for removing hooks from the fish’s mouth
Knitting leashes for fishing using homemade looper and hooker
For a long time now I have seen on the Internet devices for tying hooks and loops, the so-called loopers and hookers, but somehow I was not impressed. And now, probably, I was pressed, and decided to try it. To be honest, the idea was borrowed from Internet sites, maybe slightly modified.
First I made this device for knitting loops and hooks on leashes.
but I realized it’s not very convenient. When knitting loops, the hooker interferes. Maybe this is a subjective opinion, but I do it for myself! Therefore, I decided to separate two homemade devices for knitting loops and hooks.
Peculiarities
The fishing looper is a special small tackle that has an oblong cylindrical shape. It is equipped with a small metal hook.
In general, this design includes two main components. One of them is used directly for knitting loops, and the other is intended for tying hooks.
This assistive fishing device is an excellent option for those who have poor vision and who have impaired hand motor skills. The looper will also be a useful product for beginners.
Homemade crocheter
In a round stick (1-1.5 cm in diameter) we make a cut with an iron saw (so that the gap is not large), drill a hole to avoid splitting along the cut line
From the second round piece we cut off this washer, this is the hook clamp handle. We drill a hole on one side and press in a nut, I have an M4.
In the center of the cut, drill a hole for an M4 screw, insert the screw and tighten the nut.
We make a bracket by drilling two holes and cutting grooves between them
We put heat shrink on the handle
Now the procedure for tying the hook. (to make it easier to see, nylon thread is used instead of fishing line).
Insert and secure the hook.
We make 5-6 turns around the hook and put it behind the bracket.
We press the bracket with our thumb and stretch the fishing line.
Release the hook by loosening the screw tension. The node is ready.
We sorted out tying the hook. I’ll tell you it’s quite convenient, after several trials and errors I learned to knit without looking, I was satisfied.
It's time to knit the loops of the leashes.
Why do we make loop knitting?
We get hook and loop knitting
The hook is tied, we knit a loop of the leash:
Fold the fishing line, holding it in this way. The bend of the line is the length of the leash.
We put the fishing line behind the base.
Raise and make 1 turn.
We put the loop inward.
We stretch it, fixing the line in position.
By lowering and continuing to hold the line in tension, we get a loop.
We drop the finished loop and get a nice leash for fishing equipment and rigs.
Thus, we significantly reduce the production time of leashes, while having reliable fastening points and the ability to set the desired leash length. Even while at the fishing spot, we knit leashes quite easily and quickly, depending on the conditions.
But there are a few notes.
There are no questions about crocheting, everything is simple and clear, but there are some inconsistencies with loops. For example, how to make a short leash about 3-5 cm? This horse head will definitely not give the desired results, just a very short distance.
It is not always possible to make leashes of the same length, there is still a difference. I have some thoughts on this matter, which I will outline in the next article. Good luck to everyone and happy fishing!
Did you like the article? Subscribe to the channel to stay up to date with the most interesting materials
Source
Heat treatment of steel
The main material in the production of fishing hooks is steel. To perform heat treatment, steel must be heated and then quickly cooled in water or oil. This process is called "hardening". During this treatment, the properties of the steel will change.
Raw steel before heat treatment is easily subjected to various deformations (can be sawed, forged), but after treatment it acquires sufficient hardness, but remains brittle. Given this circumstance, it must be treated with abrasive materials.
The brittleness of steel after hardening will help reduce its tempering. This process is based on a method of heating already hardened steel to low temperatures with further cooling in oil or in the open air. The result of this procedure will be that the steel regains its original properties, that is, it will again become damp.
And lastly, annealing of tempered steel involves heating it to a temperature slightly lower than it was during quenching and cooling in air. As a result of this procedure, the steel will regain its original properties, that is, it will again become raw.
The time difference between these procedures cannot be more than 24 hours. The temperature used when tempering steel is always different (from 150 to 500 °C) and depends on the type of product produced from it.
When making hooks with your own hands, the material used can be sewing needles of any size or spring wire.
When carrying out heat treatment of hooks made independently, the following rules should be taken into account:
- When quenched using water at room temperature, the hardness of the steel is greater than when using oil.
- When the temperature of the steel reaches 330 °C, it will be viscous and suitable for making only a soft hook. To make a hard hook, hardening should be done in water, and for tempering, use a much lower temperature.
Heat treatment of steel is always carried out in a muffle furnace using a thermometer. But it is clear that there are no such stoves in homes and heat treatment can be carried out using a gas stove. Sewing needles are placed on a flat piece of steel and heated over a stove flame.
It is easy to determine its temperature by the heating color of the blank:
- dark brown color - temperature from 530 to 580 ° C;
- red-brown color - heating to 650 °C;
- cherry - up to 720 °C;
- crimson - heating to 770 °C;
- bright red - up to 870 °C;
- red - up to 900 °C;
- orange - up to 1050 °C;
- dark yellow - heating to 1150 °C;
- yellow-white - up to 1300 °C;
- white - heating to above 1350 °C.
It is impossible to anneal the spring like a needle due to the fact that it has a different design. It is annealed using a solution of salts: sodium chloride, sodium fluoride, aluminum fluoride, sodium chloride, calcium fluoride, sodium carbonate, etc.
When the material used to make the hooks is ready, you can begin making them. After the hook is ready, it should also be hardened.
How to make a simple homemade self-tie for fishermen?
Dear friends! This video tutorial will show you how to create a very simple homemade knot that will be useful to anglers. Its author did not want to spend a lot of time making them and decided to simplify the method as much as possible. And now he will demonstrate what came of it.
A thin hook from the store was used as a base. Several of these hooks were purchased. To make them, you needed 3 hooks and 3 ballpoint pens with refills. The handle cases were used as boxes for transporting knotters while fishing. In such a box it cannot be bent or broken. And the device itself was simplified to a thin hook and a tube made from a ballpoint pen rod placed on it.
The knot is already ready, but for reasons of beauty, you can replace the plastic tubes with metal ones from medical IV needles. But even such a knot can be used successfully.
Why might this be needed?
Most fishermen are satisfied with what can be found on the shelves, but still some continue to make their own hooks. This may be needed:
- In case the type of fishing is not widespread and suitable gear is difficult to find. It can be justified for fishing for catfish, as well as in the case of trophy-sized predators that are planned to be caught using silicone mounted on an offset hook. However, this also applies to the smallest offset workers.
- When such homemade products are just another hobby. Many fishermen make elements of gear without any urgent need to do this, and some even create their own fishing rods.
- In extreme situations. The probability of this is of course low, the chance of being far from civilization is small, but it is still easier to get food by fishing than by hunting.
- Also, minor improvements to factory products are often made, such as a corkscrew to prevent silicone baits from slipping or additional weight on offset presses.