Bathtubs come in a variety of shapes and sizes in modern markets.
However, you can spend time looking at different models, but still not make a choice. The main reason: it’s a pity to spend huge amounts of money on purchasing household items, which are sometimes not commensurate with wages. To save money and still provide yourself with a comfortable place to bathe, you can make a brick bath with your own hands.
Design solutions
The shape, size and design of a brick bathtub completely depend on the wishes of the owner. It can become rectangular, round, triangular or curved. Any sanitary accessories for shower and water massage are selected.
The bottom and walls are made smooth or stepped. The surface is decorated with panels, mosaics, and tiles of a wide variety of colors and patterns. There are even built-in decorative aquariums that imitate ponds.
Brick bath
The following solutions are suitable for apartment bathrooms:
- In a small standard room where you want to put a washing machine, washbasin, dryer, a neat sit-down bathtub will fit. A corner bathtub made of brick with a rounded edge is spacious for bathing and will save space. You can install brick steps and a comfortable seat in the tank.
In the bathrooms of private households there are no limits to fantasies:
- A spacious bathtub, more like a mini swimming pool, is located on a raised platform with comfortable steps and handrails. It can also be recessed into the floor. It's easy to get down into for swimming. Make it spacious for two, with different depth levels for children and adults.
What are they?
Wooden baths can be classified according to production technology, type of wood and the shape of the finished bowl. Today, fonts are made in different ways:
- from a solid log;
- from bars glued together;
- using boards fastened with metal hoops.
A bathtub made of solid wood is an ideal option. But it is difficult to find a suitable piece of wood for it, and not everyone is up to the task of whittling a solid bowl. It's a very labor-intensive job. Hence the high price.
It is much easier and cheaper to make a bathtub from bars glued together . The most important condition is to make the product airtight and durable.
We will talk about this production method below.
A font made from boards is an even simpler option. True, it’s difficult to call it a bathroom - it’s more like a barrel for taking water procedures. Its main feature is its almost vertical sides.
The shape of wooden fonts can be completely different:
- oval;
- round;
- square
- asymmetrical.
And even in the shape of a floating ship (products in this style have recently become very popular).
Photo
Below are interesting designs of wooden bathtubs and examples of bathroom interiors:
Other options for placing a brick bath
A bathing container in an apartment can be placed not only in the bathroom, but also in any other. For example, you can remove the partition to expand the area for installing a bath, combining it with another room.
In a private house, such a mini-pool is located next to the steam room or in an adjacent room with a bathhouse, and even in a gazebo on a personal plot. A brick bath can be one of the elements of a well-equipped recreation area complex with a fountain, shower, and water massage.
Brick bathroom (photo)
In many instructions, the construction of a bathroom is simple: build a container out of bricks, lay horizontal waterproofing and decorate it with decorative tiles. But in practice, such a list of works is not enough to build a high-quality brick bath.
Conclusion
If you are seriously thinking about making something in the bathroom, but at the same time you are also considering a complete bathroom renovation, it is better to do everything at the same time. Look on the Internet how to make a ceiling in the bathroom, or install this or that part.
Try once again to carefully read all the information given above, and when manufacturing, follow all the steps of the instructions as accurately as possible.
Moreover, decide in advance which design suits you best and analyze all its advantages and disadvantages. We wish you good luck and success in the construction of the structure!
Construction of a brick bath
Take measurements and draw a drawing to scale, taking into account the thickness of the walls. When designing, rely not only on your design whims, but also on the location of existing pipes for supplying clean water and sewerage.
Calculate the consumption of the necessary materials. To realize your dream you will need: brick, rolled waterproofing for swimming pools, cement, sand, mesh for reinforcement, plumbing accessories. Start implementing your project with a major renovation of the premises.
Remove old floor and wall coverings. Use a cement screed to level the surfaces. The floors in the room and in the future bath should have a slight slope towards the drainage of water.
Lay rolled waterproofing on the floors so as not to irritate your neighbors if the water overflows. Connect all plumbing units in advance and close future drains with plugs to prevent construction waste from getting there.
Mark the place for laying the walls of the bathtub by placing beacons, that is, stretch a thin rope so that the walls are smooth.
Before starting laying, soak each brick in water. If the bathtub is placed on a personal plot, then make a small foundation pad consisting of gravel, sand, and cement screed. Next, lay the walls in one brick. Reinforce each new row horizontally with metal mesh.
Lay the finished inner surface with linochrome using a blowtorch. Strengthen the strength of the bathtub walls with a special volumetric mesh. Secure vertical and horizontal reinforcement with brackets, hooks or bolts.
Waterproofing a brick bath
Cover the bottom of the bathtub and the floors in the room with cement screed, and the walls with plaster mortar. For masonry, you can use standard methods for preparing cement-sand mortar. Proportions are selected depending on the brand of cement.
Additional points
Is it possible to install a shower in the bathroom? Of course, it’s enough to install a special common mixer and hang a curtain. The latter will come in handy if the bathroom is shared. In addition, the curtain protects the floor from liquids.
I would like to create a large, beautiful plunge pool, where you can then spend hours relaxing in the hot foamy water. The task is quite doable even in a city apartment. The main thing is to imagine in advance what the room will look like and measure the location of the future bathtub. And select materials.
Rectangular bath
Before you start laying, prepare the solution.
To do this, thoroughly mix one part of M-400 cement with three parts of sand. After the mixture becomes homogeneous, add water little by little, constantly stirring the solution. The finished composition should resemble thickened sour cream in consistency.
To check its readiness, you can use the method used by professional masons. To do this, put a little mixture on the trowel and try to throw it off the tool with a sharp movement. The solution, ready for use, will come off the surface in a monolithic lump, without any residue.
Laying the bricks begins by spreading the mixture up to 15mm thick on a concrete base. The walls are laid in ordinary single-row masonry, with each row bandaged. To do this, starting each subsequent row, the first brick is shifted to the floor of the building relative to the element in the previous row. In this case, the seam between the bricks should be about 10 mm. This will make it possible to easily eliminate unevenness of individual bricks, which will not be possible with too thin a layer of mortar.
When laying, immerse each brick in water for a few minutes. This will greatly increase the strength of the masonry, since in this case dehydration of the solution will not occur and the adhesion value will significantly increase.
After going through two or three rows, fill the sewer pipes with slag and make a concrete screed. To do this, use the rule and a wide tamper. Do not forget to make the slope of the bottom of the bath towards the drain grate at least 10 mm per 1 m of the length of the structure.
In addition, when calculating the height of the screed, take into account the thickness of the waterproofing and facing layer. Of course, the bottom can be concreted after the walls of the bathtub are ready, however, you will agree that it is easier to do this if their height is 25 - 30 cm. When doing the laying, try to immediately pick up the excess mortar protruding from the seams and constantly monitor the work with a building level. Afterwards When the work is completed, the structure is left alone until the solution has completely set. As a rule, 10 – 15 hours will be enough for this.
What to do to get into trouble
In our situation, two factors led to disastrous consequences:
- We have not checked the reliability of the base. As it turned out, the concrete floor in the bathroom was poured on top of a layer of crushed stone simply poured onto the ground. The water washed it away and subsidence occurred.
- We completely ignored the instructions for waterproofing. By relying on high-quality masonry and epoxy grout for tile joints, frivolously convincing ourselves that “if anything happens, only mice will suffer,” we saved time and money at this stage.
You already know the result. But sooner or later other reasons could lead to it: insufficient slope of the drain pipe, a steep angle of its connection to the sewer outlet, the use of hollow or silicate bricks for laying the walls, insufficient wall thickness, etc.
In general, any work on installing plumbing should be carried out with strict adherence to technology, unless you have the goal of flooding your neighbors or running into unplanned, expensive repairs yourself. For example, acrylic bathtubs can only be installed in a metal frame, since they have thin and flexible walls. And if there are people in the family who are heavy, it is recommended to install the bathtub on bricks.
In modern language, ignore all these requirements, and voila: the desired problems are provided to you.
Freeform bathtub
You can create any brick bath design
To make a bathtub with a curved inner surface, a brick frame is constructed using exactly the same technology as for rectangular structures. Usually, to make a bathtub with smooth, flowing surfaces and a frame, an arbitrary shape is required. The inner surface of such a bathtub can be created using a metal mesh, from which the required contour is bent. Next, the space between the frame and the mesh is filled with concrete mixture.
To prepare it, you will need to mix 1 part cement and 3 parts granite screenings with water. Then the walls and bottom of the bath are smoothed using spatulas and a trowel. After this, they begin to seal the surface.
It will be difficult to use roofing felt in this case, so use waterproofing for swimming pools.
Tree selection
Since the time of the construction of wooden ships, types of wood have been known that not only do not deteriorate from contact with water, but also become stronger and more durable. First of all, these varieties include teak wood, as well as larch, wenge wood and mahogany. Another suitable type of wood for making a wooden bathtub is oak, which “proved itself very well” during the manufacture of the famous oak barrels. Unfortunately, all of the above types of wood have a fairly high cost and, in addition, require additional processing before they are used in the manufacture of a wooden bathtub.
There is no point in trying to replace the recommended types of wood with cheaper ones - the result is guaranteed to be negative, so the imaginary “savings” will turn out to be a waste of time, effort and money.
Waterproofing
Waterproofing a bathtub can be done using roofing felt
To protect yourself from bathtub leakage, you must seal it. To do this, you can use either special waterproofing materials for swimming pools or regular roofing felt. As practice shows, it copes with protection against leaks no worse than expensive materials. The use of roofing felt is possible only in one case - you need to remove powder from its surface. To do this, you can use a metal brush.
Then the sheets cut to size are glued to the bottom and walls of the bath using bitumen mastic. At the same time, do not forget to lay the material overlapping with a wide overlap on the walls. The edges and joints of the strips are additionally treated with a layer of bitumen. Finally, the internal and external surfaces of the bath are plastered with the same solution that was used for the brickwork, and for better adhesion of the plaster to the waterproofing layer, the surface is treated with a primer.
If you decide to use a dry mix, be aware that only cement-based compounds can be used. Considering the need for facing work, grouting of the plastered surface is not carried out. They proceed to the final stage only after the plaster has completely dried.
How to treat a bowl with plaster?
After waiting for the concrete bowl to dry completely, you will see a strict rectangular shape. It is easy to guess that this type is not suitable for taking a bath or enjoying water treatments, so it is entirely up to you how to smooth out the corners for subsequent laying of tiles. At this stage, you also need to start arranging a layer of thermal insulation, since concrete tends to poorly retain the heat of water.
This is not difficult to do, since the ready-made recipe is open to access. Using high-tack tile adhesive and crushed foam is great for bonding to concrete. The mixture is characterized by heat-insulating properties, plasticity, lightness, and does not flow. Applying the leveling mixture is usually done without any tricks.
The internal relief of the bathroom can create a problem for a beginner - here it is better to take a previously prepared plywood template. You can make it like this:
- take a plywood sheet;
- mark the desired radius on it;
- cut out the template using a jigsaw.
Apply the mixture to the surface, moving it in such a way as to achieve a perfectly even radius. Pay attention to the location of the siphon - the plaster should be applied so that the surface is level with the neck of the siphon. It is enough to estimate the thickness of the slab and focus on the data. By moving the template up and down, you will get a smooth finish.
Finishing
Ceramic tile cladding is most often used to finish brick bathtubs. To reduce the amount of tile waste, it is better to use small tiles.
If it is necessary to finish the curved inner surface of the bathtub, pasting is done with mosaic tiles, which are small ceramic elements glued to a flexible base.
During the work, you can use a special waterproof tile adhesive or use a composition of PVA glue, M400-1 cement and river sand. Before starting facing work, the plaster must be treated with deep penetration soil or the same PVA glue mixed with river sand, sifted on a fine sieve.
The use of mosaic tiles allows you to tile any curved surface of the bathtub
Before work, the tiles are soaked in cold water for several hours and only after that they begin to lay them. In this case, they begin work from the bottom of the bathroom, and then move on to its walls.
Grouting of joints is done with epoxy compounds. Only in this case can you be sure of the strength and reliable sealing of the finishing layer. The product begins to be used after the adhesive layer has completely set. The drying time of the factory mixture can be found on the packaging, and when using cement-sand glue, it is kept for at least two days. At the final stage stage, install the drain grate and connect the mixer. Before use, the bathtub must be washed with warm water and any detergent.
A bathtub built of brick will become a real decoration of the most important room in the apartment only in one case - if the work is done carefully and in compliance with technology. In addition, every time you take a hot bath, you can completely relax and get real pleasure, being confident in the reliability of the structure you created with your own hands.
Why do you need a brick bath?
In any, even a very small hardware store, not to mention a hypermarket, it is quite easy to buy a standard size bathing container. But this is how a person works - the more choice, the longer it will take to look for something unique, not like everyone else. How to make a brick bathtub with your own hands, step-by-step instructions, photos and videos - we offer you all this in this material.
About the cost of plumbing products
Often the desire to have a bathtub made of natural wood is broken by its incredible cost. Not every user can easily take 25,000 dollars/euro out of their wallet and pay for a bathing container. Even if it is original, made using manual labor.
The desire to save money can lead to buying a fake. It’s one thing if a person takes this step consciously, but it’s quite another when he is firmly convinced that he has bought a worthwhile thing made of natural wood.
The following signs will indicate deception:
- uniform repeating pattern;
- fairly light weight of the product;
- suspiciously low cost;
- Models are offered in various colors - walnut, cherry, golden oak or imitation black metal.
Such a proposal will be alarming - to make the bowl they use species of trees familiar to us and more exotic ones. Moreover, the best option is considered to be exotics that are accustomed to living in conditions of high humidity.
During production, they try to preserve as much as possible the natural color of the species used, the unique structure of the wood, giving the product the desired shape
The main purpose of the treatment is to give the material water-repellent properties. Ideally, use valuable rock that has been subjected to many years of flooding. Although in the absence of this expensive material, artificial methods are used.
All procedures carried out with wood before making a bath are expensive and take a lot of time. Plus, the cost of the material - some tree species are amazing with their price per 1 linear meter.
It is not surprising that the yellow-orange teak wood, mottled with dark stripes, the reddish-brown solid mahogany or the black-brown tone of ebony simply screams that the natural color and texture of the material should be preserved during production.
Cheaper materials are larch, oak, cedar, linden, pine. All of them are perfect for constructing a bathing tank. And they are successfully used due to their ability to weakly absorb water.
The following ranking is typical for wooden plumbing fixtures: the more refined and unusual the shape, the more expensive it is. If a single fragment of expensive wood was used in the manufacture, then the cost of the bath will be appropriate
Preparatory work
To work on the manufacture and construction of a brick bath, you will need the following tools:
- level; jointing; mop; square; trowel; spatula.
Before starting work, calculate the exact amount of materials needed. At the first stage, you need to remove the old bathtub (if any) and the flooring to the base (floor slabs). The work is quite labor intensive. Especially if this place was until recently occupied by a full-fledged iron bathtub, then you will have to remove not only the existing construction and finishing materials, but also drains and old sewer pipes.
Attention! All communications should be thought through and carried out before the construction of the brick structure begins, otherwise it will be impossible to do this later.
Before carrying out construction work on the walls of the bathtub, install all the necessary communication and sewer systems. To make drain maintenance easier, install a shower drain instead of the usual trim for a standard bathtub.
Preparing the site for the construction of a bath An important point at this stage will be taking measurements of the room, designing the structure and calculating the necessary construction (finishing) materials.
Installation of formwork
Installation of formwork for a concrete bath. To determine the size, shape and location of the bathtub, a drawing is made to a certain scale, which will help show the future usability of the bathroom. After designing the future font, they begin to calculate the number of necessary components for the manufacture of concrete mortar.
When starting to install the formwork, the work area is cleared of excess equipment, tools and other materials. The bathtub is dismantled and markings are applied according to previously prepared drawings and calculations. Using wooden boards, formwork is constructed, securing it with nails or metal staples. Next, a reinforcing structure is installed that will serve as a holding element. Thanks to the reinforcement, the formwork will become stronger and will not allow concrete to leak in the future.
Do not forget to prime the cleaned area where you plan to install the formwork.
This will improve the adhesion of concrete to the working surface. When constructing wooden formwork, it is important to ensure a monolithic structure without cracks and gaps so that the poured concrete solution does not leak through them. When choosing materials for the construction of formwork, pay attention to the smoothness of the surface, which will ensure trouble-free dismantling of the slabs. To ensure tightness, construction film is used. Next, drain recesses and overflows are provided in front.
Step-by-step instructions for building a bathtub
The next stage is the construction of the walls of the bathtub. Instead of bricks, aerated concrete blocks are often used.
The masonry mortar is made from standard M400 cement and water in a ratio of 3:1. Soak the brick that will be used for work in plain water for a day so that after laying it does not take up excess water from the solution. Masonry is usually done in one brick.
It is recommended to make the seams not very thin (optimally 8-12 mm) in order to further strengthen the load-bearing walls. Remove any excess mortar protruding from the seams immediately, thoroughly and carefully, so that the finishing material can then lay down in an even layer. The finished work dries within a few days.
Construction of bathtub walls To prevent water from leaking in the bathtub before finishing the floor of the structure, waterproof it using the following materials to choose from:
- roofing felt; special polyethylene film; metal sheet.
Cover the bottom of the structure with a layer of crushed stone or expanded clay, and then fill it with a concrete screed and let it dry for a week.
Important! When forming the bottom of the bathtub, make sure that the slope is towards the drain hole. Before final finishing, carefully plaster the outer and inner walls of the bathtub and level their surface for applying facing materials.
Steel
Blanks are made from structural and stainless steel using the cold stamping method. Bathtubs and sinks made of structural steel are covered with enamel, stainless steel is used in its pure form.
The main advantage is the price. They are cheaper than bathtubs made from all other materials. In addition, steel baths
- Made in different shapes and sizes.
- Easy to transport and install. One person can easily handle this.
- The enamel, like cast iron bathtubs, is resistant to chemicals.
The bad thing is that a fairly thin layer of metal can easily be bent or even pierced through by dropping something heavy or sharp.
- For a steel bathtub, it is better to prepare a base made of solid materials, if not solid, then at least in the area of the legs. This will ensure its stability and give additional strength.
- To muffle the sound of pouring water, you have to resort to various tricks in the form of a noise insulation device either over the entire surface or, at least, in the place where the water running from the tap falls. This, in turn, causes unnecessary costs for camouflage. You have to make a protective screen to cover the sound insulation.
- The water in such a bath cools down very quickly. You need to either reduce the washing time or constantly add hot water, which is not very economical.
- Do not clean enamel with abrasive agents.
- Metal is susceptible to corrosion, especially at the edges, where the enamel scratches and cracks most quickly.
- Stainless steel retains water stains and limescale very well. It must be wiped dry constantly. But it still fades over time.
Final finishing and lining of the bath
And the last stage is the final finishing.
You can decorate a custom brick bathtub to your liking (unlike the standard white model). The finishing can be made of facade or tiles. Mosaic tiles for swimming pools look great.
brick bath lining
Cladding a brick bathtub with mosaics The tiling work begins from the inside of the bathtub: first they make the floor, then the internal and external walls.
Cement mortar or special tile powder are used as glue. After drying the work for several days, all that remains is to rub the seams. You will be able to use your new bathroom in 3-4 days.
Finishing touches
Before you begin finishing and tiling, you must remove the formwork (the outer wooden frame of the bathroom). This must be done very carefully. Although the concrete hardened after 3 days, it still has not turned into a solid structure. After removing the formwork, you need to give the font the desired shape by rounding or leveling the corners, plaster it and apply a primer. Now you should leave the product for 10 days for final hardening. After the specified period, you can begin lining the outer and inner parts of the bathtub, having first primed the surface in 1-2 layers. Now all that remains is to choose a suitable mosaic or tile, lay it and grout the seams. The concrete bath is ready!
What are the advantages of a brick bath
- Originality and non-standard form. Possibility of beautiful finishing of the bathtub surface that suits your design. Ease of use - a do-it-yourself bathtub can be a little deeper than the standard model. Durable use (subject to taking into account all technical aspects). Significant financial savings.
Carefully made brick baths look very stylish. There are also disadvantages - if you want to dismantle the structure, there will be a lot of work.
Brick bath: photo
Source
- Date: 02/14/2015 Comments: Rating: 46
When building an individual house or cottage, or when remodeling an old apartment, fitting out a bathroom always poses a special challenge.
I would like to make something exclusive, aesthetically pleasing and at the same time as comfortable as possible, tailored to the specific needs of the owners. So that when entering the bath, the body can fully relax both soul and body. At the same time, standard cast iron, steel and acrylic bathtubs sold in plumbing supply stores do not always meet these requirements, especially for tall people.
The optimal solution may be a brick bath, which you can easily make with your own hands. It can have any size, shape and volume and make full use of all the possibilities provided by the space allocated for it. It can be folded quite easily on your own if you follow the sequence of operations and have the necessary materials and tools.
DIY bathtub installation diagram.
Selecting the source material
On the one hand, the bathtub must be durable, and, on the other hand, it is important that its appearance gives aesthetic pleasure to its owners. It should provide exceptionally pleasant emotions. It is this combination of qualities that the following types of wood can guarantee:
- wenge;
- teak;
- mahogany;
- cedar;
- oak;
- beech;
- larch.
The type of wood the bathtub is made from is extremely important. Not only its service life, but also your precious health depends on this.
The wood of these species takes the desired shape well, is not subject to rotting, and withstands high humidity. It is very important that the bathroom does not develop fungi or mold, which are detrimental to human health.
The bowl should be smooth, neatly maintained and absolutely clean. In this case, swimming will give you pleasure and add vigor and good mood.
It’s not in vain that we try to surround ourselves with not just comfortable, but also beautiful objects. By receiving aesthetic pleasure, we prolong our life
Some manufacturers use innovative technologies that allow them to combine materials, creating surprisingly effective combinations. For example, a bowl combined of glass and wood looks like a large aquarium with a lounger inside.
This model of the font allows you not to worry about the wood drying out. As a last resort, you can simply replace the sunbed.
DIY metal profile frame
Installation of a metal profile frame for plasterboard.
The profile used when installing plasterboard systems is suitable for self-manufacturing a frame device for a bathtub.
Equipment preparation and marking
The preparatory stage includes the following steps:
- the container is turned upside down;
- profiles to which the legs are screwed are fixed with self-tapping screws on the plywood-reinforced bottom;
- The drain and overflow system is being installed.
Upon completion of the preparatory work, the bath is brought into the room where the installation area is marked. To do this, the outline of the equipment is drawn on the floor.
The next step is to adjust the height by twisting the legs. For horizontal orientation, a laser level is used.
The final stage of preparatory work is marking the area of the frame wall mounts. To do this, mark a line on the wall corresponding to the location of the lower edge of the bathtub.
Frame installation
To perform the installation correctly, you must adhere to the following algorithm:
- holes are cut in the profile sections for subsequent fixation;
- According to the marks, dowels are inserted into partitions made of brick and concrete, onto which metal slats are fastened with self-tapping screws;
- installation of side support strips is carried out;
- After treating the outer shelves of the profiles with sealant, the bathtub is installed and connected to the communications.
Self-installation of the frame.
At the next stage, supports are created for the bottom. They are laid out of brick, cinder block or foam concrete using cement mortar. In this case, the bottom of the container should not come into contact with the masonry. Polyurethane foam fills the gap. After the composition has hardened, the installation of the frame is completed and a decorative screen made of plasterboard sheets is installed.
We build a bathhouse step by step
Site preparation
The first step is to work on the construction site.
It consists of the following:
- We clean the future construction site of grass, debris, and stumps.
- We make markings for the project.
- We immediately determine the location of the drainage hole.
- We supply communications, electricity and water to make it convenient to work.
Cleaning up the area
Selecting bath material
It would seem that a traditional Russian bathhouse should be made of wood, however, after considering all the pros and cons, we decided to build a brick structure.
A reasonable question arises: why?
- First of all, it's a little easier. Still, working with logs requires certain skills.
- Secondly, it's safer. A brick structure is always more fireproof.
- Thirdly, it is cheaper to build a bathhouse using bricks.
Foundation
We will prepare a simple strip foundation for a lightweight structure. You will have to dig it out yourself; ordering an excavator for this work is irrational.
However, there is a small excavation here. Our trenches will be 20-30 cm wide and 30-40 cm deep.
Simple strip foundation
We dig along the markings, trying not to go to the sides. When the trenches are ready, we set up the formwork so that our foundation rises 10-15 centimeters above the ground. We set the formwork completely horizontally.
From the materials for the foundation we will need:
- Cement.
- Sand.
- Crushed stone.
- Reinforcement with a cross section of 10 mm.
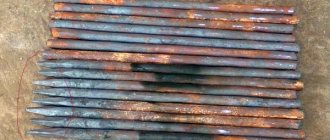
- Red solid building brick that will go to the base.
This is where we immediately pay attention to the failed communications. To mix concrete we need water and electricity if we have a concrete mixer
We knit the reinforcement, pour 10-15 cm of sand and gravel into the trenches, compact everything tightly, install the reinforcement and begin uniform pouring.
Foundation solution
Preparation of masonry
Next, let's worry about laying the walls. If everything is clear with the solution, there will be nothing unusual in it, then which brick for a bathhouse is better to choose?
A simple solid clay brick is ideal.
It has all the necessary characteristics:
Selecting products for masonry
Strength. We are building a brick building, and the walls in it must be strong.
Low moisture absorption
In relation to the bathhouse, this is all the more important, since it will often be humid here.
Frost resistance. It will be possible to build brick baths in any climatic conditions.
Low thermal conductivity
The brick takes a very long time to heat up and cool down, so throughout the entire bathing procedure we will maintain an almost constant temperature.
Easy to use. Even a beginner will be able to lay such solid bricks.
We measure sizes
First of all, you need to check the surface on which the bath will be located. If there are gaps and cracks, they need to be cleaned and sealed with cement mortar.
It is also recommended to measure with a level and level the floor with a screed if it is uneven.
Undoubtedly, it is better to carry out this procedure right away rather than suffer afterwards, fixing the location of the plumbing with the help of boards or any auxiliary materials.
The next step is to take the dimensions of the bathtub. Need to measure:
- length and width of the font;
- depth of the bathing tank;
- distance from the installation site of the supports to the ends of the bath. If difficulties occur when measuring the distance between the rows of bricks, you need to measure a distance of 25 centimeters in both directions from the middle of the bathtub. Brickwork should be located at the resulting points;
According to the rules, when measuring the dimensions of the bowl, it is necessary to take into account that the height of the bathtub from the floor should reach 55 - 70 centimeters.
Determining the required height is simple - you need to understand how it will be most convenient for home owners to take water treatments directly and choose the result obtained.
It is also necessary to remember that there is no need to form a slope of the font towards the drain hole, since modern bathtubs are already equipped with a slope at the factory.
Upon completion of measurements, it is recommended to record all data on paper.
Instructions for arranging a frame made of wooden blocks
The technology is similar to the previous version.
The differences are due to the characteristics of the material:
- the preparatory stage consists of treating the lumber with an antiseptic or oil impregnation;
- during the preparation process, the walls are leveled and primed;
- horizontal bars are fixed on vertical supports, increasing the rigidity of the structure.
The final stage of installation is treating the wood with a waterproofing agent. The walls adjacent to the bathroom are coated with the same composition. If used for tile cladding, additional waterproofing is not required.
Homemade welded frame
The welded structure is made from a metal profiled pipe of rectangular cross-section. It is used when it is necessary to construct a support of increased strength.
Manufacturing technology:
- a frame drawing is drawn up corresponding to the dimensions and configuration of the bathtub;
- Profile sections are prepared according to sketch dimensions;
- the base of the structure is formed from 3 support pipes with 2 horizontal guides by welding;
- according to the markings, adjustable legs are welded to the profile sections in designated areas to adjust the bathtub horizontally and vertically;
- on the supporting base, vertical posts are fixed by welding, on which horizontal supports for the sides of the bathtub are fixed;
- if you plan to install a screen, front profiles are welded to the outer part of the structure;
- After leveling the frame, the bathtub is installed.
Covering with decorative panels is carried out after checking the operation of the drain-overflow system. Polyurethane or silicone sealant is used to glue the bathtub to the frame structure. Sealing is also required in the area where the edge meets the wall.