A cigarette case is not a large box designed for cigars or cigarettes, placed under a special rubber band by the owner. This thing is expensive, and not everyone can afford to buy it today. This item can be given to people in high positions and birthday people. You can use vip-dar.com ready-made if you don’t have enough time. But you can make it yourself. For production, you may need two bars that are not very thick; it can be oak or linden. Elastic band - it should be wide and bright in color, threads, loops, glue, rhinestones or beads, a strip of Velcro.
On small thickness bars, small depressions are cut out or scraped out. To do this, use a special tool designed for cutting wood. The notch can be in the shape of a rectangle or square. Corners can be rounded or pointed.
A through hole is made in the sides, exactly in the middle; there should be four of them in total, two on each, which are strictly parallel. Now, the ends of the elastic are threaded through the prepared holes. There is an elastic band running through the inner and outer sides. This is done with both halves of the cigarette case.
On the inside, the elastic is fastened with threads, and the connection point is hidden in the hole. The elastic band must be tightly stretched so that the tobacco products are held under it. The hinges are purchased at a hardware store and attached to the halves with nails. Velcro is glued to the opposite side so that the cigarette case does not open on its own. Using decorative elements, the product is decorated.
- In order for you to make your own vase, you will need a block of wood, ideally oak or walnut. The base must be attached to the walls of your future product, with
- A wooden door is a leaf designed to be hung on hinges to a door frame. The door jamb can be made of timber; it will have a closed shape.
- For curtains you will need: a wooden block or a special cornice with a lifting mechanism, metal rods the length of which is equal to the width of the curtains, fabric, a wooden block 25 mm wide,
- Wicker chairs are a stylish decoration for both a cottage and any other interior. Now, of course, you can buy a wicker chair in any store, but this pleasure is not exactly cheap, but
- Is it possible to crochet a border with an elastic band in the same way as it is done with knitting needles? To achieve the same effect as when knitting, you need to work perpendicular to the edge of the product. Most likely you
The cigarette case was known several centuries ago; it was used to store cigarettes and rolled tobacco rolls. This product is a small box, inside of which there is an elastic band, under which cigarettes are placed in a row. Previously, cigarette cases were made of metal, wood and paper. They were used as souvenirs, given to relatives and friends, and used for their own needs. Today, a Kyiv cigarette case can be bought at the gold.ua store, or you can make it yourself, showing skill and ingenuity. We will try to tell you how to make a cigarette case out of paper with your own hands in this article.
To make it we will need: two small pieces of thick paper (you can use cardboard), an elastic band, sewing thread, loops, adhesive tape, beads and rhinestones.
Also on topic: How to choose a satellite TV operator?
1. So, cut out two identical small squares from thick paper. We make the edges rounded - it will look more beautiful. In each square we make two through cuts, which should be located parallel to each other. We stretch a wide elastic band into these holes, and you need to choose a bright one, because it will decorate your cigarette case, give it piquancy and originality.
2. You threaded elastic bands into both parts of the cigarette case, then secure them with threads. You need to sew it up so that the seam on the inside can be placed in the hole made. Particular attention is paid to the width and density of the elastic; it must be stretched in order to hold cigarettes inside the cigarette case. We fasten the finished halves of the product using small loops. Since paper is a delicate material, the loops can be fixed with Moment glue, leaving them to dry for a while.
Also on the topic: What misconceptions should you avoid when buying a bicycle?
3. Your product is almost ready, but in order for the cigarette case to close, you need to attach adhesive tape from the inside. The Velcro is attached inside using the same glue. She will always keep her cigarette case closed when walking or driving. Your product is almost ready, but you need to decorate it on the outside. If the cigarette case will be used by men, then its outer side will be more austere, of a single color or decorated with stickers. Women can decorate their creations with rhinestones, beads, and beautiful mother-of-pearl beads.
It is considered stylish and fashionable to have a handmade cigarette case. Such products are always made in a single copy; they are unique and dear to their owners. A handmade cigarette case is made not only from paper. These products can be made from the case of a hard drive, a used player or cell phone, or from used plastic and metal boxes. Whatever you make the cigarette case from, it will perform its direct function: storing cigarettes and cigars.
Cigarette case
It is a small box in which several cigars or cigarettes can conveniently and easily fit, placed by the owner under a special elastic band. Today, not everyone can afford to buy a cigarette case: such a thing is expensive. Typically, such products are given to birthday people or people in leadership positions. But absolutely anyone can make such an accessory with their own hands.
Homemade cigarette case
Hello. Is anyone familiar with the technology of making a cigarette case from an aluminum plate?
Leather - 3mm thick. Painting, impregnation. The interior is thin chrome. Waxed thread.
The wooden one needs to be jew's harp. From Karelian! This is chic!
The leather one is not for sale. The wooden one is not mine - the first example I came across, photo from a search engine.
I can sculpt it from the skin, but later, when I have free time.
Here we are talking about the option - PICK! It’s nice to carry a weight in your pocket that you made yourself!
Here is mine, but not made by me, but an antique one. If anyone is interested, I’ll send you a lot of photos and drawings.
Made from caporoot, quite a rare specimen. At the time they cost a lot of money, they were made by special craftsmen from selected, very rare capacorn.
From a Karelian, I think it will work too. I think that if you’re interested in sculpting, you can work hard and carve the same one. Someday, I’ll definitely take it up and make a copy for myself.
This is something in between a svilem and a burl and a root. Grows on a birch tree. That is, the growth is underground, grows on some types of birch trees, in some conditions only (next to a ditch with water, or in very damp places). There was information that plantations were planted even in the USSR of such trees that were prone to forming such caporoots. It was obtained by accident, it was rare, which is why cigarette cases like this were very valuable. _____________________________________________________________________
It would be very interesting to see what happens, if you ever do it, post photos (preferably detailed ones).
Metal is not kosher)
Leather - 3mm thick. Painting, impregnation. The interior is thin chrome. Waxed thread.
What keeps cigarettes in the cigarette case?
Yes, just a rubber band. Not in the photo, I sewed it on later.
Konstantin217
What keeps cigarettes in the cigarette case?
For example, in the photo above there are no rubber bands, they just lie there. Wooden cigarette cases open differently than other cigarette cases - at an angle less than 90 degrees - due to the characteristics of the wooden lock. There was nowhere to fall out, so he opened it, took a cigarette, and then closed it. It closes with a slight click, by the way!
Judging by the photo, the cigarette case (wooden) is one-sided and the cigarettes are pressed with a lid? The leather one (like most) has both sides for cigarettes, so without an elastic band they will “fly” there. But both things are great. I will look for a tanner - I want something similar.
How were cigarette cases made from wood before? In A.P. Chekhov’s “The Thick and the Thin,” does the thin one make cigarette cases for sale? Which?
And there in message 12 is an antique cigarette case. The owner even has drawings.
Clamp (elastic band) - sewn in the lower compartment. A lighter, cigarette holder and paper are placed on top.
Konstantin217
And there in message 12 is an antique cigarette case. The owner even has drawings.
I don’t have any drawings, but upon request, if anyone is interested, I will measure the existing one, and I’ll show in more detail everything that is visible on the surface, and it is necessary, of course, to see it to make the same thing.
By the way, such woodwork was considered not ordinary work, but aerobatics, not just someone who made such things without getting caught, but rare lone craftsmen, often their artels selected them and lured them there with a long ruble. Exhibitions were organized of international importance, with royal prizes. And not surprisingly, there were no plastics then. as beautiful as the tree looked. on things like this. There was a whole cult for wooden, one-piece things like that, and they were, accordingly, not cheap.
Read also: How to make a trellis for a climbing rose with your own hands.
I would like to first draw your attention to the fact that the most difficult place in the manufacture of this cigarette case will, of course, be in the place of two mating parts, in wooden loops connected to each other by a thin wire.
In addition, the workpiece material itself must be dense and homogeneous (most likely something stabilized).
To be honest, it’s not so much the exact dimensions that are needed to make such a cigarette case, but an understanding of where to start, how to adjust the knot that is wooden hinges, what tool to use, and also the important point - when to drill holes in the hinges, at what stage ,how.
I'll give you more photos first so you can see it all:
Beauty! I also want a cigarette case from the burl. Doesn't anyone do these things now?
One of these days I’ll give you the dimensions of the cigarette case, in subtleties and details.
If anyone decides to make one based on them, that would be really cool!
I noticed an excellent burl on a birch tree in the forest. I hope to start making some this winter.
What if the lid is made of silver sheet? IHMO it will look even better than a completely wooden one. And it’s easier to manufacture and more reliable to use.
Another beautiful Axolotl
This Axolotl was knitted to order, and the buyer chose the color combination for the toy himself.
I absolutely love the end result of the color combination.
To create this Axolotl, I took medium thickness yarn, when for the “original” (the first Axolotl) the yarn was quite thin, because of this, this baby came out 37 cm long!
This Axolotl came out incredibly tender and cute, you didn’t want to let go of him.
You can find my description of the toy in my group on VK.
Below there will be a bunch of photos of Axolotl, I always can’t choose the best photo)
Magic cigarette box. Cigarette case made of non-ferrous metals DIY cigarette case made of metal
The cigarette case was known several centuries ago; it was used to store cigarettes and rolled tobacco rolls. This product is a small box, inside of which there is an elastic band, under which cigarettes are placed in a row. Previously, cigarette cases were made of metal, wood and paper. They were used as souvenirs, given to relatives and friends, and used for their own needs. Today, a Kyiv cigarette case can be bought at the gold.ua store, or you can make it yourself, showing skill and ingenuity. We will try to tell you how to make a cigarette case out of paper with your own hands in this article.
To make it we will need: two small pieces of thick paper (you can use cardboard), an elastic band, sewing thread, loops, adhesive tape, beads and rhinestones.
1. So, cut out two identical small squares from thick paper. We make the edges rounded - it will look more beautiful. In each square we make two through cuts, which should be located parallel to each other. We stretch a wide elastic band into these holes, and you need to choose a bright one, because it will decorate your cigarette case, give it piquancy and originality.
2. You threaded elastic bands into both parts of the cigarette case, then secure them with threads. You need to sew it up so that the seam on the inside can be placed in the hole made. Particular attention is paid to the width and density of the elastic; it must be stretched in order to hold cigarettes inside the cigarette case. We fasten the finished halves of the product using small loops. Since paper is a delicate material, the loops can be fixed with Moment glue, leaving them to dry for a while.
Also on the topic: Carp fishing in the off-season in the Astrakhan and Volgograd regions
3. Your product is almost ready, but in order for the cigarette case to close, you need to attach adhesive tape from the inside. The Velcro is attached inside using the same glue. She will always keep her cigarette case closed when walking or driving. Your product is almost ready, but you need to decorate it on the outside. If the cigarette case will be used by men, then its outer side will be more austere, of a single color or decorated with stickers. Women can decorate their creations with rhinestones, beads, and beautiful mother-of-pearl beads.
It is considered stylish and fashionable to have a handmade cigarette case. Such products are always made in a single copy; they are unique and dear to their owners. A handmade cigarette case is made not only from paper. These products can be made from the case of a hard drive, a used player or cell phone, or from used plastic and metal boxes. Whatever you make the cigarette case from, it will perform its direct function: storing cigarettes and cigars.
A cigarette case is a flat box of a rigid, usually rectangular shape, made of a variety of metals: bronze, copper, brass, gold, silver and is often decorated with some kind of engraving, plot, embossing, etc. The first cigarette cases appeared in European society in the 17th century, when the fashion for the “devil’s potion” spread. This word comes from several French words: porte - “to wear” and cigare - “cigar”. The very first cigarette cases were made of precious metals - gold or silver. They were decorated with intricate carvings, inlays, various inserts on enamel, and semi-precious and even precious stones were often used. But some time later, silver became the main material for making cigarette cases and for several centuries it occupied a leading position. The choice of silver as the main raw material in manufacturing is due to the fact that it has unique metal properties. It resists all the tricks of nature very well, is very easy to process, and also has a beautiful color and shine. At the beginning of the twentieth century, this item was worn by all representatives of high society, the military and various employees. To own a cigarette case it was not necessary to smoke, since it was a kind of status item. Every man was happy with such a gift. It is believed that a cigarette case is a real men's accessory that will not go out of fashion for a long time.
Read also: How to make a fungus on a pipe from tin with your own hands, drawings.
This article is dedicated to the creation of such an object. Using the example of the author of the YouTube channel Banjo Show, we will look in detail at how to make a cigarette case yourself.
We will need: a gas torch, tin, liquid rosin, wire cutters, pliers, metal scissors, a jigsaw with a metal file, thin sheets of brass and copper, copper wire, several magnets, a core, an engraver, a drill or screwdriver, drills of different diameters, file, lathe.
Step 1.
Take a thinly rolled copper sheet. Markings are made on it that determine the size of the future product. In order for the marking lines to be clearly visible, the author paints over the metal with a marker, along which he draws lines and cuts off the required piece of material.
Next, several tubes are taken, which are soldered together and form a template on which the copper sheet will be bent. This will be the “body”, the container where the cigarettes will be placed. Having placed the workpiece on the pipes soldered together, we begin to carefully bend the edges, bringing them towards each other. This must be done very carefully so as not to injure your hands on the sharp edges of the part. We get an oval blank. The edges need to be soldered. A strip of the same material is taken and placed inside the workpiece in the middle. The parts are clamped with ordinary office clips. Along the edges we place strips of tin along the entire length. We heat the parts with a gas burner and when melted, they tightly connect the parts.
Step 2.
On the side, the edges were sealed, a stencil was glued, with marks symmetrically located on it. Using a core, we mark the drilling locations. Using an engraver, the author drills holes. Wire cutters are used to cut off wires equal to the number of holes on the body of the workpiece. These wires are bent in a U-shape and the curved edges are placed in the holes. By heating the workpiece from the outside, the ends of the wire located inside are soldered. This should be done as quickly as possible so that the temperature does not melt the tin that secures the edges and the connecting strip. After soldering, the insides are ground.
Step 3.
Let's start making the bottom of the cigarette case. For this we need a thin sheet of bronze or brass, whoever has what. We place the container on the workpiece and also solder the parts. In order for all parts to quickly cool down and be able to proceed to the next stage of work, the author uses a spray bottle with water. He sprays hot parts with it. The protruding parts of the bottom are cut off with scissors and sanded with a file until they are flush with the walls of the container.
Step 4.
We make decorative linings on both sides of the body of the cigarette case. A sheet of brass or bronze is also taken, onto which a paper template is glued. Unnecessary fragments are cut out with a jigsaw. The edges of the cuts are polished. Using the same pipe template, we give the newly obtained parts a semicircular shape. For tighter compression, a vice with wooden spacers is used between the jaws of the vice and the workpiece being bent. Next, using a lathe and a tube, the following decorative elements are created - round rings of different sizes. Holes for the wires are drilled in them. A hole is drilled in the middle of the cigarette case. Let's start decorating the surface of the cigarette case. Side decorative elements and decorations are soldered to the front wall.
Step 5. Making the lid. A strip of bronze is cut and wrapped around the top of the cigarette case. This part, the edging, should be slightly larger than the cigarette case itself so that the lid fits freely into place and covers the contents. We solder the edges. We solder the edging to the bronze sheet. The protruding parts are cut and sanded. Place transparent plastic or glass on the hole in the middle. Now you need to make a mechanism for attaching the lid to the cigarette case so that its contents are completely safe while moving. For this purpose, a small block of bronze is suitable, which is attached inside the cigarette case in its upper middle part. A hole is drilled in this block for a magnet, which is mounted on epoxy resin. A metal strip is glued to the lid. Everything is sanded very carefully on a felt polishing wheel, giving the finished product a shine. The cigarette case is ready. Cigarettes are placed inside and the happy owner of this device does not have to worry about the safety of his cigarettes!
The tree chosen was bubingo, a rather hard and brittle tree. But it satisfied my criteria. Well, let's get started!
I sawed the block into dies of approximately 10 mm.
Next, I needed to level the surfaces, which I did with cutters, a knife and P80 sandpaper.
I cut out the recesses with the same incisors, millimeter by millimeter.
Then I adjusted the halves so that they were pressed tightly together using P400-P800 sandpaper. And then the unexpected was discovered: the dies began to dry out and they began to warp... I had to wait until they were completely dry and adjust them again. Don't repeat my mistakes!
To accurately place the hinges, I clamped the dies in a vice and aligned the edge.
The carnations were large, we had to trim and shorten them.
Then I installed the hinges with two-component epoxy glue.
After that I sanded the outer surfaces.
Well, since it was not possible to order normal magnets, I made homemade ones from shelf magnets.
I sawed it with diamond files, and then pricked it with pliers.
By the way, I used an identical latching scheme, when a magnet is clamped between the plates, and when closed, the two plates come into contact with a perpendicularly located plate on the other half. In the photo it is already covered with the first layer of oil. But the loops are already stuffed! Why cover them with tape? Pralna, no need, it’ll do just fine!
Read also: How to make a cultivator with your own hands for the T 25 tractor.
Well, here's the finish. Covered with 2 layers of oil and polished with wax. And since Danish has the nasty qualities of remaining streaks, drops and not saturating dense wood, he used a trick by dissolving it with white alcohol in a ratio of 1 (alcohol): 4 (oil). As a result, the coating dried quickly and imitated a shellac-like coating, smooth and shimmering.
Now let’s summarize all the mistakes: 1) Stuffed loops. 2) Jamb latch. 3) The tree, despite all my efforts, still led to one edge on the side of the hinges with a gap. And the inner surface also has an unfinished appearance. Well, the advantages: 1) Cool appearance, bubingo, to my surprise, gives beautiful amber tints. 2) Now there is a place to store fragrant rolled-up cigarettes) 3) No one but you can open it, I didn’t make grooves for fingers on purpose, and the magnets are quite powerful.
The tree chosen was bubingo, a rather hard and brittle tree. But it satisfied my criteria. Well, let's get started!
I sawed the block into dies of approximately 10 mm.
I cut out the recesses with the same incisors, millimeter by millimeter.
Then I adjusted the halves so that they were pressed tightly together using P400-P800 sandpaper. And then the unexpected was discovered: the dies began to dry out and they began to warp. I had to wait until they were completely dry and re-fit them. Don't repeat my mistakes!
To accurately place the hinges, I clamped the dies in a vice and aligned the edge.
The carnations were large, we had to trim and shorten them.
Then I installed the hinges with two-component epoxy glue.
After that I sanded the outer surfaces.
Well, since it was not possible to order normal magnets, I made homemade ones from shelf magnets.
I sawed it with diamond files, and then pricked it with pliers.
By the way, I used an identical latching scheme, when a magnet is clamped between the plates, and when closed, the two plates come into contact with a perpendicularly located plate on the other half. In the photo it is already covered with the first layer of oil. But the loops are already stuffed! Why cover them with tape? Pralna, no need, it’ll do just fine!
Well, here's the finish. Covered with 2 layers of oil and polished with wax. And since Danish has the nasty qualities of remaining streaks, drops and not saturating dense wood, he used a trick by dissolving it with white alcohol in a ratio of 1 (alcohol): 4 (oil). As a result, the coating dried quickly and imitated a shellac-like coating, smooth and shimmering.
Now let’s summarize all the mistakes: 1) Stuffed loops. 2) Jamb latch. 3) The tree, despite all my efforts, still led to one edge on the side of the hinges with a gap. And the inner surface also has an unfinished appearance. Well, the advantages: 1) Cool appearance, bubingo, to my surprise, gives beautiful amber tints. 2) Now there is a place to store fragrant rolled-up cigarettes) 3) No one but you can open it, I didn’t make grooves for fingers on purpose, and the magnets are quite powerful.
A cigarette case is not a large box designed for cigars or cigarettes, placed under a special rubber band by the owner. This thing is expensive, and not everyone can afford to buy it today. This item can be given to people in high positions and birthday people.
You can use vip-dar.com ready-made if you don’t have enough time. But you can make it yourself. For production, you may need two bars that are not very thick; it can be oak or linden. Elastic band - it should be wide and bright in color, threads, loops, glue, rhinestones or beads, a strip of Velcro.
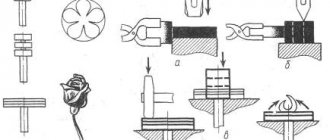
On small thickness bars, small depressions are cut out or scraped out. To do this, use a special tool designed for cutting wood. The notch can be in the shape of a rectangle or square. Corners can be rounded or pointed.
A through hole is made in the sides, exactly in the middle; there should be four of them in total, two on each, which are strictly parallel. Now, the ends of the elastic are threaded through the prepared holes. There is an elastic band running through the inner and outer sides. This is done with both halves of the cigarette case.
On the inside, the elastic is fastened with threads, and the connection point is hidden in the hole. The elastic band must be tightly stretched so that the tobacco products are held under it. The hinges are purchased at a hardware store and attached to the halves with nails. Velcro is glued to the opposite side so that the cigarette case does not open on its own. Using decorative elements, the product is decorated.
Teddy Bear. Long wallet with zipper
Hi all. Made some cute stuff last year. I want to share them.
Here's the first: a long zip-up pouch with an embossed Teddy Bear. The drawing is painted with alcohol penetrating paints (background) and acrylic (the bear itself and the inscription). In this work I used vegetable tanned leather (1.8-2.0 mm for the cover and 0.8 mm for the interior parts), 0.45 mm linen thread, 4 mm punch, and Fenice silicone-based paint for the ends.
Gas lighter
Hi all! I've been looking at homemade gasoline lighters for a long time and finally got around to making something of my own.
CAUTION, THESE ARE LONG POSTS!
Most often, such things are made (or they themselves turn out that way) in the steampunk style. I've had a brass nut from a water pipe for a long time for this purpose. But I was very confused by the size of the product; it seemed to me that it would turn out to be a little small and at the same time heavy due to the fact that the walls of the nut are quite thick. After looking a little through various resources with a steampunk theme, I was inspired to make my own lighter and began to think through the design. I realized that I wanted to see a rich patina in my lighter, a lot of knurled elements, a cap on a chain, and various rounded lines in the shape of parts.
I also consulted on various nuances of lighter construction with craftsmen who posted their work on the Internet.
I immediately decided to make the body from sheet brass - it was in stock. The advantages of such a case: you can get almost any shape and the product will be light. But there are also disadvantages: there are a lot of solder joints, it’s difficult to get an even geometry. Having roughly imagined the order of work, I prepared the details.
Next comes the most interesting and difficult part – assembly. I decided to assemble everything using silver solder; I had to practice soldering with it a little. It turned out that the key to success is good flux in sufficient quantity. Before soldering, it is necessary to fix all parts with nichrome wire and carefully monitor the temperature; overheating a thin part can deform it or completely melt it.
When all the parts are in place, you can solder the sides. First one side, laying out the pieces of solder from the inside, and then the other, laying out the solder from the outside
Then we saw off all the excess and you can solder the wind protection
When I soldered the windshield, I thought that something would definitely come off, but everything went well. After soldering, everything is put into a bleach (citric acid solution), which removes oxides and flux residues.
The seams after soldering and stripping are barely noticeable, and where the parts fit very tightly they are not noticeable at all. Well, the final treatment is patination in ammonia vapor and light polishing, as a result the product has a rich dark green color.
Of course, there are also jambs; in some places the surface was not very thoroughly cleaned, and the patina did not lie evenly. The solder on the side spout also doesn’t fit very well, this is also noticeable, but it doesn’t spoil the overall picture much. After pouring gasoline, I made sure that the lighter was sealed (there are O-rings on the filler plug and cap).
From idea to implementation, it took about 2 weeks of leisurely work. As a result, I gained a lot of experience and immense pleasure from my work.
The second life of a fur collar. Or a budget hair option for dolls
Hi all! This is a supporter of reasonable consumption and a lover of nature, Alfina.
I would like to share a method for extending the life of fur collars and hoods. In front of you in the photo is my Little Eroshka, one of the first. And on her head she has a fur skin from the hood)
It was funny, really