One of the most popular power tools, which is used with equal success in production and at home, is an electric drill.
The drill is a universal assistant. It’s not difficult to expand its capabilities; you just need to buy additional attachments, and there are a great many of them. Some allow you to drill into walls, others allow you to mix building mixtures, and others help you cut sheet material.
At the final stage of manufacturing various decorative products, an attachment for sanding wood is indispensable; with its help, you can create a perfectly smooth surface. In this case, you do not have to spend money on buying a full-fledged grinding machine.
Range of accessories
Electric drill attachments are replaceable tools for various purposes, which are driven by the drill motor. For fixation in the cartridge, each of them has a connecting pin. The right attachment will help you perform a whole range of jobs without the need to purchase expensive tools.
Among other things:
- removing traces of corrosion from the metal surface;
- removal of old paintwork;
- cleaning welds, removing burrs;
- milling of soft material;
- polishing of metal products, including those with complex geometry;
- grinding the inner surface of the holes;
- sanding the wood surface;
- polishing varnished products;
- polishing glass and grinding its edges;
- grinding and polishing various small parts.
The industry offers a wide range of ready-made accessories, so you can choose the right tool for any type of work. Some types of attachments can be used together, allowing you to turn your drill into a small, portable machine.
When choosing a nozzle, in addition to its purpose, you should pay attention to the manufacturer and country of production. Too often you can find cheap, low-quality tools, the use of which will not give the desired effect, and in some cases can cause serious injury.
Making a steel machine: instructions with step-by-step photos
A metal machine consists of similar units, but they are more difficult to make due to the complexity of processing the material. The advantage of the design is its reliability and lack of play, which is ideal for installing additional components that expand the functionality of the machine.
The general structure of the metal machine is shown in the drawing, and the procedure for manufacturing the structure is as follows:
- For the frame you will need a steel plate 1 cm thick. The dimensions can be taken similar to those of the wooden model.
- The stand is welded from a square or round pipe with a cross section of 32–40 mm. You can weld a sleeve of a larger diameter onto the plate, and insert a pipe into it and tighten it with a bolt.
- The carriage is made from a larger diameter pipe. It should fit freely onto the stand. A steel clamp for a drill is fixed to the carriage.
Now all that remains is to put all the units into one structure and try to secure the drill with clamps.
Manufacturing of control mechanism
The main working unit of a wooden and metal machine is the carriage movement mechanism. It consists of a control handle and a spring. The last element is necessary to return the carriage to its original position.
Depending on the location of the spring installation, two options for the return mechanism can be made:
- The first version of the mechanism involves installing a spring near the control handle. Two metal plates are welded from the top to the end of the rack from one and the other edge. A hole is drilled in the first two plates. An axle is made from a bolt with a diameter of 10 mm, and the end of the handle is secured. A spring is placed between the other two plates. To prevent it from jumping off, pins are welded on the stand and handle. On the side of the handle, at the point of fixation to the carriage pin, a longitudinal groove is cut, which is necessary for the correct operation of the mechanism.
- The second version of the mechanism involves installing two springs at the bottom of the carriage. They are placed in guide grooves fixed at the ends of furniture telescopic elements. The control handle is fixed to the end of the rack in a similar way, only a spring is not installed under it.
The operating principle of any mechanism is simple. During drilling, the handle is pressed down, and the springs are compressed. The carriage with the drill is directed downwards. Upon completion of drilling, the handle is released. The expanding springs return the carriage upward to its original position.
Machine made from a photo enlarger
If you have an old photographic enlarger lying around at home, you can quickly convert it into a drilling machine. The design has a ready-made frame with a stand and even a control mechanism with a handle, but without springs. The drill will have to be raised and lowered by turning the original handle of the photo enlarger. To make the machine, it is enough to disconnect the tank where the lamp with lenses is installed, and instead attach a clamp for a drill.
Manufacturing of additional units
Modernizing the design will make it possible to obtain a multifunctional machine on which you can mill small parts and drill holes at an angle.
To mill a part, it must be moved to the side. To do this, an additional horizontal stand is fixed to the slab. A vice is attached to it, moving on a carriage with furniture guides. The control handle can be made similar to a spring or a screw mechanism can be installed.
To drill holes at an angle of 30, 45 and 60°, an additional plate is installed. It is made rotary, for which holes are drilled along an arc. Fix the plate to the main stand of the machine, where it will rotate along the axis. A carriage with a feed mechanism is attached to the additional plate.
A protractor will help you correctly measure the location of the holes. The central hole for the axle is taken as a basis and points are measured from it at the required angles.
During turning and straight drilling, the additional plate is positioned horizontally. To drill at an angle, the plate is rotated to the desired hole. The additional plate is fixed with screws on the back side of the rack.
The simplest design allows you to get a multifunctional machine at home, on which you can mill small parts and drill holes at different angles.
Drill attachments: is it worth buying?
Most often, an electric drill with attachments is used when there is no special tool, and its purchase is not justified. For example, you should not buy a grinder if you only need to sand a single workpiece. It is much more practical to buy a drill with a set of attachments and use it as a universal tool.
It should be noted that the choice of accessories for drills is very wide. They are not limited to simple grinding and polishing tools. If necessary, a drill can take on the role of a router, screwdriver, jigsaw, construction mixer, and even metal scissors.
Note! Plus, a drill with an attachment is an excellent option for processing workpieces in hard-to-reach places.
Among the disadvantages of this tool, we can only mention the low efficiency of an electric drill when working with some types of attachments; for example, it is much easier to grind a large area with a full-fledged grinder. However, given the affordable price of even the highest quality attachments, a set of basic ones should be in every home workshop.
How to choose material
It depends on what goal you are pursuing. If you need a stand for one-time work, feel free to use whatever you find at hand - scraps of metal, wood, plywood, etc.
If you want to make a desktop version of a drilling machine, then you need to approach the choice of materials responsibly.
You will have to spend money on purchasing professional pipes and other components: in particular, you will need to purchase good guides and bearings.
Share on FaceBookAdd to VKShare with classmatesSend to Whatsapp
Types of nozzles
There are a huge number of accessories for drills. Some of them are designed for ease of drilling, others allow you to create large diameter holes, and others help with grinding and polishing. There are also highly specialized devices, for example, a cutter for a mini-drill for wood, which turns a hand tool into a mini-milling machine.
It is not always necessary to have a strictly vertical hole passing through the entire workpiece. There are times when it is necessary to drill at a precisely specified angle, and also several parallel holes. Here the drilling angle limiter will come to the aid of the master. Basically, these are lightweight structures that fit onto the drill and ensure its precise positioning.
Another useful accessory for an electric drill is a depth stop. The limiter is included in the basic package of delivery of almost any drill. The device is extremely simple - it is a metal rod that does not allow drilling deeper than the specified value.
Additional nodes
Additional components allow you to make the machine more functional, for example, to be able to drill holes at an angle, perform some kind of turning or even milling operations. For example, to provide the latter, you will need an attachment that will allow you to move the part horizontally. To do this, the horizontal table is given mobility, and a special vice is mounted that will clamp the part. For example, it could be a helical gear that is activated by a handle, or a regular lever drive that is activated by a handle. In other words, a second stand is installed on the machine, but horizontally, and a vice will be placed on it instead of a drill.
For grinding and polishing
One of the most popular attachments are devices for grinding and polishing the surfaces of metal and wooden products. They differ markedly from each other in execution and purpose.
Plate
They are almost a complete analogue of the sanding pads that are used in electric sanders. The only difference is that instead of a connecting thread they have a pin that is clamped into the cartridge. Actually, if necessary, you can use the working part of a grinding machine for a drill, having first screwed a regular bolt into it.
The material from which this nozzle is made can be any. There are metal models, plastic ones, and rubber ones are often found. The latter accurately follow the contours of the workpiece, creating a perfectly flat surface. The cutting part of this attachment is sandpaper. It is sold in the form of ready-made discs that have a special coating that prevents slipping.
Cup
Cup-type attachments are used for roughing the workpiece. With their help, old paintwork is removed from wood, scale is removed from metal, and rust is removed. Structurally, it is a bowl-shaped body, inside of which hard bristles made of springy wire are laid. At the bottom of the cup there is a pin for fixing in the drill chuck.
Disc and fan
Disc nozzles have a structure similar to cup nozzles. The only difference is that the brush is not limited by the size of the body, but, on the contrary, comes out of it, forming a kind of prickly “sun”. The nozzle is convenient for processing large surfaces, but requires caution during operation - one ill-considered movement is enough to damage the product and possibly cause injury.
Fan nozzles have a similar design. Their working part is petals made of sandpaper on a fabric base. This attachment is convenient for working with aluminum parts and cleaning cast workpieces from slag.
Drum or cylindrical
Nozzles in the shape of a cylinder, on the outside of which an abrasive material (sandpaper) is fixed, are intended for processing the internal surfaces of cylindrical holes. Most often they are made of metal or rubber. By selecting the grain size of the skin with this device, you can process a wide variety of materials, from wood to metal and glass.
Polishing attachments
The final stage of product processing is its polishing. Polish parts that have been milled and varnished. This procedure is performed using special pastes that are applied to a soft moving surface. Felt, leather, foam rubber or fabric can be used as such. Structurally, this attachment is a disk made of soft material, in the center of which there is a pin for fastening in the cartridge.
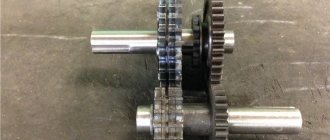
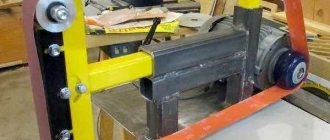
The process of making a drilling machine from shock absorbers
According to the markings, we weld a piece of roller chain to the wide side of the profile pipe.
Using bearing housings, we mark and drill holes in the steel plate for fastening them with hardware.
We screw a nut onto the stud inserted through the bearing, put on the sprocket and secure it with a second nut.
We mark another plate for installation and welding in the center of the profile pipe, drilling holes in the corners and rounding them.
We clean the old shock absorbers, and after drilling the bottoms, drain the oil and knock off the covers. After wrapping the mirrors of the rods and threads with aluminum foil, we place them in the shot blasting chamber for complete cleaning. Finally, remove the levers.
We place the shock absorbers with their upper parts in the corners at the level of the sloping shelves and weld them.
We fix the shock absorbers parallel to the steel plate at the corners using welding.
We apply a piece of profile pipe to the ends of the painted rods and drill two holes along the marks.
We lay it flat and place a U-shaped bracket in the center with its legs facing outwards and weld it.
For a fragment of a profile pipe with a length equal to the width of the larger side, remove the opposite edge. Drill a hole in the center of the square base.
We cut a fragment of a round pipe along the generatrix and weld ears with two holes along the edges of the cut. It turned out to be a kind of clamp.
Insert a bolt into a part made from a profile pipe from the inside and weld it behind the head. We fix the hardware in a vice, place the clamp along the legs with the ears up and connect them by welding.
We place the U-shaped bracket on the profile pipe between the shock absorbers, then the rods will fit into its holes. Screw the nuts onto the threads of the rods and tighten them.
We turn the shock absorbers over and place an assembly of bearing housings, pins and sprockets on the bracket leg. We weld the assembly plate to the bracket.
We weld a plate of different widths to the narrow sides of the profile pipe with a chain flush with the end.
We place the assembly on them, then the sprocket will engage with the chain, and weld the shock absorbers to the plates.
We bend a U-shaped element with rounded corners from a profile pipe. We fix the legs at right angles to the crossbar and weld them.
We weld two corners crosswise to the ends of the legs with a small gap. We make 2 holes in the shelves along the edges.
We cut out a cover for the U-shaped element from a steel sheet and weld them. This unit is the base of the machine.
We attach the assembly plate with shock absorbers to the base with four bolts and nuts.
We put the spindle feed handle on the pin and secure it with a nut.
We screw plastic balls onto the ends of the handle spokes, drilling blind holes in them and cutting threads.
To lift the spindle, we attach a tension spring to the body and spindle.
We attach a clamp with a base to the plate between the shock absorbers, into which we insert a drill with a reinforced body and tighten it.
The machine is ready for use.
Materials
- Two old shock absorbers;
- drill with power handle;
- two bearing housings with bearing;
- roller chain and sprocket;
- profile rectangular pipe;
- spindle feed handle and plastic balls;
- steel sheet, plates and angle;
- stud, bolts, washers and nuts;
- extension spring, etc.
We will also need: a square and a marker, a hammer and a countersink, a drill, welding, a shot blasting chamber, a grinder, etc.
For curved cutting
There is an interesting device that allows you to turn a drill into a jigsaw. The device is fixed in a chuck and makes it possible to cut wood-based sheet material, plastic and even thin sheet metal. The cutting tool is a movable file.
This device is a useful thing in the household, but the nozzle has a fairly high price. If you need to make curved cuts frequently, you should consider purchasing an inexpensive jigsaw.
There are other similar devices. Drill attachments for drilling round holes in wood are very popular. They help overcome the drill size limitation typical for most models and drill a hole of any diameter.
For tightening screws
Perhaps this is the simplest and most popular attachment of all existing ones; in essence, it is a hardened bit with a cross for different sizes of screws. It is enough to clamp it into the chuck, and the electric drill can easily replace the screwdriver. The only condition for using the attachment is that the drill must have a speed regulator.
More complex devices are also available for sale that allow screws to be tightened at different angles. Separately, flexible devices with a cable in a sheath can be noted. With their help you can work in the most difficult to reach places.
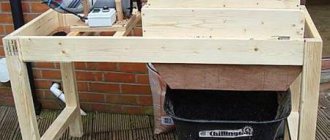
Device bed
The frame for the drilling device from the drill is made of metal (10 mm thick) or wooden (more than 20 mm thick) sheet. The massiveness of the bed that you will use as a base directly depends on the power of the drill used. The dimensions of the frame for a drill machine depend on the specifics of the work performed on such equipment. You can use the following recommendations for choosing frame dimensions:
- machines for vertical drilling - 500x500 mm;
- equipment for performing various technological operations - 1000x500 mm.
The metal frame is a thick plate with welded corners
The frame, made of metal or wooden sheets, is a very simple structure. A stand is placed vertically on it, the stable position of which is ensured by a special support. Such structural elements can be secured to each other using screw connections.
Homemade drill accessories
Despite the fact that the industry offers a wide range of attachments, both in sets and individually, home craftsmen often make various accessories for the drill with their own hands. Such a desire can be caused by a number of reasons. Some people don’t have a suitable attachment at the right time, others are not satisfied with the quality of those that go on sale.
Drilling angle limiter
A very useful and very simple device is the angle limiter. Separately, it is worth noting that this attachment performs two functions at once. It provides a precise drill angle and limits the depth of the hole.
The main part of the nozzle is a clamp with a thickening in the upper part. The clamp is attached to the drill body. Two holes with a diameter of 6 mm are made in the thickening. A thrust bracket is bent from a wire of the same diameter at the required angle. A stop is attached to the bracket, allowing you to adjust the depth of the hole. It would be useful to make several replacement brackets with the most popular parameters.
For cutting round workpieces
The basis of many homemade products is a circle made of plywood or other sheet material. Most often it is cut using a jigsaw, but the same can be done using a drill. To do this, you just need to make a simple holder that works on the principle of a compass.
The device is a pin that is attached to the drill body with a clamp. The vertical stop moves along the pin and is fixed in the required position. The stop is held on the workpiece with its pointed end, and the rotating drill cuts out a circle. Instead of a drill, it is better to use a cylindrical cutter; with its help it is easy to make a high-quality cut without much effort.
Adapter for miniature drills
The chuck of a conventional drill has restrictions on the maximum and minimum diameter of the drill, and often it is necessary to make a hole with a mini-drill with a diameter of up to 0.1 mm. A standard chuck cannot compress a small shank, but if you first clamp the drill into a collet chuck for an electric motor, and then fix it in the drill chuck, the problem will disappear.
Manufacturing instructions
In principle, the assembly of almost any drill stand follows the same pattern. After the frame has been selected and the corners have been attached to it, if necessary, the support for the rack is fixed to it. At the next stage, the stand itself is connected to the base using screw connections. Then each guide must be mounted on a stand, which is conveniently done using furniture fasteners. It is important to mention that the guides must have no lateral play.
At the next stage, a carriage is installed on the moving element, on which the holder for the drill itself will be placed.
The dimensions of the carriage depend on the size of the drill. The drilling device can be secured using two methods. Firstly, these can be clamps that will pass through specially drilled holes in the carriage. To securely fasten them you will have to tighten them very tightly.
Secondly, the device is secured using a special block - a bracket.
It is usually made from a wooden plate, attached to the base carriage at an angle of ninety degrees and reinforced with metal corners. In the block itself it will be necessary to make a circular cutout for the drill, the diameter of which is half a millimeter smaller than the diameter of the drill, as well as a slot to secure the drill in the hole. The hole is created either with a cylindrical nozzle or by following simple instructions. First, the diameter of the drill is measured and a circle is drawn on a wooden plate. Next, several holes are made along the circumference from the inside. The gaps between the small holes are cut off with a file or a special tool, and the resulting hole is processed with a file.
In order for the drill to move up and down smoothly, you will have to create another important unit from a handle that starts the movement of the carriage, as well as a spring that returns it to its original state.
The latter can either be docked with the handle, or placed separately at the bottom of the carriage using special grooves. In the second case, when the handle is pressed, the carriage with the fixed device moves down, and the workpiece, accordingly, is drilled. At this time, the springs store energy, and when the handle is released, the carriage will return to the top.