A vibrating sieve is also called a vibrating screen; the device is designed for sifting various bulk substances intended for construction, for example, sand, crushed stone, etc. The vibrating sieve contains different cell diameters and has an electric drive, which simplifies the sifting process. This article will discuss the design of the device, the necessary materials for assembly, as well as its order.
What is the need for a homemade unit?
The device is quite lightweight, so the assembled homemade product can be transported from place to place, stored in the garage, and so on.
Professional construction teams come to sites with their own equipment. However, in times of crisis, people are increasingly deciding to build houses, outbuildings, bathhouses and other objects with their own hands. Making your own tools for this is doubly important if long-term work is planned. The savings will be significant.
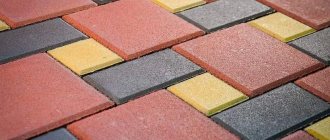
You cannot do without a vibrating unit if you plan to pave the area with paving slabs. But in order to make one and a half to two dozen tiles, it’s not worth making a vibrating table, it won’t pay off.
Other possible uses of the device:
- Creation of blocks from foam concrete.
- Tamping cement.
- Manufacturing of monuments, window sills and eurofences.
- Compacting asphalt concrete mixtures.
- Carrying out various tests.
Application of vibration motors
The basis of any vibration installation is a vibration motor. A vibrating machine can be useful not only for the manufacture of concrete structures, but for sifting bulk building materials, grain, and so on. Depending on why vibration is needed, the main parameters are selected, according to which it is quite easy to make a vibration motor with your own hands.
In this case, it is necessary to distinguish between two types of vibrators - for compacting concrete and for the production of concrete molded products, on a vibrating table. Regardless of the purpose of using the device, for constant use it will be more profitable to buy a ready-made vibrator made in an industrial environment. If we talk about piece production or the construction of one single house, then a homemade device will be the most inexpensive option.
Design and principle of operation
A classic vibrating table is a flat plate mounted on a metal base using a movable joint. An electric motor with an eccentric is connected to it, which makes the structure tremble. To ensure that future concrete tiles are smooth and of high quality, the countertop is made perfectly smooth.
Expert opinion
Kulikov Vladimir Sergeevich
When assembling, choose materials with high resistance to dynamic and static loads, as well as vibration.
The unit is firmly fixed to the floor so that it does not move to the side due to vibration. The concrete mass is poured into containers and placed on the surface of the device. After turning on the electric motor, the structure begins to vibrate strongly. Vibrations cause the concrete to become compacted and air bubbles to escape. The paving slabs are monolithic and not weakened by voids.
After a few hours, the engine is stopped and the containers with concrete are removed. Drying takes place under natural conditions for 24 hours, then the finished products are removed from their molds. For this purpose, a formwork tool is used.
To prevent the concrete from “boiling” in the mold on the table, vibration should be of minimal amplitude. Otherwise, the effect will be the opposite: the mass will be saturated with air and become cellular. Tiles can be thrown away.
Vibration electric motor for table
In order for the level and strength of vibration to be sufficient, motors with a power of one-half to one and a half kilowatt hours should be used. It needs to be unbalanced.
To do this, you need to put the pulleys on the motor shaft. A bolt needs to be inserted into one of its sides, thanks to which you can change the strength of the vibrations by adjusting the position of the bolt.
However, this is a trick; the manufacturer did not count on such bypasses of the system, which means this will primarily lead to wear and tear on the equipment. Under such heavy loads, the engine will not last long.
List of materials and tools
To make a vibrating table, it is not necessary to have a well-equipped workshop.
A spacious garage with a workbench and a basic set of tools and materials is enough:
- Electric motor.
- Metal plate for work surface.
- Several steel plates.
- Metal pipes.
- Welding machine.
- Channel profile.
- Steel cups for springs.
- Springs made of steel (can be taken from a scooter or car, but cut in half).
- Bolts.
- Wrenches and screwdrivers.
- Bulgarian.
- Drill.
- Metal washer.
Electric motor question
You cannot install a powerful trolleybus motor or similar device. Vibration should be moderate. Choose a motor of medium power, for example, from a washing machine. Its main drawback is its short resource, but the vibrating table does not work all day long, so the engine from the SM will last for several years. To increase its service life, strengthen the bearings and place them instead of bushings.
The power of suitable motors starts from 250 W. Heavy countertops will require powerful electric motors. For example, a 3,000 W unit makes it possible to shake up to 300 kg of concrete mixture at a time. In terms of paving slabs 30x30 cm, this is approximately 4 m2 of finished products per 1 load.
You can purchase a ready-made motor, for example, IV-99, for 5-7 thousand. An option for those who need the power and durability of the unit.
How to set up an electric motor
You can adjust the engine to the power required for the vibrating table in another way, but this method cannot be adjusted: you simply need to cut off the pulley from one part or attach nuts to it.
The design of these electric motors includes an unbalancing device, which allows you to exceed the maximum load threshold and withstand stronger vibrations. This improves the quality of work and the quality of the final result.
Note!
DIY vices: simple and reliable homemade vices from A to Z (190 photos)Do-it-yourself grain crusher - operating principle, types and features of creating a device for processing grain crops
- DIY concrete mixer | A visual aid on how and what to make a concrete mixer yourself
To install the motor, a beam is attached to the reverse, lower side of the surface of the vibrating table, on which ears are specially prepared so that the motor can be hung on them.
Thanks to this arrangement, the vibration will be directed directly to the surface of the table and the workpieces will be of the highest quality.
As mentioned earlier, the motor can be mounted in either a vertical or horizontal position, however, for maximum quality it should be installed in a rotated position so that vibrations can go in several directions at once.
Please note that the engine must be protected from external influences of moisture or active mixture that will form on the back side of the vibrating table.
Classic version: manufacturing stages
You cannot make a unit by eye: it is unsafe and ineffective. On the Internet, find a drawing of a vibrating table of suitable dimensions. Start from the drawing, taking into account the characteristics of your materials and tools.
- Make a base from a corner, a channel also works well. Dimensions are set depending on the needs of the builder; the standard size is 70x70 cm. The area of the vibrating tabletop must correspond to the capabilities of the motor. Can be fastened with bolts or welding.
- Collect support. The pipes will serve as table legs; weld them to the base. To increase the stability of the structure, screw iron plates to the legs. They can then be fixed in concrete using anchors if the unit is intended to be used permanently. In the case of a portable table, stability depends on the rigidity of the floor and the material from which it is made. The height of the working surface is selected so that it is convenient for the master to work. The electric motor is installed on the platform at a distance of 15-20 cm from the working surface.
- Weld steel springs at the corners of the structure so that they support the work surface. Weld plates secured to an 8 mm metal sheet to the springs. If you make the base thinner than 8 mm, there is a high risk that the tabletop will bend under the weight of the concrete forms.
- Attach the electric motor to a square welded on springs across the structure. Make an eccentric from a metal washer attached to the motor shaft. It is he who will provide vibration with the required amplitude. On the side of the eccentric, make a hole with a figure-eight thread. By screwing a bolt into this hole, you can adjust the vibration amplitude of the device. Fix the bolt in the desired position with a control nut.
Expert opinion
Kulikov Vladimir Sergeevich
The table should vibrate, not the motor. The electric motor must be firmly fixed to the stand, otherwise the duckweed will quickly render it unusable and the effectiveness of the vibrating table will decrease. To make the product last longer and work with it safer, strengthen the structure. Weld the channels crosswise on the sides, making sure that the springs are installed as rigidly as possible.
Unmolding option
Removing finished tiles can be a bit of a challenge. To speed up the process, cut a rectangular hole at the end of the work surface to the size of the future tiles. The form is placed on top of it, the motor is turned on, and due to vibration, the tile falls out of the formwork. Place elastic material under the hole to prevent the product from breaking. To be able to work with such a device, the concrete containers must have handles that can be used to support the containers on the edges of the table.
Dimensions of main structural elements
Before starting to assemble a sand vibrating screen, it is recommended to draw an assembly diagram or a simple assembly drawing. This will simplify the assembly work and help determine the order in which they should be performed.
Recommended dimensions of the supporting frame (base):
- length 1400 mm;
- width 600 mm;
- height 850 mm.
The length of the outer box without a bottom should be equal to half the length of the supporting frame. The width is 100 mm less than the width of the base, the depth is at least 120 mm.
The dimensions of the inner box with a mesh bottom should ensure its easy removal from the inner frame for free overturning and release of accumulated waste. The outer and inner boxes are connected along the short side with a piano hinge, as a result of which there is the possibility of lifting and tilting the inner structure.
Alternative solution
The option described above is a full-fledged, reliable table that can work for hundreds of hours. But sometimes there is no time and money to make such a machine. There is a way to quickly assemble an improvised construction vibrator with your own hands.
A steel plate is fixed to the edge of a vertical surface (metal or wooden panel). The opposite end is wrapped with rags or other shock-absorbing material, after which the structure rests against the wall. A hammer drill is leaned against a steel plate; instead of a drill, a piece of pipe is installed in the chuck. The vibration from the switched-on hammer drill is transmitted to the working surface, so you can place containers with concrete.
Making cinder blocks on a machine
Photo of the structure from different angles
The machine can significantly increase work productivity. The equipment has a fairly simple design.
Vibrating machine
Assembling the machine
The main element of a homemade vibratory compacting machine is a mold (matrix) for slag concrete mortar. By its design, this form is a metal box with internal elements in the form of voids. The void stoppers can also be removable.
Compact cinder block machine
The work kit includes the following materials and tools:
- welding machine;
- standard set of locksmith tools;
- grinder;
- vice;
- sheet steel 3mm thick. It will take about 1 m2;
- a pipe with a diameter of 7.5-9 cm. Approximately 1 m of pipe is needed;
- metal strip 3 mm thick. You will need about 30 cm of material;
- electric motor with a power of 0.5-0.75 kW;
- nuts;
- bolts.
First step. We make a mold according to the size of the future blocks. We cut out the side faces of the matrix from sheet steel. We will make a form for 2 blocks at once. To do this, we cut out the inner central partition from steel and fix it in the box.
Second step. We determine the height of the elements to decorate the voids.
Third step. We cut 6 pieces of pipe along the length of the limiting cylinders to form voids.
Fourth step. We give the pipes a conical shape. To do this, we cut each piece of pipe longitudinally to the middle, compress it with a vice and connect it using a welding machine. We brew each cone on both edges.
Fifth step. We connect the stops in a row along the long edge of the cinder block. Along the edges of the row we add a 3-centimeter thick plate with holes for fastening with eyes.
Sixth step. We make a cut in the middle of each such compartment. We weld lugs on the back side of the form. They will allow temporary fastening of elements to create voids. A very convenient solution - it will be possible to remove the cylinders and make monolithic blocks.
Compact cinder block machine (press on top)Machine pressMachine press
Seventh step. On the outside of one of the transverse walls we weld 4 bolts for the mounting holes of the vibration motor.
Eighth step. Using welding, we attach an apron on the loading side and blades along the edges.
Ninth step. We prepare all structural elements for painting - we clean them and thoroughly polish them.
Tenth step. We do the press. It will look like a plate with holes repeating the location of the holes in the block.
We make the plate of this size and fix it in such a way that it can go deep into the box at the place where the limiters are installed by 5-7 cm.
Finally, all that remains is to weld the handles to the press, coat the structure with a primer mixture and mount the vibration motor.
An ordinary electric motor can be converted into a suitable vibration motor. To do this, it is necessary to weld eccentrics onto the engine shafts. We won’t bother too much - we’ll just weld the bolts so that their axes coincide. To regulate the frequency and strength of vibration, screw nuts onto the welded bolts.
Compact cinder block machineMotorMotorVibration device
Making blocks
Recommendations for preparing the solution are given above. You can use the standard recipe or modify it at your discretion. The main thing is to obtain optimal viscosity. It can be determined “by eye” - the lump of mixture should hold its shape steadily.
Before loading the mixture, lubricate the contact metal surfaces with oil. Thanks to this, the solution will not stick to the iron.
We place the finished mixture into the matrix and begin pressing.
Place the filled forms on a vibrating plate and let it compact the solution for 5-15 seconds. After the specified time, add more solution to the mold, because previously loaded will inevitably settle.
We repeat the process, only this time we do not turn off the vibrating plate until the clamp reaches the limiters. We remove the mold until the machine stops.
Ready cinder block
We give the blocks 1-3 days for initial drying, carefully remove them from the blocks, lay them out on a flat horizontal surface and cover them with plastic wrap. The material can be used for its intended purpose no earlier than after a month.
Comparison of characteristics of cinder blocks and foam blocks
Good luck!
Manually driven
The beauty of the concrete shaking machine is its automatic operation. But sometimes money is tight, there are no tools and materials, and there is no hammer drill. In this case, you can assemble a tolerable unit from scrap materials found in every garage.
You need a wooden board, slats, a hammer, nails and 2-3 car tires.
- Place slats around the perimeter of the shield so that the containers with concrete do not move.
- Place the tires one on top of the other, and place a shield on the top one.
- Place forms with concrete mixture on the shield.
- Tap the edge of the shield with a rubber hammer to create vibration.
Oscillation speed control unit
An electric tool built into a vibrating screen may have a built-in speed control feature. But some models do not have such a function, so there is a need to install a separate system for adjusting the vibration speed of the vibrating screen.
A rheostatic speed controller can be purchased at specialized electrical goods stores. It is also worth purchasing a circuit breaker, which will protect against unforeseen situations and also extend the life of the device.
A rheostat regulator and an automatic switch will help to efficiently regulate the oscillation speed of the device boxes in accordance with their load and the weight of the bulk material in order to avoid drive failures.
Do you need to bother?
What kind of vibrating table do you use?
HomemadePurchased
If the manufacturing process seemed too complicated to you, let's touch on the issue of productivity and payback. A regular vibrating table allows you to make up to 60 square meters of tiles per day. This is enough not only for the construction of a private parking lot, but also for the production of paving slabs for sale.
If you do not shake the concrete, the tiles will become fragile and such products are not suitable for sale. If you buy an assembled device, it will be expensive and the return on investment will be lower.
Recommendations
Creating a vibrating table at home does not take as much effort as it might seem at first glance.
Household tools may well be enough to make a relatively easy vibrating table. All you need besides tools is a little experience and knowledge, as well as following instructions and safety precautions.
Remember that the required dimensions, as well as the characteristics of the vibrating table, depend on what materials you use. It is preferable to choose the highest quality, but within reason.
Rating of popular factory models
If you don’t have time for assembly, and factory quality and warranty come first, buy one of the popular models of vibrating tables. The average price of vibrating tables on Yandex Market is 20-25 thousand rubles. Small specimens are sold for 6-8 thousand, but their productivity is low, and they are designed for working with plaster.
VO-100 220V 220V
Dimensions: 1000x700x800 mm.
Weight: 155 kg.
Price: 27 755.
VO-60 220V 220V
Dimensions: 600x600x700 mm.
Weight: 105 kg.
Price: 21 475.
VO-50 42/380 V 42/380 V
Dimensions: 500x500x600 mm.
Weight: 90 kg.
Price: 18 576.
VS-180 42/380V 42/380V
Dimensions: 1000x500x800 mm.
Weight: 140 kg.
Price: 25 679.
VS-950 42/380V
Dimensions: 2000x1500x800 mm.
Weight: 600 kg.
Price: 79 769.
EV-342 3-380V
Dimensions: 980x480 mm.
Weight: 180 kg.
Price: 57 100.
Types of combined winding “Slavyanka”
The combined Slavyanka winding can be single-layer or double-layer, and its pitch can be shortened or diametrical. The shift between the windings themselves - the main and additional (combined) - will be equal to 30 electrical degrees.
It is also customary to distinguish between two schemes for connecting the phases of a combined winding:
- parallel, in which the main winding is a “star” and the combined winding is a “delta”;
- sequential, presupposing the preservation of the original circuit of the main winding, recalculating the combined “triangle”.
As for the combined Slavyanka winding with a series phase connection circuit, it demonstrates higher performance characteristics compared to similar parallel ones.
Application of vibration motors
The basis of any vibration installation is a vibration motor. A vibrating machine can be useful not only for the manufacture of concrete structures, but for sifting bulk building materials, grain, and so on. Depending on why vibration is needed, the main parameters are selected, according to which it is quite easy to make a vibration motor with your own hands.
In this case, it is necessary to distinguish between two types of vibrators - for compacting concrete and for the production of concrete molded products, on a vibrating table. Regardless of the purpose of using the device, for constant use it will be more profitable to buy a ready-made vibrator made in an industrial environment. If we talk about piece production or the construction of one single house, then a homemade device will be the most inexpensive option.
Purpose of the vibrating table
The main task of devices such as a vibrating table is to improve the quality of produced consumables by increasing their density; moreover, they significantly speed up production and reduce the amount of effort that had to be spent.
The vibrating table can be used in the future not only for paving slabs, but also for the manufacture of a large number of other materials.
In order to prepare paving slabs or mix concrete, it is necessary to increase the density of the working mixture. Surely you want to know how to make a vibrating table with your own hands, as well as what it is needed for and how it works.
The main principle of operation of this equipment is the creation of vibrations, thanks to which the mixture will fill all empty, unfilled areas of the mold, as well as release air from the mixture, eliminating the possibility of air bubbles appearing inside. Therefore, if you need to mix concrete and make special parts or blocks from it, you should create a vibrating table right at home.
Thanks to your skills and aspirations, it is possible to create a tool that will be of the same quality as a store-bought one, the main thing is to understand how this tool works and why it is needed. The table itself looks like an ordinary iron table, the legs of which contain hinges and springs.
Noise classification
Noises in an apartment are usually divided into two types: airborne noise (voices, screams, barking dogs) and impact noise (steps, jumping, moving furniture, falling objects, creaks, etc.).
A standard concrete floor slab (hollow-core, 220 mm thick or solid monolithic, 140 mm thick) will provide airborne sound insulation of about 50 dB. The screed will add another 2–3 dB, so the final sound insulation index will be Rw = 52–53 dB. This is enough to block out everyday voice noise, such as conversations or TV. To isolate louder noises (cinema, stereo, screams, barking dogs), additional sound insulation will be required.
In terms of impact noise, not a single floor meets the standards. If the floor in the apartment above is not soundproofed, then even barefoot steps will be clearly audible in the apartment below. To isolate impact noise, suspended soundproofing ceilings are made using vibration suspensions.
For example, consider a typical reinforced concrete floor slab with a thickness of 140 mm. The sound insulation of such a ceiling in terms of impact noise is Lnw = 80 dB, which is 20 dB higher than SNiP standards even for houses of category “B”. Not to mention more comfortable classes of housing!
Scope of application of milling and engraving machines
Milling and engraving machines are used to create products in everyday life and business. This:
- creation of three-dimensional logos, emblems, letters;
- production of souvenirs - icons, paintings, bas-reliefs made of wood and plastics;
- creation of elements of board games and 3D construction sets (prefabricated models);
- production of cliches, stamps for printing houses;
- jewelry products - engraving, making models for precision casting, creating products from semi-precious stones (gems);
- production of kitchen utensils and decorative elements;
- creating molds for chocolate confectionery;
- production of toppers (advertising signs for organizing holidays, anniversaries, weddings).
Vibration motor for vibrating table
It’s even easier to make a vibration motor for a vibrating table, on which paving slabs, cinder blocks, and curb stones are made. Depending on the mode of use of the installation, the required electric motor is selected according to the shaft rotation speed. Any motor is suitable for making tiles and blocks on a vibrating table, but unlike an external concrete vibrator, an eccentric cannot be installed on the motor shaft. The fact is that the silumin housing of a household electric motor (unlike industrial vibration motors) may not withstand the load and will quickly fail.
To manufacture a vibration motor of this type, you will have to use an additional shaft with an eccentric, which will be rigidly attached to the vibration table. The unbalance on the shaft is attached in the same way as in a surface vibrator for concrete, and the motor can be mounted separately on the installation frame and transmit rotation to the vibration shaft through a conventional belt drive.
This way you can inexpensively and quickly manufacture a vibration motor for any purpose yourself, in a short time and without significant financial costs. And you can save a fair amount, since the price of a factory-made 220 V vibration motor from the Yaroslavl plant is from 10,000 rubles, depending on the power. Good luck to everyone!
What you will need
The standard technology for manufacturing plasterboard ceilings involves the assembly of a frame and its subsequent covering. Naturally, an air gap forms between the ceiling and the sheets themselves. And air is a very good conductor of sound. To reduce noise, this space is filled with insulating materials. Usually this is mineral wool, less often - modern insulators, for example, Texaund.
The second problem is the sound conductivity of the frame itself. After all, the ceiling is suspended from the ceiling using hangers, and metal is also an excellent conductor of sound vibrations. It is in this case that special vibration suspensions are used, either purchased or, less commonly, homemade.
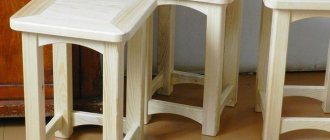
What does a vibrating sieve consist of?
The proposed design is quite easy to repeat, and it does not require a lot of time and money. Components of a homemade vibrating sieve:
- the base (frame) to which all other structural elements will be attached;
- engine (in our case, a power saw or electric drill);
- external box (box) with rollers;
- internal folding box (box) with a bottom made of metal mesh;
- “rails” for moving boxes;
- a guide chute for collecting sifted material;
- external unit for adjusting the speed of movement of the electric saw (if necessary).
For manufacturing you will need the following materials:
- wooden blocks (60 x 60 or 60 x 70 mm);
- boards or plywood (thickness 18-22 mm);
- 4 furniture casters;
- 6 rubber shock absorbers;
- piano loop;
- metal corners and plates (for connecting wooden parts and increasing strength);
- hardware: screws, bolts, nuts and washers.