In this article we will deal with a process that interests many, how to make paving slabs with your own hands. Let us consider step by step not only the production process itself, but also some of the subtleties of making the solution, pouring and pressing. This will help you save some money without compromising the quality of the final product.
Paving slabs of different sizes and colors
Stages of paving slab production
Since we are talking about independent production, most often the producers of the work, who are also the owners of the land, try to save money. This opportunity presents itself to them, especially in the process of purchasing building materials.
So, the stages of paving slab production:
- Purchase of required building materials. What paving slabs are made from: cement, sand, crushed stone, steel wire 4-6 mm thick.
- Making molds, for which you can use, for example, used boards left over from building a house.
- Making concrete mortar.
- Pouring the latter into molds with pressing to achieve uniformity of the poured mixture.
- Drying paving slabs in molds.
- Removing tiles from molds.
- Final drying in air under a canopy.
Before you start making paving slabs at home, you need to choose a site where all operations will be carried out. Its dimensions depend on how many tiles need to be produced per day. The greater the number of the latter, the larger the site should be. Because here the concrete solution will be mixed, poured into molds, and finished building materials will be dried.
Cement, sand and crushed stone are the ingredients of a solution for paving slabs
Purchase of building materials
The amount of cement, crushed stone and sand depends on the selected recipe and the amount of paving slabs. Typically, for concrete building materials that will be used outdoors, a classic recipe is used in production. Namely:
- one part cement;
- two parts sand;
- three pieces of crushed stone.
For example, if paving slabs are made with a thickness of 4 cm and a square shape with dimensions of 30x30 cm. Its volume is equal to: 4x30x30 = 3600 cm³ or 0.0036 m³. It is necessary to make 100 tiles, which means that you need 100x0.0036 = 0.36 m³ - this is the volume of all the tiles.
To make the solution, as mentioned above, three components consisting of six parts are required. This means that one part in volume will be equal to: 0.36/6 = 0.06 m³. This will be the amount of cement. The amount of sand is two parts, that is, 0.06x2=0.12 m³. Accordingly, there are three parts of crushed stone: 0.06x3 = 0.18 m³.
All this can be measured, for example, with a ten-liter bucket, the volume of which in cubes is equal to: 10 l is 10 dm³ or 0.01 m³. That is, 6 buckets of cement are enough to produce 100 paving slabs above the designated size.
To avoid mistakes, it is recommended to increase the quantity of purchased building materials by 10%.
Ruffle mesh made of galvanized wire
As for the wire, it is best not to buy it. The best option is a rowan mesh with cell sizes of 5x5 cm or a regular steel plaster mesh. It’s better to make it from galvanized wire, you can use it second-hand. Its quantity is easy to calculate, because the area of one tile is: 30x30 = 900 cm² or 0.09 m².
Before making paving slabs at home, you need to prepare forms for it. They can be of different sizes and configurations, but the simplest ones have square cells. We will take them as the basis for the subsequent analysis of the topic.
Making molds
Let's move on to the question of how to make a mold for paving slabs with your own hands. The simplest option is boards 4 cm wide. They are cut with a saw into lamellas 30 cm long and into segments 1 m long.
They are assembled into a rectangle, one side of which is 1 m, the other 30 cm. The elements are connected to each other with self-tapping screws and metal corners. The latter are installed on the outer sides of the form. Then two more boards, 30 cm long, are inserted inside at equal distances from the edges of the form and between each other. The main thing is that these distances are equal to 30 cm. Fastening is done with self-tapping screws 60-70 mm long, which are screwed from the outside, two at a time, into each board inserted inside.
One cell form
See also: Catalog of companies that specialize in landscape design of sites.
In principle, there are no strict restrictions on the size of forms. That is, they can include more than just three cells. There may be two, four, five, and so on. Simply, the longer the mold, the more difficult it is to free it from the finished tiles. When pulled out, the frame may break.
Multi-cell form
Making concrete mortar
If a small number of molds are made, then a small amount of solution will be required to fill them. Therefore, it can be kneaded in some container, for example, in a trough or in an open area.
Mixing concrete with shovels in an open area
There are several kneading technologies:
- Mix all the ingredients, then add water with further mixing until a homogeneous mass is obtained.
- Water is added to the cement, the solution is mixed until cement laitance is formed. Then sand and crushed stone are added to it in portions.
- Dry mixing of sand and crushed stone is carried out. An aqueous cement mortar is prepared in a separate container, which, after preparation, is poured into the dry mixture. The latter is completely mixed.
If there are many forms, then it is better to use a concrete mixer for mixing. First you need to pour cement into it, turn the drum on rotation, add water. As soon as cement laitance appears, you can fill it with sand and crushed stone in portions.
Small concrete mixer for mixing concrete
Pouring concrete into molds
Let's go directly to the answer to the question of how to make paving slabs:
- First of all, the inside of the molds must be treated with waste technical oil so that the dried tiles can be easily separated from the boards.
- Then half of the solution is poured into it with shovels. The mixture must be compacted using the same shovels. The main task is to release air, which, when the mixture hardens inside, forms pores. The latter reduce the strength of the concrete product.
- A mesh cut to size is laid. It performs the functions of a reinforced frame.
- The mold cells are filled to the brim with concrete and compacted again.
- The upper plane is leveled and the cementation process is carried out. That is, sprinkle with dry cement and smooth with a trowel or trowel.
Paving slabs should remain in shape for a day. After which it is pulled out and laid on its edge somewhere in a shady place. It must undergo a natural drying process.
Step-by-step process for making paving slabs
Homemade tiles from the Commander
CommanderForumHouse Member
I covered both the barn and the yard with tiles of my own making, as well as the paths to the greenhouses. Very good and profitable!
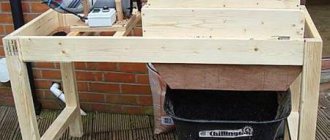
And in this case, a homemade vibrating table was used. Here's the "recipe" for anyone interested:
- Motor - from a washing machine (on rubber shock absorbers);
- From it comes a pulley for the belt drive from the engine to the eccentric;
- The eccentric is a former electric motor rotor: 1/3 is cut off with a grinder, a cage for bearings is machined, holders are welded, the entire structure is screwed to an iron sheet;
- On top of the sheet/table - wooden flooring 60x60 cm (for tiles 50x50 cm);
- High sides - so you can make tiles 6 cm thick.
For household purposes - paths to the barn, in the garage, along the edges, the Commander makes large, square tiles measuring 50x50 cm, and for decorative paths resembling sidewalks - figured ones. The forms, as in the first option, are polymer, soft - unlike hard plastic ones, they do not break for several years.
Composition of the solution and proportions for mixing:
- Gravel - bucket;
- Cement - bucket;
- Elimination – 3 buckets;
- Plasticizer – 2/3 cup;
- Water.
Water is poured into a running mixer, a plasticizer is added, gravel is added next, and after wetting the gravel, cement is added. When the mixture becomes homogeneous, screenings are added. The commander does not add sand, since there is a large amount of dust in the screenings, which replaces it and prevents the formation of voids. Before use, the molds are lubricated with palm oil and, when dirty, are easily washed with Karcher. But they become dirty if the technology is violated and the tiles are not kept for the prescribed day, so it is better not to rush.
During the discussion of the technology, it was proposed to use detergents instead of a plasticizer, this was argued by savings and their excellent performance in masonry mortars. However, in the case of tiles, such savings will backfire - household chemicals, although they increase the plasticity of the solution, are strong foaming agents. Whereas in the production of tiles, the task is to obtain a plastic and dense mass, without air bubbles. Well, the cost of the finished concentrate additive, when converted to the total number of resulting tiles, does not increase its price much.
Making paving slabs on a vibrating table
The most important operation in the process of making paving slabs is compacting the poured concrete solution. It is clear that shovels and other tools will not be able to remove all the air from the concrete mixture. Therefore, special devices and tools were developed for this purpose - vibrators, vibrating tables and others.
For the production of thin reinforced concrete products, which include tiles, vibrating tables are used. What is it and how to make a vibrating table for paving slabs with your own hands - the conversation will go further.
Vibrating table for the production of paving slabs
DIY vibration table
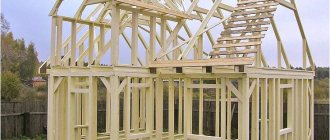
It cannot be said that a vibrating table is a very simple device. To make it, you need to have the skills of a welder and mechanic. There are a huge number of variations of this equipment. But its operating principle is the same: a frame made of metal profiles, on which a tabletop is mounted on hinges or springs. The latter is connected to a vibrator, which is connected to the power supply.
The vibrator transmits vibrations to the tabletop, on which forms with concrete mortar poured into them are installed. Small vibrations are transmitted to the concrete, which begins to compact, displacing small air bubbles.
Attention! The larger the countertop area, the more molds will fit on it. But at the same time, you will have to increase the power of the vibrator, or rather, its electric motor. The latter characteristic can start from 250 W. The optimal dimensions of the machine itself: 1800x800 mm.
Advantages and disadvantages of homemade products
A home-made stove is about 20% cheaper than a factory-made one. In addition, at home you can make samples of any often non-standard shape and paint them in the colors of the desired shades.
An important advantage is gaining skills in making a popular product. Over time, this may well be useful for opening your own enterprise for the production of paving slabs.
If this experience is not transformed into a way of earning money, then the production process itself will certainly bring aesthetic pleasure and pride from the work done.
The advantage is the confidence that high-quality materials were used and in the right quantity, i.e. deception is excluded.
The disadvantage of homemade products is their less strength and durability . The fact is that in factory conditions this concrete product is most often made using the vibration compaction method: pressing with a special press is added to the usual technology. Therefore, the material is more dense. This coating can withstand heavy loads and can be installed in areas with heavy traffic.
A slab made at home (by vibration casting method) absorbs more moisture than a purchased one. Over time, especially in winter when exposed to frost, it can crack and crumble or simply wear off.
This coating is protected with hydrophobic solutions. This extends the life of the stove.
On the pages of our website you will also learn how to lay paving slabs with your own hands. We have prepared step-by-step instructions for you.
In the following material, read about what mistakes can be made when preparing the base for laying paving slabs.
Do you know what the height of the curb on the sidewalk should be when paving paths with paving slabs and porcelain stoneware? You will find details here: .
What can you save on?
If paving slabs are used to cover garden paths or alleys, they can be made thinner. Plus, you don’t have to use a mesh reinforcing frame in the design.
The strength of garden path tiles can also be reduced. This is achieved by reducing the amount of cement used. For example, by increasing the portions of crushed stone or sand. That is, the solution recipe will be: 1:2:4 or 1:3:3. You can avoid crushed stone altogether by using coarse sand as a filler. Although this is not the best option.
Materials and tools
Nothing particularly complicated or expensive is required to produce tiles. Here's what you need to prepare.
Basic set
The materials needed are:
- Portland cement grade M500, maybe M400 . It is important to take fresh: the material, even with proper storage, loses significant strength over several months;
- filler - sand or granite screenings. Quarry sand is not suitable - only river sand. Granite screenings may contain small crushed stone. The maximum stone size is no more than 1/3 of the tile thickness;
- dye;
- plasticizer _ It retains water, which provides the solution with high strength and increases its frost resistance. Brand C is used more often. There are others, for example, “Fort UP-4”;
- hardening accelerator (optional). As an option - brand "Fort UP-2". Due to the chemical reaction, the tile is heated to approximately +40C, which leads to faster setting of the solution;
- fiber (optional). Fibrous material plays the role of reinforcement.
Tools:
- concrete mixer or container and mixer . Most craftsmen use a concrete mixer, but there are also those who consider mixing with a mixer more uniform;
- vibrating table You can make it yourself: a thick steel sheet is installed on top of 4 racks with springs, a washing machine motor with an eccentric attached to the shaft is attached to it - a steel plate with a hole drilled slightly off center. You can make several holes and then experimentally select the desired eccentricity.
You can also include a potentiometer in the circuit to be able to select the optimal motor rotation speed.
It happens that it is difficult to find suitable springs, then they do this:
- install 4 racks;
- they are tied in pairs with a cable, but not tautly, but with a slight sag;
- lay a tabletop (possibly wooden) on the cables with an engine attached on top.
Important points:
- the tabletop is leveled strictly horizontally;
- in the homemade version, it is recommended to cover the engine on the user’s side with a steel sheet - protection in case of eccentric breakage or destruction of the unit.
You will also need:
- rack for drying tiles. It must also stand horizontally and be of sufficient size so that the modules can be laid out in 1 row;
- bubble level;
- Master OK.
It is also useful to have a rubberized hammer just in case.
Casting molds
You can buy molds or make them yourself; there are two types:
- simple rectangular . Made from wood or metal profiles. The walls are slightly torn apart (they say “on a cone”) so that the tiles come out more freely. It’s even better to make the mold detachable;
- curly, with a relief pattern (wood texture or pattern). They are made from plastic materials - rubber, plastic, silicone, polyurethane. It’s easy to make such a form at home: put a template (a purchased sample or a prototype molded from plaster) into a box knocked down from bars and fill it, for example, with molten plastic (use plastic bottles, lighter housings, etc.). Silicone and polyurethane are also commercially available.
Figured forms are also made from plaster, but they break easily. If the mold is made according to a template made by yourself, the walls of the latter must be made “on a cone”.
Regardless of whether the molds are homemade or purchased, you need to make sure that their sizes are the same.
Alternative technology
Today, construction stores sell ready-made through molds for paving slabs made of silicone or plastic. They have different shapes and sizes, and they are used using a simplified technology, where in addition to the manufacture of tiles, they are laid.
Mold for making paving slabs
How to make paving slabs using this new technology:
- First of all, it is necessary to prepare paths or areas on which the tiles will be laid. It’s simple here - backfilling with coarse sand, which is compacted with water and immediately leveled.
- The concrete mixture is being mixed.
- The form is laid at the place where the paving slabs are poured.
- The mixture is poured into it, which is leveled along the edges of the mold. You can tap the last one with a mallet to achieve compaction.
- In this state, the form must stand for one hour for the concrete to set. After which it can be removed. The tile will be ready in the right place. Between the coating elements, sand is subsequently backfilled or cement mortar is poured.
Production and laying of paving slabs
Closed silicone and plastic molds are available for sale. That is, they have a bottom, which is usually covered with a pattern. This form is covered with used oil (not always) and the prepared solution is poured into it. After an hour, it can be easily removed, leaving a tile with a pattern on the front side.
How to make concrete solution
To prevent the solution from staining the surface of the area (asphalt, concrete, other tiles), you need to use polyethylene, a large container or other available devices. You can mix the components in different ways. Options available for making your own concrete:
- combine the dry ingredients in one container, add water (in small portions) until the solution reaches the desired consistency;
- prepare cement laitance: pour water, add cement, then combine the resulting solution with sand and crushed stone;
- First, dry solid fraction components (crushed stone, sand) are mixed, cement mortar is prepared separately, and then the mixtures are combined in one container.
INTERESTING: Do-it-yourself house made of profiled timber
A concrete mixer is used if it is necessary to immediately produce a large amount of paving slabs. Instructions for making concrete in this case:
- The concrete mixer turns on.
- While the drum is rotating, water is poured.
- Cement is poured in dry form.
- When laitance appears, the remaining components are added.
Video description
The video shows the process of making paving slabs in plastic molds:
Attention! Before you make paving slabs with your own hands at home, decide for yourself whether this building material will be gray or another color. If the second option is chosen, then add a color of your choice to the concrete solution being prepared.
There are many variations on the theme of decorative design of paving slabs. Here are just a few options:
- river pebbles, which are laid on top of the finished tile product;
- crushed stone, which is laid flat sides up;
- paint that is applied not to the surface of the tile, but to the mortar, which is laid as the top layer of a building material.
Pebble paving slabs
Safety precautions when working
Before you make paving slabs at your dacha with your own hands, you need to take care of personal protective equipment - at a minimum, you need work clothes (protecting exposed areas of the body), gloves, goggles, a protective mask or a respirator. The diluted plasticizer and pigment should not come into contact with exposed skin or eyes. If this happens, you need to immediately stop the process and rinse everything with clean water.
You also need to be careful during the operation of the concrete mixer - before starting, check the integrity of the socket and wires; when the equipment is turned on, you cannot add components or touch the mixture or the container itself.
Briefly about the main thing
So, the topic of how to make paving slabs yourself was discussed. This process is actually not the easiest. It is still possible to make molds yourself from boards, but assembling a vibrating table can be done by a specialist who has the skills of an electric welder and mechanic. As for the manufacturing process itself, if you correctly follow the concrete mortar recipe, if you accurately follow all the operations outlined above, you can guarantee the high quality of the final result.
| A little more attention! I would like to hear from you your story of making paving slabs with your own hands. What is the final result, did it satisfy you, were you disappointed that you took the steps to make paving slabs yourself. What difficulties did you encounter or, conversely, was everything easy and simple? |
Preparation of the solution
There is no single recipe; dry ingredients are mixed in different proportions, for example:
- cement: 1 volume part;
- granite screening: 3 parts.
Other craftsmen use river sand as a filler, adding 3-4 volumetric parts of it to 1 part of cement. However, if the preparation is supposed to be carried out in a concrete mixer, it is recommended to add 0.5 parts of granite screenings or small crushed stone for uniform mixing.
The plasticizer is added in an amount of 0.7% by weight of cement. The instructions require that the dye be added in an amount of 5% by weight of dry substances, but many, in order to save money, limit themselves to a share of 1%. The plasticizer and dye are thoroughly diluted with warm water before adding to the solution.
Water is supplied in moderation. This solution is called semi-dry. Not only does it not flow, but it even crumbles. The approximate water-cement ratio is 0.4. There is no need to worry: under the influence of vibration, the solution will compact so well and fill all the voids and irregularities that it will even seem runny.
Drying and stripping
For drying, the forms with the solution are placed in one row on racks. “Drying” is a common name for this stage, which does not reflect reality.
In fact, it is not the removal of water that occurs, but its reaction with cement, therefore it is important to prevent intense evaporation:
- forms protect from sun and draft;
- covered with polyethylene;
- In hot weather, periodically sprinkle with water.
It is also useful to line the walls of the drying room with polyethylene to maintain high relative humidity. The tiles are laid somewhat differently when using a hardening accelerator. As already mentioned, this additive causes the solution to heat up and to retain heat, several rows of tiles are placed one on top of the other, then the stack is covered with a tarp.
Plywood sheets are laid between the rows. Wooden and metal forms will withstand such a load; if they are made of plastic or silicone, each form is placed in a frame made of bars or metal profiles.
The modules are removed from the molds after the following period of time:
- when using a hardening accelerator: 24 hours;
- without accelerator: 2-3 days.
The formwork is removed carefully; the module should not be knocked out. A soft form made of plastic, rubber or silicone is slightly bent at the edges so that it comes unstuck from the tile. Next, the form is turned over, allowing the module to fall under its own weight onto a floor previously covered with a soft cloth. You can help it by lightly pressing on the bottom of the mold.
Metal and wooden forms, as was said, are best made detachable. One-piece forms are placed upside down on a frame specially made to fit the mold and lightly tapped with a rubberized hammer. The tile will fall to the floor under its own weight.
The advice of some users to remove modules on a working vibrating table has not been confirmed in practice: the tiles sit firmly in the molds and cannot be released without outside help. Forms with traces of solution are washed with acid before new use.
Form for garden path. Where can I get molds for casting?
DIY garden path photo.
Start reducing your garden path costs with tile molds. Instead of purchasing ready-made plastic molds, stockpile frozen food containers that are made of non-crisp soft plastic and can withstand many casting cycles.
Paving elements made in such substrates differ little from factory ones and are well suited for paving pedestrian paths in the garden.
Options for molds for casting concrete tiles.
To cast large concrete products, build wooden forms with a bottom or frames from bars, placed on a flat surface when working. Homemade slabs with a thickness of 80 mm or more, reinforced inside with wire, can withstand significant loads and are suitable for constructing areas for barrels or covering parking lots for passenger cars.
Place for plastic barrels.
Make round shapes by cutting old buckets (pots, trays, basins) into rings 35–60 mm wide. The elements of the original configuration emerge from narrow tin strips connected by a ring and bent at random. By laying tiles of different diameters, you will get an interesting path.
Photo of a garden path at low cost.
How to lay cement tiles with your own hands
It is permissible to install a garden path intended only for pedestrian movement without serious preparation of the base if:
- In place of the path lies well-trodden soil, which has not been dug up or added to in recent years.
- The surface level is suitable in height and does not flood with water.
Assess the area where the future sidewalk will lie. If the soil meets all conditions, use the simplified method of laying tiles.
List of required equipment
- Construction car.
- Bucket.
- Shovels.
- Bubble level.
- Roulette.
- Pegs.
- Elastic twine.
- Hammers - rubber and metalworker's.
- Scissors.
- Broom.
- Hose with sprayer or watering can.
- Grinder, stone disc.
Equipment and materials for laying cement tiles.
The installation of a leveling pad will require sand: one cart (approximately 6-7 buckets) per section of the path 2 m long and about 60 cm wide. The use of geotextiles will prevent possible washing out of the sand layer and reduce the germination of weeds, but even without it the path fabric will be quite durable .
Tile laying sequence
Having estimated the contours of the path, remove the vegetation with a bayonet shovel, cutting off the top layer of soil.
We are preparing the ground for constructing a garden path.
Hammer the pegs and stretch the twine along the border of the path, placing it at a height of 60–80 cm and aligning it in accordance with the planned slope.
We define boundaries.
Fill the hole with sand approximately 20–30 mm. Level the surface with a level, guided by the rope - create a more or less flat surface without bumps and depressions.
Sand planning.
Water the leveling layer with a watering can until puddles begin to form. Add sand where necessary and pour it again. Check the quality of the sand cushion by walking on the surface. Shallow imprints remain - the layer is well compacted.
The underlying layer is sand.
Cut a piece of geotextile material to size and cover the bottom of the trench with it, leaving small allowances on the sides.
We lay geotextiles on the underlying layer of sand.
Using sand sifted through a fine mesh, pour the mounting layer with a shovel.
We plan the working layer of sifted sand.
Calculate the height of the tiles - the distance from the sand base to the twine should correspond to the thickness of the paving stones. Pull the sand out with a level and rake the excess towards yourself. Compact the sand layer with water, fill in the depressions if necessary.
We lower the beacons and level the sand.
Lay the first tile, leveling it with the twine and driving it deep with a rubber mallet.
Laying the first tiles.
Add sand when you need to install thinner paving stones. Homemade cement castings often have non-standard sizes.
We adjust the height of the garden path.
Lay the remaining tiles end to end, making sure the surface is even. Generously add sand to the sides of the walkway and into the cracks.
Filling the gaps.
Sweep the path with a broom, clearing the surface of the paving stones and pushing excess into the voids. Do not step on the tiles until the joints are completely filled.
Sweep away excess sand.
Spray the laid paving cloth with a watering can, add sand to the gaps that appear and water again.
The sand is compacted with water.
For each approach, prepare a strip about 2–2.5 m long. Having filled the area with paving slabs, move on. Lay the paving stones without gaps - over time, the concrete elements will move apart a little and seams of 3-4 mm will appear, necessary for thermal expansion.
If all the requirements of the considered technological chain are met, the result will be a durable garden path.
Photo of a garden path made from homemade tiles.
Fine concrete
For flexible connections to work, when casting into the chosen form, it is necessary to pour liquid concrete to the very top of the stone form. In this case, you can use a regular concrete mixture (1:3) with the addition of dye and any plasticizer. You will also need to vibrate the mixture to obtain a clearer pattern on the surface of the stone. What kind of casting you get can be seen in the photo.
But such a casting is not good for plastic, since quartz sand, when vibrating, spoils the glossy surface of the mold.
In our case, we will not do this for the following reasons: firstly, flexible connections are not needed (only individual stones are needed), and secondly, we will cast thin universal tiles, which can be used for sticking to the concrete base of a garden path or on any vertical surface (for example, foundation wall, retaining wall, etc.).
For this purpose, it is best to use fine-grained concrete, which, together with a hyperplasticizer, makes it possible to obtain self-flowing concrete that does not require vibration of the mixture. This dry mixture can be bought in a store; it is used for pouring concrete floors.
We have already used fine-grained concrete in the manufacture of thin brick tiles. This article describes the entire process in detail and will not be repeated here.
Making molds
The stores offer a wide variety of forms for paving slabs, but you can make them yourself.
One of the simplest options are 40 mm wide boards. They are cut into lamellas 300 mm long, as well as into meter-long pieces.
From the resulting elements, a rectangle with sides of 300 mm by 1000 mm is assembled. The boards are connected to each other with corners and self-tapping screws. Two more 300 mm boards are mounted inside the rectangle, measuring equal distances from the edges and between them.
It is important that the end result is squares with sides of 300 mm. To fasten the boards together, use self-tapping screws about 65 mm long. They need to be screwed into the outside of the form, two into each board.
There are no special restrictions on the number of cells in the form. There can be either two or six (or even more). But here it is important to take into account that it is difficult to free the long mold from the finished tiles. There is a possibility of breaking the frame when removing it.
There is also an option to buy ready-made rubberized forms:
Painting concrete tiles
Basically, this process has previously been discussed in previous articles on the production of colored concrete products.
Today, using examples, we will show how painting artificial stone, depending on the options for adding pigment to the concrete mixture, applying it to the surface of the form, mixing two or more mixtures of different colors (or different shades of the same color), as well as the influence of the amount of pigment introduced (applied) affects appearance of artificial stone.
As a result of the experiment, about fifty different samples of concrete tiles were produced. The amount of introduced pigment (Czech-made iron oxide dyes were used) varied from 0.5 to 5% of the weight of white cement. The latter was used to obtain a purer color, otherwise, at low concentrations of dye with gray cement, an insignificant difference in the samples is obtained.
A previously published table was used to obtain additional colors and shades.
With a light (small) application of dye to the surface of the mold, the castings take all the pigment onto their surface completely and the mold remains clean.
When we apply a large amount of dye to a mold, some of it remains on the mold. This is after the product has been removed. And is washed off the concrete stone.
When a very large amount of dye was applied to the mold, the castings were obtained with shells from which the excess dye was washed out.
The results of work on some samples of concrete tiles are shown in the following photographs.
By varying the colors, the amount of pigment and mixing different color solutions, you can get any unique colors of decorative artificial stone that suit only you.
Forming the surface of concrete tiles
Concrete tiles receive their basic surface configuration from the mold in which they are cast.
Additional changes (sinks, unevenness) have already been obtained by applying an excess amount of dry dye to the surface of the plastic mold.
In the same way, instead of pigment, you can use the same ingredients that are part of the concrete mixture and additional ones: cement, ash, talc, ground mica, chalk, stone flour, etc.
By changing the amount, local concentration and using their mixtures, you can obtain a surface very similar in appearance to natural stone. Examples of the obtained samples can be seen in the following photographs.
Purchase of raw materials
How much cement and other building materials are needed depends on the mortar recipe and the required number of tiles. Often, for concrete products used for outdoor use, a classic mixture recipe is prepared. The following proportions are implied:
- one part cement;
- two parts of river sand;
- three pieces of crushed stone.
An example of simple calculations of the amount of mortar: there are square shapes 30x30 cm and 4 cm thick. One tile will have a volume of 0.04x0.3x 0.3= 0.0036 cubic meters. If you plan to produce one hundred units, it turns out that 0.36 m3 of solution will be required.
The solution recipe described above requires three components, which number six parts. Therefore, the volume of one part will be equal to 0.06 cubic meters (0.36/6). This results in the required volume of cement. Accordingly, you will need twice as much sand - 0.12 cubic meters, and crushed stone - 0.18 cubic meters.
For ease of measurement, you can use a ten-liter bucket, which has a volume of 0.01 in cubic meters. Thus, to obtain one hundred tiles from the example, you will need six buckets of cement. Since all measurements are not accurate, it is recommended to buy materials with a ten percent reserve.
It is better not to purchase wire for reinforcement. The best option would be a chain-link mesh with cells measuring 50 by 50 mm. Steel mesh for plaster is also a good option. It is optimal to use galvanized mesh; you can even take used one.
Calculating its quantity is also very simple - you need to determine the area of one tile 0.3 × 0.3 = 0.09 square meters.
Before tile production begins, molds are prepared. Today they come in a wide variety of shapes and sizes, the simplest being square.
How to care for a garden path
Monitor the condition of the laid paving slabs, promptly clear leaves and prevent the path from flooding with melt water.
In winter, remove freshly fallen snow, do not let it cake, otherwise, with the advent of thaws, ice will form on the surface, which is difficult to remove without damaging the concrete slabs. debauchery and anal sex with prostitutes Troitsky Autonomous District of Moscow
Photo of a garden path in winter.
A clean, neat path or naturally overgrown spaces between the slabs with grass is a matter of taste.
Laying weed control material does not completely solve the problem. The vegetation still appears, but it is smaller and it is easier to remove - just pull out the shoots and replace the backfill of the joints.
Caring for a “wild” garden path is not difficult, and the procedure does not have to be performed every year. To return the path to its previous state you will need:
- Bucket.
- Knife.
- Manual weed remover.
- Grass shears.
- Broom.
- Garden fan.
Tool for clearing grass from garden paths.