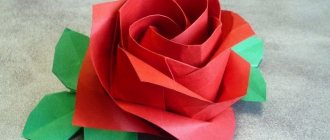
The kids really love the process of launching boats. And, naturally, the most avid in this matter are boys. This is the same technology, just like real ships, boats, yachts, boats and catamarans. Marine paraphernalia is covered with a special romance that appeals to the boyish soul.
Therefore, boats can rightfully be classified as toys for boys, which will be interesting for even the most restless tomboy to make on their own, and this, as you understand, is a rare phenomenon, and therefore especially valuable.
How to make a boat with your own hands: 4 models from scrap materials
Are you ready to open navigation? April is approaching - and with it deep streams and real seas of the streets. “It’s a shame...” the adults will complain. "Funny!" - the kids will laugh in response and, putting on colorful rubber boots, will immediately rush to launch the boats.
Making children's boats with your own hands is a simple matter, and for parents it is also a wonderful reason to spend time with their child. First, try taking our ready-made ideas as a basis, and only then your imagination will tell you new unique ships from scrap materials!
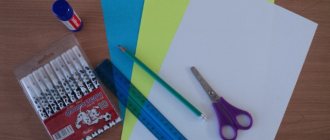
Making a boat with your own hands: what you need
The photo shows the materials for making all 4 presented boats.
- dry branches of various lengths and thicknesses
- toothpicks, wooden skewers, or thin plastic tubes (such as lollipop sticks)
- sandpaper
- thread or rubber bands
- cardboard
- lightweight floating material (foam plastic, foam scraps or any other foam insulation)
- colored paper (or white - because you can draw or print any sails and flags on it)
- Colored electrical tape is also perfect for flags.
- scissors
- stationery knife
- reliable waterproof adhesive suitable for working with a wide variety of materials
- materials for decoration - acrylic paints (cannot be washed off with water and are suitable for woodworking), colored pencils, felt-tip pens, wax crayons, glitter gel, etc.
DIY wooden boat
Both models are based on a raft knitted from branches. The arrangement of the “logs” can be absolutely anything: choose which design you like best, or invent your own, improved one.
To begin with, the branches need to be processed: cut off the bark and all irregularities with a utility blade (only under adult supervision!), and if necessary, sand the surface with sandpaper.
Now you should thoroughly think through the future design...
...and then firmly tie the logs together using thread or an elastic band.
DIY cardboard boat
Of course, making the deck entirely out of cardboard is simply not practical. It’s better to reinforce it from below with some lightweight water-repellent material (you probably have something similar left at home after renovating or purchasing household appliances). Polystyrene foam or, as in our case, foam insulation, similar in texture to polyurethane foam, is perfect for these purposes.
Using a stationery knife (which children work with only under adult supervision!) we cut out the floating part of the future ship. We sand off the uneven surfaces.
We trace the contours of this part on cardboard and cut it out.
In the center of the cardboard piece we make a slot into which we insert a pre-cut captain's bridge and a toothpick mast.
We put a flag on the mast (in the photo it is made of green electrical tape), and glue the floating part from below.
DIY foam boat
The base is the same foam insulation as the previous vessel. The sails are made of ordinary paper, and the masts are made of the same sticks that remain from caramel.
Building these boats with your own hands for children is very simple and quick. I wish you a fair wind and a joyful spring!
How to make boats bright, noticeable and unique?
Use various paints, pencils, markers, stencils and other decorative means.
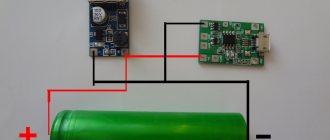
Electrical diagram
Everyone stays where they are and no one runs away. There is nothing to be afraid of. Below is a complete wiring diagram for a fishing boat. The diagram is large because it is detailed, but now everything will become clear.
Dotted lines highlight individual blocks. You may not use some of them at all, or replace some with an inexpensive purchased analogue. Just one circuit may seem complicated to you, but you don’t even need to understand it, and if you want, you can solder even what you don’t understand.
You can download and download the diagram in large format
So, control will be implemented from the keyboard in this way:
And in the table below you can see which pin on the Arduino Uno is responsible for which command. They are also afraid of the words pin, arduino, sketch; I’ll tell you everything in detail. The “Via:” column shows relays that are triggered when a specific phone key is pressed.
The DTMF decoder circuit is simple to implement, just 3 resistors and 1 capacitor. I was able to fit it all into a mini-jack plug.
Then it's a little more complicated. We will talk about the circuit of Arduino Uno, Arduino Nano and relays for Arduino boards. But still, the diagram is drawn in detail. And most of the connections are of the same type. For example, relay K1a-K6a is a relay for Arduino with a 5 V power supply. Each relay has three wires: +5V, GND (2 wires for power) and signal.
When the phone receives a DTMF signal (for example, pressing the “3” key), it transmits it through the input pin A0 to the Arduino Uno board. There, this signal is instantly converted into a control signal, which is sent to the desired outgoing pin, for example, pin 6, and relay K3a is activated, thereby triggering the circuit to turn on the “Small Forward” mode.
The second board is Arduino Nano. It is used exclusively for turns. Input signals for Arduino Nano are outgoing signals from 7,8,9 pins of Arduino Uno. But before entering the Arduino Nano board, these signals are inverted by optical relay OR1-OR3 from logical one to zero, respectively from zero to one.
This complexity is due to the fact that the rotation sketch only works flawlessly in this order. That's all; The analysis of this circuit is completed.
Optorelays KR293KP9A were available. The opto-relay block looks like this:
There are three of them in this block. The smallest and simplest is a 9 V regulator. It is called LM7809. It outputs exactly 9 volts, which powers the Arduino Uno and Arduino Nano.
Two regulators are used to set the comfortable speed “Full speed” and “Slow speed”. Firstly, for the “Full speed” mode, you can do without a regulator and simply power the motor in this mode with voltage from the battery. This will even increase the reliability of the system. Secondly, you can ask someone who is not afraid of a soldering iron to solder such regulators, if you have such a phobia. Or, in the end, explain to the radio store what power the motor is, what voltage you want to power it with, and they will select a regulator for you.
Motor control circuit:
I decided to make the motor control circuit using a relay. This is primarily due to the fact that I had them in stock.
I won’t lie. For unprepared people, this scheme is complicated. But I’ll at least tell you why it was created. Perhaps many will understand how it works.
Further, the same diagram is presented in two forms: the first is more convenient for installation, and the second is for analyzing how the interlocks work. The locks are made in such a way that when reverse is engaged, it is impossible to engage either small or full forward.
When the boat is sailing forward, it is impossible to turn into reverse. To change direction, you need to stop the boat by pressing the “0” key. The main idea of these interlocks is not to overload the electrical circuit. At the same time, on the go you can switch between low and full forward without any problems.
I placed relays and terminal blocks on the board. This is what the relay circuit installation looks like:
I soldered the outputs from the contacts and relay coils to the terminal blocks. Be sure to install diodes on the relay coils. It is not necessary to install blue varistors (2 circles).
According to the diagram, I connected the relay and power contacts to each other. This whole process is absolutely proprietary. I was chasing miniaturization. I did this. You can do it more cumbersome, but more neatly.
Unloading scheme
The principle of unloading is simple: we give a signal to the Arduino, the electric lock is activated, and the hopper with bait and equipment is released. The electric lock is a simple 24V solenoid from the paper feed in a laser printer.
To make the retraction force greater, I decided to increase the voltage from the battery to 30 V. This is done using a simple Chinese device MT3608, purchased on AliExpress.
Toggle switches, voltmeters and dimensions.
Here the diagrams delight the eye with their simplicity and accessibility. Dimensions can be achieved simply by attaching a bicycle light to the handle of a fishing boat.
I’ll finish the story about electronics with this emergency stop circuit:
It was created so that if there is an accidental loss of mobile communication while fishing, the fishing boat does not float over the horizon or into the reeds.
The principle of operation is simple: while the handset is off-hook and the phone (receiver) is in conversation mode, there is voltage on the headset microphone. It can be used to control an opto-relay, through the normally open contacts of which voltage will be supplied to the boat motor. If you end a call or if the network is lost, the voltage on the microphone disappears, the opto-relay opens and the motor stops.
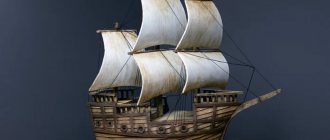
DIY ship model
You can create a model of an antique ship yourself without purchasing a ready-made structure for assembly. To achieve a high-quality result, you will have to show a lot of patience and perseverance.
To make a historical ship with your own hands, prepare:
In this model of the ship, not plywood was used as a base, but balsa wood. The choice was due to the ease of working with the material. Unlike plywood, where you need a saw for cutting, with balsa wood everything was done with a simple sharp knife. You can also take thin strips for work from any material, they just have to bend well. Wood glue should not be replaced with hot glue, much less super glue.
Step 1
.
On paper you need to draw the main details of the future ship. You can print them if you find suitable layouts on the Internet. Please note that your ideas may undergo slight changes as you work. This is not critical if you just want to build a ship in an old style, and not repeat an exact copy of a specific ship. Read also: How to make a piñata with your own hands
Step 2
. For convenience, work with the ship was divided into several parts. The ship itself was also assembled. Most of the time was spent making the central part of the ship. Then the front, rear and deck parts with the mast were made.
Step 3
. First of all, using the existing sketches, make the skeleton of the ship. Be sure to make sure that all its edges are symmetrical. If there is a slight deviation somewhere, correct these flaws. Check that when attaching the ribs, they are exactly at an angle of 90 degrees.
Step 4
. Once the skeleton is ready, start decorating its sides. To do this, glue a long strip along the center line of the side part. Continue to focus on it when you glue the rest. It is better to glue the slats in stages to make your work easier. Apply enough glue, but make sure that it does not flow down the slats. Additionally secure the slats using clamps, leaving them in this form until the glue has completely dried. After the glue has dried, remove the clamps and continue gluing the slats in the next area.
Step 5
. Fill all areas where gaps form between the slats with epoxy resin. When ready, coat all parts of the ship with wood varnish.
Step 6
. After the main work, move on to finishing. You can hide all possible aesthetic flaws at this stage. To do this, carefully glue slats over areas with obvious defects to hide them. You can make a horizontal line from rattan, emphasizing the smooth shape of the ship. The base of the ship is ready.
Step 7
. Masts need to be made from wooden rods and small flat pieces of wood. There will be two masts in the ship. Adjust the rods in advance to the calculated dimensions. To attach the masts, cut two pieces of wood measuring 4 x 2 cm. Drill holes in them for the mast rods. Make a reinforcing lattice from small rods and assemble the entire structure.
Step 8
. Make a template for the ship's deck from paper and, based on it, build a deck part from wooden strips. After letting it dry thoroughly, drill holes for attaching the masts. Insert and glue the masts. Use plywood to make the side rails of the ship.
Step 9
. Glue the wooden strips at the front and back of the ship in the same way. They need to be glued to the side and in the deck part, and rods and handrails should be made from pieces of plywood. All parts are fastened with wood glue. Don't forget to raise the back of the ship with steps.
Step 10
. The final part of the entire building process is to assemble all the parts of the ship together. By gluing everything together with wood glue, you get the finished base of a historical vessel.
It can also be supplemented with small parts and sails. The entire assembly takes a total of 4 - 5 days and most of the time is spent allowing the glue to dry.
Programming Arduino microcontrollers
Arduino, if anyone doesn’t know, is a microcontroller for the general public. Very accessible and simple. Roughly speaking: I connected it to the computer via USB, loaded it with a sketch (a program that says what the microcontroller will do) and everything is ready. I will not describe the process of installing drivers and downloading programs. Everything can be found on the A rduino website.
If you have any questions, the network is full of detailed descriptions of this process.
My bait boat uses two Arduino boards: one UNO and one NANO.
For Uno, in addition to the sketch, you will need libraries.
You can upload and download the library
The DTMF folder needs to be copied to the C:\Program Files\Arduino\libraries folder.
In the sketches themselves, after the “//” mark there are comments.
And here are the sketches themselves:
For UNO:
#include int sensorPin = A0; float n = 128.0; float sampling_rate = 8926.0; DTMF dtmf = DTMF(n, sampling_rate); float d_mags; char thischar; int ledPins = { // Array for 10 PINS/relays. 2, 3, 5, 6, 7, 8, 9, 10, 11, 12 // 4-Pin, used by the library! }; void setup() { for (int i = 0; i pinMode(ledPins , OUTPUT); // Make the entire ledPins array OUTPUT. digitalWrite(ledPins , HIGH); // Make the entire ledPins array HIGH. } } void loop() { dtmf.sample(sensorPin); dtmf.detect(d_mags, 506); thischar = dtmf.button(d_mags, 1800.); if (thischar) { digitalWrite(ledPins, LOW); delay(500); digitalWrite(ledPins, HIGH ); } }
For Nano: // add a library for working with servos #include // for further work let's call 12 pins as servoPin #define servoPin 12 // 544 is the reference pulse length at which the servo should take the 0° position #define servoMinImp 544 // 2400 is reference pulse length at which the servo drive should take the 180° position #define servoMaxImp 2400 Servo myServo; void setup() { myServo.attach(servoPin, servoMinImp, servoMaxImp); // set the pin as the servo drive control output, // and also for the servo drive to operate directly in the angle range from 0 to 180°, set the min and max pulse values. pinMode(5, INPUT); pinMode(6, INPUT); pinMode(7, INPUT); myServo.write(1430); } void loop() { if(digitalRead(5) == HIGH) // Condition of the 1st button { myServo.write(1130); // Rotate servo left 45 degrees } if(digitalRead(6) == HIGH) // 2nd button condition { myServo.write(1430); // Return servo to center } if(digitalRead(7) == HIGH) // 3rd button condition { myServo.write(1730); // Rotate the servo to the right 45 degrees } }
DIY cardboard ship
Ship modeling is interesting and exciting. Marine themes are always popular. Stories about bloodthirsty pirates, brave explorers and warriors of past centuries are always fascinating. How to make a boat out of cardboard, what is required, how difficult is it? This article will help you find the answers. Detailed master class on creating products, tips and tricks.1
Features of working with cardboard
Cardboard is a dense and reliable material from which, if desired, you can make various crafts. Working with it will not cause any difficulties if you apply these tips:
- if the cardboard is thick, take sharper scissors or cut it with a stationery knife,
- when you are going to bend the finished parts of the product along the drawn dotted lines, trace their outline with the blunt side of your scissors or with a non-writing pen - the cardboard will bend easily and much smoother,
- A glue gun is effective, but not always suitable - if the material is thin, it is easier to replace the strong glue with PVA or regular office glue,
- make sure that the room where you will work is not too humid, otherwise the finished products will then delaminate or the parts will not stick together properly,
- ventilate your room regularly, adjust the lights,
- if the model is complex, watch videos instead of text master classes,
- work in stages when the mood is good.
Read also: How to make a wood splitter with your own hands
Beginners usually start simple, gradually making the task more difficult for themselves. Anyone can make a ship out of cardboard, even a child. If you follow all the instructions.
Matchbox boat
Who said you need special cardboard? Any available material will do. For example, several empty matchboxes have accumulated at home. Great, then this master class will do.
- Take 2 boxes, connect them at the ends and carefully glue them. Glue the third one on top of them.
- Cut a long strip of paper. Make sure its width matches the size of the box. Now cover the boxes with it.
- Cut a thin (1-1.5 cm) strip of cardboard, then fold it in half. Glue tightly to the boxes, forming the nose of the future ship.
- Draw outlines on the remaining piece of cardboard, outlining the bottom of the vessel.
- Mast. Cut ¼ of the sheet and roll it diagonally tighter. Make a small round hole at the top of the future ship. Treat it well with glue, then insert the end of the mast there.
- Cut out sails and a small flag from paper (colored sheet). Using a regular hole punch, make a pair of round holes in the finished sails. Thread them one by one through the mast, and glue a flag on top.
To make a ship made from ordinary cardboard brighter with your own hands, you can paint the finished craft.
Manufacturing process
So, let's start creating.
- Take a landscape paper sheet, white or any other color of your choice.
- Folds in half to form a rectangular shape.
- One of the corners is bent into the center of the rectangle.
- Fold the adjacent corner on the opposite side in the same way.
- We bend the lower part to the top.
- Now turn the figure over.
- Fold the rectangle from the bottom upward.
- Tuck the resulting ends in and fix them inward.
- A diamond shape has formed.
- Next, lift the corner from below to the top.
- You need to turn it over again and do the same on that side.
- Lift the pointed corner at the bottom to the top.
- Next you need to get a rhombus by folding the triangle into the center.
- Start forming the boat by pulling the ends.
- Shape the bottom of the vessel so that it becomes voluminous and stable.
Ready!
Milk carton ship
Run out of milk at home and still have a box left? Great! You can make a real ship.
- Manufacturers use special cardboard for milk; in addition, it is waterproof, you can even organize “swims”. A long 1L box is used here.
- First, you need to carefully cover it all with opaque tape (so that the ship does not advertise a dairy company).
- Measure and mark on the box all the places that need to be cut. Draw lines with a felt-tip pen and, following them, cut through the box with scissors, forming the base of the boat.
- Some parts (as seen in the pictures) are cut out separately.
- Attach two sticks symmetrically at the bottom rear to the stern of the future vessel. Connect the ends with a regular elastic band (pharmacy grade will do).
- Attach the rectangle - the motor screw. The ship is ready, all that remains is to paint it or add other details - figures of people, make a steering wheel.
Pirate ship
A real pirate ship is recognizable by the color of its sails, flag and other visual features. You can supplement the finished product with Lego figures - pirates. It is worth involving a child in the work - the process is fascinating and at the same time educational.
- cardboard box,
- glue gun,
- ruler,
- pencil,
- breadboard knife,
- a piece of polystyrene foam,
- twine,
- branches (collect small ones),
- fabric (for pirate sails),
- templates
- You can draw diagrams for the ship with your own hands from cardboard, but if your drawing skills are poor, it is better to choose ready-made templates. Select the ones that suit you, print them out and carefully transfer them onto cardboard.
- Step by step cut out one side of the future vessel, then the second. It is better to choose (or draw) simple templates, without complex squiggles.
- The ship needs 2 side, bottom and 1 back parts. Use a ruler to measure each one, making sure they fit.
- Using a glue gun, carefully connect the 2 sides to the back.
- Once dry, glue the bottom. It turned out to be a large cardboard boat.
- Find a long, straight branch in advance and cut off the excess. Attach the mast to a small square of foam, and glue it tightly to the bottom.
- Cut out a small “L” shaped, even piece from the cardboard, forming the stern. When finished, glue it to the back.
- You need 2 thin sticks or skewers - they need to be tightly attached side by side to the mast. These are the sail holders. To be sure, additionally wrap them with twine.
- Sail. Cut it (a regular medium-sized square) from fabric. Color it by drawing a dark pirate skull, make romantic scarlet sails or anything else you want.
- Make several small holes at the bottom along the edge of the fabric and at the top. Cut the twine into equal small strips and thread them through those holes. Tie the finished sails to two branches on the mast.
Read also: How to make a bow with your own hands
Here's how to make a boat from an ordinary box and other scrap materials. By the way, the ship should be equipped with a yardarm (the pirates usually forced their captives to walk along it), a rudder, and a small anchor cut out.
floating ship
Why limit yourself to simple crafts when you can create a real ship that will float? Of course, you need to put in more effort, but the result will certainly please you.
- wide tape,
- a piece of foam plastic (does not sink),
- textile,
- cardboard,
- thin wire,
- cutter,
- wooden boards (small),
- threads,
- scissors.
- Frame. The step-by-step creation of a three-dimensional ship begins with its hull. Using a cutter, carefully cut out the hull, first forming the contours for the deck and bow. Then cut the two sides obliquely and make the bottom as flat as possible.
- You may need a stencil or photo of examples to create the poop. When tracing the lines, immediately leave 7 mm, draw again. Once finished, you can cut it out. You will get patterns for the skins of the future vessel.
- Decoration. Color the patterns. For example, you can take a photo of a pirate, military or ancient Viking ship. Separately, on the pattern of the future deck, mark all the places where you will install the masts. Carefully cover each cardboard model with tape. It will provide protection from possible getting wet.
- Now attach the finished patterns one by one to the foam base. To secure, use glue or tape.
- Masts. You make them from thin planks. Try to make the masts sharp at their base and narrowed at the top. Secure it with wire to the finished masts.
- Sail. Remember, if you are planning to make a sailboat out of cardboard, you will have to fit several masts and make larger sails. After all, sailboats moved thanks to the wind. After cutting out the sail, literally sew it to the finished mast. Use a needle to make several identical punctures, pass a thread through them, then tie the ends to the yards. According to the shape, it will be narrower in height. When finished, stick the masts with their sharp ends into the base of the ship.
- Steering wheel. It is needed so that the ship then sails straight. Cut a couple of identical pieces from ordinary cardboard, then symmetrically stick them in the stern area into the base itself, positioning them so that they reach the water.
- Test descent. Look, if the ship suddenly falls or rocks, attach additional weight below or inside - a nut or large bolt. It’s better to hang it by wrapping a wire 5-8 cm down from the bottom of the ship.
Cover (deck) of the boat and controls on it
The material for the cover was fiberglass laminate 2 mm thick. I attached the hull of the fishing boat to a sheet of fiberglass laminate, traced the outline with a marker, and cut out the desired shape with a jigsaw.
The weight of the lid was 590 grams. For such rigidity this is quite a normal result.
I placed the power regulators and the toggle switch for the flashlight in a powder container, which I attached with “liquid nails” glue for complete waterproofing.
For the receiver phone and voltmeters I used an external junction box. It also houses the battery contacts for charging the battery. On the back side there is a connector for unloading.
This is what a bait boat looks like with the lid installed, but without unloading:
Cardboard steering wheel
What kind of ship will sail normally if there is no rudder? For a DIY ship's helm made from cardboard, you will need a ready-made template. However, if your drawing skills are sufficient, you can create a layout yourself.
- Draw two identical circles, then cut them out. Inside each you need to cut a second circle, but smaller, to make flat rims. Remember, the size of the headbands determines the size of the product.
- Cut out several small circles for the center of the steering wheel.
- Rays. Use a ruler to measure the length you need and adjust the skewers, removing excess with a knife.
- Carefully sharpen the ends of the beams. The junction should also be sharpened, so they will fit together better.
- Assembling the steering wheel. Having connected the rays and fastened them, cover the top with the second circle. Secure everything with glue. Repeat similar manipulations with the second, larger rim.
- To make the edge of the resulting steering wheel smoother, you can sand it with sandpaper.
- Wrap the ends of the rays alternately with thread, giving them the desired volume. That's it, all that remains is to paint the finished product and attach it to your ship. By the way, any model of vessel needs a steering wheel, be it a modern yacht, a steamship or a medieval sailing ship.
In order for the steering wheel to fit seamlessly, you need to make a boat out of cardboard, which was originally used to make the steering wheel.
Origami
In order to make a boat craft using a technique such as origami, it is enough to have a clean, flat sheet of paper on hand. Both regular notebook paper and landscape paper will do.
To make an original durable ship, it is enough to be guided by a popular scheme. Namely:
- cut a sheet of paper to make a square;
- fold the sheet in half;
- bend the corners of the bottom edge towards the middle of the fold - you get a triangle;
- unfold the triangle along the line of the original fold - you get an “envelope” from a sheet with folded corners;
- fold the square in half, with the folded edges inward;
- repeat the procedure with bending the corners to the center of the fold;
- to strengthen the product, the process of folding the square and bending the corners must be repeated a third time;
- open the resulting triangle;
- inside the fold, bend the paper outward on both sides of the base of the triangle - the boat will take on the desired appearance;
- The corners formed inside the fold at the apex of the triangle can also be bent and straightened to form pipes.