how to make a bouquet of pine cones
Among the numerous crafts made from pine cones, flowers, perhaps, take first place in beauty. Here are 12 examples of delightful DIY pine cone bouquets . The popularity of crafts is not only due to the ease of production, it is an opportunity to feel like a real florist designer.
The examples of the master classes presented will help you make a bouquet of pine cones , even if you have never done crafts in your life. Be imaginative; remember, no two identical bouquets simply exist. However, like ugly flowers.
What are the benefits of working with natural materials?
Representatives of the so-called generation Z - those born after the millennium - are accustomed to getting to know the world through gadgets. A walk through the forest or park, without rides and other similar entertainment, is as rare for them as a trip to the legendary Disneyland was once for their parents. And since any work with natural materials begins with a blank, young craftsmen will have an exciting journey into the unknown world of wild (at least partially) flora and fauna.
Getting to know the forest and its inhabitants has a beneficial effect on the child's psyche. During a short collection of materials, dozens of small but important discoveries will be made, which in turn will awaken the child’s creativity and imagination. The impressions received will be enough for a year to come, because seeing mushrooms, a hedgehog or a bird’s nest “live” cannot compare with the most colorful images on the Internet.
Fantasy is the weak point of the younger generation, brought up on extremely realistic toys. But without the ability to think creatively, it is impossible to learn to think, analyze, and draw the necessary conclusions. According to psychologists, first a child must create imaginary worlds in order to then successfully live in the present.
In addition, working with natural materials has a calming effect, which is also important for children in the modern dynamic rhythm of life with many electronic “stimulants.” Crafts bring the whole family together, provide the warmth missing in everyday communication, and distract them from children’s constant companions – the computer and TV.
It is worth mentioning the development of fine motor skills of the hands, as well as the natural massage of the fingers, which accompanies any work with acorns, chestnuts, small stones, shells, etc. Cones, in addition to all of the above, also affect acupuncture points, pressing on the right ones places with their hard scales.
They have some other advantages:
- Does not depend on the season. The necessary material can always be found in the nearest forest. For spruce, new cones ripen in the fall, for pine - closer to the beginning of winter. But specimens quite suitable for work dot the ground under trees in large numbers at any time of the year.
- They don't spoil. Chestnuts and acorns gradually dry out and wrinkle or crack, losing their attractiveness. But the fruits of pine or spruce remain unchanged, products made from them delight the eye for many years.
- Easy to process. There is no need for cutting or drilling - most often they are used entirely.
Before you start making beautiful crafts from pine cones with your own hands, you need to process the “raw materials” in a certain way. Especially if you plan to make flowers from it that need coloring.
How to make flowers from pine cones
Cone flowers can be made in different ways. Let's consider the first option - paint whole cones in different colors
You can get a chic table decor from natural material if you attach painted pine cones to a wire
To do this, use glue to attach a wire to the wide base of the cone and paint it or wrap it with tape. Dip the cone into a glass of paint and wait until it dries.
The second option for making flowers from pine cones is to use only the wide part of the pine cone.
Necessary materials:
- Glue
- Wire
- Cones
- Green tape
- Paints
1. Break off the top of the pine cones, leaving the bottom wide part
2. Paint with white paint if you want to make daisies. Or paint a different color.
3. Make a hole with an awl and insert the wire
4. Wrap tape around the wire
How to work with polyethylene wax
You will need:
- You can buy wax (flakes) at a craft store or buy cheap candles;
- Dye (oil or liquid food coloring works well);
- Fragrance oil;
- 2 bowls for a water bath;
- Wooden spoon.
Let's make an original decoration step by step:
- Melt the wax in a water bath.
- When it heats up, add the remaining ingredients: paint and flavoring. I recommend choosing scents that will create a New Year's mood, for more details follow the link
Melt in a bath and add dye
Add flavoring - Dip the shoots.
- Let it dry for a few minutes.
When the first layer hardens, dip the pine cone a second time. - And again we lower it into the wax. We continue like this until we achieve the desired color.
- We don’t throw away the wax, but make a beautiful candle.
This beauty was made by the author of this master class, details on her blog
A couple of tips:
- The wax should be neither hot nor cold. Just keep it warm, then it will lie in an even layer. When we lower the cone for the penultimate time, it is already thicker.
- To achieve shine, dip into hot wax one last time.
But there are other decorating ideas.
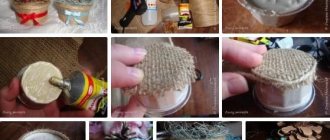
Decorative bouquet of pine cones
Bouquets of pine cones in pots can be a wonderful gift instead of fresh flowers. It doesn’t take much time to make such a bouquet.
Materials:
- Beautiful cones
- Ribbons
- Hot glue
- Scissors
- Wooden skewers
- Sequins
- Pot for the base
- Varnish
Decorate the pot with fabric
We paint the cones with varnish and sprinkle them with glitter; you can also use PVA glue to apply glitter.
Attach wooden skewers to the base of the pine cones
You can complement the cones with this decor
What is required to create a composition for the New Year?
Once you have decided on the components of the composition and its placement, it’s time to collect all the necessary components and auxiliary materials.
To preserve crafts with living twigs for as long as possible, place them in a floral sponge, which can be found in specialized flower shops. Simply moisten the sponge generously with water. If you are using spruce or pine branches, you can moisten the sponge in a solution of water, aspirin and a drop of sugar (1 tablet per 1 liter of water). This way they will last longer. Or put the bouquet in a vase (wine glass, mug,...) with water or the solution described above.
Also for creativity you will need:
- Wooden skewers (tangerines are strung on them, pine cones and sweets are glued on them);
- Glue gun/glue;
- Jute twine;
- Ribbons, bows, corrugated paper;
- Any decorative elements at your request (artificial snow, sparkles, tinsel, garlands, etc.)
Color combinations
Yes, and you shouldn’t forget about color combinations, so that your composition of pine cones does not look like a cheap handicraft. I don’t know my way around the color wheel myself, but I refer to the useful sign below as a guide:
Well, a few combinations of the cones themselves.
I think that with the decor that we prepared today, the holiday will become especially beautiful and elegant! Did you like the ideas? Share them with your friends and subscribe to other articles.
Collection and preparation of cones for work
You only need to collect intact, undamaged, fully opened specimens - they make the most believable “flowers.” If during wet weather the fruits of coniferous trees close their scales, they can be easily returned to their previous state by drying them in the oven at home.
Cones collected in the spring are already freed from seeds, which tend to spill out at the most inopportune moment. In addition, they hold their shape better.
The stored “gifts of the forest” should first of all be washed, remove resin, if any, and clean from insects. Small stains are scraped off with a stiff brush; more complex stains are removed by keeping the material under running water. Insects that like to settle between the scales are expelled with a solution of 6% vinegar. It is mixed with water in a 1:1 ratio and the natural raw materials are soaked for about 30 minutes.
The resin can be removed by wiping the scales with alcohol, or by boiling the “forest harvest” in a highly diluted detergent. If the material will subsequently be painted, it is recommended to bleach it. This procedure is optional, but after it the finished products look neater.
To bleach pine or spruce cones, they are first cleaned and then thoroughly dried. Next, immerse it overnight in any pipe cleaner, half diluted with water. Wash again and dry again. As soon as the fruits open, they are dipped into undiluted “Whiteness” and after 7–8 hours they are thoroughly rinsed, after which they are kept warm until the moisture is completely removed and their shape is restored.
Sometimes half-opened specimens are required for work. In this case, they are dipped in wood glue, which “preserves” the scales in the desired position.
Drying methods
It is very important to completely get rid of moisture to prevent rot and mold from appearing in the future.
You can do this in 4 ways:
- Naturally - that is, in the air. The raw materials are laid out on newspapers in 1 layer and left in a dry, well-ventilated room for 2 - 3 weeks.
- In a frying pan. The method is fast, but unreliable, since moisture may remain at the base of the scales. Reduce the heat under the frying pan to a minimum; there is no need to cover it with a lid. Turn the fruits periodically to prevent them from burning.
- In the oven. The cones are placed on a baking sheet covered with foil and dried at 120ºC for an hour. The door can be opened slightly to slow down the dehydration process and increase its efficiency.
- In the microwave. This option is only suitable for limited volumes. Fruits - no more than 3-4 pieces are placed on a glass plate covered with a paper towel and kept at full power for 1 minute. If the microwave chamber then smells unpleasantly of burnt wood, wipe its walls with vinegar.
Photos of New Year's bouquets
Images of ready-made gifts will provide inspiration for crafts or simplify the search for a suitable product. Photos are posted by both stores and craftsmen.
A New Year's bouquet will complement the interior or serve as an interesting surprise for friends and family members. It’s not difficult to make it yourself, and you can get all the materials without any problems.