Many people still use the old Soviet meat grinder, which turns literally everything and is so strong that the table is more likely to break than the metal parts. This is one of the most reliable kitchen tools. The modern world has provided us with Chinese consumer goods - cheap food processors. Unfortunately, the metal in them leaves much to be desired. Western products are expensive. The Soviet man’s dream of automating the process of preparing minced meat as cost-effectively as possible can be realized quickly and inexpensively. In our article we will analyze the manufacture of a budget electric meat grinder from a strong Soviet unit.
Operating principle of an electric meat grinder
According to the principle of operation, an electric meat grinder is not much different from a mechanical one. The only and main difference is that for the meat grinder to work, you just need to load everything into the receiver and press the button. And nothing else needs to be done. Using a device from Mulinex as an example, we will tell you what happens next and how to insert the knife correctly. After the meat is loaded into the meat receiver, it is also pressed against the mesh with a screw and cut off by cutting elements. After work, you need to disassemble all the elements, wash them, and leave the meat grinder in the disassembled state until it is completely dry. Only after this can you put the device in a box and place it on a shelf for storage.
Fan
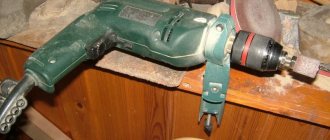
Plastic blades are attached to the protruding part of the device - a hand fan is ready. If you attach the same electric drill instead of the handle, the device will work without human intervention.
The motor from an electric meat grinder is suitable for building a grinder. There is always a place for a compact knife sharpener in the kitchen.
I disassembled the meat grinder and made a useful homemade product
Soon there will be a large amount of construction work, as always, there is a lot of work, but little free time. After thinking a little, I decided to make a small homemade product that will help complete this amount of work much faster.
I won’t spoil the meat grinder, I only need an auger.
I’ll say right away that this will be my first time doing this; there may be errors or shortcomings in the design. I took a sewer tee as a basis and put a plug at the bottom.
I cut two round timbers to the size of the grate from the meat grinder, turn on the “emery” and clean it a little. (As it turns out later, it is better to use textolite instead of plywood.)
I made a 7 mm hole in the center for the auger. I also added holes, but it’s better to make twice as many. We install it in the tee.
For reliability, we fix it with self-tapping screws. (I also screwed the plug)
Take any tube with a “spout” and cut off this part.
We make a hole in the plug and fix the “spout” with superglue + soda.
We install it in the tee and fix everything with self-tapping screws.
We install an auger and a knife into the tee, and on the other side we place a second round timber with a hole.
I added a plug, placed an adapter on top, and screwed a pin into the auger.
The design is ready, I add the solution to our homemade product. I was too lazy to sift the sand, which I later regretted greatly.
As you already understand, with the help of this homemade product you can very quickly cover up any seams. Instead of a solution, you can use another material.
That's all, dear friends, we hope that you liked this material! Good luck and good luck to everyone!
Useful products from an electric meat grinder
Not only mechanical products have found their application in the household. A broken electric meat grinder will also be useful for making new appliances from it. A serviceable engine will help in the creation of many household and household appliances.
Fan
By attaching blades and fastenings, you can get a small room fan. Thus, the owner saves on the purchase of a new device and finds a use for a broken electrical device. After all, a fan is a useful household appliance in hot weather. And it will also become an indispensable assistant for every housewife who prepares food.
Sander
For men on the farm, a mini-abrasive machine or grinder will be useful. They are also assembled using a motor. In everyday life, such products are used for sharpening metal products: axes, knives, discs. Specialized stores offer a wide selection of similar products. However, it has a high price. Therefore, self-assembly from the components of a Philips electric meat grinder or other models will significantly save your budget and will appeal to technology lovers.
The video will tell men how to get the job done.
DIY T-Shirt Remakes (44 Ideas)
Sometimes an “old” T-shirt loses its relevance and lies on a shelf in the closet for a long time without any need. Just as modern cosmetics can make your skin better and prolong your youth (more details at https://ideales.ru/uhod-za-litsom/uhod-za-kozhey-litsa-posle-40-let.html), so can remaking “old » of your favorite things can give them newness so that you can enjoy them again. You can “revive” an old T-shirt with your own hands and with minimal investment. So, looking at my favorite T-shirt, I decided to remake it and looked for ideas on the World Wide Web. Perhaps you will also like them or inspire new ideas.
To make a new one out of an old T-shirt you will need: scissors, a needle and thread, lace and other decorations, as well as imagination.
Any alteration requires patience. To ensure that the result pleases you, be sure to think through all the steps and draw the necessary lines on the T-shirt with chalk. As the proverb goes: measure twice, cut once. Although you can get by with minimal losses and simply sew on rhinestones, beads, appliqués, ribbons and other decorations. Here are some ideas:
1. An organza imitation scarf is sewn to a gray T-shirt.
2. Poppies with embroidered stems and leaves are made from organza on a white T-shirt.
3. This photo shows the idea of creating two new T-shirts from two old ones.
4. option for decorating a T-shirt with beads and rhinestones.
5. In this version, the decorations transformed the T-shirt beyond recognition.
6-9. The easiest ideas for remaking a T-shirt with your own hands.
10. If you cut off the entire T-shirt, you will get a transparent mesh tunic.
11. A beige T-shirt took on a new life thanks to successful cuts that turned into openwork inserts.
12. interesting idea for a white T-shirt with bows at the back.
13. The second option is to remake a long white T-shirt, which turns into a white pleated top.
14-15. a combination of two types of T-shirt with a top.
16. The T-shirt was turned into an asymmetrical top decorated with ruffles.
17. also an elegant top with lace.
Creative T-Shirt Redesign Ideas.
18. A green T-shirt is decorated with a satin ribbon.
19. The unusual cutout at the back of the T-shirt adds mystery.
20. A boring black tee turns into a fun fringed top.
21. and the gray T-shirt is decorated with the remains of a black T-shirt or T-shirt.
Master class on remaking a T-shirt.
22. blue T-shirt with an openwork insert.
23. black asymmetrical T-shirt with ties.
24. By decorating a T-shirt with a delicate appliqué, you can give the T-shirt an elegant look.
25. Simple cuts make a red T-shirt stand out.
26. idea of decorating a T-shirt with a zipper.
27 -28. original decoration of flowers and lace organza insert.
29. Lace will help hide even stains.
30. You can also knit collars and sew them onto a T-shirt.
31. You can make an original and very erotic swimsuit from a T-shirt.
32-33. the t-shirt can be turned into other clothes. For example, a bolero or a skirt.
34-36. and large T-shirts can make a cute little dress.
Interesting model? Share it with others:
Connecting equipment to pedal control
It is not always convenient to select and manually control the operating speed of new equipment. You can add a pedal to your grinding machine as follows:
- disassemble the body;
- disconnect the electronic control;
- connect the motor directly and make the connection to the pedal.
However, you need to know that not every model is suitable for connecting to a new device. Incorrectly selected equipment will lead to engine overheating and failure. All this can end in a short circuit. It is not difficult to calculate the required power; each product has a label indicating the nominal parameters.
To calculate the optimal pedal load current, you need to divide the mixer motor power by the network voltage. In our case it is:
700 watts / 220 volts = 3 amps.
If the pedal has a factory rated load current higher than 3 amperes, it is quite possible to make such a connection.
This device is suitable for sharpening household knives, meat grinder knives, household tools, and can be used for polishing wooden, plastic or metal objects.
Figure 4 Foot pedal motor control frees your hands
Large and small vices for the home workshop
Any old-style meat grinder has a mounting clamp, so creating a vice for home use is not difficult. You need to carefully trim the lower part of the body and sharpen the cut area with a small file. A convenient and compact clamp will be an excellent tool for the workshop when making small workpieces. If you need to make a small vice, then you will have to weld metal jaws with notches to the top and bottom of the fastening element. It is worth noting that cast iron meat grinders are much easier to weld than their steel and aluminum counterparts.
How to make it yourself
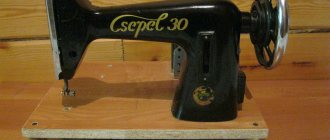
To assemble the electrical unit, we take a manual meat grinder without a rotation handle. If for some reason such a unit is not available, do not worry - it is inexpensive, and there are quite living specimens at market stalls.
To connect the electric drive, we fix the main components on a plywood base. It has only one big disadvantage - fear of moisture. Therefore, it is advisable to treat the wood with a protective varnish or drying oil.
Use a marker to mark the places where the meat grinder is attached to the board. Then we drill through holes through the base. Secure with bolts, nuts and wide-field washers. We try not to overtighten.
The commutator motor must have a reduction gearbox. The gears are metal, as the load during operation is high. Next, we put a small pulley on the gearbox shaft. We secure it with a bolt instead of a key.
It is necessary to make a larger pulley onto the meat grinder shaft and attach it with a screw. To prevent the pulley from rotating on the bolt, we modify the seat with a file. We get a driven pulley.
If the belt is toothed, then the pulleys also need notches for better grip, or gears for the belt.
Temporarily connect both pulleys with a belt with the belt tension, put marks for attaching the electric motor. It is more convenient to mount it on a motor mount, since the load will be high.
It is important to ensure correct belt tension thanks to the longitudinal holes in the motor mount. Too much tension will lead to premature belt failure.
If the tension is weak, nothing will work.
The mechanical part of the equipment is assembled, let's move on to the electrical part.
For successful operation, energy must be supplied to the electric motor. For ease of use, we will mount a switch and a power connector.
We solder the circuit through the switch. We select the polarity so that the engine rotates in the desired direction. We glue the connector and switch to the base of the platform with hot glue.
Please note that the power supply is compatible with the electric drive. As a rule, the motor has a wide range of power supply voltage - from 7 to 24 volts
The golden mean would be a voltage supply of 12 or 16 volts.
We serve food and the meat grinder starts working. The cost of a homemade device will be slightly lower than its budget Chinese counterparts, and the strength is sufficient for processing any meat. However, she lacks reverse and will have to put up with it.
It is also worth paying attention to the safety of working with a wide feed throat. It is good for manual processing of meat, but unsafe for electrical configuration
Do It Yourself (Ogonyok) 1998-03, page 66
from manual to electric
Many rural residents keep all sorts of livestock in their backyard, and to process meat products they simply need a good, productive electric meat grinder. Industrially produced food processors are low-powered, very noisy, and, importantly, nowadays, quite expensive. I managed to turn a simple meat grinder into an electric one. Although the unit turned out to be not very compact (1.5 times larger than the factory one), it was 3 times more productive.
This is a fairly simple design, very reliable, it is convenient to use in winter for processing meat, and in summer for chopping fruits and vegetables.
And one more important feature. The operating mode of my unit is long-term. I had to operate it continuously for 3.4 hours without any “technical” deviations.
To begin with, of course, you will have to find a power unit - a gearbox with an electric motor. For our purposes, an electric motor with a power of 400.800 W and a gearbox, the gear ratio of which ensures the output shaft rotation speed within 40.70 rpm, are suitable. And of course, you need to choose a regular meat grinder with a cast iron body.
The characteristics of my unit: a three-phase asynchronous motor with a rotation speed of 1400 rpm and a power of 0.8 kW, as well as a gearbox whose output shaft rotation speed is 63 rpm.
Having a power unit and a meat grinder in stock, we proceed to docking them. First, on the output shaft of the gearbox
Make a mark at a distance of 30 mm from the body wall (slightly marked with a file, needle file, etc.). Then we disassemble the gearbox, remembering the location of the gears, remove the output shaft and cut it on a lathe according to the marked mark. After this, again on a lathe, we drill a hole with a diameter of 18 mm to a depth of 30 mm at the end of the shaft.
Next, drill a radial hole with a diameter of 10.3 mm in the output shaft at a distance of about 12 mm from the edge of the shaft and cut an M12 thread in it. We make a “secret” screw from an M12 bolt, that is, we cut off the head from it with a hacksaw, leaving the thread for ourselves.
Connection unit for gearbox shafts and meat grinder:
Source: zhurnalko.net
Using internal components
Not only the body can be used in everyday life. The internal and external components that are in the meat grinder can also be used in the household or decoration.
Lattice
The grid is suitable for making potato masher. The grate must be thoroughly sanded with sandpaper. A pin is inserted into the central hole, serving as a handle, and secured with bolts. It is recommended to equip the upper part with a silicone insert for more comfortable use and safe contact with the skin.
Pen
Handles from an old meat grinder can be used to create coat hooks. This product looks very original and creative.
Other decor ideas from an old meat grinder for home and garden
A table lamp is not the only thing that can be made from a manual meat grinder. With a little imagination, some people adapt this item to suit different needs.
- The clamp used to secure the meat grinder on the table can be used as a holder for mini-shelves. The resulting stand will be useful in a country-style kitchen.
- At a dacha, a construction site, or in a workshop, there is often a lack of securely secured space to store the necessary little things - pencils, markers, knives, scissors, screwdrivers, etc. By removing the auger from the meat grinder and securing it in any suitable place, you can get a good organizer.
- By securing the meat grinder to the outside of the country window or in any other place in the garden, you can fill it with soil and plant some unpretentious flowers with a shallow root system in an improvised flowerpot.
It is worth noting that expert flower growers speak with caution regarding the use of a meat grinder as a flowerpot:
“Theoretically it is possible. Rain or irrigation water flows through the grinder grate, and there will be enough space for the roots of small annuals. However, there is a danger that a constantly humid environment will cause corrosion of the metal, and the plants will begin to be depressed and die. Therefore, I advise using such a pot indoors for planting succulents - for example, small cacti that need very rare and meager watering."
Olga Vedenskaya, biologist, landscape designer, florist
In some cases, the meat grinder itself can serve as a decorative element. For example, it can be used to create a conceptual 3D panel or installation.
Flower pots
The principle of making an unusual vintage flower pot is quite simple. It is enough to screw the meat grinder to the window sill in the standard way, tighten the fastener firmly, fill the body with earth without dismantling the mesh and the screwing element on the front panel, and your extraordinary planter is ready! If you don’t like indoor fresh flowers, then an impromptu flower pot can be filled with artificial plants.
A popular bookmaker has released a mobile application for Android,
download 1xBet
You can follow the link absolutely free.
Mechanical meat grinders
It is useful to take an excursion into the design of mechanical meat grinders; not every beginner will be able to assemble a manual model, let alone an electric one. We don’t want to seem boring, let’s describe the process in detail:
- The main and irreplaceable part of a mechanical meat grinder is the body. Assembly begins by inserting the auger inside. There is a thread at the rear end where the handle fits onto a special screw with a plastic or steel wing. Tighten thoroughly.
- The knife is installed with the blades facing outward. The edges rub against the grate and are automatically sharpened. This design helps the meat grinder to work efficiently and frees you from the procedure of finishing the blades.
- The mesh is put on either side, preferably so that the worn part is adjacent to the knife. This guarantees the presence of running-in, which will have a beneficial effect on the operation process.
- The tightening ring covers the mesh, setting the friction force by tightening the thread. Don't dress too tightly. Otherwise, the handle will become difficult to turn, and the work process will not increase efficiency. On the contrary, the wear of the knives and mesh will increase.
Assembling a mechanical meat grinder
Simple knowledge will give you an idea of the mechanical part of a manual meat grinder; electric models are assembled in a similar way. The body is made of steel, cast iron or silumin. The best option is the second one, it is difficult to find on the market. Cast iron is fragile, no manufacturer wants to show that the product is afraid of impacts. Aluminum in its free form is poisonous; not every grade of steel is considered food grade. But verifying the statement is much more difficult than mechanical properties.
The machine requires an electric meat grinder
The main drive is an electric meat grinder. The machine itself is made from rolled metal. To make it, you need a strip approximately 2 mm thick and 1–2 cm wide, a metal pipe with a diameter of 0.5 inches, a length of approximately 50 cm, selected depending on the overall dimensions of the machine bed. The frame itself is made of profiled pipes of square and rectangular cross-section, size 30x30 mm, 10x20 mm.
For the base you need sheet iron, the dimensions depend on the dimensions of the meat grinder. The parts are assembled with M8 bolts; washers are required to ensure hinge joints. The frame is welded, so you need a welding machine. Preparatory operations for the meat grinder screw are done on a lathe, holes are drilled on a drilling machine. The metal is cut with a grinder, and burrs are removed with it. Of course, a complete set of measuring instruments is required. After assembly, the machine is painted with metal paints.
Homemade liver sausage
Homemade liver sausage is a very tasty sausage for your table! Easy to prepare, suitable for sandwiches or as a snack. It cuts perfectly and doesn't fall apart. Try it!
Ingredients
- Pork liver - 1 kg.
- Eggs - 3 pcs.
- Fresh lard - 300 g
- Onions - 1-2 pcs.
- Semolina - 6 tbsp.
- Spices, salt - to taste
- Coriander - 0.5 tsp.
- Garlic - 4 -5 cloves
Preparation
- Grind the liver in a meat grinder. Add lard, cut into small cubes.
- Chop the onion and also add to the liver. Salt everything, pepper, add spices and coriander.
- Mix everything, add semolina, add eggs.
- Mix again and add garlic, passed through a press.
- Mix the mixture thoroughly again and place it in plastic bags, compact the minced meat tightly, and tie it on both sides with thread. Place each sausage in another bag and seal.
- Place the sausages in a saucepan and cover with cold water. Put on the fire, bring to a boil, then cook the sausage for 1 hour over low heat.
- Allow the finished, incredibly tasty homemade liver sausage to cool, remove the cellophane, place in clean bags and place in the refrigerator for 4-5 hours. After this, cut the sausage and can be served.
Bon appetit!
A simple homemade product from a meat grinder grill
Hi all! I would like to share one interesting idea where you can use a grate from an old meat grinder.
The first step is to quietly remove the grate from the meat grinder so that your wife does not notice. This will be the most difficult thing in this homemade product.
Next you will need a metal rod.
You need to put a wooden handle on one end of the rod. You can sharpen such a handle yourself, or you can take it from an old file.
We attach a grill from a meat grinder to the other end of the rod and weld it.
Using a grinder, we clean the weld seam.
This homemade product is ready! Now you can test it! As you might have guessed, this turned out to be a wonderful potato masher!
But you can also crack nuts with this homemade product!!!
Source
Pros of a homemade meat grinder
To evaluate the advantages, let’s compare this device with a factory-made electric meat grinder.
- The price is almost free, since most people have everything at home.
- It is not tied to an outlet - take it wherever you want: even on a hike, even on a fishing trip, even to the dacha.
- Switching modes.
- Possibility of breaking bones with blows from a ratchet screwdriver.
- Versatility (easy to turn into a regular meat grinder).
- Easy to assemble.
The disadvantages are not so obvious, but still:
- Appearance.
- There is an unpleasant load on your hands when holding a screwdriver.
After all of the above, let's admit to ourselves that we use a meat grinder 2-3 times a year. Therefore, there is no point in buying a factory one.
How to stuff sausage without a meat grinder
If you don’t have a meat grinder, for example, on a hike or at the dacha, you can make do with improvised means.
Using two plastic bottles
To do this, you need two bottles of different diameters:
- For a thicker bottle, it is advisable to cut off the bottom with a long neck.
- Place the sausage casing over your throat with the end tied.
- Fill the bottle with minced meat.
- Using a thinner bottle, squeeze the minced meat into the intestine.
- Tie the sausage with twine every few centimeters.
Scheme for making nozzles from plastic bottles
Sausage without casing
In the absence of a special shell, it is allowed to do without it. To do this, the prepared minced meat is wrapped in polyethylene, foil or a baking sleeve.
Sausage without intestines can be boiled or baked in the oven. It will not be possible to smoke such a product. It is permissible to store boiled sausage in the refrigerator for no more than 3 days.
Cooking sausage without casing
The nuances of choosing meat grinders - recommendations from the Homius.ru editors
Today, the range of manual meat grinders is quite wide. The market offers both cast iron, aluminum, plastic and stainless steel models. Such diversity, of course, makes it difficult to choose the right product. The editors of Homius.ru decided not to stand aside and have prepared several recommendations that will help you decide on the right model.
There are so many options that it’s hard to find the best model right away.
Selection recommendations offered by our experts:
- study the material from which the device is made. Some types of plastic may be toxic. If in doubt, ask for a certificate of conformity;
- look at the functionality. If you just need a meat grinder, do not buy a more expensive device with extra attachments. You will save money there;
- mounting option. Here it is worth starting from your preferences. These are usually silicone suction cups, which do not always live up to expectations. Silicone should be undamaged, durable, moderately dense;
- Last but not least is the price. The cost of mechanical models is lower than electric ones, however, a very cheap tool for grinding meat should raise questions, first of all, about the quality of the material. Study carefully the most important mechanisms: the screw shaft, the handle fastening, the shaft stroke during operation;
- Buy any household appliances only with the appropriate certificates. This is especially true for those machines and tools that are somehow involved in preparing food. Be sure to require certificates for the quality of the material and its toxicity;
- If you are planning to purchase online, be sure to check the store's reviews. You should also not buy goods on sale. Usually it already has defects. In addition, you should refrain from purchasing an item that was used as a demo model.
So, we have told you the main points that you should pay attention to when choosing a mechanical meat grinder. In addition, you now have some knowledge that will help when assembling and disassembling the product
Do not forget that any mechanisms require careful care.
Provided that all requirements and recommendations are met, a mechanical meat grinder will serve you for many years and will be passed on from generation to generation.
And in conclusion, we suggest watching a useful video on assembling a manual meat grinder.
Watch this video on YouTube
Previous Household Appliances Mills for a manual wood router: wood processing with unlimited possibilities Next Household Appliances Rating of the best multicookers-pressure cookers in 2022: reviews, testimonials and prices
What can be made from an old meat grinder: ideas for alterations
New technologies are entering the market at a rapid pace. Many household products are losing demand among buyers.
Therefore, manual meat grinders have almost exhausted their relevance in the kitchen, but have received a new application in the field of decoration.
The same applies to electrical products that have failed. They are used to create new devices needed in the economic sphere.
We'll tell you what you can make from an old meat grinder.
Ideas for using a manual meat grinder
In the modern world, electric meat grinders have practically replaced mechanical ones. A kitchen appliance that was traditional in the past is gradually moving from home pantries to the garbage disposal. However, with a little imagination and creative skills, an old meat grinder can be turned into a unique vintage interior decoration item.
Flowerpots
Lovers of house plants will appreciate this original flower pot.
To do this, just fix the meat grinder on the windowsill and pour soil into the housing.
Lamp
An original lamp will attract the attention of guests. Moreover, for the base of the light bulb, both the body of the product and the base of the mounting clamp are used
And those who love special coziness use the device as a candlestick, placing the candle inside the body.
Holder
In the household, an old meat grinder can be used as a holder for towels or toilet paper. Instead of spare parts, a suitable handle is placed in the body, and the meat grinder itself is mounted on the surface.
For needlewomen
The kitchen appliance was also used in the fields of stationery and handicrafts. The case can accommodate writing objects or a plump pincushion.
Interior decoration
Craftsmen use the meat grinder body and its components to create original installations that decorate the interior.
Using internal components
Not only the body can be used in everyday life. The internal and external components that are in the meat grinder can also be used in the household or decoration.
Lattice
The grid is suitable for making potato masher. The grate must be thoroughly sanded with sandpaper. A pin is inserted into the central hole, serving as a handle, and secured with bolts. It is recommended to equip the upper part with a silicone insert for more comfortable use and safe contact with the skin.
Pen
Handles from an old meat grinder can be used to create coat hooks
. This product looks very original and creative.
Useful products from an electric meat grinder
Not only mechanical products have found their application in the household. A broken electric meat grinder will also be useful for making new appliances from it. A serviceable engine will help in the creation of many household and household appliances.
Fan
By attaching blades and fastenings, you can get a small room fan. Thus, the owner saves on the purchase of a new device and finds a use for a broken electrical device. After all, a fan is a useful household appliance in hot weather. And it will also become an indispensable assistant for every housewife who prepares food.
Sander
For men on the farm, a mini-abrasive machine or grinder will be useful. They are also assembled using a motor. In everyday life, such products are used for sharpening metal products: axes, knives, discs. Specialized stores offer a wide selection of similar products. However, it has a high price. Therefore, self-assembly from the components of a Philips electric meat grinder or other models will significantly save your budget and will appeal to technology lovers.
The video will tell men how to get the job done.
Conclusion
Old things often take on new life. Even such ordinary kitchen items as a manual or electric meat grinder can become a harmonious and original piece of furniture. The main thing is to use a little creativity and use a small part of your free time.
setafi.com
Pincushion, stand, decorative elements
An old kitchen appliance can be used to store office supplies by attaching it to your desk. And needlewomen skillfully use meat grinders to place needles; just fill the body with foam rubber, washcloths and cover it with a piece of beautiful fabric. In addition, you can create beautiful installations in the style of the USSR using the body or parts of a meat grinder. Such interior solutions will become a real decoration of the house, sometimes practical.
DIY grain crusher from a meat grinder
The design is very simple. Agree with me that a meat grinder for crushing grain can also be used manually, right? This is good when you only need to grind a glass of beans. What do you say when you need more than one bag of feed? Of course, in this case, manual labor must be replaced with mechanical labor.
- Using a table, we install our meat grinder on it. For this purpose, we make a stand for mounting from wood with dimensions 100x100x25 mm, 7x10x50 mm.
- Using the main board with dimensions 700x350x25 mm, on which the electric motor will be installed, and the meat grinder itself, we fix the boards with 5 screws, as shown in the figure below. It is on this mount that we will further install our meat grinder. I hope there is no need to explain how to fix it to the surface.
- On the opposite side we install our electric motor. It is advisable to install the drive pulley strictly opposite the cutting sleeve (driven pulley) in order to prevent the device from beating during grinding.
- It would be a good idea to secure the electric motor with the same screws using a Phillips screwdriver.
- Next, unscrew the meat grinder handle for further steps - attaching the driven pulley.
- The driven pulley can be used ready-made, industrial, or you can make it yourself from a washing machine, which we did. To add rigidity, I additionally secured the driven pulley with bolts. Only then, using the washer, do I tighten it securely. I note that on the bushing (part) from the meat grinder, it is necessary to cut a thread to the size of the nut.
- I will also add that the distance from the meat grinder to the electric motor should be such that it is enough to install the drive belt. It needs to be installed slightly to prevent it from falling or flying off the device.
- We install the drive belt on the drive pulley of the electric motor and the driven pulley on the meat grinder. That's it - our crusher is ready. All that remains is to turn on the 220 V network, pour the grain into the appropriate tank and enjoy high-quality crushing.
Technology for preparing homemade sausage: preparation, cooking stages
Before you start making sausage, you need to prepare the products.
- Before mincing the meat, it must be kept in the cold for 36–48 hours. Some recipes require pre-salting the meat.
- If you are using natural sausage casings, they should be prepared according to package directions. As a rule, the casing is soaked in warm water for half an hour, then washed to remove salt. Frozen shells are completely thawed. If you are preparing small sausages, it will be more convenient to fill the entire casing, then divide it into the desired length by twisting it, and after that you can cut it into separate parts.
- The polyamide shell must be soaked in warm water (18–25 °C) for half an hour before use. It will soften and become more stretchable.
Preparation of minced meat
Prepared meat and lard are passed through a meat grinder. If you have a home meat grinder, then pass the minced meat three or four times, and then further process your mixture with a blender. It will acquire the necessary homogeneity. Add spices to the minced meat and mix thoroughly until a homogeneous mass is formed. Some recipes require the minced meat to ripen for several hours after its preparation, according to others, the minced meat is matured already in the finished sausages, but in most recipes it still needs to be allowed to stand for several hours in a cool place. Then it is saturated with spices, and the meat protein swells evenly.
Sausage stuffing
Place the prepared casing on the nozzle of the sausage stuffer and tie one end with twine. Place the minced meat into the syringe. Fill the shell with minced meat. The packing should be dense, without voids or gaps. This is exactly what a sausage stuffer is for, because with its help you can ensure the desired density of the sausage. After the casing is filled, tie its other end with twine, removing it from the tip of the syringe.
Cooking sausage
Before cooking, you need to make punctures in the sausage casing. Stuffed sausage can be boiled, fried, or baked in the oven. The initial heating is carried out gradually: first we heat it to 35–45 degrees, let it stand for 10–15 minutes, then heat it again to 60–65 degrees and again leave it for 15 minutes. Then you need to bring the temperature of the sausage to 75–80 degrees and after that you can cook according to the recipe - fry, bake or boil.
The sausage is pierced to prevent the casing from bursting.
You can fry until golden brown and then boil for 40–50 minutes.
Place the finished product on a wooden board and allow to cool, then place in the refrigerator for several hours. This will make the sausage denser.