- Chain brush
- Thread brush
- Bead brush
We offer a compact set of master classes on the same topic. We will learn how to make decorative brushes from all kinds of creative materials: chains, threads, beads - anything will do. “What is this for?” someone ignorant will ask. And those in the know will exclaim in a harmonious chorus: “To everything!” Yes, that’s understandable. Do you remember at least one fashion season without tassels in clothes, shoes, and accessories?
It’s hard to say when decorative brushes became an integral decoration. The Slavic peoples, in their pagan beliefs, were convinced that a brush is a small whisk that disperses all evil spirits. This is how our great-great-grandmothers wore scarves-amulets, embroidered with tassels along the perimeter.
But it was not just superstitions that aroused people’s love for tassels. The brush adorns academic caps and priestly vestments. It decorates military uniforms of different countries, banners, banners, icons... So this summer has passed under the emblem of huge tassel earrings. All you need to do is create a larger tassel, hang it on a earring - and you can rest assured that you are on trend. Well, let’s not even talk about curtains, floor lamps and other tacky interior displays. They just are. There are and will be everywhere, always, regardless of fashion with all its changeability. In general, we learn how to make decorative brushes from what is at hand. For something, the acquired skill will certainly be useful.
Methods and patterns for weaving
You can use different methods to create a product. Those who are just making their way into beadwork should work according to ready-made simple patterns. A master class for beginners will help you weave a lariat from beads. The mosaic option is ideal for beginners. It is better to carry out the first tests with only one color, and then weave multi-color works.
Using a needle
A simple way to weave a lariat is done with a needle. A detailed master class will allow even a teapot to cope.
- A thread of the required length is cut, threaded into a needle, and the end is secured with a knot.
- Begin weaving, adhering to the pattern.
- The result is a strand of seven beads. The initial option could be five.
- Weave according to the pattern to the required length. 80 cm is just right.
- put on limit switches.
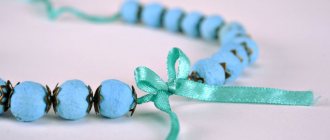
- Product design – tassels at the end. A chain is made by connecting rings whose diameter is 6 mm. Beads of a similar or opposite shade to the lariat are placed on the pins. There should be a pair of beads on each of the rings. The brush looks like a bunch of grapes.
Before starting work, you should familiarize yourself with the diagram.
Using a hook
Lariat can also be created with crochet. For products with a pattern, patterns are also used. They are not needed for a single-color harness. It's better to start with this option. For strings of more than 12 beads per circle, you will need a filling tube to maintain the shape. It's called regilin.
- Beads are strung on the thread in the required quantity using a needle.
- Make one air loop without beads. The others should already be with them.
- Close the chain into a ring by connecting the first and last loops.
- Insert the tool into the first loop right in the middle, move the bead, grab the thread, and knit a half-column.
- Continue in a similar manner after reaching the required length.
- The plait is finished with two rows without beads.
The beginning of the bundle will be loose, but this is normal. When the tourniquet reaches 1-2 cm, it will become denser. It is necessary to ensure that the beads are laid horizontally.
Making openwork earrings
So, let's return to making earrings and try to make another version of a simple decoration - openwork earrings. They are made in boho style and correspond to this trend within the framework of the naturalness of their materials, lightness and ease and airiness of decoration.
To make it, you will need threads, special blanks in the form of a circle, beads, of course, a crochet hook, ear wires, as the final stage of making the jewelry.
We string the beads, securing them to a round base. Next, inserting a hook into each of the holes, we knit with single crochets. We knit 7 air loops and fasten them into the next hole, inserting and knitting a bead and so on until the end of the row. With each subsequent row, when forming air loops, you will need to reduce the number of arches so that the lower part of the earring takes on a triangular shape.
That's all, all that remains is to fasten the thread so that the decoration does not fall apart, and attach the base in the form of a hook. The earrings are ready.
Main characteristics of the lariat
Not every harness can be called a lariat. This must be remembered in order to create a truly classic product that will have the desired characteristics. These include:
- the weaving should be the same along the entire length of the lariat;
- decorations should be used that are similar in appearance and belong to the same style;
- the weave should not only be soft, but also flexible enough to change shape if necessary;
- the edges must be decorated with fittings.
You can use the fittings that the master directly likes. But we must not forget that it must be functional.
How to weave a two-color lariat
Having mastered the weaving technique, you can move from monochromatic patterns to patterned ones. You can come up with them yourself or use ready-made ones. It’s good when there is a photo next to the beaded lariat diagram - you can immediately understand what kind of decoration you will get from the presented picture.
There are many options here:
- Stripes;
- Geometric designs;
- Abstract divorces;
- Folk ornaments;
- Twigs and flowers;
- Butterflies.
It is worth highlighting two large groups separately.
- Products woven from beads and glass beads.
- Two-color lariats woven from two monochromatic strands.
The technique for weaving multi-color jewelry is the same as for single-color jewelry.
Basics
As mentioned above, there are a lot of ideas and options on how to make earrings from beads; here it is important to focus on the clothes with which you will wear them and the facial features to which they will have to fit. If you already have at least minimal experience in bead knitting, then there should be no problems with this task.
But there are also problematic issues, one of which is fastenings. You don’t need to make them yourself; just go to any craft store and buy the option that suits you. They are called hooks - these are fastenings that contain special rings on which the hanging part of the object is fixed.
You must have already seen many photos of original beaded earrings, and therefore you are wondering whether you can make them yourself.
If you do not have much experience in weaving with beads, then it is better to use planar techniques, while experienced craftswomen can easily practice volumetric weaving.
Using macrame knots
With Josephine knot. An extraordinary option is to tie a spectacular Josephine knot.
It is better to place it near the clasp. Here is a pattern for knitting a knot.
Other knots can also be made following the diagram.
Pigtail. We fold the transforming tourniquet in three and weave a braid of three “strands”. Let's focus on the diagram. We only have one end, so we must not forget to free it when weaving by removing it from the loop.
We try it on so that the braid covers about half of the product. We bend it slightly in a semicircle, and at the end we thread the free end of the tourniquet into the formed loop. If you have brushes it looks very nice.
Tue oroi riant. You can also braid the braid completely up to the clasps. It will also turn out original. The braid can be loosely tied or tightly - this way we get different versions of the necklace.
We carry out the third version of the nodes strictly according to the scheme.
Other node options.
How to decorate a decoration
When the rope of the required length is ready, it is necessary to shape its ends. You can do this in the following ways:
- sew the ends of the decoration together;
- connect the ends of the product with beads;
- decorate the ends with pins, fishing line, thin wire. This type of design makes it possible to install a lock or clasp on the finished decoration.
Videos and articles from experienced craftswomen will tell you all the features and secrets of fastening pins in harnesses.
Beads, chipped stones, caps, and rings are used as decorative elements. This fitting allows you to embroider a finished lariat over the surface, as well as create unique additions to a braided rope (various pendants, tassels of unusual shapes). The result is a one-of-a-kind piece of jewelry.
Step-by-step description of the weaving pattern
This scheme is simple. And therefore it is most suitable for beginners. Since they are not recommended to begin their acquaintance with weaving techniques using complex patterns.
- Work begins with the bead, which is in the second row. But this applies only to the first two rows; then the work scheme changes.
- First, you need to string the 1st bead in the second row onto the needle.
- Now you need to string the bead that is first in the 1st row onto the needle.
- Until the end of the pattern, you should weave in this order - 2 and 2, 3 and 3.
- Now we need to close the circle.
- It is necessary to work in rows, following the pattern.
- Continuing to string beads separately from each row, you need to weave the 3rd row.
- The third row is woven through one bead of the 1st ring.
Next, you need to strictly follow the diagram. The length of the decoration depends on how many rows were woven. You shouldn't make it too short, because then it won't look like a lariat. The design of the lariat can be anything.
Selection of materials
In one case or another, the whole process begins with the selection of the materials you need, namely beads. It is not uncommon to find entire stores that specialize in beadwork products.
When you get into one for the first time, you will be very surprised to see how diverse simple beads can be. Here everything depends more on the patterns and patterns for weaving earrings, and on your imagination.
Beads are the basis of earrings
Beads are a great material to use for the base of earrings. There is a wide range of beads from different manufacturers on sale. It can also be either round or oblong, of different colors, matte, glossy or even with sparkles.
Most often, Chinese and Czech beads are on sale. Each of them has its own pros and cons, differs in cost and service life, as well as in its appearance.
Which beads are best to use?
Before you make earrings from beads, you should decide which manufacturer to purchase the main material from. As a rule, it is best to use beads from a Czech manufacturer to create such an accessory; they are much more expensive than Chinese ones, but they have more advantages. The main advantages of Czech beads compared to Chinese ones:
- quite long service life;
- does not fade in the sun;
- you can safely wet it with water;
- all beads are the same size;
- The beads are well pierced, there is practically no defect.
Therefore, experienced needlewomen recommend using beads from a Czech manufacturer to create beautiful and original earrings.
How to wear a lariat
Lariat is an original thing that immediately attracts attention. This is not a thin chain that can be combined with other jewelry, so this jewelry should be the main focus of the image.
If you wear other jewelry, it should be simple. It is not recommended to wear two tourniquets at the same time, for example, on the neck and on the belt
Wearing options:
- Short necklace . This necklace looks good with clothes with a semi-circular neckline. If its length reaches the waist, then the decoration can be combined with a sweater or turtleneck jumper.
- Classic sautoir . The cord looks very beautiful in the form of a classic sautoir - an elongated necklace with a pendant. In this case, instead of a pendant there will be a beautiful knot. Another option is to tie the lariat so that the clasp acts as a pendant.
- Necklace with weaving . The easiest way is to fold the rope three times and weave a braid from it.
- Multilayer neck decoration . How to tie a lariat to wear around the neck? You can intertwine two strands. The result will be a voluminous decoration that will look very impressive in the summer with light clothing.
- Bracelet . It can be a multi-layer bracelet - the tourniquet is simply wrapped around the wrist, or it can be a braided bracelet.
- Knots . You can wear the accessory around your neck or waist by tying a simple knot. Over time, you will learn to weave more complex, intricate knots using patterns.
If you wear this accessory in different ways, be sure to untie the knots and straighten it when you take it off, otherwise it may become deformed. The Lariat is an unusual thing, because it can be worn in any way your imagination dictates. If you are into macrame, you can experiment with weaving.
You will learn how to make such a decoration with your own hands by watching the video:
Thread brush
Chains are the most trendy nowadays. That’s why the tassels made from them ended up in honorable first place. But let's be honest. What material are brushes most often made from? Right. From threads! This is what we will do now. Fortunately, science is not so complicated, even an amateur can do it.
Let's start from the end. These brushes, made from synthetic or other threads, are sold ready-made in any craft supply store. Depending on their use, they can equally well become decor for clothing, interior design, or jewelry. In the latter case, all you need to do is place the base of the brush in the cap already mentioned above. For example, like this, using glue:
There seems to be no reason for unnecessary movements when making the brush itself. But this is “sort of” only until you need a brush of a certain size, fluffiness, size, color and, what is also very important, from threads of the same texture as the main product. This is where the need arises to make a brush yourself, exactly the one you need here and now.
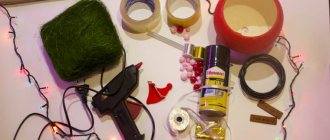
Tools and materials:
- A small (depending on the size of the brush you need) fragment of thick cardboard.
- Any thread will do. But keep in mind that with non-slip threads like wool, linen, cotton, etc. the work is much easier. Silk, nylon and other slippery threads are less pliable, slip out of your hands, and tend to come apart at the most inopportune moment in the most inopportune place. So, if you have to work with just such people, and you have never done this before, rehearse on a spool or ball of less capricious threads, and once you get the hang of it, the others will succumb.
- Scissors are very sharp scissors designed for cutting textile fibers. Otherwise, you won’t see a neat brush.
Progress:
- We prepare a cardboard rectangle: its length can be any, it is convenient for some to hold it in their hands when manipulating, but the width is the length of the finished brush, adjusted by a few millimeters for fasteners.
- We carefully wind the thread onto the cardboard base, trying to lay tight turns closely adjacent to each other. Once the brush has reached the desired splendor and density, cut the thread from the skein.
- From the same skein we cut off a short thread, approximately the same thread that is convenient for threading into a sewing needle.
- Carefully thread a piece of thread under the turns, exactly across it, so that it ends up between the cardboard and the threads wound on it.
- We tie a strong knot, firmly covering all the turns at once.
- We move the knot to the upper edge of the cardboard blank: simply scroll the turns around the cardboard.
- Along the bottom edge we carefully cut through all the turns, freeing the cardboard covered by them.
- We cut off another piece of thread for tying and tie it across the tassel, stepping back a little from the top band.
- You can step back again and tie it again, then the base of the tassel will be more voluminous, and the tassel itself will be held together more securely.
The thread tassel is ready and awaiting your further orders and uses. For example, these:
By the way! In exactly the same way, brushes are made from leather or textile cords of moderate thickness. The cord, of course, is less pliable, but it is also submissive.