How can you easily and inexpensively transform your own interior? It is worth adding bright individual details to it, because they ultimately create the mood of the room. Such items can be hand-sewn patchwork quilts, panels made from tree bark, woven rugs made from scarves and chandeliers made from beads and beads.
Today we will talk about the latter: where to start, what materials to choose, what types of similar chandeliers there are and what objects are best to combine them with.
Bead chandelier
Such chandeliers fit perfectly into hippie-style or rustic-style interiors. The easiest way to make a chandelier from beads with your own hands is when you have a frame from an old, unnecessary or lost part of a chandelier.
You simply replace all or part of the lost elements with new glass beads for the chandelier, and in the evenings it will play on the walls with the colors you complemented it with: cool blue or warm orange, rich green or transparent ones that transmit maximum light.
It’s easy to make such a design from scratch if you buy a cartridge with eyeliner at an electrical goods store and assemble the frame from wire. Be sure to make sure that the lamp does not touch the beads: they may not withstand temperature loads and melt.
For the same reason, it is worth using energy-saving lamps when the beaded chandelier is ready: they hardly heat up and will not spoil the fruits of your labor, unlike incandescent lamps.
On a rounded frame, which partially follows the shape of the light bulb of the chosen configuration, you tie a decoration made of thin wire and beads, strung on it in advance. From beads you can create not only monochromatic and slightly shy “dangles” that will not once again distract attention to themselves, but also interesting ornaments, zigzags, diamonds, flowers, just look at beading patterns on the Internet.
They do not differ fundamentally when working with beads, but it is advisable to take material of the same size and weight so that the chandelier can be hung evenly.
From plastic spoons
A simple chandelier made from spoons will not require much time. To make it you will need:
- plastic disposable spoons (200 pcs.);
- 5 liter water bottle;
- wire cutters and stationery knife;
- glue;
- socket and light bulb.
Cut off the bottom of the bottle, and separate the holder of the spoons using wire cutters. Use spoons of one or more colors. Cover the bottle in a circle with spoon blanks, making each subsequent row offset so that the center of the next one is placed between the two spoons of the previous row.
The neck of the bottle must be closed with a ring of spoons placed horizontally inside each other.
After the glue has dried in the lampshade, install the cartridge and connect it to the power supply. Choose an LED or energy-saving light bulb so that the plastic does not melt from heating.
Chandelier made of wooden beads
Chandeliers made of wooden beads look very aesthetically pleasing. They create an original pattern on the walls in the evenings, smell nice and look organic in a house decorated in a Scandinavian or Slavic style.
It can also be assembled without much effort from the simplest but boring “hanging” chandelier, replacing the decorative parts with wood braiding. What is the best way to make a chandelier from wooden beads with your own hands?
As the basis for a new chandelier, use a sturdy metal flower pot or fruit washing basket. Beads made from light wood species can improve the look of a classic interior if you make the shape of a chandelier to match it, for example, in a cascade of two or three tiers.
This will require about six hundred or even a thousand beads, depending on the planned size of the chandelier, which you first string on dense cotton threads, observing the size of the blanks, and then tie to the base, leaving a little space between them to create the effect of lightness.
Beads made from dark wood are good for dressing rooms, verandas and bedrooms, as they create more shadow than light and the room becomes very cozy and romantic.
DIY chandelier: manufacturing methods, examples, photos
A chandelier in a room is not only a lighting fixture. Without exaggeration, we can say that it is the main decoration of the room. Handmade items are considered especially valuable. This allows us to highlight the special taste of the owners of the home, as well as their extraordinary and creative mind. Of course, this type of work is quite complex and requires increased concentration. But at the same time, when creating decorations for your home, you can find many interesting and extraordinary solutions in it!
This article presents some ideas for decorating a chandelier with your own hands, as well as instructions for them. Everything is written so simply and clearly that anyone can do it at home.
In order to make a chandelier, sometimes the most unusual materials are used. For example, everyone is already familiar with glass or wood, plastic, and so on. But sometimes, when you want something completely “unusual,” wooden skewers, glass wine bottles, jars, all kinds of tree branches, cardboard, and even straw come into play. You need to choose depending on the idea of the creator and the wishes of the apartment owners. You also need to take into account the general interior of the room where the finished product is supposed to be placed.
Interesting idea for a chandelier made from plastic spoons
Plastic spoons for disposable meals are one of the simplest and most easily available materials for creating a chandelier for a room. Their advantages are low price, a variety of colors, and such material will last for quite a long time. To create such an extraordinary chandelier, you will need a minimum of investments, both physical and material.
- empty drinking water bottle, 5 liters;
- plastic spoons (their number depends on the size of the bottle);
- glue for plastic;
- an old chandelier (or rather, a socket from it);
- sharpened knife.
- First you need to prepare a plastic bottle for subsequent steps. Remove the label in advance, cut off the bottom, dry well.
- Then you need to remove the plastic spoons from the packaging and carefully cut off the unnecessary handles with a knife, leaving about 2-3 centimeters above the level of the “scoop”.
- You need to glue the scoop blanks to the base of the bottle. Apply a large amount of glue to the remaining “tail” and press it to the surface (with the convex side of the spoon facing out). It is necessary to cover the entire bottle in a circle until the entire perimeter is occupied by the plastic. It is advisable to arrange them in a checkerboard pattern and slightly move them together. This will leave fewer “free spots”.
- You need to remove the cartridge from the old unnecessary chandelier, and then place it in an already glued and dried bottle and fix it to the frame.
- A decorative bowl can also be made from plastic and glued around the neck of the eggplant.
- Install and connect the chandelier, check its operation.
Note! The option of decorative painting or painting of spoons in absolutely any color is possible. Thus, your product will look even more beautiful and more original!
Chandelier made of plastic bottles in the form of leaves
Another unusual option in the interior would be a chandelier made in the shape of leaves. It is created from simple plastic bottles, the variety of colors of which allows you to work in the most unusual colors and embody the most daring ideas.
- Cut plastic bottles into blanks shaped like future leaves.
- For each workpiece, the sheet shape is finally fixed.
- Using a soldering iron with a thick tip and a one-sided bevel, you need to slightly fuse the sections of each leaf in order to give the future product the greatest effect.
- In the same way, using a soldering iron, you need to give the workpieces a sheet structure. You need to act extremely carefully and accurately, because you can easily make a hole in the plastic. Such a leaf with outlined veins and slightly fused edges will look complete.
- Using a hot needle, you need to melt several holes at the “leg” of each leaf in order to attach them.
- Using thin wire, form branches and screw them to a steel wire frame.
It would also be a great idea to make a new chandelier in the form of a lampshade for a floor lamp or a table lamp. Thus, it will be a great addition to the previous product!
Chandelier with paper butterflies
The most common product option is a chandelier with butterflies. And this is not without reason. Let's start with the fact that this option looks luxurious and expensive, and secondly, its production does not require any special physical costs. Thus, even a child can participate in creating a chandelier.
- It is based on either an old chandelier or a similar frame. If you don’t have one, then you can take the simplest wooden or metal rim. If such material is not available, then, as an option, you can take thick wire and make about 2-3 skeins, so that a circle is formed.
- Cut out butterflies from paper according to the template. You need to take the butterfly template and adjust it to the desired size. The option also looks very unusual when butterflies of several sizes are located on the chandelier (again, depending on desire). Transfer the outlines onto paper and carefully cut out, preferably with a sharpened stationery knife, or small, non-rounded scissors. For the templates themselves, it is better to use a material that is dense, does not become very dirty and does not attract dust. For example, velvet paper is very poorly suited for the product, because in the future you will need to vacuum the chandelier quite often.
- Take a nylon thread or transparent fishing line and attach the butterflies to it. There are two types of fastening: either piercing the bodies of the butterflies, or gluing them with silicone glue.
- Next, we attach the threads with butterflies to the base of the frame and decorate it.
- You can also try a fun variation by making a wire ball! As a basis, you should take a pendant from a chandelier and place several butterfly templates on it using a glue gun.
Fabric chandelier
This chandelier is also based on a frame. As in the previous version, either old metal frames or thick wire are suitable for its manufacture.
After you have pre-prepared the base, start cutting out the fabric from which the lampshade will be made in the future. How long the finished product will be depends on your desire, but it is worth considering that the width of the fabric must be the same as the diameter of the frame! Once you finish the pattern, you need to do a fitting.
Another nuance is that the top of the fabric will need to be sewn directly on the frame, which means that it (the frame) must be solid. Otherwise, if it is possible to thread it directly into the fabric, then you should first fold the top edge of the pattern and stitch it, and then iron it. Then we sew a seam on the side of the product.
To prevent the lampshade from losing its shape, you should pay due attention to the material. If the fabric is too light, “airy,” then the bottom of the product should be weighted. You can use cardboard or fishing line for this.
Carefully sewn fringe, lace or braid will look just as beautiful. But do not “overload” the product! The process of creating a fabric chandelier is similar to making a lace chandelier. So you can safely experiment with the materials that are placed on the frame.
Lamp made of threads and a balloon
- dense threads, such as wool, cotton, or jute rope - at least 1 meter;
- cartridge;
- petrolatum;
- PVA glue;
- a brush for applying glue and Vaseline (it is advisable that the brush does not fade);
- 1 or 2 pieces of balloons (the first for working with it, and the second for checking the finished product, if desired);
- Inflate the balloon to a certain size and secure it. Remember that the finished work will exactly follow the outline of the ball! Using a marker, draw a couple of circles at the top and bottom in order to determine the boundaries of thread winding.
- Using a brush, coat the entire perimeter of the ball with Vaseline.
- Pour PVA into a plastic container and thoroughly process the threads with it (It is not advisable to apply glue to the entire length of the threads at once! Process them as you wind them around the ball!).
- Taking into account the boundaries that you drew with a marker, wind the threads around the ball. Do not forget that the future appearance of the product depends on the density with which you wind it.
- After wrapping, you need to leave the product for a day until it is completely dry; After complete drying, you need to burst the ball and remove it through the holes.
- Cut a spot in the top and insert the cartridge.
- To be completely sure that the product is strong, you can insert a balloon into it and inflate it. In a similar way, you can check the flexibility and reliability of the lampshade.
Alternatively, you can paint the structure with spray can or acrylic paint, and attach all kinds of decorative decorations to it, such as butterflies, artificial flowers or beads. Also, a great idea would be to arrange several balls in the form of a bunch of grapes and fasten them together.
Wine bottle chandelier
This version of the chandelier is a little more complex than the previous ones. Making a chandelier this way is quite difficult; the manufacturing process will require care and attention. However, you will like the result!
- wine bottle;
- glass cutter;
- sandpaper for sanding edges;
- cartridge;
- electrical wire;
- metal or wooden frame, rim.
- First you need to prepare the bottle itself for further manipulations with it. The first step is to draw a straight line around the perimeter at the level you need. This is required in order to cut off the bottom of the bottle using a glass cutter;
- To avoid cutting yourself on the glass, you need to sand the sharp edges with sandpaper;
- Pull the wire through the neck of the bottle and then connect the socket;
- Attach the bottle to the frame.
You can also decorate the bottle with all sorts of decorative items, or leave it in its original form. In any case, it will look original and impressive.
The number of products on the frame depends on your desire. You can either leave one bottle or secure four or more bottles at once.
Laserdisc chandelier idea
This idea is great for those who have a large number of laser discs left in the house, but don’t dare throw them away. It’s worth noting right away that manufacturing options and the result can be very different. It all depends on your imagination and creativity!
- two round wooden planks of different thicknesses, and which are slightly larger in diameter than the disks;
- racks made of metal or wood;
- Fluorescent Lamp;
- magnetic switch;
- disks.
- Make a hole in a thicker board and install a starter with a switch in it.
- Then connect it all to the lamp.
- String disks onto the lamp.
- Place the stands around the discs and secure the top.
The finished product will delight its owners for a long time, and it does not require special care. It is not advisable to place this type of chandelier in a child’s room so that the child cannot harm himself (only if the chandelier hangs out of reach).
Shabby chic chandelier
To create spectacular lighting in a room, you can also make a chandelier from fabric or beads. The result will be a kind of candelabra or lampshade in the “shabby chic” style.
- a ready-made metal or wooden frame (or it can be made from an old hoop, garden basket, thick wire);
- socket and lamp;
- chains and threads for decoration;
- all kinds of beads and seed beads.
Working on such a lampshade is not difficult, but it is a very painstaking task. Such chandeliers usually consist of two or three levels of rings, which are located on top of each other. It all depends on the size of the chosen bases. If you take rings of the same diameter, the finished product will be made in the “modern” style.
One of the important points is that before you start decorating the chandelier, you need to paint and wrap the frames with decorative materials!
The approximate consumption of beads is:
- For the lower part of the lampshade - 16 mm beads, about 15-17 pieces per thread;
- For the upper part of the lampshade - 12 mm beads, about 35 pieces per thread.
Naturally, when stringing beads on a thread, you can increase or decrease their number or the degree of thread tension. But it is still advisable to stock up on materials in excess of the norm.
The essence of the work is to hang threads with beads in a “waterfall” or “cascade” so that they flow downward along the structure.
In order to create the effect of “muting” the light, you can sheathe the frame with thick fabric.
A DIY chandelier will definitely add a fresh touch, originality and beauty to your interior. You will immediately notice how the room will sparkle with new colors, and your guests will sincerely admire your creativity, hard work and original taste!
Beaded chandelier
This is already a challenge for professionals: few people dare to weave something voluminous and large from small parts for several days. But you can make a beaded chandelier with your own hands if you have enough time, desire and patience.
Again, you will need a homemade or purchased frame, according to which you will measure the dimensions of the beaded fabric to be woven.
Here you can also make threads of beads that will envelop the center of light like a curtain, but chandeliers that are decorated with figures of animals, trees, flowers or any other elements that you like to weave look more original.
First, collect the elements, lay them out on one surface and then fasten them together with thin wire or fishing line. Children will definitely appreciate such a designer chandelier, because in the evening they will have a whole zoo running around their walls.
For calmer styles, you can choose to frame the chandelier from tree foliage or flames.
P O P U L A R N O E:
- Many of us have our own private houses, dachas, garden houses or “haciendas”. If the dacha is located near the city, some families even move there for the whole summer, and if they have a warm, heated house, they spend a lot of time in the winter. Life in nature is wonderful, no doubt about it, but you still want some of the benefits of civilization, like running water. Often there is no central city water supply at the dacha, and a well is used as a source of water. The depth of the well is usually much greater than the depth of soil freezing (for the Moscow region up to 1.5 meters).
You can easily and simply use paper to make a beautiful gift bag and more...
To make a bag you will need: a color printer, scissors and glue.
You can make the package together with your children - it will be interesting and useful, and it will also make a good homemade gift!
What to do if the hen does not arrive in time? And the number of young animals produced is not always satisfactory, and serial incubators are a bit expensive.
There is only one way out: try to mount it yourself.
The chamber for a simplified incubator model can be ordinary cardboard boxes, pasted inside and outside with layers of thick paper, wooden frames, sheathed on both sides with plywood or plastic, filled inside and between the walls with glass wool, dry sawdust, and foam.
Popularity:
5,224 views
Many people today are engaged in making various crafts from everyday things. All the variety of shapes, sizes and imagination can be seen in the example of lighting fixtures that anyone can make themselves. The simplest handmade option is a lamp assembled from plastic spoons.
This article will help you understand all the intricacies of transforming plastic products into a beautiful and simple lighting fixture that will be an excellent addition to the kitchen in your country house or apartment.
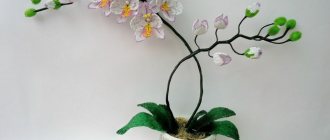
Lamp made of beads and beads
In the same way, you can gradually assemble the design for all the lighting fixtures in the house. For example, well-assembled and correctly positioned do-it-yourself beaded lamps do a pretty good job of illuminating a room when the overhead lights are turned off.
The situation begins to seem mysterious, with it you can read exciting adventure novels or detective stories that take the reader far beyond the apartment, and dim lighting will only help this process.
A lamp made of beads can become an excellent night light and will help you avoid bumping into the corners of furniture or a cat peacefully dozing in the doorway.
The frame of such lamps is usually homemade, made of wire, which is assembled into a ball or other shape you like, retreating a little around the lampshade. By the way, pay attention to models that contain not the usual lamps, but LED strips or even New Year’s garlands.
Firstly, such lighting devices allow you to make a workpiece with a narrow entrance, even in the form of a snake or a wave crest.
Secondly, no one will have such a second lamp unless you give it to them yourself.
Thirdly, you can choose a lighting mode depending on your mood: festive flashing, calm white or yellow, or even red for an evening screening of horror or thrillers.
From paper tubes
To make such an unusual lamp you will need: sheets of paper (the quantity depends on the size and shape of the structure), PVA glue.
Roll the sheets into a tube and secure with glue. Prepare the required quantity (up to 200 pieces can be used)
Lay out the blanks in the shape of a nest: first lay out a triangle of tubes on the table and fasten them together. Place another one to create a six-pointed star shape. Continue forming, gradually fastening the tubes together.
After drying, place the tube lampshade on the lampshade with the light bulb.
Important! To prevent your paper lamp from catching fire, use energy-saving light bulbs; they are safe because they do not heat up.
Beaded lampshade
A lampshade made from beads is no more difficult to make than a chandelier made from the same. Find the frame, tie it with threads from which beads come down in the chosen configuration and put it in place.
The difficulty is to cover the upper and lower circles of the lampshade, which usually do not go well with beads and are made of unaesthetic white plastic. They can be tied with threads, for example, floss in the color of beads, they can be covered with fragments of CDs, which are unlikely to be needed by anyone, and thus get a lampshade with a built-in disco ball.
A do-it-yourself beaded lampshade will be ready in about an hour, but you can work on it much longer if you take complex elements to complete instead of simple hanging threads, for example, tetrahedrons with beads of different colors in segments.
They also look interesting as a decoration for a table lamp standing in the middle of the table in the living room, especially in the same style as the chandelier.
The same patterns can be used when weaving lampshades from beads, just less material is required.
A miracle is in your hands
In fact, there are a lot of options for transforming an old table lamp and turning it into a completely new, creative and stylish piece of furniture.
In addition to the materials discussed above, you can use felt, burlap, any unnecessary pieces of fabric, old skirts, cut pockets, leather straps, fasteners, artificial flowers, various decorative small things, old wicker baskets.
Give free rein to your imagination, use a non-standard approach to business, simple materials at hand and you will get not just a lampshade, but a real work of art!
Beaded table lamps
Modern table lamps will also not suffer if they are “dressed up” with beads. For example, a junior schoolgirl will probably like a curtain for a table lamp with a pattern of the cartoon “Lady Bug and Supercat”.
Just take red as a base and weave black polka dots into it. The second lighting fixture can be decorated in the style of a cat: with a black background and green polka dots, and play with different lighting as much as you like.
And a beaded table lamp assembled entirely by caring hands will certainly bring new subscribers to social networks and other means of communication for any lover of unique products.
We use paper
A low-cost option would be to make a lampshade from paper. The good thing about such products is that even an inexperienced craftsman can make them, and the result can be very impressive. After all, both glossy sheets from magazines and old newspapers, napkins for decoupage, rice paper are suitable for implementing the idea, and this method also allows you to decorate the lampshade with any print printed on a printer, which will make the lamp original and one of a kind.
Some designers are happy to use wallpaper; texture and variety of patterns will help achieve amazing results. It is easy to make a lampshade from wallpaper from the so-called “accordion”, this is when a long piece of wallpaper is folded accordingly and strung either on a thread or on a wire.
It is important to remember that the brightness of your future lighting fixture depends on the density of the paper, and the shade of the diffused light depends on its color.
Paper is still a highly flammable material, so it is better to use LED bulbs. and it would be safer to make the diameter of the lampshade larger.
PHOTO
We are confident that decorating lighting with canvases made of beads and beads will be able to decorate many interiors with its authenticity and fresh color schemes.
This painstaking work is worth the effort, because as a result you will have in your hands a unique and necessary thing that is pleasant to use and admire.