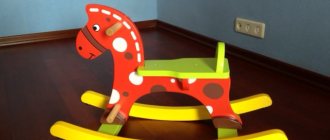
The carousel has always been one of the most interesting and favorite attractions for children. It is part of the “classic set” of structures for children. And if for some reason you still don’t have one on your site, then you can fix this by building an original carousel with your own hands, which will delight your children for a long time.
Types of carousels for children's playgrounds
All modern carousels are divided into two types:
- Mechanical. This type of play equipment is operated by children or adults spinning the structure.
- With an electric motor. Such carousels spin up thanks to a special mechanism.
There is another classification.
Disc carousels
This type of attraction is quite simple to assemble and install. It is the most common. It is installed in the city’s playgrounds and used to decorate garden plots where children frolic. And all because disc carousels not only allow children to have fun, but also contribute to the formation and development of physical skills.
Disc rides, in turn, are divided into several more types:
- "Rotating Mushroom"
The seats are tightly attached to the bottom of such a swing, and the handles for holding it are a circular ring. Children themselves can operate the carousel. - Carousels with rotation on a circular track. They begin to move when moving along a wavy track. The pedals, which are located on the drive wheel, are activated by the baby’s hands or feet. Thanks to this, the carousel becomes not only a fun entertainment for the baby, but also an excellent opportunity to develop the child’s physical abilities.
- Beam carousel.
A peculiarity of this type is the location of the seats: they are installed not on a circular base, but on metal pins extending from the axis. Moreover, the child looks at the back of the previous baby. It will be very difficult for children to spin the beam carousel on their own.
Of all the disk carousels, the most common among users is the design for 4–6 seats with metal holders. It is compact and practical.
The operating principle of a disk attraction for children is quite simple. A carousel is a special mechanism that rotates around its axis due to external influences. On the ground it is installed strictly vertically. The most important part of the design is the metal pin. All other parts are attached to it, which form an angle of rotation, through which the kids begin to spin on the attraction.
Advantages:
- wear resistance;
- no need for special knowledge and skill;
- low price for materials;
- development of the vestibular apparatus during use;
- resistance to changes in weather conditions, which makes it possible to build a carousel on a personal plot;
- ease of troubleshooting;
- ease of operation;
- load resistance;
- long service life.
Carousel, carousel is a joy for everyone. Take a ride on our carousel!
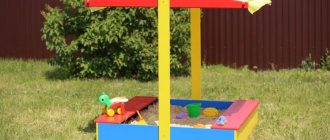
Playgrounds are not always located close to home, but if the area is quite spacious, you can make your own carousel for your child. And if the process seems uncomplicated, then over time you can make a few more pieces.
The main thing is to use all available materials at hand, without resorting to complex technological actions. Having decided how to make a carousel with your own hands, you can select the most suitable materials from the available assortment in the garage.
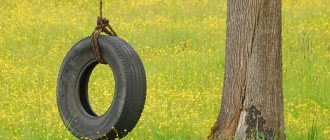
It will be an excellent addition to your DIY wooden swing.
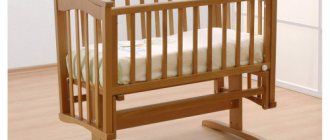
Design of a standard disc carousel with seats
The most important part in the design is the metal pin, which forms the basis, because the rest of the components are attached to it. The most suitable option in this case would be a pipe. The safety of children who will ride on the carousel depends on how strong and reliable it is. This means that its walls must be thick enough.
The diameter of the pipe is selected to be quite large so that it matches the proportions of the structure and can ensure its durability. Among other things, there should be no traces of rust on it.
Or, if there is no other option, you must clean and paint the pin to match the color of the future carousel.
Next, it is necessary to strengthen this part, for which it is installed in the ground to a depth of 80 - 100 cm.
After this, concrete is poured. Thus, it is possible to ensure the immobility of the structure even with a significant load on it. As you can see, making a children's carousel with your own hands is a doable task, because the subsequent steps are no less simple for a person who is at least a little familiar with the technical side of the issue.
A cylindrical ball bearing must be placed on top of the pin.
It should be taken into account that its inner surface must fit tightly to the outer side of the pin, which ensures smooth running of the carousel, of course, after preliminary lubrication of this unit.
Next, you will need a welding machine, since you will have to make several welds connecting the pin and additional pipes. They will be attached to the outside of the ball bearing.
The number of parts that are welded can be from 2 to 5. Then an arc pipe is attached to them by welding to create rigidity of the structure. In this case, the pipes will not be subject to greater load, being disconnected each separately.
The so-called cross, which is formed by welded parts, and the arc pipe welded to them allow the base to be installed on top. The base material is mainly wood or its derivatives, in particular plywood. Then the seats are installed on top.
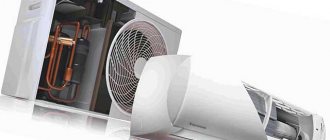
Useful tips
Almost every family can afford to install a carousel for their beloved children in their garden. Fresh air, training of physical abilities and the vestibular system, communication with neighboring children - all this undoubtedly brings benefits for the child. However, there are several features, knowing which you can make the gaming process safer and more fun for your baby:
- the carousel must be periodically checked for damage;
- when painting, it is recommended to use acrylic paints, as they are less toxic;
- metal parts must be free of rust (if there is no other option, then they must be cleaned and painted);
- the walls of the main rod must be more than 3 mm thick;
- when planning the construction and executing the drawing, the age of the child must be taken into account;
- During design development, it is worth calculating the maximum possible inertia of movement, so that the carousel will easily rotate around its axis.
Listen to your child's taste preferences. As a rule, children have their own views on certain components of the carousel (colors, shapes).
Carousel - a pleasant and interesting pastime
Hub carousel
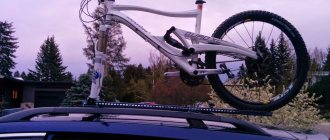
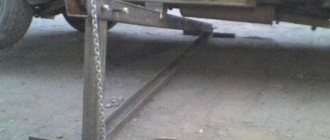
Hello readers and DIYers. For the author of this homemade carousel, it all started with the fact that he got hold of a car hub somewhere, and in working condition at that. The author, without thinking twice, decided to use it as a rotating mechanism for a children's carousel.
Making such a carousel is a rather labor-intensive process. But with the proper approach, as well as the presence of a motivator, in the form of a child snoring behind his shoulder, eagerly awaiting the result, the author coped with such a craft quite easily and quickly. Moreover, the motivator not only sang, but also helped in creating this cunning design.
For production, the author used.
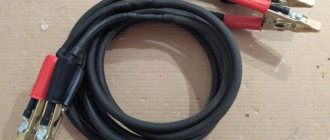
-Hub -Board 20x150 -Metal strip (length 3.3m, width 40mm, thickness 3mm) -Remnants of metal (5mm, 8mm thickness) -Metal profile 20x30mm -Pipe (diameter 70mm, length 75mm) -Pipe (1 inch, length 1 ,2m - 3pcs) -Cement-sand mixture -M10 bolts (5pcs) -M10 hairpin -Paint -Grinder -Jigsaw -Milling saw (optional) -Rolling machine for metal (optional) -Bulgarian -Welding machine -Gas cutter -Drill - Spray gun (optional) -Level
Manufacturing process.
At the beginning, the author decided to make a carousel platform. For this he will use a 20x150mm board. The author laid out seven boards on a flat surface, pulled them together with straps, and secured them with cross boards using self-tapping screws.
Next, I drilled a hole in the center and, using a ruler mounted on the drill, drew a circle with a diameter of about 1 meter.
I cut out the circle with a jigsaw. Since the edges of the circle did not seem perfectly even to the author, he decided to process the edges of the circle with a router. Although I think this operation could have been skipped, given that later the edges of the circle will be covered with a metal rim. But here, as they say, the author of the product knows better.
The creator grinds the surface of the circle using a grinder, achieving the smoothest possible surface of the boards.
The author puts the resulting strip on the circle, cutting off the excess with a grinder. At the ends of the strips, the author temporarily welds two nuts and uses a hairpin to tighten the strip. The seam is sealed by welding. The author breaks off the welded nuts, welds and grinds the seam.
Next, the master begins to manufacture the fastening elements of the carousel.
Cuts out a 30x30mm square from sheet metal 8mm thick, cuts a hole in the center, the diameter of the hole is equal to the diameter of the back side of the hub. Since it will not be possible to cut the hole exactly, the author refines the edges of the hole with a grinder, putting five already worn discs on the grinder at once. Also in this plate the author will make 4 holes for the hub bolts.
The author cuts out another part from metal 5mm thick. This is a 25x25mm square. With 30mm wide rectangles cut out in its corners. And in the center there is a hole with a diameter equal to the diameter of the outer side of the hub.
In the carousel platform, the author makes a hole with a diameter equal to the outer diameter of the hub. Then he places the hub and drills five holes for the bolts.
The mechanism is assembled in the following sequence: on the front side of the platform there is a circle, on the back side of the platform there is a square with cutouts, then a hub. All this is held together with M10 bolts.
Then the author strengthens the platform using a 20x30mm profile, which is welded on one side to a metal rim and on the other side to a square with cutouts. The author first grabs the profile to the square. Then he has to remove the square in order to weld the profile on the back side. And only after that the structure is reassembled and welded to the metal rim.
The author installs the pipe on a metal nickel, aligns it, and welds it.
When the central pipe is welded to it, the handrail pipes can be attached. The author grabs the pipes. At the ends of the pipes it grabs metal spots with drilled holes.
To avoid damage to the decking from welding, the author removes the metal structure and scalds it. There was an unclosed hole in the upper part of the thick pipe; the author decided to eliminate it by welding a car oil filter.
How to make a children's carousel with a bearing mechanism in the country
There is nothing complicated in making this design if you follow the step-by-step instructions:
- First you need to choose a place where the carousel will be installed. Mark the center of the structure on the soil.
- At this point, dig a hole, the depth of which is 80–100 cm, and the width is 25 cm greater than the diameter of the main rod.
- Install the metal pin into the recess strictly vertically, and then fill it with concrete. The hardening time of the solution is usually 3–4 days. The main thing is not to rush, since only with well-hardened concrete will the structure hold securely and firmly.
- Now place the cylindrical ball bearing on the metal rod. The parts must be positioned so that their walls touch each other very tightly. This will allow the carousel to move smoothly. You also need to remember to lubricate the assembly first.
- Weld 4 cross-shaped pipes to the ball bearing. At this stage you will need special equipment.
- Secure the pipes together with corners or a hoop pipe. The rigidity of the carousel depends on how you do this. Then install the platform from moisture-resistant plywood.
- Install pipes or corners on which the seats will eventually be attached. They are usually made of wood, but are attached to the carousel by welding.
The result of the work will definitely please you
Preparation: drawings and dimensions
The construction of any carousel design requires drawing up drawings and compliance with individual requirements.
Carousel drawing
Choosing the type of carousel, preparing materials for it, tips and calculations
When choosing any type of carousel, it is necessary to take into account the material for its manufacture, as well as the methods of fastening the elements and the type of surface coating.
The type of carousel chosen for construction was a “rotating platform” or, as it is also called, a disk carousel with a bearing mechanism. From the name it is clear that this structure, in addition to seats with handrails, must be equipped with a strong floor and a metal device that ensures smooth rotation of the structure.
It is better to use metal pipes or channels as the main materials for the supporting frame of the carousel. For the floor and seats, you can use plastic or natural wood. However, it is more advisable to replace the latter option with a cheaper wood substitute - plywood, chipboard or OSB boards.
Tips for making a structure
- Since the structure is intended for children's games, it is necessary to take care of high-quality sanding of wooden surfaces.
- It should be noted that the wood must be prepared for subsequent use in the open air. To do this, the material must be treated with special antifungal impregnations. It is better to impregnate with this substance twice.
- Plastic parts are not destroyed by moisture, are not susceptible to fungus and do not emit harmful substances. Some alloys of this material can fade when exposed to sunlight, and if damaged, leave sharp and protruding edges.
- Painted surfaces must be varnished. In this case, the paint will not peel off, and the carousel will retain its original appearance.
- When purchasing plastic, you need to know its characteristics and alloy components. High-quality material has a greater degree of safety.
- When manufacturing a metal carousel frame, it is necessary to pay special attention to the accuracy of the welds, since sharp fragments often remain at the joints. Such defects can be easily removed with a file or grinder.
- If nuts and bolts are used as connections, their ends must be recessed into the frame or structural parts.
- The base of the structure must be concreted. A solid foundation is required for safety reasons, as the carousel may become loose with constant use. As a result, stability during rotation will decrease.
Calculation of materials for the carousel
In order for the design of the carousel to be safe and meet all GOST requirements, the materials for its construction require precise calculations.
Since a carousel with a rotating platform of a circular shape has been selected, it is necessary to calculate the area of this figure. To do this, you will need to remember your geometry lessons, namely, the formula for calculating the area of a circle, which looks like this: S=π·R², where π is a mathematical quantity equal to 3.14, R is the radius of the circle under study.
According to the drawing, the diameter of the platform is 1620 mm (1.62 m). Using the formula, you need to calculate the radius of the figure. To get this value you need 1.62:2=0.81 m. Now this figure needs to be squared: 0.81·0.81=0.65. Let's substitute the values in accordance with the formula: 3.14·0.65=2.06 m² - this is the area of the platform. A carousel of this type must have a safety (landing) zone 300 cm wide.
This section is calculated from the outer edge of the rotating platform. It follows from this that you can calculate the entire required area to accommodate the carousel. The drawing shows that the diameter of the safety zone is 4620 mm (4.62 m). We calculate the radius of this circle: 4.62:2=2.31 m. We find this value squared (radius according to the formula): 2.31·2.31=5.33 m². Now let's calculate using the formula: 3.14·5.33=16.73 m².
Optimal dimensions of the structure and landing zone
The design of this type of carousel has a concrete foundation in the form of a cube, measuring 40x40x40 cm. To calculate the amount of mixture to fill such a base, you need to use the formula for finding the volume of a cube: V=h³, where h is the length of each side of the figure. It is more convenient to carry out calculations in meters. Let's substitute the values: 0.4·0.4·0.4=0.064 m³.
To make a frame you need:
- 3 pipes with a square cross-section, 162 cm long. Each pipe will be sawn into two equal parts, 81 cm long.
- The handrails will be made of round pipes with a diameter of 4 cm. The design includes 6 handrails and 3 seat backs. The height of these elements is 54 cm from the surface of the platform. The size of the seat back is 20x60 cm.
- The seats will be attached to the central element by three pipes, each 81 cm long.
- The central element will be made of a round pipe with a diameter of 8 cm.
It is convenient to calculate the number of pipes for making a frame in linear meters.
Using the above parameters it is easy to set the total amount of material for the frame:
- We calculate the length of a pipe with a circular cross-section for one handrail: 0.54 + 0.81 = 1.35 m.
- Since there are six such elements in the design: 1.35·6= 8.1 linear meters.
- We calculate the length of the pipes installed under the seats: 0.81·3= 2.43 linear meters.
- Set the length of the pipes for the seats. To do this, we first make a calculation for one seat back: (0.6 + 0.2) 2 = 1.6 linear meters. Since the design has three similar seats: 1.6·3=4.8 linear meters.
- We calculate the total length of the required pipes with a round cross-section: 8.1 + 2.43 + 4.8 = 15.33 linear meters.
- Square pipes will be required: 1.62·3=4.86 linear meters.
The seats will be made of three identical sheets of plywood, each 20x60 cm in size. OSB boards will be required to construct the platform.
Tools
When making a carousel with a rotating platform, you cannot do without the following tools:
- Bayonet and shovel.
- Garden borer.
- Cord with stakes.
- Measuring tape.
- Welding machine.
- File.
- Circular saw with grinding discs.
- Jigsaw.
- Grinding machine.
- Wrench.
- Pliers.
- Pipe bending machine.
- Concrete mixer.
- Containers for water and concrete mixture.
Nuances of care
In order for the carousel to serve you as long as possible, you need to periodically check it for damage and rust, and also pay special attention to regular lubrication. It will allow the structure to move smoothly without creating loud noise or creaking. It is recommended to lubricate the mechanism after a certain period of operation. First every 2-3 months, and then once a year.
The carousel must be safe for children
Features of the carousel finish that will spin
Upon completion of all work, the carousel must be varnished and painted. It is recommended to treat the base (plywood) with waterproofing agents, which will increase the service life of the device several times.
Before you begin finishing, you should check the quality of all seams in the welding areas. The safety of children depends on this.
It is advisable to choose the paint color for the carousel with your child, so you will learn about his preferences and make the new attraction ideal for him.
Photo gallery: decoration options
Bright colors will delight your children every day
An unusual coloring of the carousel will cheer up your child
The child will appreciate the rich colors of the new attraction
Plain coloring looks nice and laconic
Beautiful and bright color will give you and your baby happiness all day long
Types of products
The easiest way to make a wooden carousel. However, variations in this process are very limited. And some aspects are performed only in the factory. For example, seats in the shape of animals. And here only the following versions are obtained: disk and beam. They have a similar rotation angle. The only difference is in the seat configuration.
When developing a design, it is important to take into account the force required in action. If your technology is difficult to influence, then children will not be able to receive positive feedback from such a carousel; they will not even be able to launch it. Therefore, carefully calculate the highest potential inertia of motion. This way the carousel will rotate freely around its own axis. After a number of operations, provided that the rotation element is properly lubricated, the mechanism will begin to function even better. And even small children will be able to run this carousel.
DIY entertainment areas for children
You have your own cottage or country house with a plot. Your neighbors have a swing, a pond, a bridge, and some other delights on their property. Why are you worse? And why don’t you build a carousel on your site. This fun is not that difficult to build. And this way you will amaze your friends and neighbors in an original way. And your children will shine with joy.
The main thing here is to use all available materials. And overly intricate technical moves are not needed here. Having decided on the methods for constructing a carousel yourself, you can first look into your garage and see what arsenal of materials is there.
Choosing the type of future carousel, tips and calculations
We chose to manufacture the simplest mechanical carousel with a platform and handrails, without seats; took into account ergonomics and the load on all elements.
The main structural elements of the carousel are the axis and the turntable
- garden auger;
- container for diluting cement;
- drill with the option of tightening screws;
- welding machine;
- files, sandpaper.
You will need the following parts and raw materials (we give approximate characteristics, options are possible):
- two bearings 80110 (hole diameter of the inner ring - 50 mm, outer ring - 80 mm, bearing width - 16 mm);
- pipe 12Х18Н10Т;
- three segments 25x6 (outer diameter - 25 mm, wall thickness - 6 mm) with a length of 1555 mm;
- one piece 50x7 1150 mm long;
- one piece 90x7 109 mm long;
- six sections of rectangular pipe with a cross-section of 80x40x4 and a length of 560 mm;
- one cotter pin 4x63 (diameter - 4 mm, length - 63 mm);
- three sheets of moisture-resistant plywood 20x604x1083 mm (wood, plastic, chipboard, and fiberboard can be used, but the coating density must be high);
- one steel strip 4x100 (thickness - 4 mm, width - 100 mm) 3952 mm long;
- impregnation for plywood - antiseptic, insecticidal or water-repellent;
- primer - acrylic, alkyd, epoxy or shellac.
Step-by-step instruction
- Having decided on the location, mark the central point of the future structure. The cleared, compacted or paved area should exceed the diameter of the future carousel by two and a half times.
The ratio of the circumference of the carousel and the space for it should be approximately 1:2.5
A simple hand drill will save a lot of effort
The carousel axis consists of five parts: 1 - axis (pipe 50 x 7); 2 - lower bearing; 3 - central bushing; 4 - upper bearing; 5 — locking sleeve; 6 - cotter pin
The dimensions are listed here.
When assembling the axle, you must observe the dimensions
Let's look at a drawing of a bearing housing with dimensions marked.
We use bearing units in the design
The rotation unit consists of three parts.
The base of the carousel platform is assembled from the following parts: 1 - bearing housing (pipe 90 x 7); 2 - rectangular pipe 80x40x4; 3 — handle (pipe 25 x 6)
All parts are welded according to the drawing. The durability and safety of the carousel will directly depend on the quality of the welds. The parts must be welded with high quality, without protruding burrs that could injure children. When assembling and welding, the rectangular pipes should protrude 10 millimeters from the upper edge of the bearing housing. If you (quite possibly) do not have a welding machine and do not know how to weld metal, then you can hire a welder. The work is quite small.
The rotating platform also consists of five parts.
The platform consists of parts: 1 - rotation unit; 2 — handle (pipe 25 x 6); 3 - flooring sector (moisture-resistant plywood 20 x 604 x 1083); 4 — strip 4 x 100; 5 - cover
The figure shows the dimensions of the turntable.
When assembling the turntable, it is also necessary to accurately take into account all dimensions
We place and fasten the lower bearing and the central bushing onto the axle. We attach the rotation unit to the lower bearing, the upper bearing to the axle. We try to center the rotation unit using the bearing. We fix the result with a locking sleeve with a hole where we insert the cotter pin. Carefully unbend its antennae.
Photo gallery: number of handrails
Finishing the finished carousel
- We drill holes. Using metal screws (or another method) we fix the floor covering with the handrails already mounted on it on the rotation unit.
- We cover the end of the covering with a steel strip. We fix it with self-tapping screws and a press washer (or in another way).
- In the center of the coating there is a hole, in it there is a bearing unit. We cover it with a circle of plywood and secure it.
- Let's prepare the handrails and floor covering for painting: clean and treat the coating with an antiseptic for wood, prime the handrails, axle and coating, respectively, with a primer for wood and metal - to increase the adhesion of the final paint. We will paint it in cheerful colors that both kids and their parents love so much.
It is better to concrete the base of the structure for stability
Safety
If you want to further improve the safety of the carousel you are creating, you can arrange chain fastenings. They can be made between the seats by attaching 1-2 links to the backrest. You can put small pins for them. In this case, the chains stretch along a circle (maybe in a different carousel shape) and are attached to pins. The ends of these pins should be blunt or soft. You can place some small soft toys on them. All these measures will prevent the rider from falling out under significant dynamics.
All metal structural elements are attached to each other, mainly by welding. The remaining areas allow traditional fastenings: bolts, washers, self-tapping nuts.
If you are not satisfied with the plywood version of the base, and you also want to save money, then you can mount the seats directly to the cross formed by the designated pipes.
All these technical aspects are extremely important. The child’s taste preferences are also of great importance. You should listen to them at the stages of creating your carousel. Usually children have their own original views on certain components of the mechanism. And this will then allow your child and his friends to have great fun riding on your homemade carousel. And the neighbors will be amazed why they don’t have a similar design.
Did you like the article? Share with friends:
Master class “Carousel” for celebrating Maslenitsa.
Maria Krupnikova
Master class “Carousel” for celebrating Maslenitsa.
Good afternoon, dear readers!
I'll probably start with a short introduction.
I got a job as a music director in a kindergarten at the end of 2016. Little experience, lots of ideas. And one of the first events was the celebration of Maslenitsa. Since by training I am a conductor and choirmaster of a folk choir, the theme of folk holidays is quite close to me.
The prospect of making a “One Time” carousel from improvised materials did not impress me, so I decided to do everything, so to speak, thoroughly.
My husband and I thought through all the subtleties of the design, went to Leroy Merlin to get materials, and started creating!
I’ll say right away that, unfortunately, I didn’t keep track of the carousel on the street, it was blown away by the wind and several rays broke off. I will attach one photo where it is still intact, and in the rest it will be without rays.
So, we need:
1) A 50x50 block 3 meters long (then cut to the length we needed)
- 1 PC
2) Self-tapping screw with M8 stud – 1 pc.
3) Flat washer M8 – 1 pc.
4) M8 nut – 2 pcs.
5) Plywood 150x150cm thickness 6 mm – 1 piece
7) Self-tapping screws – 8-16 pieces (8 were enough for us)
 Sandpaper/plane/any device to create a smoother wood surface;
9) Tapes 2.5 m long, 5 cm wide - for the number of holes. I recommend immediately scorching the edges of the ribbon with fire so that they do not unravel. Everywhere we use NATURAL (natural) shades: yellow, blue, green, red, white, blue. The use of “acid” and other unnatural colors is not encouraged, because they simply did not exist before. We remember natural colors (sky, grass, rainbow) - we take them. You can take ribbons that are not 5 cm, but narrower ones, but it won’t look so beautiful.
10) Paints in natural shades + brushes (we needed yellow paint the most). Don't use gouache! She's putting on makeup. It is better to take specialized wood paint.
11) For durability and to fix the paint, you can apply another layer of varnish on top.
We will also need a jigsaw for cutting out parts and a drill for drilling holes for the tapes.
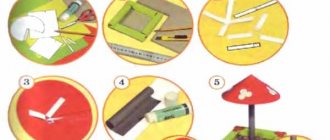
Let's begin!
1) We take a block and screw a self-tapping screw with a pin into the middle from one edge. Smooth the surface of the block using a plane. The base for the carousel is ready. All that remains is to paint;
2) On plywood we draw a circle with a diameter of 50 cm and cut it out using a jigsaw (I think there are no compasses of this size, so we draw it as follows: tie a thread to a pencil according to the size of the radius (25 cm, hold the other edge of the thread with your finger in the center of our future circle, and draw a circle using the tension of the thread);
3) Using a drill, drill a hole in the center of the circle (the drill needs to be taken a little larger than the thickness of the self-tapping screw with a hairpin that we screwed into the block)
. Use sandpaper to remove any unevenness near the holes after drilling;
4) Take the washer and glue it to the circle with Moment glue, as shown in the photo. Thus, we reduce the friction of the bar on the circle when circling, increasing the service life of our carousel;
5) We determine the number of feeds that we would like to see on the carousel. On a circle in the distance
3 cm from the edge we place marking points where holes for the ribbons are needed. We drill holes (the drill is not thin. We drilled with the same thing as the center of the circle. The holes will still not be visible because of the tapes);
6) Next - the flight of your imagination: draw an ornament on the circle on the side where the washer is glued (the other side will look into the sky, paint it in 1 tone).
Paint and let dry. If there is varnish, cover it with it;
7) The block can also be painted at your discretion;
Take the plywood again and draw a sun-semicircle: length along the base (cut)
they took a little less than 50 cm, the upper rays were much longer
(the upper one was 43 cm, so that the children could see clearly from below)
.
the lowest rays (along the cut)
wider
(we will attach them to the circle)
, the rest are at your discretion. Draw it - cut it out with a jigsaw;
9) We paint the sun yellow, varnish it, and let it dry;
10) We take our sun, put it on a circle, stepping back a little from the middle, and fasten these parts with the help of corners and screws on both sides;
11) We attach the ribbons to our circle: we thread it through and tie a knot;
12) That's all! All that remains is to put the circle on the stud and secure it with two nuts.
With such a carousel, the celebration of Maslenitsa will become even brighter!
Master class “Pancakes - a symbol of Maslenitsa” for children of primary school age This master class is designed for children of primary school age. Making a souvenir will be interesting for primary school teachers.
Master class “The Scarecrow of Maslenitsa”. Master class “Maslenitsa Scarecrow”. Educators of the Municipal Educational Institution “Elementary School in Dubovoe” Oksana Sergeevna Guzeva and Svetlana Vladimirovna Tarasenko.
Master class “The Scarecrow of Maslenitsa” Wide Maslenitsa We can’t praise you enough Come visit us In the wide yard Play with the children On the roller coaster ride! Goal: to connect.
Master class “Mathematical carousel” Master class “Mathematical carousel” The purpose of the master class: To promote increased interest among teachers in the search for interesting methods and technologies.
Master class on making a Maslenitsa doll Master class on making a Maslenitsa doll. Now we are having Maslenitsa week. And the most important rite of this period was burning.
Master class on making souvenirs for the celebration of Maslenitsa Every year, the team of our preschool educational institution takes an active part in events dedicated to the celebration of Maslenitsa. The holiday is cheerful and joyful.
Master class “Merry carousel!” based on Dymkovo painting. Master class “Merry Carousel”
(Dymkovo painting). Last week we had a theme week on getting to know each other in our kindergarten.
Scenario for celebrating the 7 days of Maslenitsa in the Maslenitsa children's center Characters: Grandmother, 5 girls, Boy, Thomas, Fedul, Guy, 3 girls, Spring, Winter In the center of the hall is a Russian hut. Near.
Scenario for celebrating Maslenitsa “How Maslenitsa reconciled Winter with Spring” Scenario for celebrating Maslenitsa in the middle group “How Maslenitsa reconciled Winter with Spring” Purpose: To introduce children to the national holiday.
Scenario for celebrating Maslenitsa “Oh, Maslenitsa!” Pedagogical goal: Continue acquaintance with the Maslenitsa holiday and the folk customs associated with it, with Maslenitsa songs. Targeted.