New Year's toys made of jute twine in a simple and even a little rough rustic style are an excellent holiday decoration for the Christmas tree and for the home. This style is quite popular, so such jewelry will please the eye for a long time.
So, toys made of jute twine. It's not difficult to make them. You can organize an evening of joint creativity with your children: have fun and make new decorations for your home. Homemade decorations for a family holiday, made together - there is something warm and homely about it. Do you agree?
In addition, the basic materials for them are inexpensive. If you buy jute twine and PVA glue at a stationery store (for example, in Komus), and not at a craft supply store, you can save a lot of money.
So, toys made of jute twine. It's not difficult to make them. You can organize an evening of joint creativity with your children: have fun and make new decorations for your home. Homemade decorations for a family holiday, made together - there is something warm and homely about it. Do you agree?
I offer you three short master classes on creating New Year's toys from jute twine to decorate your home and Christmas tree.
- Master class on making Christmas tree decorations from twine
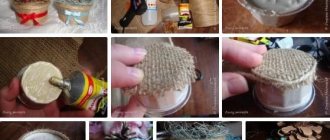
- Master class on making Christmas balls from twine
- Master class on making Christmas tree decorations - twine rings
After reading them and watching photos and short videos, you can easily create unique toys to decorate your home with your own hands! You can use the ideas that I share with you, or you can come up with something of your own.
The main materials in all three mini-lessons are jute twine and PVA glue. Some bases for these New Year's toys can be made independently from scrap materials, some will have to be purchased at craft stores. Read more about everything below.
Well, if you want more variety, look for interesting ideas in my review “DIY Christmas Balls”.
Volumetric Christmas tree made of threads
A cone made of polystyrene foam, foam, or at least cardboard will come in handy here. Weave it tightly with a thread in a circle and decorate it with beads and tinsel. It is better to use wool or other textured threads.
Photo: sovet-ok.ru
How to make a Christmas tree from candies with your own hands: 10 beautiful and easy ideas
Light as the main decoration
Despite the shimmer of gloss, this tree can be completely attributed to the minimalist style, so its main decoration should be the refraction of light, or, simply put, lighting. For lighting solutions, you can offer a separate master class.
One acceptable option is bottom electric lighting. A lighting device is placed inside the tree, preferably not bright. Light coming from below penetrates the distances between the turns of the rope and shimmers on its outer edges. You can install a diode light bulb that will contrast with the color of the tree itself.
For example, a golden Christmas tree plus a pink light bulb, or a turquoise base with soft yellow lighting. The “premium” class means placing an electronic kaleidoscope there. In this case, it turns out that the artificial tree casts strange reflections on the walls.
The second option is to use lower natural lighting. If you are a master of extreme sports or an incorrigible romantic, you will definitely like this approach. Since the Christmas tree has a fairly large radius, you can place a candle in it, with virtually no risk of ignition.
A living flame will create an atmosphere no less fabulous than a kaleidoscope. True, you will have to constantly ensure that the fire does not come close to the walls of the product. Naturally, you need to place some kind of ceramic or metal container under the candle into which the hot wax will fall.
You can also use a classic New Year's garland with diode bulbs; it will look very elegant and festive. To prevent the wire from spoiling the appearance of the homemade Christmas tree, the luminous elements can be pushed from the inside to the outside. This should be done evenly, starting from the top of the head and all the way to the base. An ideal mount for such a device would be a heat gun. The process will be difficult only on the upper part, since it may be too narrow for the hand; in this situation, ordinary tweezers will be a good help.
For those who find this process too energy-intensive, there is another way to decorate the Christmas tree with a garland - paint the wire the same color as the rope from which it is made, and simply wrap it around the perimeter. However, in this case you will also have to work hard to protect the light bulbs from the aerosol coating.
If you are placing such a Christmas tree in a children's room or school classroom, you can decorate the Christmas tree more safely. Colored transparent beads, satin bows and small blown glass toys - these are the ideal holiday decorations for a rope Christmas tree. You can also attach them using a heat gun.
Christmas tree made of threads on the wall
A beautiful and elegant wall decor is made from several meters of textured thread. And for contour, fixation and decoration, use bright decorative tape.
Photo: 2022g.ru
DIY tree made of pine cones: 10 beautiful and easy ideas (photo)
Universal method
The first option on how to make a Christmas tree from threads is to use a cardboard cone as a base. Before starting work, prepare:
- dense green threads (you can dye white ones yourself);
- PVA glue;
- elements for decoration: beads, seed beads, sequins, charms;
- tape and a sheet of cardboard for the base;
- scissors;
- glue brush;
- compass or round template.
To begin, draw a circle on cardboard, divide it in half, cut it out and roll it into a cone. Cover the cardboard base with tape. This must be done so that the future Christmas tree does not stick to the cardboard and can be easily removed from the workpiece.
Next, form a frame of threads, winding them around a conical base. You can do this in any order. The frequency of winding will depend on whether you want a more airy or, conversely, dense tree.
Then generously coat the thread workpiece with PVA glue. Place it in a warm, well-ventilated place. After it is completely dry, carefully remove the craft from the base. The result will be an airy and light Christmas tree.
The final stage is decoration. Glue or tie beads to the finished decorative Christmas tree made from threads. You can attach one large bead to the top. Using the tips given in this master class, you can experiment with decoration, the color of the future Christmas tree and the winding density.
DIY thread tree - photos and ideas
And before you get started, we recommend that you look at ready-made examples for inspiration!
Photo: vtemu.by
Photo: dizajngid.ru
Photo: flamingotoes.com
Photo: .
Photo: culture.ru
Photo: liveinternet.ru
Photo: show.7ya.ru
Photo: winner-light.ru
Photo: nn.ru
Photo: redsol.ru
Photo: youtube.com
Photo: chihan-scrap.blogspot.com
Photo: instagram.com
Photo: chto-polezno.ru
Photo: lovecreatecelebrate.com
Photo: stranahandmade.net
Photo: strlan.ru
Photo: teplodom24.ru
Photo: eco-kotly.ru
Photo: teplodom24.ru
Photo: metnor.ru
Photo: bestlj.ru
Did you like the post? Subscribe to our channel in Yandex.Zen, it really helps us in our development!
Methods of applying glue
When making a homemade Christmas tree from threads, you need to apply PVA correctly. If the adhesive is not applied correctly, the structure will quickly become unusable. Some novice craftsmen dip a spool of thread in adhesive to immediately saturate all the threads. However, experienced craftsmen do not recommend using this technology. After soaking the spool in glue, the threads may tear, get tangled, or lose color.
There are three effective ways to apply adhesive to the base: Initially, apply an adhesive composition to the base made of cardboard, plastic or foil. After this, you can wind the threads. However, you need to remember that the glue dries quickly and work must be carried out in an accelerated manner. The next method is to initially wind the threads. Then you need to cover it with glue using a brush. The disadvantage of this method is that craftsmen often skip places without sizing. Because of this, there will be gaps in the finished structure. The latter method is more difficult to implement, but also more effective. To do this you will need an empty plastic container, a large needle, glue, and thread. It is necessary to fasten the needle to the tip of the thread, pour the glue into a plastic container. Just above the level of the adhesive, pierce the wall of the cup with a needle, stretch the thread over the glue and make a second hole in the opposite wall. This way the thread will be evenly saturated with glue. To do this, you need to slowly pull the thread on the needle. To prevent the glue from hardening, you need to stir it periodically. When choosing a method, you need to take into account the size of the thread, the material from which the base is made, and further decoration of the homemade Christmas tree.
How to make an interesting craft for school for the New Year: Olaf from a sock
We have already made a snowman from socks and other crafts in the form of these charming creatures from different materials, and now I propose to make your favorite cartoon character. It’s so entertaining, the kids will definitely love it and their school friends will be surprised.
Materials:
- children's socks
- a glass or a little more rice
- hair bands
- small piece of orange felt
- black felt
- eyes
- glue gun
How to do
- Pour some of the rice into the sock in such an amount that you are satisfied with the size of the bottom ball of the snowman, shape it by kneading it with your hands.
Make sure the top of the sock is centered away from this ball.
- Pull the sock over the resulting ball with a hair tie.
- Next, pour a new layer of rice and form the second ball in the same way, it should be smaller than the bottom one.
- Now we make the head in the same way, its size will be larger than the average ball.
- The two bottom balls need to be slightly pressed together and secured with glue so that Olaf holds his shape.
- Glue the head and middle ball in the same way.
We cut out the details of the nose and mouth from felt, glue them and the eyes onto the snowman’s body.
https://onecreativemommy.com
Buttons, hands and even hair can also be made from felt. Don't forget your eyebrows!
And the final touch is the pompom legs.
Easy New Year's crafts with children in kindergarten
Anyone who has small children at home always faces the question of what to do in kindergarten. Look at the following crafts for the New Year: interesting and easy to do.
Christmas trees made of cardboard and felt
For the first option, we will need to cut out a Christmas tree in the form of a triangle on a leg from cardboard. You should make several holes in it using a hole punch. Glue this blank onto bright felt and trim its edges. We make a hole in the top and thread a thread through it to hang it.
In the second option, we will need several triangles made of felt and thick paper of different sizes. Make their edges wavy, and then glue these parts, overlapping each other, alternating the material.
You can also stick anything you like on a cardboard blank: buttons, pom-poms, candies, etc. See the main photo for an example.
Snowman
Such a cheerful snowman is a wonderful craft for the New Year, which sways on the table.
Let's take a regular sheet of paper, draw on it a circle of the diameter you want the toy to be, and cut it out.
In this circle we will draw a snowman, only so that his body is located at the bottom and his head is slightly above the middle.
Invite your child to color the picture.
Now you need to bend the circle in half and press the edges a little - these will be marks for further actions.
Draw a thin line along the marks with a pencil (without affecting the image of the snowman).
Above the resulting line, cut the figure with a stationery knife.
Fold the remaining paper behind the cut out head along the lines and the craft is ready. Place it on the table, rock it slightly and your snowman will come to life.
Video master class on making a New Year’s craft “House in a Ball”
I don’t even mention balls of thread and glue; we started making them and decorating holidays a long time ago. But look what an interesting winter composition you can create if you place a house in the snow in a large ball like this, the windows of which emit light in the evenings!
How to make this composition, look in the video.
Necessary materials:
- jute
- PVA glue
- hot melt adhesive
- cardboard
- gouache
- white threads
- foamiran
- padding polyester
- cotton wool
- glitter
- snowflakes
- tinsel
- led garland
- pine branch
- wooden plank.