Photo: grandisconti.ru Photographs are the guardians of the most valuable moments in life, so they often decorate our homes, evoking pleasant memories. How much more attractive will a photo look if you put it in an original frame made by yourself! Today we will tell you 14 ways to make a photo frame with your own hands, which will become a real interior decoration or a unique creative gift.
Cardboard photo frame
The simplest and at the same time not devoid of originality photo frame can be made from cardboard. Even a child can handle this kind of work!
On one sheet of cardboard, cut out a rectangular center, which should be slightly smaller than the photo. Separately, prepare a cardboard rectangle larger than the photograph. If you plan to put the photo frame on a leg, prepare it too using the template. For a wall item, don’t forget to glue the string.
Then everything is simple - we put a photo on the back side of the “window” and fix it with a rectangle greased with glue, attach the leg.
Such a frame in itself will not have decorative value, so it needs to be decorated. Use colored paper, magazine clippings or gift wrapping.
Photo: c-deco.ru Photo: masterfibre03.ru
Postcard with a lock
Such an original thing can be made by analogy with a notepad with a lock. All you need to do is glue a tiny lock to the edge, hang the key on a chain and give it along with the card.
A postcard with a lock serves as an intimate gift. It is intended for those closest to you, not for prying eyes, and can help express your deepest feelings to a person who is very dear to you.
Frame of branches
You can create a wonderful eco-style photo frame if you use thin twigs and twigs to make it. It is noteworthy that the material is easy to collect simply by leaving the house. Also prepare cardboard for the base, a glue gun, varnish and additional decor in the form of flowers, beads, cones or ribbons.
Form a rectangular blank from dark-colored cardboard or paint it (the main thing is that it does not remain white). Dry twigs need to be lightly peeled, freed from excess bark, and cut to the same length to fit the sides of the frame.
Now you can start gluing the twigs, slightly intertwining their ends in the corners. Finally, glue on the decorative ornaments and varnish the craft.
Photo: stroychik.ru Photo: vse-otoplenie.ru Photo: et.diy-site.com
And there is room for flowers!
There are a lot of flowers in your house, the window sills are occupied and there is no room on the floor for green residents. In order to compactly place the flora and not go out of budget, the flower garden is planted on homemade shelves.
Usually, inexperienced craftsmen do not know how to start and what to make a flower stand from. The imagination pictures a structure made of wood or iron. This is a good option if you have extra money, because metal products, especially forged ones, are not cheap.
But from improvised materials they make flowerpots, flowerpots and stands not only for apartments, but also for summer cottages.
For an apartment, men are able to make a modular structure from a metal pipe and plywood. They cut out pieces of wood of any shape, drill holes along the diameter of the tube, string it on it and secure it with special fasteners.
An airy shelf is made from wooden rectangles with drilled holes in the corners. A rope is pulled through the holes, tying knots on both sides so that the shelf does not move along the rope. And, having hung it, they set up flowerpots with flowers.
If you are confused by possible difficulties, you should watch the video, and they will tell you in detail and show you how to make a stand out of pieces of wood.
But for the balcony and summer cottage, non-traditional materials are used. From plastic bottles, plastic sewer pipes, old buckets, shoes, bicycles, chairs, car tires they create such works that you can only marvel.
At dachas there is a lot of material, for example, logs, which can be laid, hollowed out, earth filled into the hole and flowers planted.
Photo frame made of seashells
Any family with children will probably find some seashells lying around. The tireless child is ready to collect tons of this material, without finding any use for it. Take this opportunity and decorate your photo frame with shells!
The basis can be a regular wooden or plastic frame. Select whole shells, rinse thoroughly, dry and start gluing. When the composition is finished, open the shell frame with varnish or paint.
Photo: infantilcolebeethoven.blogspot.com Photo: alexgrim.ru
Denim photo frame
A creative youth photo frame can be made from old jeans. As a base, take a thick sheet of plywood or a rectangular wooden board. Draw the outlines of the future photo on it.
Prepare the decor - cut denim ribbons of the same width, but different lengths, so that the finished rounds are of different sizes. Lubricate each tape with glue on one side and twist it. When you have collected a lot of these “details”, cover the frame with them.
After complete drying, it is necessary to carefully trim the bottoms of the outer rounds from the inside, as well as the sides of the cardboard protruding from the sides. Now you can place your favorite photo here!
Photo: kukolnik-shop.ru Photo: kukolnik-shop.ru
Photo: mebel-mart32.ru Photo: kukolnik-shop.ru
Wall-mounted key holder for the hallway: 10 beautiful ideas
DIY photo holder.
Every family has photographs that are most dear to us as memories, and often we want them to be in plain sight and not stored in an album. Of course, there are frames for this, but often they are large and there is not always room for them. You can make miniature photo holders with your own hands. The material for them is the simplest, they are made quickly, and their design will give you great pleasure, especially since you can decorate them using almost any technique available to you: scrapbooking, quilling, decoupage, paper art, etc. So let’s begin. We need two cardboard blanks measuring approximately 8 by 8 cm, two wooden clothespins, PVA glue and double-sided tape.
Instead of cardboard, you can take these plywood blanks. These are actually coasters for glasses.
I decorated my blanks using decoupage technique. I used a rice card and made a craquelure.
I also decorated the reverse side.
I also tinted the clothespins to make them look completely aesthetically pleasing, but this is not necessary.
And then everything is very simple. We glue our clothespins onto one of the blanks. Regular PVA glue.
This is how our future photo holder will stand.
Next, to stabilize the photo holder, we glue double-sided tape to the clothespins. The distance between the workpieces will become wider and the holder will be more stable.
We attach the second blank to the tape.
That's all. The photo holder is ready!
Let's add some more plastic roses and you can insert a photo. To do this, squeeze the lower part with your fingers, the clothespins will open and clamp your photo.
This holder is made using scrapbooking technique.
Here, as you can see, for greater stability I did not use tape, but an additional third clothespin, divided in two. It is more stable.
You can put the whole photo.....
Or you can (if you don’t mind the photo) cut off the excess and place it in a homemade frame like this.
Well, and one more, again using the decoupage technique. This is the front side.
On the reverse side I used the same napkin, but without additional details.
stranamasterov.ru
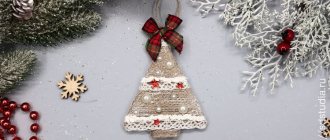
Country style frame made of yarn
To make a cute frame in which a family or children's photo will look great, you can use knitting threads. You will need 70-80g of yarn of one or more colors (at your discretion) and two cardboard frames.
Each of the bases must be tightly wrapped with thread, passing twice so that there are no voids left. Now cover the photograph with two of these wrapped frames and once again pass the thread through the entire product, fixing it in this way.
During the winding process, you can string multi-colored beads, buttons onto threads, or decorate a ready-made photo frame with artificial flowers.
Photo: pinterest.ru Photo: elihome.ru Photo: pinterest.ru Photo: thecraftedlife.com
Paper creations
You can make a stand out of paper not only for stationery. Once you set a goal and get involved in the process, you will see how easy it is to create a beautiful and useful paper craft.
Here are some examples to help a creative person create:
- coasters for Easter eggs. In this case, they make do with minimal materials: leave a fragment of a paper egg tray with 4-6 cells, decorate it with tulle, ribbons, artificial flowers;
- stands for newspapers and papers. They create from old cardboard boxes, pasting them with felt flowers, yellowed newspapers (vintage version), trimming them with buttons and fabric;
- organizers for kitchen utensils, household items, buttons, and so on;
- Baskets are woven from twisted strips of waste paper and coasters are made. If desired, they can be painted.
Be bold in your creativity! Take your example from children, because they are not bound by conventions and cliches. For them, the orange sun and grass doll hair are the norm, “but I like it that way!” Be artists, their motto is “That’s how I see it!” Let your imagination go free and you will be surprised how much space and material there is around you to realize your creative ideas.
Mosaic frame made of disks
Iridescent DVDs are an excellent material for making a high-tech photo frame with your own hands. Take a few old, unwanted disks and break them into small fragments.
Prepare a cardboard base and start gluing pieces that can be placed in a chaotic manner. After finishing the work, let the frame dry for several hours.
Now you need to process the gaps - use acrylic compounds in tubes or paints for stained glass painting. Don't forget about the edges of the frame!
Photo: teknolojioku.com
Photo: liveinternet.ru Photo: liveinternet.ru Photo: liveinternet.ru Photo: liveinternet.ru Photo: liveinternet.ru
How to select and place frames correctly
If you want to place a large parade of photographs on the wall, you must first look at where exactly it will be most profitable to place it. Perhaps there is no wall in the house that is free enough to be used for photographs.
In this case, it is worth reconsidering the interior and decor; it is likely that a large number of unnecessary things have accumulated.
The color of the frame should not match the main color of the room. It should match the secondary color, the one in which the decor is painted. This way it will look much more harmonious against the background of, for example, a gray wall, itself painted turquoise.
If the room is small, you should refrain from having a large number of frames on the walls. They will create a feeling of visual overcrowding and narrow the visual free space. The ideal option would be to place 2-3 of the most important photos on the wall, and another 1-2 photos on the shelves.
Cook photo frame
A reliable and original design of a photo frame can even be made from salt dough. Creating it is quite simple: pour a glass of flour and half a glass of salt into a bowl, add 100 ml of water (if you want the frame to be colored, dilute the water with food coloring). Knead the dough and season it with 50 ml of vegetable oil.
The dough should “rest” for two hours, after which you can begin modeling. Place the finished product in a preheated oven and bake for two hours, remembering to turn it over.
If you do not color the dough initially, you can paint the finished product after it has completely cooled. A dough photo frame will last longer if you open it with a layer of varnish.
Photo: copytsvet.rf Photo: shop-myhobby.ru Photo: mebel-miru.ru Photo: mamadochka.ru
Photo: mamadochka.ru
Fastening a glass shelf with a Pelican bracket
For attaching small shelves and slabs to the wall, there are specially designed brackets - Pelican-type shelf holders. They are indispensable for attaching glass shelves to the wall. Pelican brackets are available in several modifications, designed for mounting shelves with a thickness of 2 to 40 mm. The bracket parts are made of metal, decoratively coated with chrome, gold, copper, bronze, shiny or matte. You can choose any shelf design.
The Pelican mount consists of two parts, a base and a movable console, and works on the principle of a vice, that is, the shelf is fastened by clamping it by the edge of the plane between the base and the console using a screw. The vin is located in the bottom recess and is not noticeable from the side. Before clamping a glass shelf, it is imperative to install plastic spacers to prevent the glass from cracking, which are usually included in the kit.
In the base there is a hole for fastening to the wall with a self-tapping screw, made in the form of an oblong groove. Thanks to this adjustment, it is possible to set the shelf strictly horizontally.
Fastening wire shelves
Wire shelves are very convenient in the kitchen and bathroom. They are available in corners and for mounting on flat walls. They are easy to hang and have all sorts of design options for all occasions. Loops for fastening are usually provided in them. Often the kit already includes screws and dowels.
Mounting options: easily removable, without unscrewing the screws, and removable when unscrewing. The first option is convenient if, for example, you store sunflower oil on a shelf; anyway, over time, its residue ends up on the shelf and you have to wash it under the tap. The second option is suitable for storing clean things.
For the removable version, a plastic cylinder with a recess is first screwed to the wall, and then the shelf eyelet is put on it. To securely fasten such shelves, a self-tapping screw with a diameter of 3 mm and a length of 20 mm is sufficient. Taking into account the thickness of the wire, which is usually 5 mm, the length is 25 mm. The shape of the self-tapping screw head is conveniently conical, the thread pitch does not matter.
Frame using decoupage technique
The name of the drawing technique sounds rather pompous, but in reality it is a simple re-gluing. To make a stylish photo frame, you will need napkins with a pattern, PVA glue, a wooden or plastic base frame and varnish.
Disassemble the old frame and paint the front surface with white acrylic paint (for convenience, it is better to use a sponge), wait for it to dry. Apply a napkin, dip the brush in glue and work the canvas, smoothing out any air bubbles that may have formed.
When the product has dried thoroughly, you need to cut out the middle for the photo and glue the edges inward. Now you can assemble the photo frame and varnish it.
Photo: str-mebel.ru
Photo: kukolnik-shop.ru Photo: elihome.ru Photo: kopitsvet.rf
Photo: mebel-miru.ru
Wire stand
How long has it been since you made anything with wire? But it turns out that you can make beautiful stands for photographs from it. And if you combine a beautiful, golden wire with some decorative stone, it will be very beautiful.
The wire itself must be tied around the stone once. Next, from the stone there should be a beam in the form of a wire, with a small rounded stand at the end.
You can put photos on this stand. It is recommended to use vintage photos; they will go better with the combination of wire and decorative stone.
This way you can create an entire exhibition.
Window frame photo frame
Yes, you are reading absolutely correctly - you can make a unique panel in the shabby chic style from an ordinary window frame. To do this, of course, you will need an old window frame, which you don’t even need to paint - cracked paint and chips will become the “highlight” of the product.
The frame needs to be disassembled, one large photograph or several small ones must be inserted, depending on the number of windows. The photographs must first be glued onto a sheet of cardboard or thick paper. It is better to choose black and white photos - they will look harmonious with your “antique” luxurious frame.
Now all that remains is to assemble the product and find it a worthy place on the shelf of the living room or bedroom.
Photo: novamett.ru Photo: novamett.ru
Support the phone
Now let's take a look at the phone stand, which can be created in a few minutes.
Let the novice master not be intimidated by the question of how to make it. You won’t need a saw, jigsaw, drill or other “scary” devices. Holders for modern gadgets are made from straightened paper clips and cardboard folded in a simple way.
There are original individuals who do not see a problem in creating a stand at all. It is enough to take two office clips so that the phone stands upright.
We recommend reading:
- Special rescue equipment
- How to insulate a veranda for winter living: a review of the most effective methods, instructions, materials, installation diagrams
Tile work: description of all stages + step-by-step instructions for beginners
Old cassette boxes, wire bent in two or three steps, or fragments of Lego constructors are also perfect for this purpose.
For those who are not looking for easy ways, it is advised to build a stand from a wooden block, cutting out a groove for the phone in it. Those who like to collect origami will create an intricate craft that will comfortably fit a communication device. For such a stand you do not need thick cardboard.
It happens that you need to charge your phone, but there is no table or chair near the outlet. Shouldn't a faithful friend hang on a cord? A plastic bottle will be used.
It is necessary to wash it and outline the contours of the stand with a marker. The front part should be slightly shorter than the phone itself so that it does not fall out of the “case”.
A hook is marked on the back wall, which the cup clings to the charger. We cut out the craft along the contour and use it for our health!
Photo frame made of buttons
It's no secret that many housewives, when sending old clothes to a landfill, cut off buttons from them in the hope that they will come in handy someday. Well, their time has come - decorate a photo frame with multi-colored buttons!
Choose buttons of different sizes - this will make it easier for you to create a composition. Place the large buttons on the frame first, and then fill in the gaps with small ones. If you are satisfied with the result, start gluing, fixing each button one by one.
If you make a frame-backing yourself from cardboard, it is better to first cover it with colored paper, because the gaps, one way or another, will be visible.
Photo: 1000000diy.ru Photo: 2020-2020.ru
Manufacturing stages
You should start making a postcard by choosing an occasion and thinking about the plot. The ideal option to start creativity is to draw a sketch of the future postcard.
It is important to take into account the specifics of the holiday, the age and favorite colors of the recipient, the possibility of delivering it in person or sending it by mail, the need for an inscription, and internal contents.
Thinking through and developing a sketch is a responsible matter; it is better to do it in advance, giving yourself a day or two, or better yet, a week.
The next stage is a practical approach to the matter. You need to choose what exactly will be used in production, what will be needed - glue, colored paper, stapler, tape, additional materials. Preparing everything you need can take from half an hour to a whole day.
Then the creativity itself begins. It requires a workplace free from other things, as well as a sufficient amount of time. To make a postcard neat and similar to a sketch, you need to put in a lot of work, diligence and patience.
Original frame made of cereals
A simple and affordable option for making a photo frame with your own hands is to make it using cereals or grains. You will also need thick cardboard, some paper, glue and paint.
Create a frame from cardboard or plywood, and cover the edges with paper for beauty. Paint the workpiece. Now you can start decorating.
Place the frame on the support so that it is in a horizontal position. Thickly coat the surface with glue to form a decent layer and sprinkle cereal on top. The miracle frame is ready! To make it last longer, coat it with additional protective varnish.
Photo: str-mebel.ru Photo: drova-darom.ru Photo: mebel-miru.ru
DIY cardboard photo stand » Useful homemade products
DIY cardboard photo stand
. A convenient photo stand can be glued together from cardboard quickly and easily.
To make such a stand we will need:
- thin cardboard,
- glue,
- scissors and drawing supplies.
You can use shoe or candy boxes - then the stand will also be bright.
Making a stand for a photo frame
First of all, we draw out the templates for the stand parts. All parts, except the base, will have allowances for gluing. Dimensions and allowances are indicated in the diagram.
We cut out each piece from cardboard in two identical copies. On one of the base parts we mark and make two 7 cm slots - one in the center, the second parallel to the first, 1 cm from it. On one of the parts of the vertical back wall we mark and make a 4 cm long slot. We bend the allowances on all parts.
From below we thread a part of the back wall with a slot into the central slot of the base. At the bottom we glue the allowance to the base. From behind we thread both parts of the support into the slot in the rear wall. We glue their allowances to the wall. Glue the parts of the support together. From below we thread the back wall without a slot into the central slot of the base. Glue both parts together. We glue the halves of the front wall together up to the allowances. We thread the wall from below into the second slot.
Glue all three allowances to the bottom. Glue the bottom part of the base, hiding the allowances inside. The cardboard photo stand is ready!
Category: Home Ideas / Photo Frames
www.freeseller.ru
Retro frame from an alarm clock
An interesting idea to make a stylish photo frame, giving a second life to an old alarm clock. Use a screwdriver to disassemble the alarm clock. Place the glass on the photo and cut out the image.
Now put the whole structure back together, but without the hands and clock mechanism. The photo is placed under glass. To securely fix the photo, coat its edges with glue.
This retro-style photo frame will be a wonderful decoration for a fireplace, bookshelf, or an excellent gift.
Photo: kukolnik-shop.ru Photo: c-deco.ru Photo: eldomo.ru Photo: shop-myhobby.ru
Fastening objects to tiles
Attaching the shower head
You can live without hanging pictures, but it’s impossible to live without shelves and other attributes in sanitary facilities. I will give the technology using the example of fixing a shower head in a bathroom on a tile.
A hole with a diameter of 6 mm is drilled in the tile, and a dowel is inserted into it. Since I found myself in a void, I had to install a 6x25 dowel with a flange so that it would not go deep. The hole in the base of the stand for the shower head is located at a distance of one and a half centimeters from the surface of the support; the self-tapping screw had to be taken so much longer, 45 mm. The required length was only available with a large pitch and a conical head.
The diameter of the hole in the base of the holder cone was comparable to the diameter of the screw head; to increase the support area, I placed a washer. The self-tapping screw is screwed in, and the watering can holder is screwed on with a union nut. It is done.
Attaching a hook for things
When choosing hooks for the bathroom to hang towels and bathrobes, I liked an inexpensive hook, but to attach it I needed to drill two holes in the tile. I didn’t want to do this, so I figured out how to get by by drilling only one hole.
I made the fastenings using an additional 4 mm thick plastic plate and two M2.5 threaded screws with conical heads. The plate can be made from any solid material.
The hole for the screw in the plate is made in the upper part so that the center of gravity of the hook is lower. The plate is secured to the wall with a self-tapping screw, with a universal thread pitch, with a conical head shape, standard size 3×25, and a countersink hole is made in the plate so that the self-tapping screw does not protrude, and the plane of the base of the hook fits tightly.
Photo frame made of clothespins
You can use clothespins to make a fun sun frame where the photos will be arranged in a circle. This is one of the easiest ways!
First you need to form a circle from thick cardboard. Cut out the middle or leave it, pasting it with a colorful picture - decide at your discretion.
Now glue the clothespins along the entire circumference so that the opening side of each of them faces up. Your wonderful photo frame is ready!
Photo: ok.ru Photo: pinterest.ru
Photo holder - 5 ideas that you can implement yourself
Each of us has not the best days - when we just want time to quickly come to the evening, so that we can hide at home, so that, having changed into slippers, we can leave all our problems and troubles behind the threshold. How do you save yourself on days like these? It has long been proven that needlework is one of the best relaxing procedures. Try making a photo holder with your own hands - during the process you will be so carried away that you will forget about all the possible troubles and difficulties. In addition, later, when the photo holder is ready, when returning from work, you will always meet the eyes of those dear to you, and this is a separate plus.
Photo holder - 5 ideas that you can implement with your own hands:
1. Photo holder - mountain
The people you love deserve the best, the highest! Make each of them their own Everest - all you need is polymer clay, paint and diligence. Just start working - and you are guaranteed a good mood; it will come on its own, displacing the worries and worries of the past day.
Master Class
2. Macaron holders
Do you like macarons? Bright, juicy, incredible! Just looking at these delicious cakes will lift your mood and improve your well-being! Imagine how much you will want to smile if, in addition to your unrealistically attractive appearance, you can also see the beloved faces of your children, parents, and husband. Definitely do it!
Master Class
3. Heart holders
What could be sweeter and kinder than a simple naive heart that holds, as if hugging, a photograph of a person dear to you? Make such a photo holder on your desktop - and any negative thoughts will disappear before they even have time to form words. This is a simple project, but there is a lot of meaning hidden in its simplicity.
Master Class
4. Photo holders made from wooden blanks
Do you have a wooden cube or ball on hand? Be sure to twirl them in your hands, take a closer look at the patterns that nature has created, and then, having figured out how to best play with them, decorate them and turn them into stylish eco-friendly holders for family photos. Very warm, sincere things for the warmest relationships.
Balls, cubes
5. Stylish holders made of clothespins with decoupage
And this project definitely deserves the title of the most relaxing! It contains everything: creative search, fine motor skills, selection of the most delicate materials, and calm, unhurried, almost meditative work. Choose the motive that best suits the state of your soul, and create for pleasure!
Master Class
Discussion of the article
You can rate the article, share your opinion, and subscribe to comments on the article.
What else to read on this topic on the Handicraft Runet:
www.darievna.ru
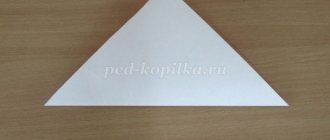
Elegant paper photo frame
Look how easy it is to make a cute photo frame even from plain paper! For the frame you will need a thick sheet of paper. Draw a template as shown in the photo - you can print the image or redraw it by enlarging it on the monitor.
Now, following the step-by-step instructions, fold the frame and decorate the inside with colored paper or fabric. Start decorating, but don’t forget that the frame is paper, so you can’t glue a lot of decorations onto it, otherwise the product may lose its shape.
Two or three flowers or butterflies will be enough. You can complete the composition with a contrasting thread winding with a cute trinket.
Photo: koffkindom.ru Photo: vrukodelii.com Photo: vrukodelii.com
Rubbish - put to work!
Let's consider a small fraction of handicrafts, from which you can make stands for stationery, flower pots, telephones and other household items.
First of all, needlewomen use unnecessary paper, cardboard, newspapers, postcards, glossy magazines.
Glass jars with small chips and chips are carefully sanded and coated with acrylic paint. Use tin and cans. They are wrapped in multi-colored yarn, thick rope, covered with beads, felt, sequins, and trimmed with buttons.
Those who are familiar with woodworking tools will love the two-in-one stand. Two parts in the shape of an elephant are cut out of wood, and a box or glass is glued between them. The curved trunk will serve as a stand for the gadget, and the container will serve as a stand for pencils and pens.An interesting option is to glue colored pencils or popsicle sticks in a circle onto a glass or Pepsi-Cola jar. Such a wooden composition will fit the theme on the desk of a creative person.
Young ladies do not like to tinker with a jigsaw and a soldering iron; they like to embroider, knit, sculpt and glue. Therefore, they know how to make coasters in the form of little cases, crocheted and knitted, in the shape of animals and flowers. Original stands are made from baked clay or plastic, which can be painted with acrylic paints.
We recommend reading:
- Do-it-yourself antiseptic: instructions on how to make disinfectant at home
- DIY medical mask: instructions on how to easily make a mask against coronavirus. Photo, video, step-by-step guide, made of gauze, with valve, made of paper
How to make a mirror with your own hands: tools, materials, new designs, step-by-step instructions, reviews + secrets from the master (105 photos)
Photo gallery
Making a photo frame with your own hands is an interesting creative process that allows you to make a real masterpiece from simple materials. Don't forget to check out our photo gallery! Here you will find even more interesting ideas that you can safely experiment with using different decorating methods.
Photo: mebel-v-nsk.ru
Photo: culture.ru
Photo: livemaster.ru Photo: dk-ritm.ru Photo: skolkogramm.ru Photo: plusto.ru Photo: koffkindom.ru Photo: azbukaplavania.ru Photo: azbukaplavania.ru Photo: clevercamp.ru Photo: dmitryk.ru Photo: severdv .ru Photo: in.pinterest.com Photo: pinterest.ru
Photo: eldomo.ru
Photo: pinterest.co.uk
Photo: culture.ru Photo: dompodelok.ru Photo: km-toys.ru Photo: domhauz.ru Photo: pinterest.ru Photo: shh.cso52.ru Photo: eldomo.ru Photo: mikrobleyding-msk.ru Photo: decor- decoupage.do.am
Photo: furnilux.ru
Photo: deco-magic.ru Photo: skolkogramm.ru Photo: hostboard.ru Photo: liveinternet.ru