Paper heart craft
This type of craft is the simplest. But you can get a little confused and come up with something unusual.
Star frame
This origami photo frame made of modules resembles either a star or a snowflake. It consists of two parts - larger and smaller, which overlap each other. Each is composed of 8 modules. For a larger ring you will need squares of 15x15 cm, and for a smaller one - 10x10 cm.
Manufacturing instructions:
Openwork decor for scrapbooking will add elegance to the frame:
On the back of the product there are convenient “pockets” where you can store receipts, business cards and other documents. So the benefit of the model is double: it is both an elegant accessory and a mini organizer.
Option 2. Flying hearts
Such beautiful hearts of different sizes will be an excellent decoration for a room or work area. To create such hearts you will need to buy special paper for decoration.
We recommend reading:
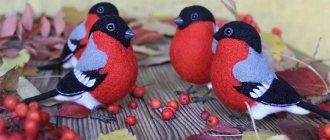
- Craft bullfinch: detailed description of how to make a bird with your own hands (115 photos)
Crafts from vegetables: 100 photos of the best crafts for children and a review of recipes for adults
- Craft ship: 120 photos, templates, drawings and step-by-step instructions on how to make a boat
Draw a large number of hearts on paper using a pencil. Let's cut them out. On each heart we make a small cut in the middle. And glue it together. It looks like a three-dimensional heart.
This composition is great for decorating panels and for hanging on the wall. You can sew a felt pillow and glue flying hearts. It will turn out very impressive.
Stages of work on making a heart-shaped photo frame
There are four stages in total. First stage
–
Preparation.
☛ Making a template.
Watch the video above.
And one more thing to pay attention to →
☛ preparing the board
Advice.
If you don’t have a carpentry machine, you can clean the surface of the board by sanding first with a coarse sanding belt and then with a fine one.
I can give an example on this matter. We once worked at a customer's dacha. The owner of the dacha was German. So, using only a grinding machine, he made such cool blanks for the bench from an ordinary unplaned timber that you would never think that they were not planed at all.
making a photo frame
Advice. Since the tree is made of strong species, it is not very easy to process compared to, say, pine. Therefore, the cutters must be very sharp and the speed of the milling cutter must be at least 5000 rpm.
Also, you cannot slow down the movement of the cutter along the plane during processing. Otherwise the wood will burn! Of course, the defect can be corrected with fine sandpaper, but this is an additional hassle.
Unfortunately, I was unable to avoid this and had to tinker a little more. Third stage
–
painting photo frame
We paint with stain varnish at least three times.
Advice. It is better to paint with an artistic brush with natural bristles.
Additional information on wood protection can be found here.
I already said that the varnish is water-based and therefore it dries quickly. So within 25 minutes you can easily finish painting. Fourth stage
–
inserting a picture or photograph into a frame
Everything is simple here. ✔ Place the finished frame on the cardboard and draw a line inside along the contour with a pencil, as shown in the video. The cardboard will serve as a seal between the frame and the photo. Instead of cardboard, you can use fiberboard. ✔ Cut out the cardboard with scissors. If it's fiberboard, then cut it out with a jigsaw.
✔ Place the cut out seal on the desired fragment of the photo, trace it and cut it out. ✔ Insert the photo and seal it with cardboard so it doesn’t fall out.
That's it, now you can give it in a solemn atmosphere accompanied by a romantic song.
Please contact us with questions via the Contact page or comments. I will be happy to answer all questions.
The publication of articles on the renovation of a small kitchen will continue in 5-7 days, so subscribe to the site’s news so as not to miss the publication of an article under the working title “Furniture in a small kitchen, what can be done.”
See you soon in new articles. Sincerely, Yuri Filippov.
Craft volumetric heart
This heart can also be made in several ways.
Photo gallery
Making a photo frame with your own hands is an interesting creative process that allows you to make a real masterpiece from simple materials. Don't forget to check out our photo gallery! Here you will find even more interesting ideas that you can safely experiment with using different decorating methods.
Photo: mebel-v-nsk.ru
Photo: culture.ru Photo: livemaster.ru Photo: dk-ritm.ru Photo: skolkogramm.ru Photo: plusto.ru
Photo: koffkindom.ru Photo: azbukaplavania.ru Photo: azbukaplavania.ru
Photo: clevercamp.ru Photo: dmitryk.ru Photo: severdv.ru
Photo: in.pinterest.com Photo: pinterest.ru
Photo: eldomo.ru Photo: pinterest.co.uk Photo: culture.ru
Photo: dompodelok.ru Photo: km-toys.ru
Photo: domhauz.ru Photo: pinterest.ru
Photo: shh.cso52.ru
Photo: eldomo.ru
Photo: mikrobleyding-msk.ru
Photo: decor-decoupage.do.am
Photo: furnilux.ru Photo: deco-magic.ru Photo: skolkogramm.ru Photo: hostboard.ru Photo: liveinternet.ru
Option 1
In order to sew such a toy you will need red and white felt, threads, padding polyester, and scissors.
Draw two hearts of the same size on felt. We cut out wings from white fern.
We compress two hearts, but leave a small hole. You need to insert a padding polyester into this hole and place a stick. Sew up the hole.
Yes, and don’t forget to place the wings in the right place during stitching and stitch them.
Panel
Necessary materials:
- Thick fleecy fabric;
- Buttons;
- Glue "Moment";
- Scissors;
- Canvas.
A heart is cut out of the fabric and glued to the canvas. After this, the buttons are glued so that the fabric is not visible.
Option 2
This heart is made from thin red papyrus paper. Fold the paper in several layers and cut out a small heart. In general, you should get 10-15 such hearts.
To prevent our hearts from falling apart, we need to stitch them in the middle. Hands take a long time, so use a sewing machine. Do not cut the thread at the root, it should be long. For her we will hang our hearts.
Now you need to give the heart a shape, straighten all the petals. That's it, our heart is ready.
Original ideas for topiary
Don't be afraid to experiment and use your own imagination when making a coffee tree. There are many different variations of topiary, here are some stylish ideas for crafts.
Classical
Traditional coffee topiary has a round shape. There are no special decorations here; it is best if the craft is made in soothing shades using natural materials. This is a simple and truly elegant option that is suitable for interior decoration in different styles.
Valentine's card
A heart-shaped topiary can be given as a surprise on February 14th. The base is sold in stores with floral materials, but you can also make it yourself using available materials.
"Flying" cup
Crafts like these seem incredibly complicated, but they are quite easy to make yourself. To do this, you will need a piece of wire, a glue gun or a can of polyurethane foam.
Tree with flowers
A tree with delicate flowers will be a wonderful surprise for a gift on March 8, birthday, etc. In addition, such a topiary can be placed in the living room or bedroom.
With birds and butterflies
Imagine a stylish tree with dragonflies, butterflies or birds sitting on it. This craft looks truly spring and reminds you of warm days, regardless of the weather outside.
fruit tree
Decorate the craft with dried fruit slices, for example, citrus fruits, the result will be a wonderful decorative item for the summer table. However, such topiary can easily be complemented with New Year’s table setting.
Money Tree
A coffee “money” tree is a good surprise option for men. It can be made in the same way as an ordinary topiary, the only difference is that the ball needs to be covered with coins, then zipped around them and finally covered with coffee beans.
New Year
A topiary in the shape of a Christmas tree will be a wonderful table decoration during the holidays, and will also complement the homely New Year's atmosphere. You can buy the base blank additionally or make it yourself. To do this, just roll the cardboard into a cone and trim off the excess pieces.
Double and triple
This craft requires more time, but the result is a really beautiful topiary. Several crowns develop from one stem or “grow” from two or three trunks at once, which may have different thicknesses and heights.
Ball
This is not exactly topiary, but a coffee ball is made in a similar way. The difference is the absence of a trunk, and in shape it will not at all resemble a tree. You can combine coffee beans with seeds and legumes in a composition. A stylish option can be achieved by placing several balls in a beautiful glass dish or vase.
If you like to surprise and delight your friends with non-standard gifts, you will definitely like this type of craft like coffee topiary. After all, all that is required to create it is simple devices and materials, accuracy and patience. Well, a drop of inspiration, of course!
Craft cold heart
Olof the snowman can be made from fluffy pompoms. To do this you will need cardboard, white wool, black thread, glue, scissors, ready-made eyes and colored paper to create a nose and mouth.
First of all, we prepare blanks for our pom-poms. These should be 8 ovals of different sizes. We take two at a time and start wrapping them with wool. There must be a lot of it so that our snowman turns out voluminous. We cut the wool along the perimeter and tie it in the middle with thread. Let's fluff up the pompom.
As a result, you should have three pompoms of different sizes. We begin to attach the balls to each other.
Now you can glue eyes, hairs, make a carrot nose out of colored paper and glue buttons.
Weave a scarf from three thick brown threads and tie it on our snowman.
And for those who took the meaning of the craft literally and are not a fan of the famous cartoon “Frozen,” you can make a craft from water. To do this, find a heart-shaped mold, pour water into it and put it in the refrigerator for several hours. The heart is ready. It's a pity that it will melt very quickly.
Materials and tools
| beer cardboard | 1 sheet 30 cm by 30 cm |
| scrap paper | 3 sheets 30cm by 30cm |
| watercolor white paper | 1 sheet |
| satin ribbon 1 cm wide | about 2.5 m |
| lace elastic to match the paper | 11 pcs |
| cotton lace | 7 pcs |
| sisal | 3 pcs |
| openwork paper napkins | 15 pcs |
| beads on fishing line | |
| roses 1 cm | |
| large roses | |
| hearts for decoration | |
| paper leaves | |
| dry pastel | |
| wet wipes | |
| glue gun | |
| glue Moment “Crystal” | |
| double sided tape | |
| scissors | |
| ruler | |
| composters | |
| boule or pen | |
| distress ink | |
| sponge |
Photos of heart crafts
0