- November 18, 2018
- Crafts
- Natalia Penchkovskaya
Making crafts for children is not only fun, but also useful. While working, children learn the properties of different materials, learn to use scissors, threads and a needle, glue and other types of fastening parts together. Crafts can be created from plasticine, paper, fabric and polyethylene, plastic bottles and any natural or waste material.
When thinking about the topic of crafts, children learn to think and fantasize, and learn a lot of information about the subject of research. For example, if the topic is dedicated to the inhabitants of the Black Sea, then children must distinguish between ocean inhabitants and sea inhabitants, which craft is suitable for an exhibition, and which will be superfluous.
In the article we will talk about how you can make crafts from the inhabitants of the Black Sea. Although our reservoir does not contain ferocious sharks, whales, octopuses or exotic fish, it does have its own interesting inhabitants. These are jellyfish and dolphins, crabs and seahorses, pipefish and flat flounder or glos, as well as many fish of different sizes.
We will also tell readers how to make a sea out of paper. Step by step, the sea is created from individual parts in the form of waves, and you will learn later in the article how to glue them layer by layer. After familiarizing yourself with this method, you can depict amazing seascapes with yachts and sailboats for craft exhibitions in kindergarten or school.
Inspection of available material
First, it’s worth examining what is available to create crafts. Then you should familiarize yourself with the many photos of marine crafts created by professionals and amateurs; this will help you, based on them, invent something of your own, or really just copy the product you like with your children.
Do not forget that this fun is primarily interesting for the little ones. They will enjoy spending time with adults during the creation and preparation process.
It’s worth pushing them a little so that they take the initiative on their own and demonstrate their imagination; sometimes children’s crafts amaze with their ideological content, and an adult will definitely help in making them.
Preparing for work
- If you brought the shells, you must wash them to remove the smell and remains of shellfish. You can treat them with water and chlorine-containing preparations, immerse them in the solution for an hour, and remove any remaining dirt with a small brush. If there is a lot of unnecessary stuff in the shells, then you need to boil it for about five minutes, let it sit and remove the debris with a stick or tweezers. Then dry well.
- The surface can be uneven, but with the help of available means it is easy to eliminate flaws and make them invisible by using aerosol varnish or nail polish with or without glitter. Products with shells covered in a pearly pinkish or white tint will look very chic. You need to glue the shells with Moment or Titan glue, they will provide water resistance and strength.
We use wooden materials
Children often love to carry home various pebbles, sticks and wooden boards. Don't throw everything away, as this can make for some amazing sea-themed crafts. The main thing is to create an idea and explain it to the little ones.
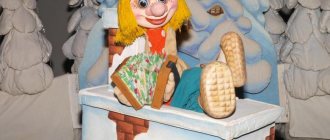
- For example, already at home after a few months you can recall the first days of rest. What were all the family members like? Surely white and perhaps slightly gloomy, tired. In just a few days they were smiling and covered with a bronze tan. It is this period that can be displayed in the form of crafts.
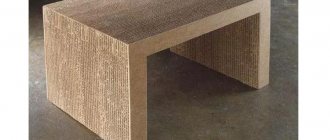
This option can be considered one of the best for making your own marine children's crafts, since the process is very simplified. To do this, a wide and long piece of wood about 10 by 30 cm is used as a stand. Then the children are given the task:
- It is necessary to carve a wooden statue that looks like a mother or a woman;
- Create a blank with the outlines of a dad or a man similar to him;
- Make a blank similar to a brother or sister, depending on the number of family members.
Now everyone should start coloring together to highlight their hair, clothes, and face. Decorative elements are added. All blanks are glued to the stand. To make the paint durable, the craft is varnished. All decorations for the interior of the apartment are ready.
Magic wand
What can you make a star from with your own hands? To make the toy look elegant, it is better to choose thick paper with a grainy, shiny structure.
Prepare in advance a wooden or plastic stick 20-30 cm long. Scissors, glue and shiny ribbon, the kind used for wrapping gifts.
Secure one end of the tape to the end of the stick with glue or tape. Wrap it in a spiral to the very bottom and also fix it so that the tape does not unwind back.
Fold the A4 sheet in half crosswise. On one side draw a five-pointed star. Carefully cut out the silhouette, you will get 2 pieces. Coat both pieces with glue and connect them to each other and to the stick. Let it dry.
Decorative frame made of seafood
To create a high-quality craft from sea creatures, you will need a few different materials. The main thing is to involve children in this process.
As a result, you can make a frame for a family photo from a vacation at sea, a frame for a painting or a wall clock.
Tools and materials:
- Any collected shells, pebbles from the seashore or beach;
- Cardboard;
- Strong scissors;
- Beads, buttons;
- Glue;
- Pencil.
Manufacturing stages:
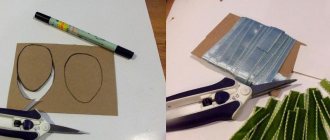
- To begin with, a base is created from cardboard, the size is determined by applying it to the main object for framing. Pencil markings are allowed. The workpiece is cut with scissors;
- Now you can select a composition from seafood. Let's look at where we can add beads and buttons to create an attractive look; it's good if they are also found on the beach;
- After estimation and rough composition creation, you can evenly glue the elements along the entire perimeter of the cardboard. It is important that there is no tread beyond its edges;
- After completion, you should wait a few hours until the glue dries and all the parts are completely fixed;
- Now you can glue the decorated frame onto the main product and admire the joint work with the children. Obviously everyone will be happy with the final result.
Rozhdestvenskaya
Templates and diagrams for making a star on the eve of the holiday are sold in large quantities in stores. But it’s much more interesting to do the whole process yourself, with your own hands.
Fold two sheets of thick glossy paper together. On one draw an eight-pointed star and carefully cut it out. Glue the figures together inside out. Find and glue a round thematic picture into the middle of the star. Decorate the edges of the picture with beads or seed beads.
Coat the edges of the star rays with glue and sprinkle with glitter. Wait until completely dry. The second step is to glue a multi-colored long braid to the tops of the rays. Attach the star to the stick.
Let's make beads and bracelets from sea stone
To create these crafts from sea stones, you will need a lot of different materials. First you need to select suitable stones and arrange them according to size on a cardboard or table.
To create an attractive look, you will have to sharpen some elements using sandpaper or a file; children will be happy to do this.
Then adults use an awl, preferably a drill with the smallest cutting element, to make holes for stringing stones onto a fishing line or rope. After this, the little ones will be able to use their fingers to collect all the elements to form a bracelet or beads.
The latter should be created in several rows to be proudly worn on the chest or used as decoration in a child’s bedroom.
Fish on CD
Every home has either a damaged or old disk. It can be used as the base of a craft. The fins, tail and mouth are cut out from bright and thick double-sided paper, drawing their outlines with a simple pencil. The pelvic fins are made by folding paper like an accordion.
To do this, take a rectangular sheet of paper and make alternate folds along a straight line, first forward and then backward. The finished part is inserted into the hole of the CD to the middle and the edges of the “accordion” are straightened with your hands. The result is spectacular corrugated fins. All that remains is to glue on the toy eyes.
Soaking in a chlorine solution, like, “Duckling”
A similar product is diluted 1 to 1 with water and the shells are soaked in it for 30 minutes. If it was not possible to achieve the required result, then it is worth extending the process.
The fact is that the material may be very dirty with the presence of a dark outer layer (periostracum). After this, the workpieces are cleaned with a brush and washed with running water.
Convex small stars
Prepare paper strips 2 cm wide, 25-27 cm long. For the first time, to master the skill of folding, 5-6 pieces are enough.
Step back a few centimeters from the edge and make a loop. Pull the short end into the middle, tighten it and bend it inward. You will get an equilateral pentagon with a strip sticking out on one side. Wrap it around the pentagon in several layers, each time starting from the adjacent side. The second tip should also be hidden inside.
Gently compress the edges of the triangle so that the figure acquires volume. You can pry it a little from the inside with nail scissors. The figurine should be “pot-bellied”, almost round.
If you put 30-40 of these stars in a transparent glass fruit bowl, you will get a festive decorative element.
Learning to prepare live shellfish
If live or dead shellfish remains are found inside, then a disgusting smell is guaranteed. Removal methods:
- To do this, the shell is lowered into boiling water for about 5-7 minutes. Now the remains can be easily removed with tongs, nail scissors, or tweezers;
- Alternatively, you will need a microwave. When exposed to powerful microwaves, the shells are not damaged, but the inside will dry out, burn out and peel off. Now you can remove it; in most cases, the contents spill out freely when tilted.
Pillow
Fold the fabric in two layers. Using soap or a piece of chalk, draw a star on the top layer. Cut out. Sew both parts, leaving one side of the beam unstitched. Fill the pillow with stuffing and sew up the unstitched part. The sofa thought is ready!
The simplest pendant option for children
Kids must choose one of the most beautiful shells with an unusual shape. An adult drills holes, inserts fishing line, rope and the decoration for the child is ready.
Important: It is worth explaining to your child the safety precautions for using a shell pendant. It may have sharp spots, so you need to remove it before going to bed and wear it carefully. It is good if it is worn over a T-shirt and located in the solar plexus area.
Making jewelry
Seashells are used to make jewelry for fashionistas and resemble real jewelry.
- Seashells are attached with glue to bobby pins used to create hairstyles.
- If you carefully drill holes in the shells with a screwdriver or drill, attaching them to a wooden surface with masking tape, you can make chic earrings, necklaces, pendants that are in no way inferior to expensive jewelry. There are no such tools, use a sharp awl or needle. But you need to follow safety precautions. Then cover the surface of the product with shiny varnish. Accessories for products must be purchased in the store.
- Seashells will look very good on a Christmas tree. Moreover, a copy of the forest tree can again be made from wood chips painted greenish and decorated with a starfish at the top.
- To make a snowflake for a regular Christmas tree, the master makes a cross-section on a machine and then glues a snowflake from such ornate plates. You can also make earrings, jewelry for weddings or other special events from such details.
- A wreath is made from pine or spruce for the New Year, and it is quite possible to decorate it with shell material, decorated with stones or whole strips of such rhinestones.
- Glued small shiny stones give the products a rich look. Of course, the work is painstaking and requires patience, because each rhinestone, holding tweezers in your hand, must be laid out on the surface and attached. Therefore, the decoration of bracelets and pendants is very much appreciated. Making such jewelry is in demand and is a good idea for business.
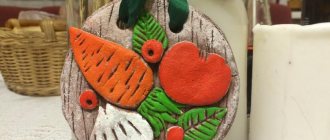
Shell Valentine
Manufacturing stages:
- A cardboard base is cut out in the shape of a heart;
- Now the surface of the base is glued with shells. They should not go over the edges.
The craft can be given as is, or used to frame photographs of young people or images from the parents’ wedding.
Now we have looked at enough interesting examples so that you can understand how you can make a sea craft from various seafood collected on vacation. But in this case, the quality of the product should not be the main goal.
It is very important to preserve the memory of a joint holiday with your parents; it will be able to recall the bright moments of childhood after many decades and will allow you to reveal the history of the craft to your own children.
Bottle for the underwater world
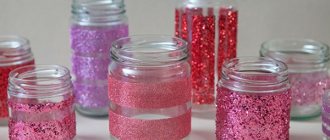
First you need to prepare: a plastic bottle, water, blue dye, vegetable oil, shells, pebbles, glitter, a cocktail straw, a funnel.
First of all, fill the container a third with water, add a little dye, and stir thoroughly with a straw. Place the selected decor inside and pour in a little oil through a funnel. Place the cap on the bottle. That's it, the unusual bottle world is ready.
We recommend reading:
- Crafts made from epoxy resin - stylish, original and beautiful products and decorations made from epoxy (110 photos)
Crafts from seeds: step-by-step instructions and tips for choosing the most beautiful ideas for crafts
- Crafts from airy plasticine - ideas for creating beautiful crafts, the main steps and a description of how to make a craft correctly (100 photos)
Photos of sea crafts
Aquarium with fish
You will need: a cardboard box, a simple pencil, a ruler, paints, a brush, scissors or a stationery knife, colored paper, markers, threads, glue, pebbles, shells.
Master Class
- Paint the inside of the boxes blue and the outside white, then leave to dry.
- Draw the outline of the glass using a pencil and ruler.
- Cut out the "glass".
- Draw or print bright fish, then cut them out.
- Cut out the bottom and seaweed from paper, then glue them on.
- Glue shells and pebbles to the bottom of the aquarium.
- Glue the threads to the fish, and use a needle to thread them through the top of the box and secure the knot, then hide the knots by gluing a strip of white paper.
The fish aquarium is ready! I recommend watching this video!