Small, cute gifts make great items during holiday greetings. Most often, such useful or simply cute trinkets are purchased in stores. However, often such gifts become quite expensive in terms of finances, and there is a high probability of purchasing identical things.
It is much more profitable to make souvenirs with your own hands from scrap materials.
Simple technologies
Making easy DIY crafts for children is not difficult. You just need to decide on an idea, select materials and choose a method of processing them.
Usually in such creativity they use ideas that a child can implement. It could be something simple but entertaining: a drawing, an applique, a plasticine figurine, a composition of vegetables, etc.
Classes may require certain things, for example, spools of thread, needles, glue, scissors, ruler, gouache, watercolor.
As you can see in the photo of easy DIY crafts, they can be created from paper, cardboard, wood, pebbles, dry leaves, pine cones, clay and waste materials.
Quick jokes for the family
Prank family members in every possible way. For example:
- While your spouse or parents are sleeping, secure their blanket to the entire perimeter of the mattress. To do this you will need a set of safety pins or regular hairpins.
- Hide food coloring of any color in the divider on the tap. Parents will have to wash their face with green or red water.
- If you “damage” the TV remote control, cover the sensor with a piece of transparent tape.
On such a day, the family should have fun, and not waste time watching news and TV shows.
Crafts using paints
Paints help to make stylish and unusual panels. At the same time, drawing and writing techniques are honed, which is important for fine motor skills. Can:
- Apply the image with your fingers. This technique is usually used to make paintings with sea and forest landscapes.
- Make impressions using potato or cork stamps. In this case, any subject matter of the works is acceptable.
- Create wax paintings. The technique is suitable for older children who already know how to draw.
Mints are refreshing
Many people know that when combined with cola, mints create an avalanche of foam. Few people dare to use this knowledge on April 1st. But in vain, because an offer to drink a cool cola will not arouse suspicion among friends and employees even on such a day.
You need to prepare for the draw in advance:
- Freeze water with mint tablets in ice cube trays.
- Buy a cola and pour it into your glass.
- Invite others around you to refresh yourself.
When your friend or colleague agrees, add 1-2 cubes of pre-prepared ice to the glass. Remember to move away to a safe distance.
Fun for April 1st: Pixabay
Options for homemade paper products
Paper and cardboard crafts have always been considered one of the easiest to make. Despite this, they look quite nice. From white or colored paper you can make:
- animals and insects;
- holiday garlands and decorations;
- Christmas decorations;
- Greeting Cards.
Ideas from cotton pads
Crafts made from cotton pads have a special elegance. From such unusual material you can make:
- flower with the addition of soft multi-colored pompoms;
- snowman on a postcard;
- funny chickens.
Such things can be used to decorate a nursery. They look very cute and cozy.
Unexpected birthday gifts
Multi-colored shiny beads are strung onto pieces of fishing line, and then they are hung on the shade of a regular lamp.
Damaged CDs can serve as material for making a beautiful dish.
Using the decoupage method, a unique candle decorated with fresh flowers is made.
We recommend reading:
- DIY crafts from Kinder surprise eggs - 125 photos of exclusive options with step-by-step instructions, master class and video
- Crafts made from twine - an overview of original design solutions. More than 100 photos of new products + step-by-step instructions for creating crafts with your own hands
- DIY crafts from candy wrappers: 150 photos of the best ideas from craftswomen. Simple instructions, master class, diagrams and video tutorials on creating crafts from candy wrappers
Ideas from napkins
Paper napkins have long become commonplace. They are used in table setting, when cleaning an apartment, and as a hygiene product. But not everyone knows that the product of the pulp and paper industry can be used to realize creative ideas.
Making easy crafts from napkins with your own hands can turn into an interesting hobby. From this material you can make photo frames, panels, paintings, dolls, figurines of fauna, flowers, and gift wrapping.
Christmas toy light bulb
So, for example, a simple glass light bulb can easily turn into a New Year's tree decoration or even a vase. Usually paint is applied to the outside of the glass.
It’s best to take acrylic – it dries faster and applies well. The light bulb can be filled with various beads, sparkles, and small things for decoration. The result will be unique and will be a delightful decoration for any occasion.
Stone crafts
Stone is one of the most accessible materials. It makes very stylish decorative items. To work with it you may need the following things:
- acrylic paints;
- glue;
- plasticine;
- clay.
From pebbles you can make a hot stand, a rug for a vestibule, a panel to decorate a wall in a kitchen or nursery, a vase for the garden, a candlestick for a gazebo, etc. Refrigerator magnets and key rings made from pebbles are in demand.
Flower pots
Select plastic bottles of the same size. Make holes in them.
Take a strong thread and thread it through both sides of the bottle. There can be up to 5 bottles in one row. Secure the bundle at the top.
Fill each pot with soil and you can plant any flowers or plants.
You can make the pot differently. Take a 2-liter water or juice bottle and cut it right down the middle. Using acrylic paint, paint the craft at your discretion. You can stick different stickers. These pots will look great on the windowsill.
Doll made of threads
As you know, a child never has enough toys. But buying a new one every day is too expensive. Therefore, it is worth learning how to make them yourself, using improvised means, for example, threads. To create a thread doll, you should prepare:
- floss threads;
- half a cardboard sheet;
- scissors;
- flesh-colored ribbon;
- markers.
Progress:
- Wind the threads onto the cardboard. The thickness of the thread layer should be large.
- Tie the completed winding with thread. Determine the location of the doll's head and mark it by rewinding it with thread.
- Design the arms and legs in the same way.
- Measure the flesh-colored tape according to the volume of the head. Glue its sides.
- Wrap hair threads around your hand. Cut the resulting roll on one side and glue it to the head.
- Use felt-tip pens to sketch out eyes, eyebrows, mouth. The toy is ready! If you wish, you can sew clothes for her using old scraps.
Stationery stand
Such a product will not only be beautiful, but also useful. For the construction you will need bushings, a cardboard box, glue, as well as stickers and other decor.
- The first step is to attach the sleeves to the bottom of the cardboard box.
- This can be done using regular glue.
- After connecting all the parts, the resulting structure is painted and covered with stickers, glitter and everything that the child can find.
- Having built such a thing on their own, children will probably begin to put all their pencils and pens back in place.
It's always a pleasure to create something with your own hands. And when children are involved in the process, the work becomes more fun and interesting. Together you can come up with even more great ideas. The most important thing is to do the craft with love, investing your soul, and then everything will definitely succeed.
Fabric animals
You only have half an hour of time? Make these funny little mice. They do not require sewing. By cutting the slits in a certain way, you will create colorful cute toys for your child to play with. Look in the craft box for leftover felt, juice straws and beads.
Move the glue and scissors closer. Progress:
- For each rodent, prepare 2 parts from the same material. The first will be the body, pointed at the head.
- From fabric of a different color you should make “8” shaped ears and a nose.
- Next, you need to take scissors and make 4 cuts on the body: 2 vertical on the back of the head and 2 in the rump area.
- All that remains is to place the ears, glue the nose and attach the beads in place of the eyes.
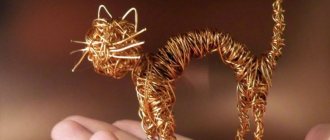
Materials
Any materials can be used as sources. They could be:
- wood, in all its manifestations: sticks, boards, saw cuts;
- textile;
- yarn;
- paper.
As decoration you can use:
- lace;
- ribbons;
- beads;
- coins;
- rhinestones;
- shells and everything else that has not yet found its place.
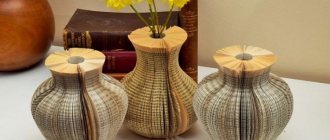
Crafts made from plywood
When arranging interiors, designers increasingly began to use plywood products. Of course, you can buy a figurine in a store, but it’s much nicer to make it yourself. In this case, you do not need to have carpentry skills at all.
To make lightweight plywood crafts with your own hands, they are not required, nor are the use of expensive tools. You just need to print out the design you like, transfer it to a wooden base and carefully cut it out with a jigsaw. If desired, the finished product can be painted or varnished.
Original bouquet
Disposable plastic spoons and forks can form an unusual original bouquet. The devices can be painted in any desired color, and then fastened together with string or plasticine.
It would be a good idea to build a vase for such a bouquet using empty cans or plastic bottles. They are also decorated, and the craft turns out delicious and unique.
Cardboard decor ideas
In winter, when there are few sunny days, it’s time to start creating cardboard crafts that will lift your spirits. Get a bouquet of cheerful flowers on your windowsill. To do this, take:
- some colored paper;
- white cardboard;
- felt-tip pen;
- scissors, glue;
- ribbon.
The procedure for making one flower:
- cut out three blanks (two with six petals from colored paper, one in the shape of a circle from cardboard);
- make holes in the cardboard element for eyes and smiles;
- put the part with the petals in front of you and glue a piece of cardboard in its center;
- Color the eyes with a black felt-tip pen, bend the petals forward;
- cut out a stem from cardboard, on one side of which glue the finished flower blank, on the other - a pre-cut part with petals;
- Make a leaf out of green paper and attach it to the stem.
Having created the required number of flowers, they should be tied with a ribbon and placed in a vase.
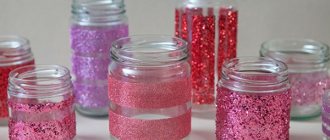
Candles in jars
In order to make such a craft you will need:
- Autumn leaves;
- An empty jar, which must first be thoroughly rinsed and dried;
- PVA glue;
- The candle itself (scented is perfect);
- Any decorations (ribbons, beads, decorative tape, etc.).
The manufacturing process is quite simple. You just need to prepare everything you need, and then decorate the jar as you please. Finally, a candle is lowered inside.
On rainy autumn evenings, this craft will create a cozy atmosphere and give you a good mood. Instead of leaves, you can glue snowflakes cut out of paper, and then a New Year's version will come out.
Vegetable crafts
The arrival of autumn means that it's time to make crafts from vegetables and fruits. Even kids can do this task. Age doesn't matter here. If desired, you can create an edible composition. After the child gets bored of playing with it, he can eat it.
Nowadays, there are a lot of options for vegetable crafts. What idea to realize depends on the imagination. If everything is bad with it, pay attention to the finished works, photos of which are posted on the Internet. Girls will definitely love the swan princess. And the boys can be asked to make a parrot - the companion of the pirate Silver.
Easy DIY crafts for beginners - just right if you decide to get creative, but don’t have any special skills. By creating them, you will gain experience and be able to determine for yourself the most promising directions in needlework.
Videotapes
Once costing a significant amount of money, video cassettes are now completely unnecessary. VCRs have long been replaced by new technologies.
If the cassettes have not yet been thrown away, they will find a worthy use. They can make fashionable shelves for books and trinkets. Such cassette shelves will certainly attract the attention of guests with their originality.