If, while setting the table, you suddenly discover that you don’t have a napkin holder, don’t be upset. You can easily make it yourself from any available material. For example, from cardboard. It is always in the house, and it is convenient to work with it.
Thanks to this publication, you will learn how to make a variety of napkin holders with your own hands - I present as many as 10 step-by-step master classes with unique photographs and descriptions.
We choose quality material
The main material is plywood.
The choice is always difficult. Each of us has probably encountered such a problem as delamination of plywood from the end part and asked the question, what causes this delamination? Well, of course, this is mainly due to low-quality plywood. If this is not the first time you have picked up a jigsaw, then you can select plywood from the remnants of a previous craft. If you are new to sawing and you don’t have plywood, then buy it at a hardware store. Choosing material for sawing is always difficult. You should always choose plywood carefully, often look at the defects of the wood (knots, cracks) and draw conclusions. The difficulty in choosing plywood lies in the fact that no matter how you guess at its defects and shelf life. For example, you bought plywood, cleaned it, translated the drawing and suddenly it began to delaminate. Of course, this has happened to almost everyone and it’s oh so unpleasant. So it’s better to pay attention when choosing and choose good plywood. I wrote a special Article that describes step by step all the principles of choosing plywood
Stripping plywood
We clean our plywood with sandpaper. As you already know, “Medium-grained” and “Fine-grained” sandpaper is used for cleaning plywood when sawing. You've probably seen sandpaper in hardware stores, and that's what we'll need. In your work you will need “Coarse-grained”, “Medium-grained” and “Fine-grained” sandpaper. Each of them has its own property, but a completely different coating, by which it is classified. “Coarse-grained” sandpaper is used for processing rough plywood, i.e. which has many defects, chips, and cracks. “Medium-grained” sandpaper is used for processing plywood after “Coarse” sandpaper and has a slight coating. “Fine-grained” or otherwise “Nulevka”. This sandpaper serves as the final process for stripping plywood. It gives the plywood smoothness, and therefore the plywood will be pleasant to the touch. Sand the prepared plywood in stages, starting with medium-grain sandpaper and ending with fine sandpaper. Sanding should be done along the layers, not across. A well-polished surface should be flat, completely smooth, glossy in the light and silky to the touch. How best to prepare plywood for sawing and which sandpaper is best to choose Read here. After stripping, check the plywood for burrs and small irregularities. If there are no visible defects, then you can proceed to the process of translating the drawing.
Translation of the drawing
For me, drawing translation has always been the main process in my work. I will tell you a couple of rules, as well as tips for high-quality translation of a drawing. Many people transfer the drawing onto plywood not only using a pencil and copying, but also using “Black Tape”, glue the drawing to the plywood, then wash off the drawing with water and the markings of the drawing remain on the plywood. In general, there are many ways, but I will tell you about the most common method. To transfer the drawing onto prepared plywood, you must use a copy, a ruler, a sharp pencil and a non-writing pen. Fasten the drawing in plywood using buttons or simply hold it with your left hand. Check if the drawing fits the dimensions. Arrange the clock drawing so that you can use a sheet of plywood as economically as possible. Translate the drawing using a non-writing pen and ruler. There is no need to rush, because your future craft depends on the drawing. For those who are still in a hurry, it is possible to translate a drawing faster; the method of applying a drawing to wood is described in detail in the article on drawing drawing technology
Drilling holes in the parts
As you have already noticed, there are four grooves in the parts that need to be cut out from the inside. To cut such a part, you need to drill holes in it using a hand drill or, as in the old fashioned way, make holes with an awl. By the way, the diameter of the hole must be at least 1 mm, otherwise you can damage the elements of the drawing, which, alas, are sometimes difficult to restore. To avoid damaging your work table when drilling holes, you must place a board under the workpiece so as not to damage the work table. It is always difficult to drill holes alone, so ask a friend to help you in your task.
Simple technique - minimum details
Often everything gets done with three parts.
In order to get a napkin holder, we need to make three or four parts. Why three or four, you will now understand.
Each such device consists of:
- two parallel side parts. They can be either the same or completely different, it all depends on your imagination. On each fragment there are connecting spikes, their length corresponds to the thickness of the base;
- bases with joining grooves.
As a result, we get three parts. Very often, the assembled composition is placed on a base, which is made of thicker plywood. This foundation is the fourth detail that, in principle, can be dispensed with.
The number of parts can be increased.
From drawing to material selection and drawing
Drawings of a plywood napkin holder are quite simple to make.
During your first attempts at writing, we do not recommend making a complex drawing with a lot of curls, although the skills will come very quickly.
It is enough to focus on two points:
- acquiring skills in working with plywood;
- creating a functional product that will not burn in the stove after an unsuccessful experiment.
You don't have to start with complex patterns.
Having drawn the contours of the future side parts, the design is cut out. If the product involves internal closed cavities, then they are also cut out. This part will serve as a template for applying a pattern to the plywood; all you have to do is trace the contours of the stencil attached to the plywood.
Thus, as in the photo, you can transfer the design to plywood.
Manufacturing process
Now it's time to consider how to make a napkin holder from plywood.
The drawing is drawn, we gather our courage, prepare the instrument, and begin:
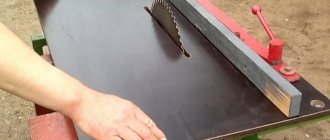
- a piece of plywood is attached to the work table. The process of reliable fastening will be provided by clamps or a vice. Usually two clamps are enough, and for working with small fragments one is enough;
- Using an electric tool or a hand jigsaw for wood, we begin to cut along the contour of the workpieces, not forgetting to leave space for the joining tenons;
The more patterns, the more painstaking the process!
- if you are planning internal recesses of plywood of a bizarre shape, then in the largest place of this recess, drill a hole with a wood drill so that the saw of a hand or power tool can be inserted without effort and can be used to cut in any direction;
- the finished parts are sanded with sandpaper, the edges of the internal closed fragments are processed with needle files.
Assembly and painting
The final stage is gluing the elements.
Assembly is quite simple - do it yourself. The side parts are inserted with prepared tenons into the grooves. Before assembly, PVA glue is evenly applied to the spikes with a brush.
The work is almost finished: the result is a useful homemade product!
If you have any other glue that is used for gluing wooden parts, use it in accordance with the instructions for use. After the glue has dried, the finished product can be painted. For these purposes, either acrylic paints or varnish + stain are suitable.
Interesting ideas
There are stands for napkins made of wood, where the napkins just lie, there are those where they are rolled up, stand on their side in a storage unit, or lie on a backing. Less often, there are very original ideas for the base of a napkin holder in the form of a female figure or a simple plot.
Dripping napkin holder bloody
Design approach to the design of a napkin holder:
- The edges of the white wall are made uneven with smooth roundings.
- Some of the slits are made in the form of a leak of viscous liquid and are cut quite deeply.
- By inserting red napkins there, we get a gorgeous visual effect of bloody smudges.
Dripping napkin holder.
Ballerina
The base of the napkin holder in the form of a female figure is made of plywood:
- A ring with slots for attaching napkins is made around the waist or along the hips.
- The napkin itself is folded diagonally and the sharp end is inserted into the slot.
- Its right angle remains inside.
- Thus, when all the napkins are installed on the base, you get a beautiful ballerina skirt.
In a similar way, you can create a female figure by using napkins as hair, styled in an intricate hairstyle.
Girls napkin holders.
Country chair
This is a wooden napkin holder in the form of a carved chair with a back made of dies. Stylish and pleasant decoration for the kitchen. The napkins are placed on the seat without folding.
Ship
The walls of the napkin holder are made in the shape of a sailboat. This is already done by laser cutting using special equipment.
Napkin holder-ship.
Varnishing crafts
If you wish, you can transform our craft by covering it with wood varnish, preferably colorless, this will allow the burnt pattern to stand out more strongly on the surface of the napkin holder. Read how best to varnish a craft. Try to choose a quality varnish. Varnishing is carried out using a special brush “For glue”. Take your time. Try not to leave visible marks or scratches on the craft.
Template for a plywood napkin holder in PDF format you can download from the link: salfetnitsa-iz-faneryi-chertezh.pdf (17052 Downloads)
Wooden napkin holder
A wooden napkin holder in the shape of a maple leaf will become a real table decoration
A wooden napkin holder will be a wonderful decoration for any dining table. It is also perfect as a gift for loved ones.
The process of creating such an original craft is more labor-intensive and time-consuming compared to making paper coasters. But even a beginner can make such a napkin holder.
Tools and materials
To make a napkin holder with your own hands from wood you will need:
- Plywood.
- Product drawing.
- Coarse, medium and fine grit sandpaper.
- Copy paper.
- Ruler.
- Sharp pencil.
- Non-writing ballpoint pen.
- Awl.
- Hand drill.
- Jigsaw.
- PVA glue.
- Strong thread.
- Electric burner.
- Varnish.
- Brush for applying varnish.
Selection of raw materials
The main material is plywood. It is recommended to purchase it only in construction stores, carefully inspecting knots and cracks.
Preparation of material
The selected plywood must be cleaned with sandpaper. The sanding process should be carried out in stages: experts recommend starting with medium-grained sandpaper and ending with fine-grained sandpaper along the layers.
A properly sanded plywood surface should be flat, absolutely smooth, glossy in the light and silky to the touch.
After finishing the cleaning, you need to examine the material for the presence of burrs and small irregularities. If no visible flaws are found upon inspection, you can proceed to the next step.
Translation of the drawing
In order to transfer the drawing onto prepared plywood, you will need carbon paper, a ruler, a sharp pencil and a non-writing rod.
Drawing of a napkin holder in the shape of a maple leaf
The drawing should be attached to the plywood with buttons or simply held with your left hand.
It is imperative to check the compliance of the selected drawing with the dimensions of the plywood and place it to maximize material savings.
Copy paper must be placed on a plywood sheet, and on top of it - a drawing of the future product. Then carefully, using a ruler and a non-writing pen, you need to transfer it onto the tree.
Creating holes in parts
There are four grooves in the base part of the napkin holder that need to be cut out from the inside. To do this, you first need to drill holes in it with a diameter of at least 1 mm with a hand drill or make them with an ordinary awl.
To prevent damage to the workbench, it is recommended to place a board under the plywood sheet before drilling.
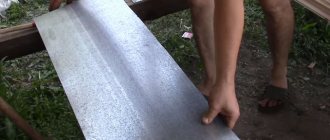
Sawing blanks
The next step in making a napkin stand is cutting out the parts.
First you need to carefully cut out the internal elements and only after that you can proceed to the external pattern.
The part is cut out along the marked lines using even up and down movements of the jigsaw.
Bevels and irregularities formed during the process can be eliminated using a flat file or coarse sandpaper.
Cleaning parts
The cut elements must be thoroughly cleaned with sandpaper.
To do this, use medium-grain sandpaper to sand the ribs and back of the parts. Then use fine-grained sandpaper to complete the sanding. She is also recommended to clean the front surface of parts.
A rounded file can also be used for cleaning. It makes it very convenient to clean the inside of holes.
Gluing parts
The prepared parts of the product must be assembled into a single whole and only after that they can be glued together.
For gluing, you can use PVA or Titan glue. It must be applied in a thin layer on the surfaces of the parts and pressed against each other. It is recommended to tie the assembled product with a strong thread, tighten it and leave it until the glue dries completely.
The gluing of the craft occurs within 10-15 minutes.
Decoration
The finished stand can be decorated with different patterns. To do this, you need to draw the design you like on the product with a simple pencil and burn it out using an electric burner.
If desired, the finished wooden napkin holder can be coated with a layer of colorless varnish. To apply it you must use a paint brush.
Music stand "Lyre"
Scheme for cutting out a music stand with an applied ornament using a jigsaw. Designed for music notebooks with A4 sheet size. Sketches by S.I. Kushchenko (1934) are taken as the basis. The drawing makes it possible to make a luxurious gift for a musician with your own hands at home.
Expert opinion
Strebizh Viktor Fedorovich, leading construction foreman
For a long time, Russian people, having cleaned their hut and completed field work, took up the art of carving wood on endless autumn and winter evenings. If you want to clarify something, please contact me!
Festive table setting
Let's complicate the task a little and try to fold several pockets at an angle. This example will be needed if you are looking for how to beautifully fold napkins on a holiday table. For this:
- We position the square so that the open corner is on top. Pull its tip down. Smooth out the fold line. Return the corner to its place.
- Focusing on the ironed line, apply a triangle. After that, we roll it into a strip. We repeat the action one more time.
- After this, we need to fold another layer of napkin in a similar way. You should end up with two folded strips in the center of the paper.
- We turn the workpiece over so that the straight side is in front of us. We apply one and the second edge to the middle. Carefully iron the fold lines.
Turn the product over and you will see the resulting cutlery pockets.
Step-by-step methods for folding napkins in a napkin holder
Napkins should be used during festive occasions and during regular meals. For everyday use, there are stands that do not require special skills for quick folding. It is enough to take the products out of the packaging and place them there. Some models are equipped with a holder that ensures they retain their shape and neatness.
How to fold "Rose"
A royal flower made from an ordinary napkin will add romanticism to any event. To implement your idea, follow these simple steps.
- When unfolded, spread the napkin in one layer on the surface. Next you need to fold it diagonally.
- In the fold part, it needs to be wrapped a couple of times so that a piece of material remains. It will serve as the stem of the flower.
- The strip that turns out to be bent is the bud. It curls up, the rest curls up. The result will be a stem.
- Flatten the top of the inflorescence to create a rose shape.
- If desired, make petals from a green napkin. The resulting flowers can be placed in a glass or plate.
This method helps out when there are no napkin holders at hand.
How to make a “Flower in a Glass” from napkins
To work you will need one glass and ten napkins. Next follow the instructions:
- take one product, place it on the glass so that the corner of the napkin falls inside;
- the other three corners are outside the container;
- lightly press the napkin to create a fold line;
- Place the second one close to the first one so that it rests slightly on it;
- the third piece is placed in free space;
- then lay several tiers, performing similar actions;
- then take another napkin and turn the glass upside down on it;
- Holding the workpiece with your hand, remove the dishes, you should get a voluminous flower.
Tips for preparing and assembling plywood crafts
Some useful tips and warnings:
When transferring patterns and drawings onto plywood, use the thinnest and sharpest pencil lead. It's even better to use a used ballpoint pen, then the lines will always be the same and the copy paper won't be torn by the ballpoint. It is convenient to transfer drawings to plywood using a laser printer. For better fastening of parts, where possible, it is recommended that the width of the grooves correspond to the thickness of the plywood sheet. There are two types of files with large and small teeth
It is more convenient for beginners to learn how to use a thick file, and cut out small parts with a thin file, already having some experience and skills in using a jigsaw. The files must cut from top to bottom, so pay special attention to the correct fastening of the file in the jigsaw. Files can easily break, so cut carefully and do not allow parts to hang on the saw blade. When purchasing a file, make sure that the teeth are sharp, and that the file itself should not bend easily, but rather be firm. It’s not the flat ones that are easy to use, but the so-called “twisted” files – they can be used to make cuts in any direction. For those who have a hobby cutting out structures from plywood sheets, there is no need to purchase a band saw; it is enough to purchase a jigsaw
Although everyone is an amateur, some craftsmen still often resort to a hand jigsaw when they “need to get a feel for the material.”
Pros and cons of the material
Plywood products are durable and, at the same time, inexpensive. The quality of the material is assessed by the smoothness of the surface, the absence of knots and cracks.
Plywood has many advantages:
- the material is resistant to mechanical damage;
- low price segment;
- ease of use and assembly of the product;
- versatility of use.
Despite the above advantages, there are also disadvantages:
- standardized sheet sizes;
- the material is not resistant to moisture;
- impossibility of leveling the surface of the plywood sheet.
A little history of napkins
Napkins appeared more than three hundred years ago; they were sewn from expensive fabrics, decorated with embroidery, and were used by noble, rich people. Over time, with the development of manufactories, napkins began to be used by different segments of the population. These beautifully designed items, most often embroidered, were used at celebrations, were carefully stored and passed on from generation to generation.
Then the napkin, folded in a certain way, was threaded into a special ring and in this form was placed near the cutlery. Nowadays, also on special occasions, linen napkins threaded into a ring are used, which give the set table a solemn appearance.
Over time, disposable paper napkins appeared, which we all actively use. Many different items are used for table setting, and a beautiful napkin holder is one of them.
Metal products
Stainless steel with its mirror-like shine is ideal for creating a variety of cutlery. Products made from it do not corrode and are durable.
- There are also attributes for feasts made of silver, yellowish brass or aluminum.
- Any metal can fit organically into the design of a family breakfast or a luxurious, formal table.
Napkins beautifully arranged in a napkin holder with an engraving or a lacy metal insert decoration can create a rich and elegant holiday reception design.
They will look even better if there are other serving items on the table, such as vases, candelabra or spice stands, made in the same style.
For ultra-modern interior styles, metal napkin holders are made with deliberate simplicity and are more reminiscent of man-made structures.
Homemade napkin holder made of wood
To make this napkin holder with your own hands, you should prepare the following materials in advance:
- pieces of plywood;
- a simple pencil;
- jigsaw;
- PVA glue;
- strong thread;
- pen (not writing);
- wood burning device;
- copy paper;
- sandpaper (various degrees of grit).
Procedure.
- The selected plywood is first thoroughly cleaned using sandpaper. This process must be carried out in stages. After this, the material should be completely smooth and have a glossy surface.
- Then a suitable drawing of the openwork pattern is selected. It is transferred to wood. To do this, it is better to use carbon paper, a simple sharp pencil, a ruler, and a non-writing ballpoint pen. To make it more convenient to work, it is better to attach the drawing to the plywood with buttons.
- At the base of the future stand, holes are made that will act as grooves. There should be 4 of them in total. Such elements are cut out from the inside. In this case, holes are first drilled in the workpiece, the diameter of which must be at least 1 millimeter. They can be made using a regular awl.
- Now you should start cutting out the blanks. First you need to make the internal parts, after which they move on to creating the external pattern. The work is carried out along pre-marked lines with careful movements of the jigsaw in the up and down direction.
- Next, all cut out elements are processed with sandpaper. After this, they begin gluing the resulting wooden parts. To do this, it is better to use PVA adhesive.
When the napkin holder is completely ready, it is decorated with a variety of patterns. In this case, you should first draw a sketch with a simple pencil, and then carefully burn it out using a special electrical apparatus.
Advantages and disadvantages
Wooden napkin holders have an attractive appearance and are made from natural, environmentally friendly material. Various types of wood can be used to make this serving item. This material has unique characteristics, thanks to which it is possible to give the napkin holder any shape, decorate it with carvings or engravings.
Advantages of wooden napkin stands:
- material safety;
- many original options;
- the ability to manufacture objects of various shapes;
- ease of product care;
- Ease of use;
- attractive appearance.
Disadvantages of a wooden serving item:
- does not fit into every interior;
- higher price compared to plastic products.
A wooden napkin holder must have high-quality processing, then it will serve for many years, decorating the table.
Form options
Wooden napkin holders can be of three types:
- closed;
- open;
- curly.
Closed napkin holders have a minimalistic design and resemble ordinary boxes in appearance. Such stands can be carved, artificially aged, or maintain a natural appearance.
Open products can be square or rectangular and consist of one or more compartments. One compartment is designed for standard-sized napkins, while the other can store salt and pepper containers, for example.
Figured stands are unusually beautiful wooden products that can be made in the shape of houses, castles, forests, various animals and much more.
Square
Square products can be either horizontal or vertical. But the horizontal version is more common. These napkin holders look very laconic and have a discreet design.
Triangular
Triangular napkin holders are another fairly common type of vertical napkin holder. Despite their simplicity, they look quite stylish.
Other
It’s hard to imagine all the variety of shapes of wooden napkin holders. Curly napkin stands depicting carved silhouettes are very popular and in demand. This could be, for example, the figure of a ballerina, or a product in the form of a girl in a dress with a fan or an umbrella. The originality of this design lies in the fact that the napkins are laid in such a way that they form a beautiful dress.
A napkin holder can be in the form of kitchen utensils: a teapot, a cup, a pan. It may look like the silhouette of some fruit: an apple or a pear. Animals, including fairy tales, flowers, birds, leaves, ships, buildings. Anything can become the basis for making a napkin holder.
How to make from newspaper tubes?
Now let's look at a master class that allows you to make beautiful napkin holders from newspaper. In order to weave this original stand, you will need the following materials and accessories:
- old newspapers;
- scissors;
- glue stick;
- stationery knife;
- long knitting needle.
Step-by-step algorithm.
- First you should prepare the newspaper tubes themselves. To do this, sheets of newspaper are cut lengthwise, and the width of each resulting element should not exceed 5-7 centimeters. In this case, you should cut strictly according to the fibers. Otherwise, the workpieces may turn out unsightly, and it will be much more difficult to twist them. Before you start weaving, you should put a little pressure on the paper - if the tear is even, it means that it goes along the fibers.
- Then one edge of the strip is folded onto the edge of the knitting needle so that it is placed at an angle of 45 degrees in relation to the rest of the material. Next, they begin to gradually wrap the paper onto a metal knitting needle until a thin tube is formed.
- The ends of the paper blank are carefully coated with adhesive. When it dries a little, carefully remove the knitting needle. This procedure is repeated with all newspaper cut out parts.
Later, the finished paper blanks are painted. This will make the napkin holder more beautiful and colorful. For this you can use various compositions.
- Acrylic paint. This substance will give the finished product a light glossy finish. As the paint dries, it will begin to harden, so it is recommended to apply it to the finished craft.
- Gouache. These coloring compositions have fairly bright and saturated shades. Before use, it is better to dilute them with a small amount of water.
- Wood varnish. This substance for coating a napkin holder will give it a rich and juicy shade. But it will be necessary to apply several layers.
- Stain. It can be made on an alcohol or water basis. This composition is sometimes also diluted with water.
If desired, the tubes are additionally decorated with sparkles and rhinestones. As a result, the blanks will acquire an unusual and beautiful design. After this, you can begin the process of weaving a napkin holder.
There are a wide variety of weaving techniques.
Let's look at how to make a square-shaped product.
- To do this, first take a sheet of paper and mark it where the racks of the future kitchen napkin holder will be placed. Place one newspaper tube on each rack.
- Two rolled paper blanks are carefully connected to each other using an adhesive substance, and the whole thing is bent. The resulting element is put on the first stand, then they begin to weave a rope into two tubes until the end of the row.
- Then weaving is carried out in the opposite direction. To make a turn, you need to turn over the bottom tube, and then the top one. In this way, make 4 rows, gradually increasing the newspaper tubes, inserting them into each other behind the counter.
- One tube will need to be hidden, while the second piece will be built up. Weaving continues with chintz until a fabric is obtained, the length of which is 18-20 centimeters. During work, it is better to hold the workpiece a little so that the side parts do not lose their shape.
- It is better to immediately hide the free ends of the material in front of the stand, then they are simply cut off. As a result, the front side will have to be a flat part in the shape of a rectangle.
- Next, the napkin holder is turned over to the wrong side. The package with napkins is attached strictly along the center line. A paper sheet is folded around it, and it is fixed in this position with a thin elastic band.
- After this, the product is well coated with an adhesive composition or colorless varnish. Then 2 double parts are formed from 4 newspaper blanks, they are glued at the distance where the edge of the napkin holder will be placed. They wrap the workpiece with it. All of this connects to each other.
When the product is completely dry, you will need to carefully remove the package of napkins. If desired, the finished craft can be decorated with various decorative details. At the same time, it is best to glue them at the joints of elements to hide them.
You can also weave the product, creating an imitation of a vine.
Beautiful examples
Unpainted products are very popular, where the beauty of the natural texture of wood is clearly demonstrated. Such products are coated with oil or varnish and have a natural appearance.
The napkin holder, which can be called “Toreador,” looks very nice. One wall looks like the silhouette of a bullfighter, while the other is the silhouette of a bull. When red napkins are inserted into the gap, a complete picture of a bullfight is obtained.
The napkin stand can depict an air cloud. To do this, the edges of the white serving item are made uneven, its contours reminiscent of the drawing of a child’s cloud. If you put colored napkins in the napkin holder, the effect will be excellent.
A product that resembles a cup of coffee in appearance also looks interesting on the table.
Another interesting idea is a napkin holder in the shape of a crown.
Maybe a napkin holder in the shape of a medieval castle, two hearts, butterflies, a wooden hut, a steering wheel.
Some people prefer napkin holders that have a simple rectangular shape but have interesting designs burned into the surface. Themes for images can be very different, it all depends on personal preferences.
Napkin holders are a special serving accessory. Thanks to the right wooden napkin holder, the decor takes on a special touch. And if the product is made with your own hands, then it will be unique and unique.
To learn how to make a napkin holder out of wood with your own hands, see the following video.
What to use for decoration
Whatever is at hand. Beads, plastic or cardboard figures in the shape of hearts or butterflies. Also used:
- ribbons;
- lace;
- ribbons from gift sets;
- small pebbles.
Acrylic paints
The base of the napkin holder can be painted with acrylic paints, depending on the material. Paints are sold in all craft stores. If you have a penchant for drawing, draw a beautiful picture or episode. Alternatively, you can paint with chaotic strokes.
Decoupage
How to decorate:
- Select a napkin with the desired pattern.
- The selected scene is cut.
- All layers of the napkin are separated, leaving only the layer with the pattern.
- The base needs to be coated with decoupage glue-varnish.
- The drawing is pasted and again coated with glue-varnish on top.
This varnish can also be used to coat a product painted with acrylic paint.
Electric burner
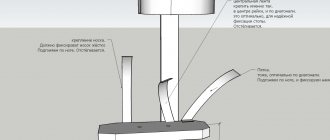
A scorched design looks beautiful on wooden crafts or plywood. It’s not difficult to use an electric burner; you don’t need any special skills for this:
- To begin with, there is a drawing.
- Then it is transferred to plywood using carbon paper.
- The contour is treated with a burner.
Varnish mixed with stain
Wood is treated with stain to provide protection from moisture and rot. It also has color. The varnish creates a final protective film and also protects from UV rays. In combination, varnish and stain provide reliable protection to a wooden product and protect it from moisture and premature aging, while creating a beautiful surface.
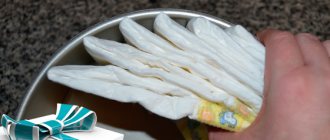
Napkin holder made from CDs
You can make an unusual napkin holder with your own hands from ordinary computer disks, which gather dust in huge quantities in every home.
Tools and materials
To work you need:
- CD/DVD discs – 3 pieces.
- White kitchen napkins.
- Multi-colored napkin for decoupage.
- Scotch.
- PVA glue.
- Glue gun.
- Acrylic paint in gold, blue and white.
- Acrylic lacquer.
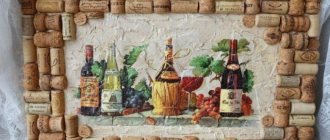
- Wine cork.
Preparation of blanks
To make a napkin stand, you need 3 computer disks: two of them will serve as side walls, and the third will serve as the base of the future napkin holder.
Using a stationery knife, you need to cut the disks as follows: cut off one side part of two disks, and two of the third.
Blank for side wall
Blank for the base of a napkin holder
Seal the central part of the disks with the hole with several layers of tape.
Decorating blanks
It is necessary to prepare a mixture of PVA glue and water in a 1:1 ratio and use it to glue a white napkin to the blanks using the decoupage technique
To do this, you need to dip the brush and carefully blot the napkin with it, trying to create wrinkles.
After the glue has completely dried, it is necessary to apply a layer of white acrylic paint to the central part of the workpiece, sealed with tape, and let it dry.
You should cut out two designs from a colored napkin for decoupage and stick them on the central areas of the blanks with acrylic varnish.
After the varnish has dried, all surfaces of the parts, with the exception of drawings, must be covered with two layers of blue acrylic paint and dried.
Apply a few drops of golden acrylic paint to the rough surface of a kitchen sponge and rub it on the polyethylene. With short, jerky movements, you should walk over the entire surface of the workpieces, without affecting the drawings.
Decorating blanks using decoupage technique
The final stage of decorating the blanks is to decorate them with napkin flagella in the paper art style. To do this, you need to form thin paper threads from napkins, paint them with gold acrylic paint and glue them to the outer surface of the workpieces using decoupage varnish or acrylic varnish.
Decorating blanks in paper art style
Assembly of parts
Using a utility knife, cut the wine cork into four parts and cover them with gold acrylic paint.
Glue 2 parts of the cut cork with a glue gun onto the inner surface of one side blank. They will serve as napkin stops.
The second side blank must be glued to the other side of the plugs exactly opposite the first.
After this, you need to apply hot glue to the lower edges of the side blanks and glue them to the base of the future napkin holder. All actions must be performed very quickly and carefully, because hot melt glue dries very quickly.
The final stage is the formation of the “legs”. For this purpose, the two remaining parts of the wine cork must be glued to the bottom of the napkin holder using a glue gun.
The protruding parts of the base of the napkin holder must be decorated with napkin flagella.
This napkin holder will be a real decoration for any kitchen.
The original napkin holder made from discs is ready.
It is also possible to decorate a napkin holder made from compact discs using ordinary colored paper, any cotton fabric, etc.
Making a cute and stylish napkin holder with your own hands is not at all difficult. This will require a minimum of cost and time. The main helpers in the process of creating it are the desire to make a quality item and patience.
Crown
The second classic version of the layout is with a crown.
- Fold each napkin diagonally without straightening the squares. You should get a triangle.
- Place the second one on the first napkin.
- Fold all the napkins in this manner, alternating.
- Place another napkin on the center on each side, wide side down.
- Place the crown in the napkin holder.
As you can see, folding napkins into a napkin holder beautifully is not difficult.
Tips and tricks
Napkins should be folded and laid only with clean, dry hands; the napkin holder itself should also be washed and dried. A greasy stain can ruin the most spectacular composition.
If the occasion is not too formal, such as a children's birthday party or a large family dinner, there is no need to carefully observe etiquette. It is enough to support only the shade of the tablecloth (or tablecloth-runner) with the color of the napkins. For a children's event, you can involve children in decorating the festive table, including folding napkins.
If the reception follows all the rules, then the table setting must comply with them. The use of oilcloth is not allowed. Only an immaculately clean and carefully ironed linen tablecloth can make the right impression.
Dishes and utensils must be thoroughly washed and wiped dry. They must also be absolutely the same for each guest. The number of cutlery near the plate should correspond to the number of dishes served. Napkin holders should be available to everyone who wants to use them.
All shades of leaf fall are suitable for an autumn celebration, and the entire palette of pastel colors is suitable for a spring celebration. Both variegated patterns and plain bright colors are suitable for a summer holiday. In winter, during the New Year holidays and Christmas, combinations of green, red and gold are appropriate, and later – blue, blue, white, as well as other “snowy” prints.
For the convenience of guests, it is more advisable to combine two types of napkins for serving: fabric and paper. Then some (textile) will lie on the laps of guests, while others (paper) will serve for hand and mouth hygiene.
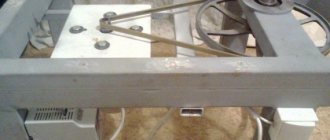
DIY napkin holder made of cardboard: getting started
A fairly simple template is offered for your consideration, but this does not make it any less attractive or practical. In this case, this “simplicity” is associated with familiarization with some basic techniques. If you don’t yet have experience in such events, then this option is just for you! You will be able to gain the necessary experience, and in the future create different ones from cardboard.
Cut out 2 rectangular and 4 semicircular pieces from thick cardboard.
You can increase or decrease the size of the future napkin holder as desired by changing the size of the blanks.
Use mounting tape when connecting parts. Do everything exactly as you see in the photo. It is necessary to tape over not only the inside, but also the outside.
A little tip: you can use more than just colored paper as decoration for a napkin holder. You can also choose cotton fabric in different colors. This will not change the work process, except for one thing: before tightening, the inside of the fabric must be treated with glue.
Trace the already glued blank onto colored paper. From each edge, retreat 3 centimeters.
Fold the cut colored paper and glue it around the workpiece using PVA glue. Try to avoid air bubbles.
After the glue has dried completely, make small cuts on the paper. They need to be made at the junction of the walls and the bottom.
The part of the paper that protrudes at the edges must be glued to the inside of the napkin holder. Then repeat the same procedure, but only on the side parts. Make jagged cuts as shown in the photo.
Glue the cuts to the inside. Use clothespins to prevent the paper from coming off until the glue dries completely.
Now that the main part is ready, it’s time to start making the last elements. The remaining blanks should be inside the main part, so they need to be trimmed a little (2 mm on each side). Do not forget to check the workpieces by periodically applying them to the walls of the finished part.
Let's now make an interesting and beautiful napkin holder with our own hands, which guests can put on the table along with original napkins. There must be a napkin holder, because it’s not easy to put napkins on the table, but they will stand neatly in the center or on the side. We will spend a couple of hours making the craft itself; we will take the material we need during the master class.
First, we need cardboard with a thickness of 2 millimeters, draw a circle on it and divide it in half, the radius is 8 centimeters. We also cut out the bottom, the size of which is 15x5 centimeters.
We also cut out similar parts from paper to cover the napkin holder. Make the internal parts one centimeter smaller.
We glue the cardboard blanks using instant glue. We wait until it dries.
Before covering the outer part with paper, we cut out similar blanks from the fabric.
Take a colorful cloth and smooth it out.
This is how the blanks need to be laid out, and then cut out of the fabric but with an allowance of 1-2 centimeters.
It is visually clear that fabric blanks are larger than paper blanks.
We cover the walls of the napkin holder with paper blanks, and do not spread too much PVA glue.
Apply glue to the white paper with a brush and glue the fabric. At the moment we are working only with the external side.
We make cuts along the bend so that it is easy to bend the edges.
Lubricate the edges of the napkin holder from the inside with glue and wrap the fabric.
Then, to cover the cardboard sections, we glue a piece of green fabric to the inside of the bottom.
We pour more glue on the bottom than on the walls.
Now we work with the interior decoration of the napkin holder, gluing the bottom and sides to the fabric.
We cut the fabric with allowances, make teeth on the bend, and make 45-degree cuts on the bottom at the corners.
We immediately wrap and glue the short allowances.
We put the bottom inside the napkin holder, but first we pour glue, and glue the long allowances to the walls from the inside.
On the side inner workpiece, we also wrap and glue all the allowances.
We glue the side blanks inside the napkin holder.
Now we make the bottom from the outside.
As for me, this homemade product is very difficult, since you need to master many methods and work with more than one material. Of course, in this regard it is easier to create or, but mixed types of homemade products are incredibly beautiful and useful in life.
We are not always able to choose the necessary and suitable accessories for the interior of the kitchen, bedroom or living room. Fortunately, you can always make them yourself. Homemade accessories will fit perfectly into the design of the room. Their additional advantage is that such a thing will be unique. So you can be sure that no one you know will tell you that they have the same accessory. Today we will talk about ways to make a beautiful and bright napkin holder with your own hands.
How to decorate a napkin holder?
Fantasy in this matter has no limits. Some craftswomen prefer to decorate a fresh device with decoupage. This solution is perfect for stylish modern kitchens or rooms with an eclectic design.
If a person knows how to draw, you can get by with acrylic paints. With minimal drawing skills, draw elementary patterns along the body of the product with a pencil, and then draw them with bright colors. You can do electric burning - it always looks great.
It is not forbidden to use beads, rhinestones, sparkles and other elements of bright life. Do not deny yourself the pleasure of pleasing your eyes. Every day you will see an item that was lovingly crafted by hand on your desk.
What are napkin holders used for?
Serving napkins is one of the main nuances of serving. By placing an elegant napkin holder, you can add individuality or solemnity to the table.
The product must be harmoniously combined with all table decorations and be one with the service and other decorative elements.
Napkin holders are installed not only in kitchens and on tables, but they can also be seen in bathrooms. There, the presence of paper napkins allows you to use them instead of a towel. For example, to quickly remove stains or drops of water, wipe your hands, wipe off steam from the mirror.
The modern market offers a wide range of different models of napkin holders.
Thus, three main models can be distinguished:
- Open napkin holders. This model is most often used when setting a table for meals or on a cutting table in the kitchen.
- Closed boxes. This accessory can be seen in the bathroom or in the bedroom on the bedside table.
- Figured stands. Refined, carved, decorated with stones and paintings: such products are placed on an exquisitely served table or as decor for the dining room and kitchen area.
The role of the napkin holder in the interior
A napkin holder, without a doubt, can be a good, high-quality and worthy decoration. A special and decorated model can be a very nice detail, and sometimes even the highlight of the kitchen. But their benefits are primarily practical - they are a serving item. Such an object is usually placed in the middle or slightly to the side of the table.
There is also a relatively unpopular method of application: in the bathroom. The paper napkins in the box are easy to get and use for their intended purpose: you can quickly remove drops of water, wipe your hands, and so on. For such cases, napkin holders are used not only in bathrooms and toilets, but also in any premises in general - in school classrooms, for example.