With its help, you can greatly facilitate the process of decorating cakes and make it enjoyable, comfortable and safe.
If you are not planning to purchase it in the near future, then an experienced craftsman can assemble it yourself.
Stocking up on materials
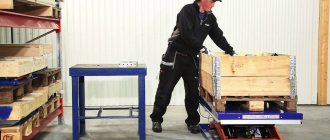
How to make a turntable? To begin, prepare all the necessary materials. You will need two bearings, which can be purchased at auto parts stores.
Please note that there are double, pressed bearings. The second option is preferable because you will have to tinker less.
The rotating table also needs a wooden slab. You can stock up on a door from a kitchen unit. In addition, you will need hard nails, self-tapping screws, plastic tubes, a metal circle, thin plastic, and plywood.
Assembling a folding transforming table
Sand the end parts of all cut parts using sandpaper (sandpaper) and cover them with melamine edges matching the color of the chipboard.
Fig.5 Assembly of the transformer table base
If you were careful and precise when marking the parts and sawing them, then assembling the table will not take much time and effort.
As shown in Fig. 3 and 5, first, using confirmations, we connect the bottom and sides of the box for the mechanism (in detail b of Figure No. 5 they are marked with crosses).
Using the same confirmations, at the required height from the floor, we fasten the magazine shelf to the end parts of the table - 2-3 fasteners per side.
We attach the box to the end legs using furniture corners; for greater reliability, we screw another 1-2 confirmats into the middle of the line of contact between the bottom of the box and the end plate of the table.
- Using card loops we assemble the tabletop;
- We attach a transformation mechanism to the desk drawer.
We attach the tabletop to the mechanism platforms:
If the mechanism is single, then we attach the lower part of the tabletop to one pair, and fasten the second pair together with a connecting panel (on the underside of the platforms).
If the mechanism is double, then we attach the tabletop to the large arms of the mechanism, and the supporting tabletop to the smaller ones.
Materials, fixtures, fittings and tools
For work, in addition to the material (it is better to use laminated chipboard for the table top and table frame elements), you will need:
- Tools – a jigsaw (or a hand-held electric miter saw), an electric drill, a screwdriver or a shaped screwdriver, a key for confirmations.
- Fasteners and fittings - their number, types and sizes depend on the intended design of the table, so we will talk about them in each case separately.
Case 1. Making a folding table - a transformer “coffee table”
If you decide to make a folding table - a transformer for the living room, then you will need to purchase special mechanisms for transformation (Fig. 1 or 2). Such a table will perfectly masquerade as a regular coffee table until guests come over and you need to set a table for several people in the living room.
Transforming tables can have different dimensions.
Fig.1 Single transformation mechanism
Fig.2 Double transformation mechanism
Making such a table is quite simple, provided you strictly follow the instructions and procedure.
First of all, carefully review the proposed drawing of a folding table (Fig. 3), clarify its dimensions relative to your requests and, if necessary, make changes to your drawing.
Fig.3 Drawing of a folding table
- LDS plate (25mm):
- For the tabletop – panels 750x90 mm (2 pcs.);
- in case of choosing a double mechanism (Fig. 2) - another panel measuring 350x720mm for the auxiliary tabletop;
- in case of choosing the mechanism from Fig. 1 - a connecting panel, the length of which is equal to the distance between the mechanism platforms, the width is equal to the length of the mechanism platform.
For the frame:
- 2 panels 730x460mm (end sides of the table),
- 2 panels 730x150mm (side parts of the box for the mechanism, serving as a frame for the tabletop);
- 2 panels measuring 680x730mm (bottom of the mechanism box) and 730x730mm (shelf for magazines “d”).
- Mechanism for transformation: from Fig. 1 – 4 pcs. (2 right and 2 left), from Fig. 2 – 2 pcs.
- Fasteners – confirmations 8-10 pcs., furniture corners 4 pcs., card end hinges 2 pcs. (see Fig. 4), self-tapping screws for attaching the table top to the platforms of the transformation mechanism.
Fig.4 Furniture corners
Important! All parts must be cut very accurately; before final assembly, it is best to “bait” the main components of the table and, if necessary, adjust them to fit.
Tools
Having decided to make a rotating cake table with your own hands, prepare the following tools and materials :
two bearings (they can be purchased at any auto store);
Important: bearings are double and pressed. The second option is preferable when assembling a rotating cake stand, as they are more convenient to install.
Video
Watch a video about making a wooden turntable with your own hands.
A do-it-yourself cake turntable is needed not only by seasoned pastry chefs. This is a necessary item for those who cook for pleasure. Housewives who bake cakes coated with mastic cannot do without such a design. The main purpose of the rotating table is to facilitate the process of decorating the cake. That is, you don’t have to beat around the bush with the finished product; it will be enough to simply decorate the rotating cake. The baked goods spin around their axis, and you just need to have time to decorate them.
A cake turntable will make decorating your baked goods easier
Baking cakes is not only interesting, but also responsible. The quality of decoration determines the aesthetic appeal of the confectionery product and the ability to arouse appetite among consumers. Therefore, you cannot do without a special rotating round table designed for decorating sweets.
The stand consists of several parts. Using step-by-step instructions, you can make a cake turntable yourself.
Round table options
We will not list all the variations of the round table, because there are countless of them. However, there are several classic variations that are always relevant:
- A small round table with one massive leg in the middle.
- Classic table with 4 legs.
- A table with 4 legs that has several “floors” for storing books and magazines.
Article on the topic: Do-it-yourself loft-style table
However, tables are not limited to legs alone. Furniture stores in our country offer models with hidden recesses and folding shelves.
Labor costs and cost of making a table with a rotating center with your own hands
After finishing the work, I was interested in calculating how much it cost to install the rotating table. Money was spent:
- Fiberboard (0.5 m2) – 50 rubles;
- Chipboard (0.5 m2) – 100 rubles;
- liquid nails “Montazh” (tube 185 g) – 160 rubles;
- articulated leg for a chair - 70 rubles;
- sheet of whatman paper (1 sheet) - 20 rubles.
I bought sheet material from a furniture workshop as cutting waste. I took a piece of timber, hardware, and adhesive furniture tape from my supplies.
As for labor costs, the work took me no more than 8 hours.
DIY rotating table
DIY round table with a rotating center
After making my own turntable, I came across plans for an easier turntable project. You can use a hinged support with a vertical axis instead of a platform. This should be done as follows:
- a hole is drilled in the center of the round table,
- insert an axle with a plastic insert into it.
The table is assembled and attached to the rotating support in the same way as described above. What is attractive about this method of creating a round table with a rotating middle with your own hands? Because the table can be removed at any time, and the hole in the center of the table can be closed with a plastic plug.
Tabletop project with a rotating center
It was important to me to create a stand in the form of a turntable. Its design should be simple and not cause time or financial costs. The main idea is the design of the table plane rotation unit. I used a hinged furniture support. I decided to make a load-bearing plane from two sheets of fiberboard and chipboard. I don't use wood. Before making a table with a rotating center with my own hands, I prepared the tools and materials.
Article on the topic: Do-it-yourself coordinate table for a drilling machine
How to make a rotating table: design and design choices, plus simple assembly instructions
Thanks to the centrally located rotating tray, each banquet participant can get any dish
Rotating tables are furniture that is in demand in various fields, from advertising to metalworking. But this time you will learn how to make an easy-to-use turntable for home use. I bring to your attention simple assembly instructions, plus recommendations for choosing a suitable design.
Beautiful examples
Our photo gallery shows interesting examples of ready-made designs for cakes:
- using available materials, you can make a beautiful stand for cake and pastries;
- original plywood construction;
- 3-tier stand for sweets;
- wedding cake stands;
- A cute design can be made from paper and cardboard.
You will learn more about how to make a cake stand with your own hands in the following video.
Materials
A rotating table can be made from any available materials :
- Fiberboard;
- MDF;
- plywood;
- tree.
Each individual option has its own advantages. Wood is environmentally friendly, safe, and has a texture that is pleasant to the touch . MDF and plywood are easy to process. In addition, this material has a low cost.
But chipboard is inexpensive, looks attractive, and is a pleasure to work with.
Tip : in order to save consumables, you can use a door from an old kitchen set to make a countertop.
Features of the rotating table
If you want the cake to be accessible to you from all sides at the same time, and at the same time you do not have to run around it, be sure to consider having a rotating stand.
What is a rotary design for cakes? This is a product consisting of:
- round work surface;
- legs-bases;
- rollers, rubber bands.
Thanks to its design, the table easily rotates around its axis and provides convenient access to the confectionery product . With such a supply, you can create elegant and original decors in the most convenient way and create decorations of any complexity. At the same time, you don’t have to worry at all that your masterpiece will move, get damaged, or fall to the floor.
You can either purchase a turntable for cakes ready-made or make it yourself. A homemade design has many advantages. Firstly, you will be able to make a product that will fully meet your requirements and preferences . Secondly, you yourself will be able to create a thoughtful drawing of the product, select materials for its manufacture and think over the most optimal dimensions. In addition, a homemade design will be much cheaper than a purchased one.
Making a wooden table
Next, precise instructions will be given on how to properly make a round table. First of all, prepare the wooden flooring for work. Grind it on all sides so that the wood becomes smooth without splinters.
Then several thin layers of wood glue should be applied to it. If you are worried that the structure is unreliable, then it can be further strengthened with clamps.
Then apply the drawings and dimensions of the future round table to the wooden surface. The next stage of work will be to carefully cut out your drawings with a jigsaw.
If everything is done correctly, you will get an even circle, which will be the basis of the table. Next, you can start working on the table legs. To do this, prepare 4 beams and make them the same in size and height.
Yes, the work is not easy, but every craftsman can do it. Then use metal corners to attach the legs to the table.
The final touch of the whole work will be to apply water-repellent impregnation to the table. This product will not only help cope with moisture, but also protect the tree from small insects.
DIY dining table. Kitchen table. Photo
To make a dining table with your own hands, you will need a little skill and a lot of time and patience. If carpentry skills are well developed, and you have a full set of tools at home (from a circular saw to a milling machine), then such work will be completely simple. In this case, you can choose an option for making a table that corresponds not only to your skills, but also to your financial capabilities.
Choice of materials and size of the future table
The dining table is the center of the kitchen or dining room, even if it is located under the wall. Its size should be selected depending on the size of the room and the number of people who often dine together. The comfortable area for one person at the table is 60 cm. In total, for a family of 4 people, a tabletop measuring 80x60 cm will be sufficient. But sometimes you have to receive guests, so it is better to increase the size of the table to the maximum suitable for the dimensions of the room.
If the kitchen is small, you can choose a table with a sliding or folding tabletop.
This way it will take up minimal space, but if necessary, the usable area will double. At the same time, it is better not to make the table attached to one wall, because sometimes you may need to move it to another room.
Interesting ideas
Now we will give you some interesting ideas on how to make a round table with your own hands.
Despite the rapid development of modern technologies, elements of antiquity are still in demand. For example, if you are the owner of a dacha or a nice country house, then why don’t you make a knight’s table from the times of Medieval Europe? Let’s say right away that it will take a lot of solid wood to make it, but the result will be worth it.
Article on the topic: Do-it-yourself heating table for a 3D printer
To make a knight's table, take a look at several thematic sites where craftsmen share their knowledge and give useful advice. Don't worry, because 50% of the work is identical to making a regular round table.
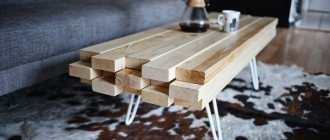
Another interesting solution will undoubtedly be a loft-style table. Its lid will be made of stone, and the legs and other structures can be made of wooden and metal elements.
Several reasons to make a folding table with your own hands
Today, the market offers many different designs of folding tables, but there is nothing difficult in making them yourself. In addition, in some cases, making a folding table with your own hands is much more profitable and, again, more rational:
- the dimensions of the table can be varied based on the size of a particular room;
- The design of the table can be chosen depending on ease of use, according to your desire;
- The design of the table is chosen in accordance with the interior of the room, so it does not “stand out” from the general style of the room.
An important factor is the exclusivity of hand-made furniture.
A folding table in the kitchen is the best option in small apartments, when all family members can sit at it (folded). When unfolded, it is a full-fledged banquet table, which can accommodate twice (or even three times) as many people.
To make a folding dining table, you don’t have to take a cabinet-making course: you can just use our tips, dream a little (in terms of design, of course), and think a little more about the drawings of the folding table you need.
Determining dimensions and preparing a drawing
The beginning of making a round table with your own hands is to determine its dimensions and configuration. The strength, stability, and practicality of the product depend on the correctness of the calculations. The basis for calculations are the following criteria:
- total area of the room;
- the presence of other furniture and its installation location;
- purpose of the item;
- height of legs;
- configuration;
- optimal size to meet the assigned tasks.
You need to think about it so that even on the most beautiful round table you can easily arrange a set of dishes for the whole family. In this case, it is advisable to provide a reserve for 1–2 guests.
After this, design documentation is prepared, where dimensions, hole diameters, and distances between parts are drawn. Detailed detailing will allow you to complete the work with a high degree of accuracy. Drawings can be made both on paper and on a computer. The choice is determined by individual skills and experience in carrying out such work.
How to find out the diameter of the spinning center for your table?
The swivel center is easy to use, within easy reach of your hand, and at the same time there is enough space to arrange plates, glasses and cutlery. A square table gives you a little more space to arrange items than a round table due to the corners.
On a round table, provide approximately 30 cm of space around the rotating center on each side, and on a square table, 25-30 cm. If the table has the shape of an elongated rectangle, then you can place two or three rotating centers to make it comfortable for all guests.
Table for selecting the diameter of the rotating center for your table
Rotating base BZ
For tables larger than 2 meters, we cannot yet offer you reliable options. If you have a small table measuring from 90 to 150 cm, check out the Lazy Susan ready-made spinning centers
You can install a rotating center with a smaller diameter. In this case, treats are placed only along its edges so that it is easy for guests to reach with their hands.
Parts for self-assembly of a rotating table center
Rotating table center to suit your taste, in your interior
A beautiful solution for your dining table will be a rotating center, assembled by yourself, of the diameter and color you need.
The parts of the prefabricated spinning center are suitable for tables measuring from 120 to 200 cm. The diameter of the spinning center will be from 60 cm to 140 cm. What parts does the spinning center consist of?
If you have a small table measuring from 90 to 150 cm , pay attention to the serial rotating table centers with a diameter from 40 to 80 cm, which do not require assembly and are supplied ready-made. If you want to assemble a removable Lazy Susan spinning center with a diameter of 35 to 70 cm without attachment to the table surface, the ML rotating mechanisms are suitable for you, and for circles from 100 to 160 cm, use the MX rotating mechanisms
If you are planning to install a rotating center with a diameter of 35 to 120 cm with a rigid mount to the table , and you only need a rotating mechanism, use the MT rotating mechanisms. Rigid mounting will ensure reliable operation of a circle with a diameter of up to 1 meter.
If you want to place a turntable made of glass or stone with a diameter of 35 to 60 cm in the center of the table, use the MK rotation mechanisms
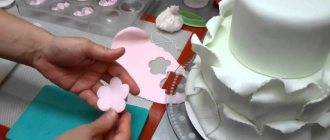
How to Make a Rotating Cake Decorating Stand
You can buy a stand in a store, or you can make it yourself. First you need to decide on the appearance, size, shape and material. Looking at your sketch, you can easily assemble a rotating cake stand. You will need two bearings, a wooden plate or sheet of plywood, a plastic or metal tube 14-16 cm, a metal circle 30-40 cm, nails, screws.
Before making, decide on the shape of the cake, match it with the appropriate diameter.
Once you have decided on the initial data, start making the tabletop. To do this, you need to draw a diagram. Next, you need to prepare the bearing, assemble one from 2. You need to cut two circles of the same diameter of 15-20 cm from wood. Cut a hole for the bearing in one circle and hammer it into it. Secure the circles together with nails.
The optimal diameter of wooden structures is at least 34 cm.
Install a pipe of the required height of 14-16 cm into the bearing. The pipe must stand firmly and rotate due to the mechanism. The metal circle must be welded to the tube using conventional or cold welding. Cold welding is similar to plasticine; it is convenient to work with without experience. Secure a wooden circle on top of the metal circle. The top can be decorated with self-adhesive film of the appropriate color. The rotating cake tray is ready!
As the film wears out, it can be replaced.
Types of rotating cake platforms
Specialized markets offer many tray stands from world-famous brands.
Someone wants to have compact products for a dessert bar (Candy bar) when serving sweets. Some people are impressed by rotating models with a tilt, while for others the ability to use only 2 tiers of the stand is not suitable.
Specialized markets offer many tray stands from world-famous brands.
Varieties of design
Models are distinguished by shape:
- Oval;
- Circle;
- Square;
- Rectangle.
As well as shaped trays for an extravagant demonstration of confectionery creativity.
A rotary cake maker is often equipped with complementary accessories: it may be supplied with a spatula, a lid, baking dishes, a pastry syringe, etc.
A rotating cake maker is often equipped with complementary accessories.
Materials used to make a rotating cake decorating stand
There are cake makers:
- Steel;
- Glass;
- Plastic;
- Ceramic;
- Wooden.
Plastic rotating cake stands are a rather fragile product. This is the most affordable option. Thanks to the last circumstance, it is also the most common. They are presented in a wide range of models, made with or without tilt. Plastic cake pans usually have a non-slip material, which promotes good grip on the table. It's quite convenient.
Plastic cake pans usually have a non-slip material, which promotes good grip on the table.
The glass rotating cake tray looks elegant. Made from high-quality tempered glass, often decorated with an original design. It looks neat, impressive - you can take a photo and serve it on a rotating plate. It has a non-porous surface, washes quickly and easily, and does not absorb odors.
The glass rotating cake tray looks elegant.
Metal structures are heavy, but they are designed to last longer. They can withstand heavy cakes and do not deform over time.
Metal structures are heavy, but they are designed to last longer.
The wooden cake maker is constructed from natural material and looks aesthetically pleasing. Sweet products can be served directly on it. The cost, compared to a plastic rotating stand for decorating cakes, is higher.
The optimal diameter of wooden structures is at least 34 cm. This cake pan is spacious, it is convenient to decorate products from three kilograms (or tiered ones) and make confectionery decor on them. The wide surface makes it possible to place the leveling spatula in a convenient way.
A wooden tray has some advantages:
- It is durable;
- Does not absorb odors and moisture;
- It is not difficult to care for and is easy to clean.
What is important is that it fits into any interior.
The wooden cake maker is constructed from natural material and looks aesthetically pleasing.
Work process
Making a turntable with your own hands is quite simple. First of all, you will need to draw a high-quality drawing. After this, we begin to work according to the following scheme. If you have two bearings, and not one pressed one, then we hammer the element of the smaller diameter into the larger one using nails. It is necessary to cut two circles with a diameter of 20 cm in a wooden slab. A hole is cut in the middle of one of the circles into which the bearing is driven. In this case, the two parts are twisted and secured with self-tapping screws. A bearing is placed in the center.
The DIY table is equipped with plastic tubes. The tube should connect the upper and lower parts. Keep this point in mind when making a drawing for the turntable. In this case, the tube must fit exactly into the bearing. The ideal length is 15 cm. Such a tube will not be too short or long, so you will not have to bend over while decorating the product.
The top is made of metal. In order for it to spin, pay special attention to its diameter. On average, the diameter of a metal circle should range from 30 to 40 cm. If you have the opportunity to weld the elements, that will be great. For those who are deprived of this opportunity, cold welding was invented, which looks like plasticine. The cake turntable also requires circles cut from plywood. The rotating part is installed on the pipe, and the elements are fastened with self-tapping screws.
The table can be made of wood:
OK it's all over Now. The cake turntable is ready. In order to give it an aesthetic appearance, you can cover the product with thin plastic. Another option is to purchase self-adhesive film. It is sold in wallpaper or supplies stores. This film is easy to apply and washes well.
Important part of household appliances
The glass microwave turntable serves as the main surface for heating or cooking food. It can simultaneously bring several dishes to the desired temperature, spending a minimum of time, which significantly reduces energy consumption and helps save money on the family budget.
In addition to heating ready meals, the microwave tray is used for defrosting food. The size of its surface allows you to place several ingredients that need to be defrosted in a short time. The product is also used for baking confectionery, roasting meat, fish or vegetables.
The glass microwave tray is easy to clean. Its surface allows you quickly and easily deal with any contamination using regular dishwashing detergent. When installed in the oven, the glass tray is placed on a roller stand with its center aligned with the coupling.
The diameter of the rotating element is selected depending on the volume of household appliances. Its central part can have different configurations, which allows you to buy a tray for a specific model of microwave oven. The durability of the product is ensured by the use of special fire-resistant glass in the production process.
Rotating base on a ring bearing for mounting a round tabletop
The rotating base consists of three parts : 1) The lower support circle ensures the stability of the entire structure on the table. 2) The turntable is designed for attaching a tabletop to it (for this there are holes for self-tapping screws).
3) The rotation mechanism is a metal ring ball bearing.
Rotating base, side view:
The rotating base is a product completely ready for installation. To assemble the rotating center, you will additionally need: a round tabletop, a screwdriver, a ruler, a pencil and self-tapping screws of the appropriate length (usually 3.5x20 or 3.5x25 mm).
Step-by-step instructions for assembling a rotating table with your own hands
I outline all my actions in points in the following order.
- I determine the size of the rotating plane to be 600 mm. Since the diameter of the main table is 1300 mm, the table will not interfere with the plates around it.
- I fasten a sheet of whatman paper to the board with push pins.
- Using drawing tools, I draw a 600 mm circle on paper. I carefully cut out the table layout with scissors.
- Having attached whatman paper to a sheet of fiberboard, I trace it with a pencil. I use a jigsaw to cut out the lining for the tabletop.
- I perform the same actions with a piece of chipboard.
- Using pliers and a screwdriver, I remove the plastic roller from the metal hinge.
Rotational support for chair with fasteners
- In the middle of the block I make side cutouts for a tight installation of the support.
- Having installed the hinge strictly in the center of the beam, I drill a hole from the side through the openings in the metal.
Installing the hinge on the beam
- I apply the hinge area to the center of the fiberboard and mark the attachment points with a pencil. The hinged support will allow the table to rotate and turn in the desired direction at any time.
- In the fiberboard, following the markings, I drill 4 6 mm holes with a drill.
- I thread the screws through the holes in the sheet and support. I put washers on the side of the platform and tighten the nuts.
Attaching the support to the fiberboard circle
- I coat the screw heads with machine oil.
- I apply a circle of chipboard so that the outer boundaries of the two circles coincide.
- Using the marks obtained, I use a drill to make small indentations in the chipboard. They will allow the screw heads to not interfere with the tight fit of the two parts of the rotating tabletop.
- I apply a layer of liquid nails to the surface of the chipboard and connect both parts of the table. Having separated them, I wait 3 minutes. Then I finally connect the parts, loading the top with heavy objects at hand.
- I sand the side edges of the circles with sandpaper.
- I place the support beam in the center of the round table. I make marks at a distance of 30 mm from the edges of the plank.
- I drill through the marks through the timber and the tabletop.
- I thread two bolts. At the bottom of the tabletop I secure the bolts with nuts and washers.
- I put a hinge with the table top on the fixed support beam. I thread a bolt through a pre-drilled horizontal hole and tighten it with a nut and washer.
- I glue the tape along the end of the circle using an iron. I cut off the protruding part of the edge with a knife. The table is ready.
This instruction makes it possible to understand how to make a table with a rotating center with your own hands without much hassle and at minimal cost.
How to make a rotating table?
Making a turntable is quite easy and simple. First you need to make a well-thought-out sketch. In this drawing, indicate the design of the product, its exact dimensions and materials of manufacture. Having such a diagram at hand, you can easily assemble the table the first time and without errors.
The manufacturing process of the rotary table is carried out in the following sequence:
According to the drawing, we cut out a round tabletop from plywood.- Take the bearing (if you chose a double bearing rather than a pressed one, then use nails to hammer the smaller element into the larger one).
- two circles with a diameter of 20 cm in a wooden slab .
- We insert a bearing into one of the pre-made circles .
- Next, we twist the two parts together using self-tapping screws and place the bearing in the center.
- The turntable is equipped with plastic pipes . They will connect the top and bottom of the product. The tube must fit into the bearing with millimeter accuracy. It is best to make it 15 cm long. This will simplify the process of decorating cakes. Since you won't have to constantly bend over your masterpiece.
- The top of the table is made of metal . Particular attention is paid to its diameter. It is best if the diameter of the metal surface varies within 30-40 cm.
- Next, we weld the elements together . If you do not know how to use a welding machine, you can use cold welding.
- We install the rotating part on the pipe and fasten the elements with self-tapping screws.
That's the whole simple process of manufacturing a rotating structure.
Tip: to give the product a decorative appearance, it can be covered with thin plastic.
The product can also be decorated with self-adhesive film. It simply sticks on and is easy to clean.
Tip: An extendable table, a coffee table or a good quality kitchen table can also come in handy in the kitchen.