Having a universal assistant that does not depend on electrical power is what a laptop was once designed for. Thanks to its functions and options, each of us can work calmly, conduct a conversation on a social network and watch video content at the same time and in any position.
After all, how nice it is after a hard day at work not to sit in a cold chair, but to lie down on the bed and enjoy your favorite movie.
Proper operation of the device implies that it will stand on a flat and solid surface.
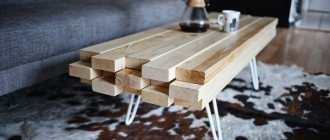
Why then, in this case, not make some kind of cooling table for a laptop, which would at the same time look beautiful, and at the same time maintain the desired temperature regime inside the mechanism.
Moreover, you can find a huge number of different ideas that are not so difficult to implement (and this does not require special skills).
In addition, a folding laptop table is a great gift for a friend that he will truly appreciate.
Benefits of DIY
Ready-made designs of tables for laptops are durable and reliable. The devices are easy to use and have a long service life. However, there is one drawback - the high price. Quality products are too expensive.
A rational solution would be to make your own laptop table using a ready-made diagram. Several advantages of this approach should be highlighted:
- Budget savings. Thanks to the competent selection of inexpensive materials, you can significantly save on the design and assembly of the table.
- Exclusivity of design. Each laptop owner can choose the type and design of the product.
- Ideal size ratio. Having the drawings, you can choose the optimal size of the structure, which will be convenient to use in any conditions.
- Ease of execution. Despite the presence of elementary mechanisms and specific structure, any type of laptop table can be built in a short period of time. Even an unprepared person can handle the installation.
The only condition is attention to detail. You should correctly calculate the dimensions of the product and adhere to the exact dimensions.
Ease of execution
Budget savings
Exclusivity of design
Finishing
After making the table, it must be treated with sandpaper so that there are no burrs or flaws on the product. To extend its service life and add aesthetics, it is recommended to paint or varnish the folding table.
When choosing paint, choose a color that best suits the overall interior of the room. There are no special requirements for this material. The main thing is that it does not emit harmful toxins, is of high quality, and dries quickly.
The paint should be applied in several layers . If you are making a product from natural wood, you must take into account that it absorbs moisture well. Therefore, each layer of applied material must dry, and only then it is recommended to apply the next one.
Attention : when painting natural wood with a brush, it is recommended to brush it along the grain. Be careful to ensure that there are no leaks. It will be difficult to get rid of them in the future.
And the last final stage of decorating the table will be varnishing . It will give the product a shiny and smooth surface and protect it from high humidity and sudden temperature changes. For these purposes, you should choose a high-quality matte colorless varnish.
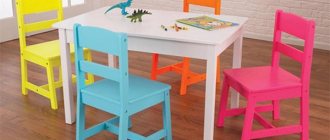
Advice : if the thirst to create is still looking for a way out, try making a sand painting table, an elegant coffee table or a children's table.
Possible modifications
Most tables have an identical type of construction, which consists of 4 support posts and a table top. Upon detailed analysis, several main varieties can be distinguished:
- classic monolithic tables;
- with rising part;
- folding transformers;
- designs on wheels.
Each of the samples is designed for a specific load and the presence of additional elements. You should select the type of design that is ideally suited to your individual needs.
DIY monolithic laptop tables are a durable design. The base is often made of beech or other strong materials. The main requirement for wood is resistance to mechanical stress. The optimal material thickness is at least 20 mm.
4 legs are mounted to the shield (future tabletop). Installation is carried out using special corners and screws. The simplicity of the design allows you to make a laptop table into your bed quickly and economically. The finished product can be used not only for a PC, but also for eating, reading books and newspapers.
Devices with a rising part have a number of features. The main thing is the installation of special devices that allow you to hold part of the tabletop in an inclined state.
The structure is divided into 2 parts. The smaller part remains stationary and is used as a base under the armpit. The second part is equipped with two hinges and thrust plates. Adjustable tabletop makes it possible to install it in different positions.
Making a folding transforming table with your own hands is a little more difficult. This design contains several basic elements at once:
- cup holder;
- armrests;
- folding legs.
To arrange such a table, you will need to use a large tabletop, in which you will have to make special cutouts for the arms. The most suitable shape of cutouts is in the form of a boomerang. It will allow you to use a folding laptop table without excessive strain on your hands.
Cup holders are optional. A distinctive feature of the transformer is the wide variety of components that can be added or removed from the package.
A laptop table on wheels is practically no different in structure from a regular device. The device also includes a table top, legs, partitions and fastening elements. The model differs only in the presence of small wheels. These parts are sold in any specialized store.
The table is convenient because it can be moved throughout the room and used for various needs. Most often, the device is used as a bedside table for a laptop.
Most PC owners prefer rounded edges of the table top and legs. However, a rectilinear design will also be convenient. The main thing during the installation process is to carefully treat the wooden surface so as not to drive splinters or get scratched during use.
Classic
On wheels
With rising part
Transformer
DIY sewing machine table
Many people have trouble finding the right table for their sewing machine: dining tables are too high and coffee tables are too low. Here is one way to solve this problem. Making a table for a sewing machine is not that difficult. Buy a cheap folding table at the market, where they sell old things. It is necessary that the legs are installed at angles to the tabletop, which gives the entire table the stability of a triangular base. Now the main task is to make a recessed shelf for installing the machine and at the same time be able to fold the resulting structure. To solve this problem, the author of the project made hinged side parts to fold with a shelf that slides down and hooks the side parts with brackets.
Full instructions, including a list of materials and tools, can be read on the website, everything is described there in great detail. But as for the materials, in addition to plywood, metal strips and hinges, you will need a special bracket, the so-called French tenon. This bracket is a two-piece mounting system used for hanging pictures. Each piece is a z-shaped piece of aluminum with screw holes along one side. One clamp attaches to the wall and the other to the item you want to install. Two clamps connect for a very secure fastening system.
The shelf on which the sewing machine is installed is just a cut piece from the table top. Since the tenons are over two centimeters wide, there is really no room to install a tenon on the edge of a shelf without the tenon interfering with the folding of the table. Instead of using tenons on the side of the shelf, I installed a piece of 3mm by 12mm aluminum rod at the ends of the shelf and cut material behind those rods to allow the tenons to hook under the aluminum bars that would hold the shelf. The first step, assuming you already have a folding table that suits your project, is to create a template.
The goal is to create a very small gap between the sewing machine and the tabletop. The author did this by simply setting the sewing machine on the cardboard and tracing the outline. Cut out the template and check the fit. Make notes on the template to indicate how much you need to cut in the next version of the template. It takes a few tries to get the shape right. Also, be sure to make room for the power cord and access to the switch. Once the template fits on the top surface of the sewing machine, trace the outline onto the table top. Cut out part of the shelf, trying to stay as close to the line as possible. Ideally, you should have a shelf wide enough so that you can use a wide piece with tenons for better stability. Read further on the website, because the instructions are really very long.
Photo source: www.instructables.com/id/Folding-Sewing-Machine-Table/
Simple sewing table
Whether you need a very large sewing table or a very small one, making one is quite simple. Following these recommendations, a simple sewing table can be assembled in any size. It all depends on whether you are sewing curtains or soft toys. Decide in advance on the size of the future table, this will greatly facilitate further work. The materials needed are all very simple, cheap and accessible. The main material is plywood, you will need a standard sheet. Having determined in advance what size your sewing table will be, it is better to cut the plywood in the store and deal with ready-made pieces of the desired size at home. You can also buy the legs ready-made, it’s not expensive, stock up on tape, glue, wood trim and decorative nails. However, the step-by-step photographs below will better tell you about the process.
Photo source: theborrowedabode.com/2012/12/how-to-build-a-sewing-or-crafting-table-with-trim
Dimensions and drawing
An important aspect of creating a reliable device for working at a computer is preparing a drawing. Before this, you need to decide on the dimensions of the workpiece. It takes into account what dimensions the table will have - standard or individual.
The most common option is a device with dimensions of 30 x 60 cm. These are the initial data for a standard product. It is better to adjust the sizes to your own preferences. If you need to make a laptop table with armrests with your own hands, then the only option is to increase the size.
Many drawings involve making straight legs. However, such products are not reliable. Installing supports in a Z shape will help achieve greater stability.
Photos of laptop tables
Read here: How to make a wooden box: the best ideas for creating a modern interior and creative uses in design (95 photos)
Manufacturing materials
Among the possible types of material, one of the reliable ones is pine. A wooden table made from this species is strong and durable. At the same time, the material is lightweight, which is an undeniable advantage for home owners. To save on materials, you can use chipboard, MDF, chipboard or plywood to make the countertop. These options are lightweight and inexpensive compared to solid wood.
Plastic is practically not used to create such a device. However, if you have a sheet of thick plastic or plexiglass at your disposal, these materials are also suitable for building a table for your laptop yourself.
For work you should prepare the following tools:
- saw;
- plane;
- grinding machine;
- drill;
- drill;
- hammer;
- screwdriver;
- screws;
- corners.
If you do not have a special grinding device at your disposal, you can use sandpaper. It is most effective to use several types of this material of different dispersion.
Loft
This year the style remains in demand. It is often used to equip kitchens combined with a living room. This combination gives more free space, which will only emphasize all the details of the loft.
For example, stylists play with brickwork, wires or concrete walls. The photographs clearly show how successful it can look like a living room that is combined with a kitchen. For loft, rough and heterogeneous surfaces and rough materials are selected. In apartments decorated in this style, wall lamps are installed. In this case, the light is directed along the walls. Due to this, shadows fall so that uneven surfaces look three-dimensional. At first, loft was viewed with caution, but it quickly became popular. Designers do not hide finishing materials and even fake them. To imitate a concrete surface and smudges, decorative plaster is used.
Step-by-step algorithm for creating from wood
If device owners do not know how to make a laptop table, then step-by-step instructions will save time. It is important to observe safety precautions when working with tools.
- The first thing you need is a drawing. Ready-made or compiled independently - it doesn’t matter. The diagram must contain exact dimensions and sequential steps for processing materials. The best option would be to print the drawing on large sheets of paper.
- The next stage is creating forms. To do this, the required shape of parts is cut out of wooden blanks. An electric jigsaw is used, but you can also use hand tools, such as a wood saw.
- The further process of preparing folding tables for laptops involves sanding all surfaces without exception. You can use a grinder, a grinder with a special attachment, or regular sandpaper.
- Painting is done quickly; if a water-based composition is chosen, conventional paints will dry in about 24 hours. At the end comes the crucial moment - varnishing the surface of the table. This makes it possible to protect the wood from moisture and sunlight, as well as give the workpiece a unique shine.
- The last step towards creating a reliable table is assembly, the guideline for which is an accurate sketch.
Wooden components are often treated with adhesives that can hold different types of wood together.
Drawing
Creating Forms
Sanding all surfaces
Painting
Assembly
Ready product
Useful tips
When reading reviews about laptop tables, you can often come across useful advice left by people who have already done similar work.
- DIY bread box - step-by-step master class on making and tips on how to decorate a wooden model (105 photos + video)
- DIY high chair - interesting drawings and projects on how to make a comfortable and functional high chair (120 photo ideas)
- DIY built-in wardrobe: 115 photos of original ideas and video tips for building built-in wardrobe models
For the most part, they leave recommendations that will help a person use his wooden friend for as long as possible.
Here are some of them:
Before assembling the product, it is necessary to sand the edges of the table as best as possible with sandpaper. After all, if such an operation is not carried out, then in the future the thing will lose its original appearance, and the person risks getting injured.
For good strength, as well as to add shine, it is better to cover the table with two or three layers of varnish.
Instead of a hole for a mug, it is better to use a wooden saucer, which is simply glued using special glue.
Why is that? Because the drilled hole is a very fragile place, if you press hard on it, it is likely that the structure will not hold up and will simply break. This will never happen when using a saucer.
- DIY corner cabinet: 80 photo ideas and video description of how and what to make a cabinet from. Main manufacturing stages and best design projects
- Do-it-yourself wardrobe for the balcony - 80 photos of how to make a balcony wardrobe from various materials with your own hands
- Do-it-yourself wardrobe - a detailed description of how to make and assemble a wardrobe with your own hands at home (110 photos + video)
Use paint to give an item a more aesthetic appearance. Using paint and varnish products, a person can easily apply the desired print to the surface of the table.
In order for the design to last as long as possible, it must be opened with several layers of glossy or matte varnish.
A laptop table is an original and interesting thing with which you can do whatever you want. And we can say with confidence that a person will not regret that he decided to take up this subject on his own. Because in the end the result will pay off many times over.
How to make a cooling system
For most modern technology, it is necessary to purchase additional equipment. For example, laptops often require an auxiliary cooling system. This is especially true for digital equipment that is used quite often.
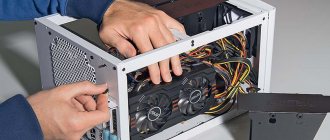
To build cooling yourself, you will need an old computer or a couple of coolers from the system unit. Based on old units, you can build an effective cooling system that will run from a USB cable.
The cooler can also be installed in the table itself. Installation is carried out from the reverse side of the tabletop. Air will flow to the bottom of the laptop case through a specially prepared hole of a certain diameter. This design can be used both on the bed and in any other place.
To do this you will need to make markings for the cooler. The hole should be aligned with the laptop's ventilation grille. If you use 2 coolers, you should visually divide the tabletop into 2 sections and cut out one hole in each. The cut areas are carefully sanded and also treated with a protective compound. To install the cooler, you can use small self-tapping screws.
Multi-level floor
To zone the space, craftsmen install floors at different levels. They advise installing a podium to separate the kitchen and dining room. This option is considered one of the most practical because, among other things, the owners have additional free space where they can hide something. It is convenient to use boxes or drawers for this. Wicker baskets will look good. But such space can remain free.
However, such a design should not be made if there are small children in the family, since the podium can become an obstacle for him. In addition, various floor coverings can be used. They will zone the space between the living room and the kitchen and protect the podium from damage. For example, tiles are laid in the kitchen area, and laminate flooring in the dining room. The main thing is to choose colors and textures and combine the finishes correctly.