Nowadays you can easily buy a computer case in a store. They can be horizontal or vertical - this is the most common type. However, if you do not take into account some variation in the front panel, they all look the same, differing only in color. A boring metal box with a couple of buttons and a couple of LEDs may not satisfy the sense of beauty, and then you want to make a case for your PC with your own hands. There is another situation - the existing one is no longer suitable in terms of functionality - there is not enough space in it or there is insufficient ventilation, causing the computer components to overheat. For example, sometimes you need to add a second video card or several hard drives, and a standard case becomes unsuitable for all this. There are other situations when you have to make a computer case yourself. For example, all the money is spent on top-end components, but there is not enough budget for the body. Or you have a laptop with a faulty display, and you want to turn it into a desktop one. The cases are different, but they have one thing in common - you need to pick up the tools and make a computer case with your own hands.
Making your own PC case.
Requirements
- Minimum size
- Any mATCH board should fit
- Any video card, even 3090
- Any CPU cooling without water (for example, 20cm tower)
- Any regular power supply
- One 140mm fan at the rear
- Good cooling with a minimum of sides with ventilation holes. There are cases, although small, but ventilation at the bottom requires high legs, and side ventilation does not allow the case to be placed in a niche, or even just against the wall.
- Simple installation of a video card, without half an hour of pushing a kilogram card into the hole above the bend (those who have inserted it will understand).
Nothing was found . There are a decent number of articles “smallest mATX cases 2020” where a dozen cases are discussed that are not suitable for me for various reasons:
- The power supply is located under the motherboard, increasing the width/height of the case. (Chieftec CI-01B-OP)
- The power supply is located above the motherboard making installation of a high cooler impossible (Jonsbo V4, Silverstone sg11)
- Unusual PSU SFX/custom (Antec Aria)
- Case dimensions are not minimum. 5 card slots, extra space for 3.5” drives, a bunch of external plastic molding (Jonsbo UMX3, CI-01B-OP)
- Ventilation holes on all sides (ALL except Antec Aria)
Not a single building was better than the existing one. Also, such cases are not readily available . I would like to take mine and leave it, but it is always in sight. I want to replace the video, in case the new one won’t fit. This, of course, saved me from impulsively buying a 3080, but overall, I wish there was an option. If you want to do it well, do it yourself. This stupid motto has failed me more than once, so I decided...
Modding: History. Difficult path from case to flash drive
This is something that should be of interest to those who spend most of their free time at the computer.
The same tuning, but not a car one, but a computer one. It is human nature to strive to transform, at least at the everyday level, reality. Let's say, car enthusiasts cherish and decorate their cars, add some bells and whistles to them, bikers try to stand out with a painted helmet, and sometimes an entire suit.
Changing the appearance of computers is called PC-modding, or simply modding (from the English word modify - modify, transform), and the people who do this are called modders.
Have you ever wanted to make something with your own hands, something beautiful and incredible in its own way? Then modding is exactly what you were looking for. Moding is changing standard parts of your computer (mouse, keyboard, DVD-Rom, etc.).
Modding is inextricably linked with Overclocking, and owes its birth to it.
Warning: There are indecently many photos
.
Cycle: Part 1: Overclocking: The evolution of overclocking.
Start
Most of the pictures are photographs.
Therefore, there cannot be one format for everyone. The main rule of modding is: don't start doing anything unless you can finish it without surgery. Mistakes can cost a lot of money; you can ruin your monitor, or even your entire computer. The simplest mods are replacing the LEDs on the keyboard, mouse, system unit, etc. You can also add your own, well, in general, whatever you want will happen. The drawing on the body is also modding. Real modders don't stop there; a successfully completed project is a reason to start a new project.
sad fate of the monitor
Short story
Nobody knows when it all started.
No one also knows where it happened or who did it first. We only know that this was a very, very long time ago, when cases were small and inconspicuous, and additional fans, and even more so standard places for these fans, could only be found in the most expensive “semi-server” cases, processors were still being expanded frequencies, and accordingly their dissipated thermal power increased, the coolers drove the same hot air through the radiators, and since no one had yet canceled the laws of heat transfer, the processors absolutely did not want to be cooled by such air. Something had to be done. In those days, many people were involved in overclocking, and they didn’t want to leave PC covers aside. And then someone came up with the idea of cutting a hole in some part of the case, and equipping this hole with a fan so that the air in the case would be renewed faster. The moment when this unknown person picked up a hacksaw can be considered the moment of the birth of modding. Then a person’s craving for beauty and the desire to make things cooler than others came into play.
In 98-99, the first modding sites appeared. In addition to modding guides, there were often galleries of converted cases (case galleries), which raised the desire to make things cooler than your neighbor to a completely new, international level. The “worldwide competition” of modders began... From that time on, modding abroad began to develop very quickly.
Now it is extremely popular there, many both professionals and amateurs still do it. There are also many competitions organized.
The history of modding in the CIS is much shorter. In October 2001, the site PC.Pervertz was created, the first modding site in Russian (later this name was replaced by the more serious ModLabs.net) and then other modding sites appeared, including MODDing COMmunity. Only after a few months of the site's existence, people stopped coming there just to look at the curiosities, and began to actually engage in modding. The peak was in 2004, after which modding began to be popularized.
It’s very difficult to count how many sites dedicated to modding are on the Internet now; there are hundreds of them. In large “case galleries” the number of cases reaches a thousand. Modders have even developed their own slang, which is quite extensive for such a narrow field of activity. Online stores have been opened selling accessories for modding, primarily the so-called kits, that is, various “Do it yourself, but according to the scheme” sets.
Of course, there are exclusive offers, but the set of basic modifications does not change. This is a kit for cutting a window (acrylic/plexiglass window, stencil for cutting, rubber seal molding), a neon lamp for illumination inside the case, various cooler speed controllers, monitoring systems, transparent fans (including with built-in LEDs), grills (fan grills - grills for fans), ultra-bright LEDs, text LCD displays, round cables.
Unfortunately or fortunately, the chronology ends here.
Jargons
“dropsy” - a water cooling system for a computer “grill” - a decorative protective grille for a fan “Christmas tree” - a mod with excessively bright and multi-colored illumination “body, case” - a computer case “cooler” - a device for cooling a processor or video card. They can also call an ordinary fan... “mod” - the same as modding, any addition, homemade computer-related product “modder” - a fan of modding “modding, modding, modding” - technical improvements and modernization of a computer. “pornography” - the state of the desktop / inside the body of the average user; “rounding” - packaging of power supply cables into bundles or individual additional braiding of each wire, a mode in which the wires are collected into a bundle and wrapped with luminous or fluorescent material. Many different options “reobass, fanbass” - a panel that allows you to control the fan speed “shopmod” - a case stuffed with ready-made accessories for modding in the absence of any “handwork” or creative flair
What is modding? I think that if on the Internet you catch a dozen different people who are unfamiliar with each other and are engaged in this type of activity, then each of them will give their own definition of their occupation. Modding can even include installing case fans in their original places. But still, most modders believe that the main task of modding is to give their computer and its peripherals a unique, unique look by... yes, by anything - from simple painting and drawing faces on the case wall to crossing the system unit with a food processor. Well, I may have given up on the harvester, but a hybrid of a PC and a coffee maker, created by a craftsman from some developed capital country, is a fairly well-known thing on the Internet.
Non-standard cooling systems, in general, can also be called modding. That is, modding is an activity whose goal is to give the case, monitor and various peripherals the most non-standard and beautiful look possible, different from the look of the standard white ATX Miditower box or the same white brick, for example, a printer, as well as actions aimed at improving functionality of all of the above devices.
But modding is by no means an exotic hobby of single enthusiasts who are ready to cut or paint something day and night. Now there are entire companies founded by modders that work only for modders and produce only products for modding. I’m not even talking about online communities of modders who periodically organize offline lan-parties, where they demonstrate who modified what during the reporting period - now this is the norm.
LAN-Party (LAN-parties)
a very fun and useful pastime for real computer geeks, the essence of which is that a group of people with computers and a local network between them gathers in some room for a while to receive moral and aesthetic pleasure by playing online games and exchanging software, films, music . This is where we exchange experiences and show each other our mods.
You can make your computer non-standard and beautiful without even imagining what a dremmel looks like or how oil paint differs from gouache, and gouache from car paint. There would be money. But more on that later. Now let's take a closer look at the arsenal of modders, as well as the most common techniques for giving your PC a custom look.
Computer cases, as you know, are usually painted gray or white; they are much less common in black, orange and blue. I don’t think there is a serial case painted in the colors of your favorite football team, or you’ll have to look for it for a very long time. If in a regular computer store you ask for a case painted, for example, like a zebra or a tiger, then at best they will politely send you somewhere else (the worst case is a car with flashing lights and orderlies). But “does not exist” for a real modder is not an obstacle, but rather an order akin to “Attack!” It doesn’t exist, so let’s do it!
Now there are two branches - amateur and factory.
Directions in modding
First we need to understand what genres and large fan groups exist now.
- post-apocalyptic - the creation of computers that seem to have survived a nuclear war or other global catastrophe. Stylizations of the game universes STALKER and Fallout are very common:
- High-tech and cyberpunk - the creation of ultra-modern buildings. In recent years, fashions based on the films Tron and Tron: Legacy have gained popularity.
- steampunk is a stylization of electronic devices inspired by the era of steam and Victorian England. Made using wooden, leather and brass elements; This style is also characterized by numerous gears and copper tubes depicting parts of steam engines. This is probably the most popular modding.
- thematic modding - making a case based on the work of a musical group, computer game, book, etc.
- advertising - creating a mod using components from a specific company, which, as a rule, acts as a sponsor. In this case, the company’s logo and its corporate colors are usually played up; there was an article on the hub relatively recently
- embedding - installation of computer components into an unusual case (household appliance, piece of furniture, toy or even stuffed animal)
- HTPC (Home Theater Personal Computer) - creating a virtually silent computer for use as part of a home theater. In this case, passive cooling is often used
- ghetto - deliberately sloppy production of a mod using various rubbish. However, sometimes this is simply what they call a crudely made and ugly case mod, even if its creator did not specifically plan the “ghetto-modding” style.
What happens?
If PC cases were the first, now modding is almost everything.
Regarding the PC. What do they do with them?
Cutting out windows:
Repaint:
Airbrush:
Engrave
Cover with film:
Install water cooling systems (WCS) (Yes, yes, this is modding):
Add ventilation holes (“blowholes”):
Braiding (“rounding”) of power supply cables:
Backlight:
Installation of carrying handles:
Adding indicators and controls, Fanbus and reobus (“fanbus” and “reobas”):
Artificial aging:
Pyrography:
Change the shape of the body panels:
These are just the basic mods that make up the backbone. In fact, each modder himself selects and comes up with something exclusive and original for himself. The good thing about modding is that it is simply impossible to find two identical cases/components.
Modifications of power supplies are very popular. After the body, this is perhaps the second element in terms of the number of various mods. What can you do with it? Well, firstly, this is the “round” of wires described above, cutting out windows of different shapes and lighting them, replacing the fans inside the power supply with low-noise and beautiful ones, and, of course, painting. They look very nice, for example, completely made of transparent plastic.
Periphery
What about mice and keyboards?
These are things that are one of the most visible parts of a PC. In this area, the number of modders is simply impossible to count. Countless variety of transformations. They change the appearance, shape, cut out holes, change keyboard diodes, repaint them, stylize them in all possible ways.
It’s better to look once than to write a sea of “water.”
From steampunk
High-tech and cyberpunk
Just different
But the periphery is not limited to this. There are moddings for flash drives, speakers, monitors, and much more. Mobile phones are also no exception to the rule, laptops, game consoles, but the tablet movement is a new spirit of the times.
More pictures
So the story came to the companies.
Companies, modding, gaming
We are simultaneously observing a constant increase in the quality of homemade mods and the entry of serious companies into this market. Firms offer their services to those who do not want to redo it themselves or want to get truly professional quality. These are mainly gamers. The most modest solution is cases modified by the manufacturer himself, i.e. almost serial. But there were and are giants in this field, although they were companies that approached this with enthusiasm.
Thermaltake Level 10
This company approaches modding everything it produces with a rather interesting approach. Under this series there is a huge number of different PC devices. All the splendor has appeared since 2009.
This series includes cases, mice, keyboards, and various coolers. Modding these boxes exist, but there are not many of them.
Original
Modding
New round: “Razer. For gamers. By gamers."
You can, of course, remember the Fatal1ty and Republic of Gamers series, but only Razer is still really alive. This company has carved out its niche in factory modding. No matter how anyone treats her, this is a new round. This is one of those companies that deserves a separate article. From 1998 to the present day, they have not lost their luster. Although not by case, there are laptops.
Iron
Instead of an afterword
Modding is as much a milestone in history as overclocking.
They walked in parallel, developing and acquiring new “followers” and enthusiasts. Unlike Overclocking, Modding has a great chance of development - both among enthusiasts and in company circles. Today's modders, without knowing it themselves, when buying mice from companies, are already entering this world. It’s just a pity that there aren’t so many “pure-blooded” modders among gamers. And there are quite a lot of buildings with a normal appearance. Only one thing is certain - the number of modders is huge, there are also plenty of beautiful mods, it’s a pity that the modding scene is passing by. After all, the history of every modding is the life story of both the person doing it and the hardware itself.
Everyone needs to mod!
To nag!
A little more has been added to the requirements for the case above:
- Materials from your nearest hardware store
- No or minimal bent parts. To drill, cut the thread, tighten it and you're done!
I spent a couple of evenings mastering sketchup by drawing this:
To be honest, I couldn’t think of any other layout options. All the details fall into place on their own. There is only one place for the power supply. For sizes I used this wonderful resource .
The thickness of the sheet and corners is 2mm so that the thread holds.
I spent a lot of time choosing the height of the case. The greater height gives freedom in choosing the power supply and rear fan, but this is a taller case. For the prototype I chose the minimum height for installing a 140mm fan. A regular non-modular power supply with a depth of 140mm is installed with careful cable routing.
The ventilation for the power supply turned out to be interesting - part of the air exits through the front panel, and part goes under the board and exits from the back under the IO panel.
Design
Another question I often ask when talking to clients is: “How important is design to you?” The total majority answers that it is important and this is understandable (and where is it not?), but it is better to ask an additional question: “Do you have competitors? Do they invest in the design of their products?” And the answers to these questions will give a clearer and more in-depth idea of how much design is needed to sell a product. I have already touched on this topic on Habré.
2.1. Sketch an idea
Sketching (aka hand sketches) allows you to imagine what the future building will look like.
Now you will say: why is this necessary? Still, it will be clear. Not entirely true.
Experience shows that project visualization is important because we all see the same things differently. If you need other developers to see the future body of the device the same way you do, draw it as best you can.
Be sure to draw the body of the future device - how it turns out.
You don’t need to be an artist here. You can just start sketching one element, and it immediately becomes clear whether you’re going in that direction or not:
Sketch
You can sketch it on a napkin or A4 sheet; on the way home on the subway, in a cafe, on your knee, anywhere. Again, quality doesn't matter.
2.2. Draw a sketch
Hand drawing is good for only one thing - speed.
But often what is drawn in the picture (if you are not a professional designer) is not realizable in practice. Therefore, you need to “ground” your idea, bringing it closer to reality, starting with the dimensions and ending with the detailing of the elements. It’s better to take a screenshot of an image of your electronic board and try to sketch on top of the resulting picture how you see the case. Here, quality is also not very important: the main thing is that the person to whom you demonstrate it imagines what exactly you wanted to show, and that they are understood correctly:
- proportions;
- what parts the body will consist of;
- where the controls and displays of the device are located;
- materials from which the parts are made.
It makes sense to check the result on someone who is doing the project with you.
For example, show the drawing to a programmer sitting at the next table and ask him how he understood the idea (if he understood it at all). Detailed rendering
If a colleague, after looking at the drawing, starts asking about problems (“The board won’t fit here, but how are you going to get the cable through here?”), that’s great. This means that, most likely, the form factor and proportions of the case are correct, it accepted your idea.
Well, then the developers just need to start agreeing on the details and “embroider” the problem areas of the future product with additional explanatory drawings.
2.3 Develop a 3D model
If you have even a little knowledge of CAD, skip this step. If not, then there is only one piece of advice: start using CAD (but not AutoCAD - that’s not it).
Below is my own list of the required software - with links to the official websites of the developers. At the model development stage, you can use the simplest and even free programs. After all, the task of this stage is relatively simple - just imagine the future building in real dimensions and proportions.
3D model
I strongly recommend that you design the design directly in engineering software (from the list below) - save yourself a lot of nerves and a bucket of blood. No polygonal 3ds Max or analogues. As a last resort, you can use surface modelers (Rhino, Alias studio), and then in capable hands.
2.4. Visualization
This point could be skipped altogether - visualization (rendering a model with photorealistic materials), in my observation, disappears from projects in its pure form.
This happens because the result (pretty pictures) has lost its significance for the actual product development process. It is needed only for advertising departments - so that managers can show pictures to investors, partners and management. But if you still have to show your project to someone, then the visualizers built into CAD will be more than enough. If not, it’s easier to turn to freelancers and entrust this task to them - there is a lot of software that makes beautiful pictures literally on the fly (google keyshot
, For example).
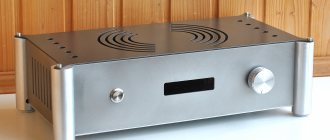
On renderings it makes sense to show the degree of glossiness (matteness) of the surface and color:
The handle of the device is made of matte plastic
We buy
- A piece of aluminum sheet 1000×600, 2mm thick. I have no idea what kind of alloy, but it is very soft. So flexible that by bending all the power supply mounting pads in the wrong direction, I was able to bend them back 180 degrees! Unthinkable. $22
- Aluminum profile 10x10mm (rod) - 3 meters. $10
- Corner, 15x10x2mm. 3 meters - they didn’t sell less. $4
- I chose a lovely bamboo cutting board for the front. $7
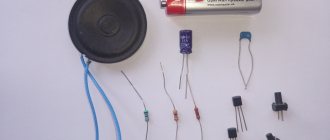
- Button, LEDs, resistors (to make the brightness reasonable). $4
- Fasteners Stainless steel hexagon screws. $3
- Tuning mesh $6
- Angled power cable $2
- power connector, switch - from a dead power supply. USB strip from the closet. $0
- Tools, taps, cutters (drill and jigsaw do not count) $50.
- A mATX backplate from Amazon that I never used. $30
An unusual start for the case
Let's do
- I sawed the rods, estimated how long the board plus the power supply would be, and cut the threads
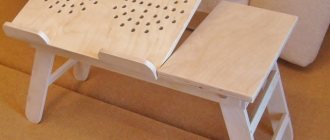
- Cut out and assembled the tray for the motherboard
- Made a complex bracket for attaching the power supply
- The back panel is from a corner (the most dreary moment). The corner was very fragile. It was not easy to bend even 90 degrees
- I sawed out and made a hole in the cutting board - the front panel
- Sawing down the side and top covers
- Collected!
Of course, after each point there are long fittings, adjustments and reflections.
Ready!
Did I get what I wanted? Definitely, yes! Although this is more likely not a body, but a lot of manual labor to have fun during quarantine. And the body itself...
- The minimum size is more like “yes”. You can steal a couple more millimeters here and there and that’s it. We are limited by the size of the board
- Any MATH board - YES
- Any video card (even 3090) - YES
- Any CPU cooling - tower up to 20cm (mugen max) - YES
- Any regular power supply (except modular ones, since they are 2cm deeper)
- Good cooling. 300-350 watts (Ryzen 5600x + 1080ti strix + PSU 700W 90%+) works stably with holes only in the front and rear walls. If it gets hotter in the summer, I’ll widen the holes for the rear fan (you can cut a circle and install a chrome grille). Maybe I'll add holes on the side cover
- A photo of the bottom of the case explains how the power supply is attached and where the air goes from it. Part comes out through the 4 front holes, and part goes under the board tray to the back wall.
Advantages of plexiglass
Plexiglas is used to make computer cases due to its advantages such as lightness, impact resistance and aesthetics. Most often, transparent plexiglass is used to create the case - many see a peculiar beauty in the open display of wires and circuit boards. If you want to hide the internal “stuffing” of the computer, use matte sheets.
To create a computer case, transparent plexiglass material is most often used.
The pliability of this material is also important - even a beginner can cut and glue it.
What didn't work out
- The ease of manufacture is definitely a fail. Bending the corners turned out to be more difficult than expected. Sawing straight is not easy. I had to drill a lot and for a long time.
- 140mm fan. I had to give up for the sake of simplified wiring of the power cable. When using a 140mm fan, you would have to drag 220v from the opposite corner, from the video card. And also, I already had a sensible 120mm.
- The case is rigid and transmits vibration perfectly. It is worth adding soft legs and a vibration-damping gasket at the place where the PB is attached.
- It will probably be a bit hot in the summer and you will have to add holes and rework the back panel
- You can open the side cover until holes are added
What can be done better
- By adding a 5mm gap between the power supply and the front wall, you can install rubber seals and increase the air inlet by a third due to the right holes
- If you remove the middle rod under the mat board, the cross-section of the “air duct” from the power supply to the rear wall will almost double. It is possible to replace the profile with a non-continuous corner.
- The 220V input can be moved towards the video card and the cable can be routed along the rear left edge of the case and along the lower air duct. This will remove the high voltage cable from the case itself and return the ability to install a 140mm fan. You can install a 2-pin power connector (like on printers or household appliances) to reduce the size
- Design a single bent part that combines the motherboard tray, power supply mount and HDD mount
- Definitely laser cutting of all panels. In the prototype, I deliberately went for manual cutting, since the dimensions were unknown in advance.
- Installing a 2.5” drive is possible in the lower air duct (now the front USB cable is installed there) or on the front panel, opposite the video card. Installation of 3.5" drives was not intended.
How to design a case - work diagram
You can almost certainly design the case for your device yourself.
The main thing is to have a good understanding of the entire cycle, from idea to production. Corpus development is a process divided into several mandatory stages. I won’t even discuss this: it has been tested many times. Even if you are not going to get involved with “big” production (for example, if you plan to make a device only for yourself), it would still be better for you to follow the correct sequence of steps.
And for those who doubt their abilities, I’ll say right away - you’ll definitely be able to figure it all out: software has stepped far forward, and now you don’t need to spend several years to put the first prototype of the case on your desk.
Here is the diagram we will follow: Step-by-step scheme for developing the device body
Tips for Followers
- The drill stand made it possible to drill all the holes evenly and accurately. If you do it by hand, you need it. I bought it specifically for this case for $30.
- A good ($3.5) 3mm tap is a must have. A special tap for aluminum produced a more “relaxed” thread. I liked the carving more than the usual one for machine cutting.
- The 6-32 (inch) tap is rare and optional. In aluminum, you can easily screw a self-tapping screw from a good case kit into a 3mm hole.
- Avoid using fasteners from cheap housings - there is a high probability of breaking the screw in the hole.
- Bent parts in the body are still needed; without them, it turns out to be Lego from scraps. In my version, these are 3 parts: a power supply mount and 2 corner rings for the rear panel.
- A finished back panel increases the cost of the case and imposes restrictions on the size (although it is beautiful and there is no hassle with bending a corner).
- Not all cutting boards are level. Mine may have started to leak after drilling. There is a curvature of up to 1mm in the middle. When purchasing, check.
- In the factory case, the covers are attached with an overlap and small distortions and cracks are not visible. I had to adjust the covers quite accurately and still, in some places a slight curvature is noticeable
Delivery of a batch of electronics cases and customs clearance
To deliver finished products, you can use several types of transport, which differ in cost and delivery time: air, railway, sea and road transport.
You can also use combined options. Each type of transport has its own advantages and disadvantages that determine the possibilities of its use. Air transport is the most expensive type of delivery, but at the same time the fastest. The simplest items - samples - are usually sent by express delivery services. This takes on average 3-5 days excluding customs clearance.
When sending larger shipments, it is necessary to especially carefully consider the feasibility of sending by plane, this is the most expensive delivery method. Yes, it takes no more than 4-5 days, but the cost is several times higher than delivery by rail or sea. Customs clearance of cargo involves customs clearance and payment of customs duties. The provision of such services is carried out by a customs representative or a customs broker. This is an agent who has the right to carry out any customs clearance operations on behalf and in the interests of the customer.
To begin the procedure, it is necessary to submit to the customs service all documents confirming the origin of the cargo, its characteristics and value.
Such documents include (list of 12 items):
- Agreement (contract) of international purchase and sale.
- Specifications for the agreement (contract).
- Registration of the transaction with the bank if the contract amount exceeds 3 million rubles. at the exchange rate of the Central Bank of the Russian Federation on the date of signing the agreement. Registration with the bank takes 2-3 days.
- Invoice or proforma invoice.
- Packing list.
- Transport document: for sea delivery - bill of lading, for road delivery - CMR, for air delivery - air waybill, for courier delivery - express waybill, for railway delivery - railway waybill);
- Permits and/or licenses for the import of goods restricted for movement across the customs border (if required).
- Documents certifying the compliance of goods with the requirements of technical regulatory legal acts - in relation to goods for which a “certificate of conformity” is required.
- Certificate of origin of goods in form “A”, ST-1, general or other form provided by law.
- Documents confirming payment of customs duties.
- Contract and invoice from the transport expedition.
- Documents allowing the identification of goods - a description of the goods indicating the contract or commercial name of the goods with an indication of its characteristics sufficient for identification in accordance with the Commodity Nomenclature of Foreign Economic Activity.
Customs clearance usually takes 1-2 days unless additional customs checks (tariff and non-tariff) are carried out. After customs release of goods, they can move freely throughout the EEC.
Total
The size is good. I was especially pleased with the width - the body turned out to be smaller than the old Aspire X-Qpack. Yes, a little long - 30mm longer, but already 30mm and the same amount lower. Final dimensions Width x Height x Depth: 255 x 210 x 366mm
Without holes on the side wall, the case can be placed on its side - you get a lowered miniTower, just add a bracket so that the video card does not sag. Everything fits. There are reservations regarding power supplies - huge kilowatts and modular power supplies will not be included.
Ventilation between the board tray and the case is an interesting solution. It seems to work and not bad.