Quite often, among owners of poorly functioning or already faulty office equipment, the question comes up about what can be done from an old printer. Of course, the easiest way to solve this problem is to send your used inkjet or laser printer for recycling. But if you have free time and some desire, then you can turn a printer into a CNC machine, i.e. equipment with numerical control, which has found wide application for solving both amateur and professional problems. You can find out about this in more detail below, but first, let’s look at the question of what can be extracted from an old printing device.
Product details
As a rule, only one element in a scanner or laser printer becomes unusable, while the rest of the parts are quite usable. The most valuable in this sense are MFPs and matrix devices. When disassembling the latter with your own hands, you can get a lot of valuable parts.
Old printer
- Fasteners - screws, nuts, gears, bolts and other small items. For the home craftsman, any fastener is useful, since sometimes the lack of elements of the required diameter makes work very difficult.
- The most valuable part in any type of printer is the guide, made of hardened steel. In many Chinese and Korean devices, the guide is made of cheap alloy and bends even under the weight of the drive belt. Inkjet devices from Canon or Epson use steel. This part is used in the construction of CNC machines or homemade printing devices.
- The head sliding unit - in inkjet devices it is plastic and is only suitable for CNC engravers, but in matrix engravers a bronze bushing is pressed into the unit, so the part can be used on metalworking home machines.
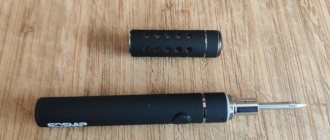
- If you intend to install a printing device, a Canon cartridge is the best option.
Cartridge from Canon
- A toothed drive belt is a universal element suitable for any device where it is necessary to transmit force from a stepper motor to a platform. And the belt sliding assembly can be found in MFPs and scanners and even old copiers from Epson.
- Stepper motor – provides the movement of the paper. On older dot matrix and laser devices they are more powerful, however, and the parts of inkjet printers can be used effectively. In addition, the engine along with the controller and driver can be removed from the old machine.
- Limit switches – provide control over paper quality. A necessary part for a homemade printing device or machine.
Limit switches
Electronic filling
There are two options:
- You arm yourself with a soldering iron, flux, solder, a magnifying glass, and understand the chips from the printer. Locate the 12F675 and LB1745 printer control boards. Work with them by creating a CNC control board. You will need to attach them to the back of the CNC machine, under the power supply (we also take it from the long-suffering printer).
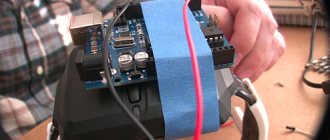
- Use the factory CNC machine controller. Offhand – a five-axis CNC controller. Homemade electronics are wonderful, but the Chinese are heavily dumping on prices. So, with a light click of the mouse, we order the CNC from them, because in Russia you cannot buy such a CNC device. CNC controller 5 Axis CNC Breakout Board allows you to connect 3 inputs of limit motors, a shutdown button, automated control of a dremel and as many as 5 drivers for controlling a stepper motor of a homemade machine.
This CNC is powered by a USB cable. In a homemade version of the CNC, you need to power the control board based on printer chips from the power supply of the CNC machine.
A stepper motor for a homemade CNC machine will have to be selected with a power of up to 35 volts. At other powers, the CNC controller runs the risk of burning out.
Remove the power supply from the printer. Connect the wiring between the power supply, the on/off switch, the CNC controller and the Dremel.
Connect the wire from the laptop/PC to the machine control board. Otherwise, how will you load tasks into the machine? By the way, about assignments: download the Math3 program for drawing sketches. For non-industrial design professionals, CorelDraw will do.
You can cut plywood (up to 15 mm), textolite up to 3 mm, plastic, wood with a homemade CNC machine. The products will be no more than 30-32 cm in length.
Most people have equipment that is no longer working, or a device with severe technical damage. Naturally, such equipment is thrown away, but some people have a very working question: “What benefits can be obtained?” Even old devices can be used on the farm. In this article I wanted to talk about an ordinary printer.
What can be done from an old printer
An old printer can be modified and used for several other purposes. In this case, you will also need ingenuity and skill, but the result is sometimes very interesting.
What can be done from a Canon or Epson device, and judging by the reviews, this is the most suitable line of MFPs and scanners for modification? Device for printing on thick materials. The basis is most often an old inkjet printer.
Inkjet old printer
- Remove the front tray, input tray, side panels and housing. Remove the paper feed sensor but keep it.
- Remove the pressure and central roller, as well as the head cleaning mechanism.
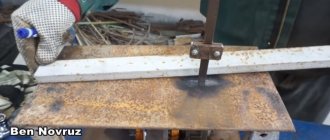
- The platform with the head can only be removed by cutting it using a hand grinder. For such work you need to wear protective goggles and a respirator.
- The print head is cleaned.
- Then washers and nuts are used to adjust the required gap width. Most often, an old printer is used for printing on textolites, thin sheets of plywood and similar materials. The head cleaning mechanism is then installed on the corners.
- The material supply sensor is a photosensor with an emitting diode. For it and the feeding system, a platform of appropriate size is cut out of plywood. Aluminum corners are mounted as guides for the PCB. The feed sheet is also made of aluminum.
The second life of trash, or a mini-lamp from a scanner
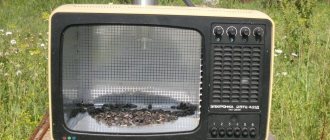
Kind people gave me this fairly old scanner, Mustek 6000p, a device from the times of Windows 95 and large white plastic cases. As a rarity, it is not of great value, but it would be a pity to throw it away without looking inside).
Actually, all its electronic contents, the case, are sent to the trash.
The illuminator from the scanning carriage is a conventional cold cathode fluorescent lamp (CCFL), similar to those used in the backlight of LCD matrices.
Board from the carriage. On the left side we see a high-voltage inverter; it’s time to try to light the lamp.
In the left corner is the 7812 integrated stabilizer, designated Q8, from which it is easy to understand which tracks the inverter receives power from. At its input, when the scanner is turned on, there is about 14 volts, but the lamp does not light up, how can I start it? There are not many tracks leading to the section of the board with the inverter from the connector that connects the carriage board to the main board, so let’s assume that transistor Q5 contains a switch that starts the lamp.
Using tweezers, we close resistor R3, connected to the base of the transistor, to + power, and... let there be light!
Having figured out what's what, we'll cut off all the unnecessary stuff, solder a resistor-jumper between R3 and the power supply...
... and pins for the printer’s native power connector.
Let's get such a neat inverter board, check it again.
This, of course, is not enough to illuminate the workplace, but you can make a backlight in some drawer similar to the lamp in the refrigerator. An equally elderly mouse, the same age as the scanner, worked well as a body donor. The switch will be a reed switch with normally closed contacts.
Assembled. It's a pity that the buttons do not carry any functional load =)
We attach the lamp and body with double-sided tape. On the door there is a magnet from the hard drive on the same tape. Not particularly aesthetically pleasing, but it gets the job done.
More than enough to illuminate a small space
An attentive reader will notice that in the photo of the board in the mouse case there is already a jumper instead of a stabilizer - it is no longer needed, the inverter is powered by a home server, which is located on the same cabinet.
Source
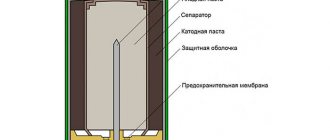
The cartridge is filled with special ink.
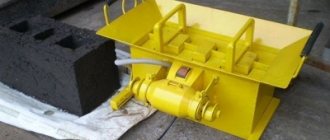
The photo shows a modified old printer.
Wind generator from an electric motor
What else can you do with your old printer? A wind generator that converts wind power into electricity. Such a device may well provide for household needs. In essence, this is not the use of the entire device, but only parts. Stepper motors from a laser device or MFP are preferable.
Printer motor
- The old printer is disassembled to remove the stepper motor.
- Assemble the rectifier: 2 diodes are required for each of the 4 phases.
- The blades are made from PVC pipe - this makes it easier to select the desired degree of curvature.
- The bushing with slate is machined to the size of the shaft.
- The sleeve is placed on the shaft, secured, and the blades are fixed to the flange. It is important to balance the composition.
- The motor is inserted into a piece of pipe where it is secured with bolts. A duralumin weather vane is fixed to the pipe from the end. The entire structure is supported by a vertical pipe.
The video demonstrates how to assemble a wind generator with your own hands.