Once upon a time, only royalty and noble nobles had a personal seal. You can use the author’s advice below and make such an unusually interesting thing for personal use. You will find it useful for sealing hand-made wedding or anniversary invitations, and you can also use it in decoupage and other types of hand-made needlework. For people working on a commercial basis, it is generally irreplaceable - you don’t need to make name tags for your works, just take jute twine and hang an imprint of your personal seal on the product instead of a tag on the product.
To work, you need to prepare the following materials and tools:
1. A small piece of flat wooden stick. The author advises using a small piece of a shovel handle, which can be bought in construction supermarkets. 2. The tape is not wide. 3. Simple pencil. 4. A picture of the future print printed on a printer. 5. A collet knife or a small, thin, sharp knife. 6. Wood burner. 7. Sandpaper. 8. Soft rags. 9. Napkins. 10. Vegetable oil. 11. Drying oil. 12. Brush for applying drying oil. 13. Matches. 14. Sealing wax or wax candle.
1 step.
First, we thoroughly sand the piece of stick using sandpaper.
We will especially carefully polish the end side on which we plan to place the seal. Then, using a collet knife, we very carefully cut out the image of the previously printed seal. The author recommends printing the blank on thick paper.
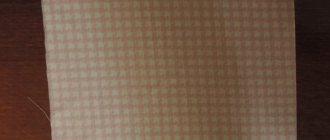
Making a template for future printing is a painstaking job that will require your full concentration. This is roughly what a neatly cut blank for printing should look like: Step 2.
Then we apply the cut-out design to the end side of the previously prepared stick, secure it with tape and paint over the wooden surface with a pencil through the cut-out design on the paper.
It is very important not to forget that the template blank must be applied in a mirror image, otherwise you will end up with an incorrectly positioned seal. This is approximately what you should get as a result of painting:
step 3.
Then, using a burning device, we carefully burn the wood according to the drawn template, while trying to burn the wood to the same depth.
Step 4
Now you need to process the blank for printing using drying oil.
Then thoroughly dry the workpiece with a rag and leave it to dry for 24 hours. After the drying oil has completely dried, your seal is ready for use.
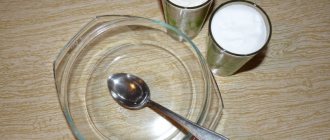
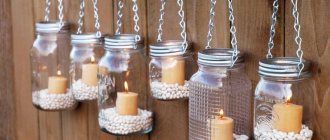
You can put your personal stamp on sealing wax, wax, paraffin and even use hot glue from a hot glue gun for these purposes. This glue comes in different colors, so try and experiment. But keep in mind that sealing wax will be the strongest and most durable. To make a seal imprint on wax, light a candle and drip hot wax where you want your personalized seal to be. The wax should be given a little time to cool slightly. This time is approximately 15-20 seconds. At this time, dip the seal in vegetable oil and carefully blot off excess oil with a napkin. Then press the seal tightly onto the slightly cooled wax and leave it until it hardens completely. Many centuries ago, only those of royal blood and titled nobles at the royal court were given the privilege of having their own seal.
Today, anyone can purchase a personal one. The seal is no longer the exclusive symbol of power and might. In addition, if you wish, you can make it at home instead of ordering it from a specialty store. This will be discussed in our article.
Why might you need a wax seal?
A wax seal created by yourself will allow you to decorate gifts, letters, souvenirs, hand-made items and much more with unique imprints.
The ice cream can be used:
- when decorating and sealing invitations - for a birthday, wedding, engagement, party, anniversary and so on;
- in decoupage and scrapbooking;
- when making homemade cards;
- when writing special letters and arranging gifts.
Wax seal is most popular among craftsmen, in particular scrapbooking (decorating personal and family albums). Print impressions will give products individual, unique features and an unusual style.
Let's figure out how to make a sealing wax seal at home using one of the simplest step-by-step instructions. This will greatly simplify all further work - for example, you will not have to come up with and develop the design of copyright logos and tags. However, it should be borne in mind that the printing process itself is quite long and requires attention and painstaking work.
Required Tools
The main set of tools consists of:
- A rotary knife with replaceable blades of different sizes and shapes, it is needed to create patterns, logos and all kinds of images on the top layer of leather;
- Sets of various stamps, impressions and clichés are purchased in special stores; they can also be created with your own hands or ordered from professionals who work with metals;
- A specialized hammer for stamps that absorbs most of the vibrations when struck;
- Styluses made of durable plastic or hard wood for pressing out image borders;
- Wheel markers for marking curved landmarks;
- Lots of files for adjusting the shape of stamps if necessary;
- Smooth platform made of good wood for embossing work;
- A soft sponge for soaking the skin with various liquids before starting work;
- Other useful tools for various types of leather processing.
Step-by-step instructions for making a seal at home
Before you start creating a sealing wax seal, you should prepare for this process and select all the necessary materials. Depending on your printing needs, you may need:
- glue;
- clay, plastic or ready-made modeling kit;
- embossed buttons and epoxy resin.
One of the easiest ways is to create the desired tool using buttons with a relief surface, chess, nail polish remover and resin. Buttons can be pre-polished - this will create a better impression.
Step one
. The checkerboard surface is cleaned of dirt and dust using nail polish remover.
Step two
. Buttons are washed and wiped dry.
Step three
. A ball is formed from the resin (which, when leveled, should cover the bottom of the chess piece).
Step four
. The button is carefully pressed into the epoxy resin. After this, you should wait until the mass hardens.
Step five
. The sealing wax is melted and an impression is carefully made.
Recommendations
. To prevent the sealing wax from sticking to the button, the seal must be slightly cooled before use. If there is some material left in the recesses of the button relief, it can always be cleaned off with a knife or dissolved with nail polish remover. The seal itself should always be kept clean.
Disadvantages of homemade printing
As we have already found out, creating a simple seal is a task that is feasible for almost everyone. However, homemade fillings have a number of disadvantages. For example, the product may not work out the first time or may not fully meet the requirements. In addition, the imprint of a homemade seal does not always look clear and even.
But over time, you can improve the technology for making ice cream, stock up on the necessary materials and correct all the errors.
The time for letters sealed with wax is long over; now wax seals are used in narrow industries for specific purposes and by an extremely narrow circle of people. And if you decide to send your girlfriend a romantic letter with a stamp, then you can do it quickly and easily, you just need to walk through the pages of our website. And after reading this article, you will find out what sealing wax is made from and what it is.
Types of sealing wax used for printing
Several types of sealing wax have been developed for sale. The very first of them is a candle and a wick. This type of candle is lit and the required material is melted onto the surface. This method is considered the most expensive when compared with others. It is used when it is necessary to send someone, for example, an envelope with a wax seal in one copy.
Another common type will be a wax gun as an alternative to a candle. But it is a cheaper option. When using it, disposable wax rods are used. This variation will be ideal for sending outgoing correspondence.
Sealing wax can be produced in granular form, as well as in lump form. Working with such material will be difficult and long-term, so this technique is resorted to in rare cases.
Preparation of sealing wax:
It is necessary to carefully melt the rosin (shellac can be used) in an enamel container; when heating, it is necessary to stir constantly. When the rosin is completely melted (the rosin should neither burn nor boil), you need to add turpentine, after which you need to gradually pour in a mixture of chalk and sulfur-barium salt, gradually stirring.
You can color the sealing wax by adding mineral paints (cinnabar, ocher, chrome yellow) to the hot mixture. To obtain brighter colors, you can use aniline dyes, which dissolve in fat. The main thing is that your paints are not temperature sensitive!!!
When all your mixture is mixed, you need to take a little and carefully drop it onto a wooden surface to check whether your sealing wax has acquired the desired properties (color, hardness and fragility).
After the mixture is ready, it must be poured into molds after lubricating them with oil and heating them.
Sealing wax recipes:
1) Red (highest grade):
a) 8640 g of gum varnish, 3600 g of Venetian turpentine, 5760 g of the best cinnabar, 135 g of Peruvian balsam,
b) Melt: 12 shellac, 8 Venetian turpentine, 9 cinnabar, 3 magnesia, 2 turpentine.
2) Wax for parcels:
a) 2000 g of rosin, 1000 g of pine resin, 30 g of turpentine oil, 750 g of chalk, 500 g of turpentine.
3) Simple black sealing wax.
a) Mix 6480 g of gum varnish, 3600 g of Venetian turpentine, 2880 g of chalk, 720 g of Dutch soot.
PS: I tried to clearly show and describe non-tricky tips. I hope that at least something is useful to you. But this is not everything that can be imagined, so go ahead and study the site
We first encountered the need to apply a wax seal 3 years ago. The client wanted to decorate gift chocolate with sealing wax. And the client’s desire, as we know, is the law...
We bought a bunch of unnecessary (as it later turned out) equipment and got to work. The process went slowly and looked like this. One man was carefully applying wax seals. The second methodically tore them off: the prints turned out crooked and a good half of them were wasted. Of course, we fulfilled the order. But we spent a lot of time, nerves and money.
In general, as expected, the first pancake came out lumpy for us. But the very idea of using wax seals on packaging seemed interesting to us. We started experimenting. And our experiments were crowned with success.
Preparing for work: what do you need to have on hand?
To start making wax seals, you don’t need any complicated equipment. You can find everything you need to get started at home or buy it literally “for pennies” in the nearest store.
You will need:
- Sealing wax.
We recommend buying lump sealing wax - it is cheaper than candle sealing wax. Although if you need to decorate several invitations, for example, for a wedding or corporate anniversary, you can use sealing wax in candles: it is somewhat easier to work with. - Cliches for sealing wax.
You can order cliches from a company that specializes in the production of seals and stamps. And prepare the layout in any vector program (for example, Corel, Illustrator). - Metal cup
for melting sealing wax. We use cheap military grade camping bowls. - Tea spoon.
- A hair dryer
will help remove the remaining sealing wax from a spoon or speed up the process of melting the substance. - Electric stove.
If you plan to make several prints, then you can get by with a home stove or even a hair dryer. If there is a lot of work to be done or it will be carried out regularly, then it is better to purchase an inexpensive stove with one burner. Otherwise, you can seriously damage your home oven with sealing wax leaks.
Absolutely useless:
- Wax gun
. At its core, it is an ordinary heat gun. It is not just inconvenient to use, but almost impossible. - Wax seals
. They are not cheap, but they do not provide any benefit. We declare with full responsibility: the use of sealing wax will not speed up the process and does not improve the quality of the finished seals. Therefore, we advise you not to throw money away, but to spend it on something truly useful.
Features of wax seals
Of course, today such products are used extremely rarely. Any stationery store has a lot of ready-made stamps for children, which differ in colors and low prices.
But there are also those people who love interesting experiments. For example, you can pleasantly surprise your beloved if you give her a beautiful confession, which is sealed in wax with a beautiful logo. Making such seals can be interesting as a hobby. Moreover, making such products is not difficult.
DIY wax seal: step-by-step instructions with video
So, we have stocked up with everything we need, now we can start making wax seals.
When working, follow this algorithm:
- Solid sealing wax should be split into small pieces.
- Melt the wax on the stove at medium temperature, stirring constantly.
- Scoop up the sealing wax with a spoon and pour it onto the desired area.
- Wait for the sealing wax to harden and remove the cliche.
- Repeat steps three and four for subsequent products.
This way it will melt much faster. In addition, it is more convenient to pour small pieces into a cup for melting during operation.
We do not recommend melting a lot of substance at once: it will be difficult to work with. Also, do not bring the molten mass to a boil. Boiled sealing wax forms bubbles, which give the finished prints a sloppy appearance.
According to manufacturers, the melting point of sealing wax is 60°C. But, as our practice has shown, this indicator can vary significantly depending on the color of the substance. Apparently, this is due to the pigments that are used to color the wax mass.
Thus, black and white sealing wax have a much lower melting point than red sealing wax. Bronze sealing wax has the highest melting point and hardens much faster than sealing wax of other colors.
Make sure that the sealing wax is not too liquid, otherwise it will spread over the surface and give an unsightly impression. Press the resulting clot with a cliché and wait for a while.
Different colors of sealing wax require different times to harden. Black sealing wax is the most difficult to work with - it hardens for a very long time (several times longer than, for example, red).
After the sealing wax hardens, the cliche itself will easily separate from the finished seal. It is better to shoot the cliche a little sideways rather than horizontally.
Do not forget to add new batches of crushed sealing wax into the melting bowl as you use it - this will prevent it from boiling.
In addition to the article, we have prepared a video about how our company’s craftsmen apply wax impressions to corporate gifts. We hope that the video will give you a clear idea of the process of applying wax seals with your own hands at home.
Problems when working with sealing wax and solutions
- Sealing wax boiling.
- The print falls off after drying.
- Sealing wax sticks to the cliché.
When working with sealing wax at home, certain problems may arise. One of them is boiling wax, leading to printing defects. If the substance boils during melting, then you need to reduce the temperature of the stove and vigorously stir the sealing wax. Stirring will remove air bubbles from the sealing wax, which reduce the quality of the prints.
Another problem is the weak adhesion of the wax mass and the material on which it is applied. This leads to the fact that after hardening the seal simply falls off. In our practice, this happened with craft bags to which the sealing wax did not want to stick. We conducted many experiments and found a solution. If you add a small amount of hot-melt glue (hot-melt gun rods) to the molten sealing wax, the seal will reliably adhere to the craft paper.
In this case, we use a hair dryer. Using it, we heat the cliche and carefully remove the softened wax mass with a rag. Some people recommend using a solvent to clean the cliché. We have not tried this method. But you can try both methods and decide which one is more effective.
How to make a seal using a candle?
We light the candle, and when it starts to melt, turn the candle over and create a puddle the size of a stamp from the drops that fall. Let the wax cool for 15-20 seconds and press it onto the stamp. If the seal sticks, treat it with olive oil (or sunflower oil) and wipe it off quickly.
Interesting materials:
How to apply one transition to all slides? How to try on shoes online on Lamoda? How to answer a call on a Samsung smartphone? How to accept payments via PayPal? How to take birth control pills to avoid getting pregnant? How to accept TP in Minecraft on a server? How to park a domain on Beget? How to park a domain? How to tame a wild hedgehog? How to tame a zombie horse in Minecraft?
Wax seals in decoration: options for use
With the help of wax impressions you can design a wide variety of objects. Textured prints give them a vintage look, making them elegant and impressive.
- Applying sealing wax to paper and cardboard.
- Applying sealing wax to fabric.
- Applying sealing wax to wood.
- Applying a wax impression on glass.
Classics of the genre are scrolls and envelopes with wax seals. There are no difficulties with applying stamps to envelopes. As for the scrolls, there is one trick here. To make a scroll, take a round stick and wrap paper on it. You need to pour sealing wax into the right place - it should not be too liquid, otherwise the clot will spread. The sealing wax needs to be pressed firmly onto the cliche, and the scroll is ready.
This way, for example, you can decorate gift bags beautifully. Feature: when applied, sealing wax flows through the fibers of the fabric. Therefore, you need to place something metal under the canvas - a thin ruler or a trowel.
Rope sealed with a wax seal looks very impressive on gifts and scrolls. To get such a print, take a metal sheet or a construction trowel and grease it. Place ropes on the metal, fill them with sealing wax and place the cliche. After complete hardening, the wax seal will easily come off the metal surface.
We often use this technique to decorate wooden boxes with corporate gifts. By the way, a wax seal can be combined with a label. Applying sealing wax to wood, as a rule, does not cause any problems.
This method can be used when decorating bottles. To apply to glass, thick sealing wax with the consistency of “sour cream” is required. To get it, it is enough to lower the heating temperature of the stove. You can also add a few solid pieces to a cup of melted sealing wax and stir the mass vigorously.
If you have any questions, ask them in the comments - we will be happy to answer. We will also be glad if you share your secrets of working with sealing wax at home.
Sealing wax at home can be replaced with:
| How can I replace sealing wax? | Description |
| Stamp from a glue gun | Those who are actively involved in handicrafts and scrapbooking must work with a glue gun. It will help in creating an imitation of sealing wax. A stamp blank will be required. It will be replaced by a button or a coin. |
| Stamp made from wax crayons | Wax pencils can be purchased at any store that sells similar products. Their consistency, of course, is weaker than sealing wax, but if you don’t have anything else at hand, this is a good solution. |
| Printing from modeling material | Modeling compound is also sold in DIY stores. Its consistency allows you to create an imitation of sealing wax at home. It is necessary to separate the required amount of mass and roll it into a layer of equal thickness. Next, attach a stamp or coin. This option is used to decorate hand-made products. |
| Wax seal | Wax candles can also be a worthy replacement for sealing wax. Contact a craft store to purchase a candle with suitable wax. Light it at home, drip melted wax onto the site of the future seal, attach a coin or a completed blank, make an impression and wait until it hardens. |
| Homemade sealing wax | At home, you can prepare good sealing wax for future letters or packaging of hand-made souvenirs. All the necessary components can be found in the nearest stores. Required:
You can also make a print blank yourself, but you can purchase the print you like or replace it with a button or coin. |
Wax in its composition is a homogeneous mixture of resins, dyes and auxiliary components. A wax seal can be found on invitations, certificates, commemorative and souvenir letters.
There are several options for replacing sealing wax if you don’t have it on hand at the right time.
At home, you can easily make an alternative version of sealing wax using a glue gun.
- You need to insert a rod into it, heat it up, and drip liquid glue into the place where the future seal will be printed. Don’t feel sorry, the print should be quite dense.
- Leave the mixture for 30 seconds.
- Then attach the finished stamp, button or coin.
- Press firmly and leave until set.
The print can be easily painted with acrylic paints. Many people use ready-made colored rods.
Leather embossing methods
All methods of blundering can be divided into 2 groups - cold and hot.
The cold method is usually applicable in situations where a simple pattern, inscription or brand should be made on the treated leather. For this method, only skin whose thickness is in the range of 0.8 to 1.2 millimeters is suitable.
In general, thickness does not play a special role here, since the most important evaluation criterion is how well the print will hold its shape.
Leather processing using hot stamping technology is carried out with a stamp, which is preheated from 60 to 140 degrees Celsius. The best material for the job is a material whose thickness ranges from 1.1 to 1.4 millimeters.
When creating a relief print, 4 methods are mainly used:
- Blind embossing. Used to produce a drawing or inscription with a perfectly flat surface. The imprint is made using a stamp, which is struck with a hammer; the result largely depends on the force of the blow. Sometimes the dies get hot, but usually not above 80 degrees Celsius, as there is a high probability of damage to the material.
- With foil. The secret of the method is that between the stamp and the material a foil in the shape of a picture or logo is placed, which is pre-impregnated with wax-based glue. When the stamp is struck, the foil is imprinted into the impression and then firmly bonds to the skin. In this case, the stamp necessarily warms up.
- Embossing. Embossing is carried out using a press, the impression is created with or without foil.
- Texturing. The essence of this option is also extrusion, only now the pattern is created on a specific place, and on the entire material.
Printing from modeling material
Modeling mass is sold in children's art stores. Make a blank of the desired size, attach a stamp, and then bake the mass in the oven. Detailed instructions are on the packaging.
By melting a wax or paraffin candle, you can get the desired seal that imitates sealing wax. To work, you can use colored candles, or then color the seal.
Pour hot wax onto the desired area, apply the seal and wait until it cools.
What is this type of printing?
A wax seal is a mechanism that includes a wooden handle and a brass attachment. Using the surface of this nozzle, it becomes possible to apply any design. A sample of the planned seal is developed independently by its future owner. You can create several different replacement attachments.
The wax seal impression is made on preheated wax. You need to drip the substance into the place where you plan to put the stamp, and then use a brass nozzle to squeeze out the stamp.
Homemade sealing wax
Prepare the necessary components and follow the simple instructions.
- Take an iron container (you can use a Turk).
- Pour 50 g of rosin into it.
- Cut 3 cm from the candle and add to the container.
- Add a pinch of chalk.
- Place the Turk (cocotte maker) in a pan of water and turn on the heat.
- Cook until all ingredients are dissolved, stirring constantly with a wooden stick.
- Add ocher to a homogeneous mixture and stir.
- Make a paper tube and place it on the second sheet.
- Carefully pour the liquid ingredients into a paper tube, holding it with your hand in an oven mitt and a plastic bag (to avoid getting burned).
- Hold the tube well, preventing any liquid from leaking.
- After hardening, peel off the paper and use sealing wax using the usual technology.
At home, you can find something to replace sealing wax by making stylish and sophisticated seals on souvenirs and bright packaging. The offered options are affordable, and if you wish, you can make sealing wax yourself.