- May 17, 2019
- Weapons and ammunition
- Tamila Gresko
Hunting is considered a rather expensive activity, especially for novice shooters. The reason for this is the lack of experience, which affects the accuracy of hits. In this regard, a beginner will need to use a fairly large amount of shot to shoot. Shot ammunition costs a lot. The only way out is to learn how to prepare hunting shot yourself. Judging by the reviews, there is nothing complicated in this matter. If you have the appropriate equipment, you can cope with the task at home. You will learn how to make shot for hunting with your own hands from this article.
How to make a wood splitter with your own hands: drawings, photos, instructions
We will send the material to you by e-mail.
Chopping wood with an ax is very hard work, so many owners of country houses who heat the stove with wood try to buy or make a wood splitter themselves. These devices allow you to avoid the tedious swinging of the cleaver, so you can split much more firewood in one day, because you don’t have to rest every now and then. From the article you will learn how to make a wood splitter with your own hands: drawings, photos, instructions will help you in making it.
Stage 1. Preparation of round timber
Attention! To determine the quality of logs (you can refuse low-grade sawlogs at any time), you need to know about the ideal harvesting conditions, which we will consider below.
Round timber must be harvested at sub-zero temperatures, that is, in winter. It is at this time that the amount of moisture in the wood is minimized, therefore, during drying the material will deform and crack less.
In order to ensure the durability of the log house, certain sections of logs (the so-called butt logs) are used during construction. These sections start from the rhizome and end at the crown. Such butt logs are denser (which compares favorably with the tops) and there are practically no knots in them. Selection criteria also include the round shape and degree of curvature of the trunk. In both cases, a defect is an error exceeding 1 cm per linear meter.
Harvesting logs for a log house
Butt logs
Attention! If the length is, for example, 5 m, and the error exceeds 5 cm, then the log can be safely rejected.
The same applies to diameter. For example, the diameter of the base of the log is 35 cm, while the top is 25 cm or less. Such round timber is categorically not recommended for use in construction.
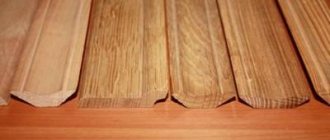
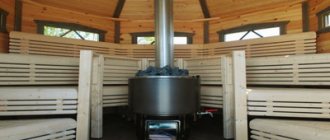
Finally, pay attention to the type of wood. Ideally, coniferous trees (spruce, larch, etc.) should be used for a bathhouse. Larch is characterized by resistance to moisture, although in extreme cases you can resort to the “pine-spruce” combination, in which the first few crowns are erected from pine. And if only spruce is used in construction, then the material must be treated several times with an antiseptic.
Perform further actions in accordance with the previously drawn up project. You can create such a project yourself, find it on the Internet, or order it from specialists. It is with the help of this document that you can calculate the required amount of consumables, determine the area and shape of the base.
Types of wood splitters
There are three main types of wood splitters, which differ in the source of energy for influencing the log:
Electric rack splitter
Hydraulic type device
Hydraulic wood splitters
This device works on the principle of a hydraulic press. The hydraulic cylinder pushes the log onto a sharpened wedge, which splits the wood. These wood splitters are driven by an oil pump powered by a gasoline or diesel engine. Their main disadvantage is the high cost of high-quality hydraulic cylinders, control units and pumps.
Electric wood splitter
Electric (rack and pinion) wood splitters work on the same principle as hydraulic ones. Their basis is a rack and pinion gearbox, which pushes the log onto a sharp wedge. Their advantage is the availability of parts and their low price. Such gearboxes are installed on sliding gates and other similar equipment. Electric (cone) wood splitters operate on the self-tapping principle. The steel cone is threaded so it screws into the log and tears it apart.
Manual (inertial) wood splitter
The basis of this wood splitter is a metal pipe (crane), fixed to a metal support using a hinge. The pipe is equipped with a wood splitter blade, as well as various steel reinforcing elements. Sometimes a counterweight is installed to make lifting the pipe easier. To split the log, the pipe is sharply lowered. The blade, under the influence of the inertia of the pipe and reinforcing elements, splits the log. The advantage of such a device is that it can be made from any steel pipes, which can be sold for a few hundred rubles by an employee at the nearest ferrous metal collection point. The disadvantage of this wood splitter is that it uses muscular strength to operate it, so a person gets tired quickly.
Stage 2. Timber processing
Step 1. After the consumables have been delivered to you (or you have cut them and delivered them yourself), they need 25-30 days to rest.
Step 3. Then start processing. First, peel the bark from the logs (do this carefully so that they do not crack), leaving a little of it on the sides - about a 15-centimeter strip on each side.
Step 4. After processing, place the logs in storage approximately 25 cm from the surface of the ground. You can stack it however you like - in stacks, packs, etc., the main thing is that the distance between the logs is 7-10 cm.
Scheme for preparing logs for building a log house
Log storage
Video - Preparing logs
Homemade wood splitter - what and how to do
If you have the necessary materials, then it’s easy to make a wood splitter with your own hands: drawings, photos, instructions are freely available on the Internet. For this you will need:
- various metal scraps;
- Bulgarian;
- welding inverter;
- ability to cook;
- ability to draw up and calculate diagrams;
- creative ingenuity.
Helpful advice! The design of each wood splitter must be developed individually, according to the available parts.
Rack splitter - diagram and manufacturing
The easiest way is to make a rack wood splitter with your own hands: drawings, photos, instructions for which are posted on the Internet. Its basis is a powerful steel frame, to which a wedge, motor and gearbox are attached. To make it, take an electric motor with a power of at least 2 kW and two pulleys with a diameter ratio of at least 1:4. You can also use gearboxes from various mechanisms with transmission ratios over 8:1. If you don't have an electric motor, but have a gas engine from a saw or trimmer, you can connect it. In this case, you will have to increase the transmission ratio of the gearbox even more due to the too high speed of such a motor. Make a knife for a wood splitter from sheet steel at least 1 cm thick, sharpening it at an angle of 90 degrees. To work with thick logs, it is necessary to make a compound knife so that its thickness is at least 5 cm, and reinforce it inside with a steel blank of a suitable shape.
Approximate diagram of a rack wood splitter
The gear of the rack and pinion mechanism should be 4–6 cm higher than the frame and located from the knife at a distance equal to twice the length of the log. In addition, it is necessary to make a carriage that will ride on the bed. The height of the carriage must correspond to the installation height of the rack and pinion gear. On the front (facing the knife) side of the carriage, install a transverse plate that will act as a pusher. For it, use sheet steel with a thickness of at least 7 mm. Install any hinge on the carriage that will allow you to raise and lower the rack, and also attach a spring to lift the rack above the gear. Install and secure the return spring, which will move the carriage towards the gearbox. Install a lever on the frame that will press the rack against the gear. With this lever you will control the operation of the wood splitter - when the lever is pressed, the rack comes into contact with the gear and moves forward. If necessary, cut the rail with a grinder - it should be slightly shorter than the distance from the feed plate to the knife.
Hydraulic wood splitter - materials and drawings
To make a hydraulic wood splitter with your own hands: drawings, photos, instructions for which you will find below, you will need:
- electric or gasoline motor with a power of over 2 kW;
- oil pump;
- oil tank;
- high pressure hydraulic hoses;
- control unit;
- hydraulic cylinder;
- I-beam or U-shaped metal beam;
- metal corner with a shelf size of 30–40 mm;
- sheet metal 0.5–2 cm thick (it is advisable to stock up on pieces of different thicknesses).
Stone processing
In the first samples of a stone ax, the thickness of the working part did not allow cutting the material, since it was blunt and could only thresh, crush or break. In this regard, ancient people learned to process stone by sharpening one edge. To do this, elongated thin plates with a sharp edge were beaten off granite with systematic blows. Later, stone anvils were used to make an ax, which were struck repeatedly with the tool, achieving the required sharpness of the blade. Archaeologists have found tools with chips at an angle of up to 900.
How to make a wood splitter mobile
There are situations when the wood splitter needs to be transported to another location. But the weight of the structure often exceeds 100 kilograms, so it is very difficult to carry. To make your device more portable, attach wheels to it. To do this, you can use wheels from a garden or construction wheelbarrow. It is advisable to provide some kind of wheel locking system to prevent the wood splitter from rolling while the engine is running. But you can also make do with bricks, supporting the wheels with them while the device is operating.
How to make a fraction?
The “filling” for hunting ammunition is prepared as follows. First, put the frying pan on gas and put pieces of lead in it. It is advisable that their total weight does not exceed 3 kg.
Then the prepared basin is filled with water. The container itself is placed below, under the frying pan, a couple of centimeters away. Next, a groove is attached to the basin using a magnet, which is first covered with silk or flannel and thoroughly soaked. When the lead melts, the plug should be removed. Thus, the metal will take the appropriate shape. Then it will flow from the hole in the frying pan along the groove into the water and cool there.
How to make a mechanized cleaver for chopping wood
Homeowners who heat their homes with a wood-burning boiler or stove have to prepare 4-12 cubic meters of logs annually. Sure, exercise is good for your health, but chopping with a hand ax takes too much time. There are 2 ways to speed up the cutting process: buy a mechanical splitter for firewood, or save money and make a wood splitter yourself. Let's consider options for homemade devices and the technology for their manufacture.
Stage 3. Construction of the foundation
Let us immediately make a reservation that massive monolithic foundations can be abandoned due to the insignificant weight of the future structure. In order to save money, you can resort to one of two possible lightweight designs, namely:
Let's consider each of the options.
Strip foundation
To build such a foundation around the entire perimeter, as well as under future walls, dig a trench 40 cm wide and 50 cm deep, lay a “cushion” of sand and gravel at the bottom. Next, lay the reinforcement, build formwork 50 cm high and pour concrete mortar. As a result, the height of the foundation will be approximately 1 m.
Attention! A more specific height depends on the depth of soil freezing in a particular region.
Video - Pouring the foundation
Place strips of sand and crushed stone inside the perimeter. In the future, the strips can be filled with concrete or a wooden floor can be built on them. The choice of one option or another depends on personal preferences and financial capabilities.
Columnar foundation
In the case of a columnar base, supports will need to be erected. There are two possible options:
Place supports at the corners of the perimeter, as well as under all walls in 1.5 m increments. Pre-lay a concrete “cushion” under each support. Fix several reinforcement rods in each support so that the latter protrude above the surface by at least 30 cm.
Build formwork 40 cm high, lay reinforcement in it and tie it to rods protruding from the supports. Fill with concrete mortar. After four to five weeks, when the concrete is completely dry, you can begin further work.
Bathhouse foundation
Brick columnar foundation
Choosing a wood splitter design
First, let us remind you what a firewood cleaver is. This is a modified ax with a long handle (about 0.8 m) and a heavy blade sharpened at a relatively obtuse angle - 30-35 degrees. The design is designed to split wood along the grain; this tool is not suitable for ordinary chopping and hewing.
Reference. The weight of the “head” of a traditional hand cleaver with a long ax lies in the range of 2-3 kg.
Mechanical wood splitters have inherited some of these characteristics, which we will discuss below. Nowadays, households use 3 types of factory-made devices and home-made analogues:
- spring with manual drive;
- electric – screw and rack and pinion;
- hydraulic.
We propose to consider the designs of mechanical cleavers and find out which device is best to make based on the volume of the cleavers and the cost of components. If you need to chop a lot of small branches, then it is better to make another machine - a wood chipper.
Spring device with lever
The wood splitter options shown in the photo consist of the following elements:
- frame made of metal profiles or pipes with horizontal supports;
- long boom - a lever mounted on a hinge;
- on the hinge side, the boom rests on a spring inserted between two cups;
- At the end of the lever there is a weight and a cleaver blade, plus a handle for a comfortable grip.
Note. The frame design is arbitrary. The main task is to prevent the mechanism from tipping over during the process of cutting decks. Sometimes the end of the arrow is embedded in the wall or attached to various adjacent structures.
The operating principle of the wood splitter is based on enhancing the impact due to the elasticity of a manually stretched spring. Under the blade, at a convenient height, there is a stand where sawn logs are placed. The operator swings the lever with one hand like a pendulum, with the other he moves the tree under the blows of an improvised ax.
The advantages of a spring cleaver made of metal with your own hands:
- simplicity and minimal price of materials for manufacturing the device;
- the operation of the mechanism does not depend on electricity;
- thanks to the frequent vibrations of the deck lever, it is easy to chop into firewood of any size - from splinters to logs, the main thing is dexterity.
The main disadvantage of the wood splitter is the danger of putting your fingers between the oscillating blade and the block during the rearrangement process. Well, the second point: the mechanism does not relieve the homeowner from hard physical labor - you need to swing the boom, quickly move the deck and remove the firewood.
Comment. It is much more difficult to chop knotty cuttings and “slingshots” - you have to apply several blows to one point.
Electric models
Mechanized cleavers - screw and rack-and-pinion, powered by an electric motor - greatly facilitate the work of the hewer. But the cost of these wood splitters increases due to the use of motors, drive parts and special splitting tools:
Attaching the stone to the shaft
With the development of mankind, the shape of the stone ax was constantly changing and improving. Due to the frequent splitting of the handle and the blade falling out of it, the hole began to be made narrower, which led to deep penetration during impacts and further jamming of the chopping part of the tool. Later, they began to tie the stone to the shaft with leather ribbons in different ways. Later, to strengthen the weapon, they began to make a hole not in the shaft, but in the stone. A handle was driven into it, and for reliability the structure was tied together with straps made of animal skin. Scientists have found samples of an ancient stone ax with an ax attached to the side of the shaft.
With the improvement of the design, the scope of its application changed. For example, a chopping ax had a flat, sharp blade located along the handle. The hammer was equipped with a striking part with a flat surface. The pickaxe was ground down to the shape of a beak. The hoe's blade was located across the shaft. Almost all forms of ancient axes have survived and are used today.
Assembling the screw and hydraulic apparatus
A suitable engine with a speed of 500 rpm and a power of 1.5-2 kW will greatly simplify the design of the cleaver. This electric motor connects directly to the cone; there is no need to install a belt drive. If a unit with these characteristics cannot be found, prepare the following set of materials:
- 2 single-groove pulleys of calculated diameter, reducing the shaft rotation speed to 500 rpm;
- V-belt;
- bearing blocks and driven shaft;
- screw splitting cone made according to the drawing;
- profile pipes or other rolled products for making a table;
- electric motor mounting plate made of sheet 8-10 mm thick;
- metal 2-3 mm on the tabletop;
- mounting bolts and nuts.
Recommendation. Do not order a screw “carrot” from a turner until you know the diameter of the driven shaft or the main shaft of the engine. The thread of the working cone is made with two starts, the steel grade is St35...St45 (high-carbon).
You need to weld a table from metal profiles and fasten a sheet of metal on top. The motor is mounted on a plate under the tabletop, the secondary shaft with a cone is on top. The pulleys are placed on keys or fixed with locking screws. When connecting the power cable, be sure to ground the unit.
Important point. When chopping wood with a screw device, you must correctly move the block towards the tool - strictly in a vertical position. If you lay it on its side, one log will get stuck between the cone and the countertop.
On the stationary version, the oil station is located separately
The assembly of a hydraulic splitter differs in the installation of equipment. Instead of an electric motor and a carrot, you need to install a blade, a pusher plate and a working cylinder. Please note that the remaining components can be placed separately by connecting high-pressure hoses from the hydraulic pump to the cylinder.
The manufacturing process of a hydraulic unit is shown in very detail and clearly in the video:
Final stage
Whatever method of lead smelting the home craftsman chooses, at the very end the pellets should be processed. The essence of this procedure is sorting, shaking and polishing. To remove unnecessary slag, the shot is first sifted using a special sieve. In order to rid the product of solid inclusions, rolling is carried out. Grinding and shaking are carried out with the addition of graphite powder in a separate container, which should be tightly sealed. Judging by numerous reviews, homemade shot will not differ in appearance and lethality from factory shot.
Functions and principle of operation of cone crushers
- cleansing;
- crushing;
- cutting;
- shock impact.
The principle of operation is as follows: in devices with a simple movement of the cheek, the latter is suspended on an axis. It makes rotational movements around the circle, which are reported to it by the eccentric shaft. The cones begin to break up when the cheeks come together. If they hit each other, the pieces of material fall down.
Did you know? In caves in the United States, archaeologists have discovered the remains of roasted pine nuts, which were hidden by the ancient Indians more than 2 thousand years ago.
In cases where the size of the cones is smaller than the width of the exit slot, they fall out of the chamber. Subsequently, the cycle is repeated. In the cheeks with a simple movement, the nuts are crushed by crushing. This is due to the fact that there are grooved crushing plates on both sides.
The device consists of: 1 - power unit, 2 - flexible drive, 3 - shaft, 4 - supports, 5 - loading funnel, 6 - conical threshing drum, 7 - whips, 8 - auger, 9 - threshing drum housing, 10 - mesh drum small fraction, 11 - auger on the inner wall, 12 - mesh drum for separating the seed fraction, 13 - auger on the inside of the drum, 14 - tray for collecting the fine nut fraction, 15 - tray for collecting the large nut fraction, 16 - unloading hole.
Easy cleaning using a sieve
Most often, cedar cones are cleaned at home using a sieve. It can also be replaced with a round sieve. The diameter of the cells should be 6-7 mm so that the kernels do not fall through with the waste. Place the fruits on a sieve, and spread a cloth or film underneath. Start shaking the sieve so that the kernels hit its walls.
Did you know? Cedar is most revered in Lebanon. They are depicted not only on the coat of arms of this country, but also on the flag and money.
Continue the procedure until the cones crack and the nuts fall out. Sooner or later, all the debris will end up on the mat, and the whole kernels will be inside the sieve. For more thorough cleaning, re-sieve using a sieve with a hole diameter of 3 mm . This will get rid of even small debris.
Varieties of devices for peeling cones and cleaning pine nuts
The modern market offers a huge selection of various equipment, thanks to which cleaning and preparing pine nuts for consumption becomes much easier.
Processing pine cones into nuts
Large enterprises usually use a whole line of devices, thanks to which the source material is completely prepared for sale with virtually no human help. Typically, such tapes consist of special equipment that alternately performs the following functions :
- In order for the process to start correctly, the pine cones are first dried ;
- then the kernels are separated from the cone using cone crushers and winnowers;
- shell nuts;
- clean the edible kernels from various impurities and residues of the cone;
- then the film is removed ;
- washed again and packaged for further sale.
The following devices can be found at enterprises::
- Machines that calibrate already peeled nuts into size fractions. Such devices process on average 160 kilograms of nuts per hour, and their cost starts from 85 thousand rubles ;
- A machine whose work is aimed at crushing pine nut cones (husking). Some machines dump everything processed “in a pile” and a person has to manually sort through the kernels and debris, while other machines are equipped with a blowing system that separates the nuts from the parts of the bud and distributes them into different compartments. The cost of a combined machine averages 120 thousand rubles , and it can process up to 200 kilograms of product per hour;
- The next step will be removing the shell ; for this purpose, special installations have been created that, using various mechanisms, peel the shells from the nuts. Average productivity is 70 kilograms per hour, and the price is 100 thousand rubles ;
- Also very useful will be a machine that separates the film from the nut , with virtually no injury to the finished product. This device is capable of carrying up to 500 grams of nuclei per hour, but its price will also be quite high, at least 150 thousand rubles ;
- Another useful device would be a roaster , which can prepare up to 40 kilograms of nuts for consumption in 30 minutes, while there are also units that additionally pre-wash the product. The price of such a device starts from 130 thousand rubles .
Pine Nut Kernel Film Removal Machine
Pine nut cone crushing machine
Pine nut shelling machine
Apparatus for roasting pine nuts
Shelled Pine Nut Sizing Machine
Many manufacturers sell both individual machines and a whole range of devices that allow continuous processing of pine nuts. Moreover, the so-called conveyor or belt is much more convenient, because the manufacturer comes up with and compares all stages of the process in advance.
Stage 6. Construction of a log bathhouse
There are several assembly technologies:
The first option - Russian felling - is the easiest to perform; even an inexperienced carpenter can handle it. Therefore, we will consider this technology.
Step 1. The construction of the log house should be carried out in stages and begin with the frame crown (in other words, from the first). The logs that will serve as the frame crown should be edged to ensure a tight fit to the foundation.
To begin with, we lay the so-called “backing” linden board on the foundation. This can be a beam about 50 - 100 mm thick and at least 150 mm wide. Then we begin to assemble the log house
Mortgage crown
Laying the first crown on the foundation
Step 2. Lay the first pair of logs on top of the waterproofing layer. Place the next pair at an angle of 90ᵒ relative to the first and connect everything into a “cup”.
Attention! “Cup” is the simplest connection option when constructing log buildings. It is done quite simply: the boundaries of the future “cup” are measured at the bottom of the log, then a recess is marked using a “line”. After checking the dimensions again, the recess is carefully cut out with an ax.
You can use a chainsaw - this will save a lot of time. Although the final finishing of the “cups” will still have to be done with an ax.
How to properly cut a corner in a log house
Log joining
Attention! In the starting crown, the “cups” will not be deep, as a result of which the logs will not come into contact with the base. Therefore, place a lining in the gap that appears - a small piece of board of the required thickness, treated with an antiseptic and covered with insulation.
Step 3. Next, lay the second crown using the thickest logs possible. This is explained by the fact that in the future you will cut sex joists into them. To ensure a tight fit, make a longitudinal groove in the top log, which would be equal to a third of the diameter of the previous log. To draw the boundaries of the groove, place the upper log on the lower one and mark using the “line”.
Attention! The longitudinal groove can be semicircular or triangular. If you have a chainsaw available, you can cut a triangular groove in two to three minutes. But remember: logs with such a groove will not fit tightly, which will negatively affect the thermal insulation properties of the walls.
Obviously, the best option is a semicircular groove. Do it with a chainsaw and use a chisel to remove any residue.
Step 4. Insulate the joints of the logs, preferably using flax-jute fabric. Place one piece of fabric on the lower crown, and seal the longitudinal groove with the second (especially if the latter has a triangular shape).
We fill the entire groove and recess of the bowl with caulking material
Step 5. Connect the crowns together. Here you can use:
Make holes in increments of 1-1.5 m, parallel stitching the top pair of crowns completely and not completely the third one (from the bottom). To avoid distortion, after shrinkage is completed, recess the dowels into the upper crown by at least 6-7 cm.
Step 6. After raising the walls to the desired height, lay the ceiling beams and rafters on top of them. If damp wood was used, then lay slate sheets instead of rafters and wait until the structure shrinks. Usually, it is enough to overwinter once, but ideally, shrinkage should last a year and a half.
Flooring made of massive solid logs
In the spring, when the shrinkage is complete, start caulking.
Video - Roof made of aspen shingles
Stage 8. Caulking logs
After shrinkage is completed, the log house is caulked. To do this, prepare the following equipment:
Attention! If you sealed the inter-crown space with tow or moss, you can skip this step, since you most likely will not need caulking. But if you find even the slightest cracks, then it is still better to carry out the procedure.
Proceed to work only after the insulation has completely dried. First, twist the material (tow or moss) into a rope, then hammer it between the crowns with a hammer and caulk.
You can use tape jute - in this case, the material is simply fixed with nails or a mounting stapler.
Primary and secondary caulking of a log house