How to prepare material for crafts, nuances of the process
The creative process itself is no different from working with any other materials - plasticine, polymer clay, and so on. The advantages of the dough are that it has high plasticity, does not stain your hands and surrounding objects, and allows you to carry out more complex work. If all drying rules are followed, it becomes durable and can be stored for a long time. The most interesting thing is that the material can be used not only for making toys; salted dough is perfect for decorating a loaf, for example.
To prevent the mass from sticking to your hands and tools, drying out and cracking, you must follow the manufacturing technology and take into account some nuances:
- Pancake flour is not suitable for such dough; it has increased stickiness, the mass will be sticky and of poor consistency.
- Fine salt must be used. Large particles of the product make the consistency coarser, are less soluble in water, and the dough becomes porous and crumbly.
- When mixing, it is better to use ice water; the material for work is plastic and homogeneous.
Recipe for making dough for making salt dough jewelry:
- Mix bulk ingredients - 1.5 cups flour, 1 cup salt and 2 tbsp. l. any water-soluble wallpaper glue.
- Pour in 0.5 cups of water and knead the dough thoroughly.
To obtain a more plastic salted dough for decorating a loaf, the recipe will look like this:
- Mix 1 cup each of salt and flour.
- Add 0.5 cups of water and 2 tbsp. l sunflower oil.
Knead the dough
In a container you need to mix salt with flour and add water. Water should be added little by little until the dough reaches the desired consistency. The mass will be more plastic if you add a large amount of flour (if you need to make any small detail, this advice will come in handy).
The dough needs to be kneaded for 15 minutes. Only in this case can plasticity be achieved. Remember, with the right consistency it will not break when bent. The salt should be fine so that it is not noticeable in the dough.
Despite the fact that the instructions for making jewelry are simple, you need to follow all the rules in order for the jewelry to turn out beautiful.
Tools for work
Making jewelry from salt dough involves the use of certain tools and materials.
Each of them can be found among kitchen utensils, stationery, and home handicrafts:
- A rolling pin for dough, if it is not available or is too massive, you can replace it with a glass bottle.
- A regular or shaped knife for cutting dough. To protect the child, you can give him a plastic knife from a plasticine set.
- Modeling board.
- Paints for painting finished products; here you can use watercolor, gouache or acrylic.
- Water-based finishing varnish. Best used in aerosol cans. In addition to standard varnish, it is recommended to use sprays with glitter, mother-of-pearl, and so on as an addition.
- A glass of water and a set of brushes for decorating crafts.
- Cookie molds.
- A variety of accessories for needlework (knitting needles, brushes, hooks, buttons, lace), with the help of which they add texture and volume to products.
It is advisable to prepare an apron and armbands so as not to get dirty while decorating the jewelry. Napkins and rags are used to wipe your hands while working and wet your brushes; they should always be at hand.
Making a cage from newspaper tubes: master class with description
We will need:
- PVA glue.
- Toothpick.
- Pin.
- Spoke.
- Cash tape.
- Scissors.
- Three liter jar.
- Acrylic lacquer.
- Varnish brush.
- Decor (beads, ribbons, flowers).
- Newspaper.
It’s easy to see that the materials are common and if you don’t have them on hand, buying them won’t be a problem. So, in addition to the fact that the cage will be beautiful, it will also be budget-friendly, which is doubly pleasant.
Making a cage step by step:
It's not that difficult, especially when there are photos and video instructions. The main thing is to adhere to all the nuances and then everything will work out.
- First you need to prepare the tubes. We take a knitting needle of about 2 mm and a strip of newspaper 50 cm long and 10 cm wide. Next, we take a knitting needle and begin to wind the ribbon obliquely, do this carefully and evenly so that the resulting so-called tube has no gaps and the sheets fit snugly against each other to a friend. After this, take out the knitting needle and coat one corner with PVA glue. We need 50 of these tubes.
- We take the finished tubes and insert them into each other, thus lengthening them, you can continue indefinitely, it all depends on what size cage you want. In today's master class we need 10 pieces.
- Before you start weaving a cage, you need to make a base. To do this, five tubes are placed vertically and five horizontally on top of them. Having bent the horizontal tube in half, we need to bring it under the vertical. Now, according to the chessboard principle, we place the front part of the working beam behind the second stand, and bring the rear part in front of the second stand.
Then, on the contrary, we move the end of the working tube that is behind the second rack forward to the next 3rd rack, and move the front end behind the rack. We need a diameter of 20 cm.
- After the row is completed, hide the ends in the weave. Take a ruler and make marks at the optimal height for you. And using the same pattern shown above, weave 2 more rows along the marks.
- After 10 centimeters, weave 4 more rows. Take an unused tube and make a circle of 6 centimeters. Take it and push through all the stitches, bend them and glue them. Make a loop from the tube and attach it inside the top corner.
- Take a jar and twist a cone of straws around it. Secure the cone at the top.
- To make a door in a cage, cut off several posts in the bottom row and attach the door using wire loops.
Decorating the cage:
For this you need to take such decorative things that have sunk into your soul. It can be all kinds of bows, flowers, beads, paint, aged notes. Of course, you can paint the cage like this yourself, but, alas, not everyone has artistic talent.
Option one, which you can use to decorate the cage:
- Napkins.
- Glue.
- Dummy bird.
- Dye.
- Paint the cage white and let dry.
- Take pink and white napkins and make roses out of them. You can choose the rose technique yourself. You will need to cover the bottom of the cage with them.
- Place a tube of newspaper horizontally inside the cage, making it like a perch, and place the bird on it.
Option two:
- Artificial flowers.
- Dye.
- Paint the cage the color you want.
- Attach flowers to the top.
In fact, there are a lot of options, it all depends on your imagination, capabilities and time you have. This can be from a large-scale and complex design to the simplest. If you like it, then this could even be a good option for earning extra money. Such a cell will always make you happy, even on the gloomiest day, because everything that is made with your own hands is valued much higher than what is made in a factory.
How to dry products correctly?
It is necessary not only to know how to make crafts from salt dough, but also how to process them after that.
Proper drying of the dough is the key to long-term storage of the finished product. You can do this in several ways:
- Drying in a heated oven. Depending on the thickness of the product, the temperature is set from 50°C to 80°C. The fashioned craft is placed on a baking sheet covered with parchment paper and placed in a heated oven for one hour. If the product is large, it may take longer. Then turn off the oven and leave the crafts in it until they cool completely.
- Dry in a cold oven. It follows the same scheme as in the method described above, only the product is placed in a cold oven, and then the heating is turned on.
- The best and longest way to dry is in the open air. Crafts dried in this way become very durable due to uniform and gradual weathering. However, it is suitable mainly for small and flat products.
Do not dry figurines on a radiator or using electrical appliances. Products treated in this way often crack or remain damp inside, which leads to damage to the jewelry.
Tips for working with the dough
A well-kneaded dough has its secrets. Having mastered them, you won’t have to worry about the quality of products made from it. “Raw materials” turned out to be of high quality if:
- there is no excess moisture - by slightly changing the proportions towards more water, you risk disrupting the whole process;
- Over-drying is also harmful to the dough - it cannot be stored without a bag;
- long-term storage (more than three to four days) can spoil the material;
- slightly exceeding the oven temperature when trying to dry the products quickly will result in cracks - it is better to be patient and dry at room temperature.
Has the material become sticky due to long storage? Try air drying it without adding anything. However, it is unlikely to work for small items. If the dough has been stored for a long time and has become sticky, air dry it without any additives. This dough is best used in large quantities.
A sign of a high-quality kneaded dough is considered to be clean hands and the table at the end of kneading: if nothing sticks, it means that the procedure for preparing the “raw materials” was a success!
Painting and varnishing crafts
At the stage of preparing the dough, you can add colored pigments to it. Coloring a finished craft combines two types of creativity: modeling and drawing.
It is best to use water-soluble paints. Acrylic dyes deserve special attention. They paint in a dense, uniform layer the first time, have a wide range of colors, dry quickly and are easy to use. Conventional watercolor covers with a translucent tone, which makes it possible to layer the palette and create a three-dimensional pattern. The product, smeared with a layer of PVA glue, allows you to obtain a base layer for opaque, permanent coloring.
Jewelry made from salt dough has a good ability to retain pigment without a protective coating. If the finished item is planned to be used in everyday life, for example, a vase, box, dolls, chess pieces, then frequent touches can wear off the paint. In this case, varnishing is mandatory. In addition, the glossy shine often makes the product especially beautiful.
It is better to cover with an aerosol can in the air or in a ventilated area. If necessary, you can apply several layers, drying each one well.
Material for making beads
I started thinking. I have long been attracted to jewelry made as if from sea stones. It’s beautiful, but if the time to make beads has come, then the time to collect stones, alas, has long passed. And where would I be able to make holes in the stones even if they were found among my countless reserves (it’s a sin, in my bins there are a lot of things that even I sometimes forget about: one word - “handicraft”).
You can make beads from polymer clay! It’s a good idea, but there’s already a lot of time, and there’s no clay at home. 24-hour shops for handicrafts have not yet been opened, but in vain. Creative people are like that, they are like night and day. Night is even better - no one bothers you. So “hey you up there!”, think about my proposal.
All that remains is salt dough. By the way, almost the same as polymer clay. And it costs absolutely nothing.
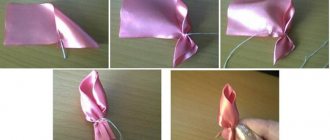
Dough pendant
Making such a decoration is quite simple. The dough is rolled out into a layer, and the base is cut out of it using a cookie cutter. Use a pen or knife to cut a hole for threading the lace. The future pendant can be decorated with any items at hand: cut along the edges, stick on geometric figures, attach lace that will leave a beautiful pattern, etc. Then the product is sent to dry.
After drying, begin decorating and painting the product. The effect of antiquity is given by light touches with a sponge with fresh paint. Then the pendant is varnished, dried again and the lace is threaded. A beautiful handmade product is ready.
Making a cage from newspaper tubes: master class with description
We will need:
- PVA glue.
- Toothpick.
- Pin.
- Spoke.
- Cash tape.
- Scissors.
- Three liter jar.
- Acrylic lacquer.
- Varnish brush.
- Decor (beads, ribbons, flowers).
- Newspaper.
It’s easy to see that the materials are common and if you don’t have them on hand, buying them won’t be a problem. So, in addition to the fact that the cage will be beautiful, it will also be budget-friendly, which is doubly pleasant.
Making a cage step by step:
It's not that difficult, especially when there are photos and video instructions. The main thing is to adhere to all the nuances and then everything will work out.
- First you need to prepare the tubes. We take a knitting needle of about 2 mm and a strip of newspaper 50 cm long and 10 cm wide. Next, we take a knitting needle and begin to wind the ribbon obliquely, do this carefully and evenly so that the resulting so-called tube has no gaps and the sheets fit snugly against each other to a friend. After this, take out the knitting needle and coat one corner with PVA glue. We need 50 of these tubes.
- We take the finished tubes and insert them into each other, thus lengthening them, you can continue indefinitely, it all depends on what size cage you want. In today's master class we need 10 pieces.
- Before you start weaving a cage, you need to make a base. To do this, five tubes are placed vertically and five horizontally on top of them. Having bent the horizontal tube in half, we need to bring it under the vertical. Now, according to the chessboard principle, we place the front part of the working beam behind the second stand, and bring the rear part in front of the second stand.
Then, on the contrary, we move the end of the working tube that is behind the second rack forward to the next 3rd rack, and move the front end behind the rack. We need a diameter of 20 cm.
- After the row is completed, hide the ends in the weave. Take a ruler and make marks at the optimal height for you. And using the same pattern shown above, weave 2 more rows along the marks.
- After 10 centimeters, weave 4 more rows. Take an unused tube and make a circle of 6 centimeters. Take it and push through all the stitches, bend them and glue them. Make a loop from the tube and attach it inside the top corner.
- Take a jar and twist a cone of straws around it. Secure the cone at the top.
- To make a door in a cage, cut off several posts in the bottom row and attach the door using wire loops.
Decorating the cage:
For this you need to take such decorative things that have sunk into your soul. It can be all kinds of bows, flowers, beads, paint, aged notes. Of course, you can paint the cage like this yourself, but, alas, not everyone has artistic talent.
Option one, which you can use to decorate the cage:
- Napkins.
- Glue.
- Dummy bird.
- Dye.
- Paint the cage white and let dry.
- Take pink and white napkins and make roses out of them. You can choose the rose technique yourself. You will need to cover the bottom of the cage with them.
- Place a tube of newspaper horizontally inside the cage, making it like a perch, and place the bird on it.
Option two:
- Artificial flowers.
- Dye.
- Paint the cage the color you want.
- Attach flowers to the top.
In fact, there are a lot of options, it all depends on your imagination, capabilities and time you have. This can be from a large-scale and complex design to the simplest. If you like it, then this could even be a good option for earning extra money. Such a cell will always make you happy, even on the gloomiest day, because everything that is made with your own hands is valued much higher than what is made in a factory.
Beads and bracelets
Beads and bracelets are made using the same technique. First of all, you need to make beads. You can make them in a standard round shape by rolling them into a ball and stringing them on a toothpick. Or get creative and make square, triangular, flat and three-dimensional pieces. Each bead is pierced with a skewer, stuck into a soft base and dried in this form.
To make your jewelry more original, you can sculpt animal figures, symbols or zodiac signs. In addition, the same pendants on the beads and bracelet will combine them into one set. Then each part is carefully painted inside and out, dried and varnished. If this is evening jewelry, you can use glitter and mother of pearl.
The final stage is threading. The beads are strung on a bunch, observing a certain order, and the clasp is attached. The decorations are ready.
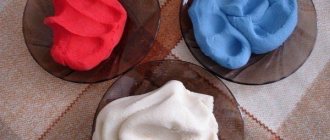
Preparing salt dough for modeling
In order to make plastic mass you only need:
- fine salt;
- plain flour without additives;
- water.
To work with the tools, we take from the kitchen dishes for mixing ingredients, a board for kneading dough, and a knife. All this can be easily washed after work. And since all the ingredients are part of regular food, they are not poisonous.
Pour flour into a bowl - 2 parts by volume. You also need to add salt there - 1 part. That is, the volume of salt should be half that of flour. For plasticity, you can pour a tablespoon of vegetable oil, although this is not necessary. And to make the product stronger, some people add a little PVA glue. This is again optional.
Now pour in the water little by little, immediately kneading the mixture. It is very important not to miss the moment when there is enough liquid. The consistency of the mixture should resemble dumpling dough.
Christmas tree decorations made from dough
Even a child can make New Year's decorations from salt dough. The dough is rolled out and figures are cut out of it (Christmas tree, mitten, heart, etc.), a hole is made for the ribbon and dried. Then they paint it and send it out to air again. New Year's toys look especially festive when they are covered with snow-effect spray, small confetti and sparkles.
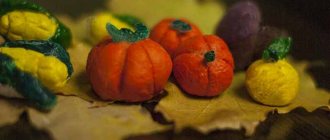
Animal figurines or dolls
You can make small animals or dolls with your own hands as home decorations from salt dough. Children will especially enjoy this process.
Making three-dimensional figures is a little more difficult, so you can create a craft together with your parents. If a child wants to make an object on his own, it is better to start with the simplest, for example, a hedgehog or a caterpillar:
- To sculpt a hedgehog, roll up a ball and stretch out one half a little - this is the future muzzle; a small ball is sculpted on the tip - a nose. Needling is done using frequent cuts with scissors or thickly sticking halves of toothpicks.
- To make a caterpillar you will need several balls connected to each other. To make the craft look more realistic, you can attach the parts to the wire and give the insect a bend. The finished product must be painted in different colors.
- You can sculpt a doll in different ways. The simplest one is a bell-type doll. The rolled out square of dough is rolled up into a ball, the excess is cut off so that the form stands on the resulting wide part. A ball is attached to an acute angle - this is the head. Then they sculpt the hair - strips of dough cut out in a chaotic manner - and attach the arms. The doll is ready. You can complement the craft by decorating your head with a wreath or bow, and your dress with flowers or a strap.
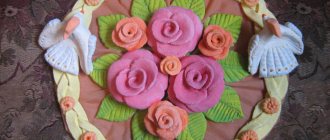
Pictures of panels
The basis for the panel can be a piece of plywood or thick cardboard; this will solve the problem of what to stick the salt dough decoration on.
The mass is rolled out into a thin layer and glued to the base. Then the details of the future picture are cut out or sculpted and attached to the resulting layer. The finished painting is thoroughly dried and painted, then varnished.
If we take plywood covered with foil as a basis, the finished and painted product is easily removed and can be transferred to another material. For example, a frame covered with fabric, a box, glass or plastic would be suitable.
Loaf
Particular pleasure will come from decorating dishes, for example, a loaf. The production of salt dough to decorate this product is carried out according to the recipe described above. The classic way is to twist ropes from the finished material and braid them. You can also make flowers and leaves from the dough. The decor is laid out on the top of the loaf and dried in the oven.
Such handicraft, accessible to everyone, allows you to please your loved ones and friends with an original thing, develops imagination and perseverance. In addition, the activity makes it possible to complement any look with beautiful jewelry.
Assembly of finished jewelry products
If you decide to make earrings, then you need to purchase metal fastener loops in advance. To strengthen them, a strong thread is passed through the bead, a bead that does not slip through the hole is caught, and the thread is returned to its original position.
Now the bead has a bead on one side, and both ends of the thread on the other. The ring of the clasp loop is tied with these ends. The earring is ready!
The bead thread should also be strong. I happened to have a spandex elastic thread with a gold winding. I don't remember why I bought it. There was a piece left, a good one. There will be enough for beads and there will still be left.
Pushing the spandex through the bead hole was fairly easy.
Having strung all the beads, I simply tied a knot, turning the elastic thread into a ring. As I put the beads on, I stretch the spandex slightly.
Although some people might want to attach a special clasp to the ends of the spandex. I thought it was unnecessary.
Well, now I'm fully armed! I hope young people will like my appearance. Moreover, for jewelry I have fashionable joggers and a light jumper knitted with a large pattern. My beads look stylish and youthful in this set!
Some needlewomen string beads and metal balls along with dough beads and alternate them with pendants that are available.