Simple products
The easiest way to make flowers is from colored paper - it can be corrugated or ordinary, and if you plan to make strictly decorative flowers, you can take paper with a mother-of-pearl or metallic effect. You shouldn’t make a tulip or a rose as your first experiment - try something very, very simple first.
Decorative crafts
In order to make simple and spectacular flowers you will need:
- double-sided colored paper (corrugated paper is also suitable);
- thin wire;
- sharp scissors and a pencil for marking.
It is better to take colored paper of several shades, so your flowers will look impressive and attractive - for example, it can be shades of yellow or several tones of red. You should not try to mix cold and warm colors if you doubt your taste. For beginners, the easiest way to do this is to fold colored paper several times so that you get a stack of squares approximately 6 * 6. Then mark the shape of the future buds on the top square with a pencil - it can be a smooth rounded figure, regular circles, or whatever your imagination suggests. Then, with scissors, you need to carefully cut the stack according to the shape of the marked sepal and disassemble it into components - for each flower you will need three to five blanks. The wire needs to be cut into pieces of approximately 15-25 centimeters, twisted on one side so that a decorative center is formed, then the previously obtained “petals” are put on each wire, after which a stand is made at the bottom of the wire (a stable ring is twisted). With such crafts you can decorate a table for a holiday, or use them for a photo shoot or interior decor, or you can simply attach them to the wall in the nursery or in the hall near the mirror - a good mood is guaranteed.
Other options
A master class on making flowers with your own hands can be carried out using special preparations. Templates and patterns for artificial flowers can be found in large quantities on the website.
The step-by-step instructions for making it yourself will look simple:
- Print the templates on a printer and transfer them to colored paper.
- Cut out the blanks.
- To make flowers with your own hands, just combine several blanks and fasten them in the shape of a flower.
A master class on how to make paper flowers with your own hands using templates is perfect for making wall decorations (flowers can be strung on a fishing line or thread and making a garland), artificial bouquets of daisies, camellias and other flowers with many straight petals. A flower garland will be an excellent solution for festive decoration of the hall.
This is what the master class looks like with step-by-step instructions and the finished flowers in the photo:
Didactic material from the template
For group developmental activities, you can use a ready-made color template. All you have to do is enlarge and print the proposed version, then glue the blank onto cardboard and cut out the parts along the contour. The assembled layout can be used for classes with preschoolers on speech development and increasing knowledge about the environment.
Remember that the knowledge acquired during the game is absorbed better and can be easily applied in various life situations in the future. Make playing with your child not only interesting, but also useful!
Types of techniques
Making flower crafts is an interesting activity for the whole family. Joint creativity brings people closer together. Let's look at interesting ideas that you can do with your children.
Paper flowers
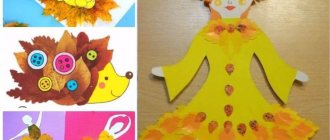
On the eve of the spring holiday, give your children a nice gift to your loved ones - a floral applique of snowdrops. Take glue, colored paper, scissors. Cut out the green leaves and stem. For paper petals, choose a bright color. Lay out all the elements on a blank sheet of paper and glue them in sequence. Invite the children to make a flower meadow.
Origami is a technique for creating various paper figures. A vase with a bouquet of homemade flowers will diversify the interior. Fill it with different types of plants: daisies, daffodils, roses, tulips. It is interesting to carry out such projects in kindergartens. Fine motor skills are developed well with the help of origami.
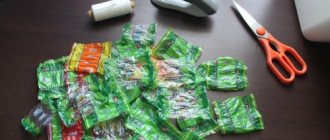
Making a craft from corrugated paper is not difficult. Roses made from this paper are an unusual interior decoration. Hide some candy in a small rose to make a great gift. The growing bushes will become the object of everyone’s attention and a reason for the master’s pride.
Postcards with three-dimensional images
Volumetric postcards will become a masterpiece. A child will be happy if he gives such an amazing holiday gift to a loved one.
How to make an original craft? The materials you will need are a model of a mimosa sprig, green paper, a stationery glue stick, and yellow napkins.
- Roll the napkins into balls, spread the area with glue and press the lump tightly.
- Cut out the leaves and stem.
- Glue to the template.
Iris folding is a new needlework technique that is easy to perform. With its help you can create an original craft. Let's look at the manufacturing process.
- You will need: multi-colored paper, ruler, pencil, scissors, tape, figure layouts.
- Draw colored paper into 4 cm strips and cut.
- Fold each strip in half with the colored side facing out and sort them by color.
- Place the bird template on the cardboard and glue the lined layout to it.
- Start gluing the strips in a certain sequence: yellow numbers 1 - 5, 20, pink - 6-9, 16 - 19, light green: 10 - 15, green - 21. It is important not to confuse the algorithm and glue the strips only to the template, sticking to each other they should not.
- Cover the remaining window with tape with a hologram effect. Draw the bird's eye and beak.
- Complete the picture with bright flowers and lush greenery.
Step-by-step job description
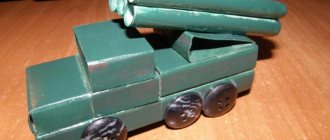
- Cut out a tree crown template from newsprint. Choose the sizes yourself. If the toy is intended for individual use, then the height of the future tree can be no more than 40 cm. But for crafts for kindergarten, it is better to make a larger model (50-60 cm).
- Trace the template onto cardboard and cut out 2 identical pieces.
- Make slits as shown in the photo and insert the parts into the resulting holes. As a result, you should get a three-dimensional figure.
- Glue the joints (you can use a glue gun)
- To make the edges of the craft look neat and even, cover them with small pieces of white paper.
- To imitate the branches and foliage of a tree, cover the crown on each side with thin, crumpled paper (paper napkins or plain toilet paper will do).
- When the workpiece is completely dry, coat each side of the wood with paint of the appropriate color. You should get something like this: winter – white or blue; spring – light green (light green), summer – bright green, autumn – orange or yellow. Paint the trunk brown on all sides.
- Now make a round stand. Cut a circle out of cardboard and cover it with paper.
- Divide the part into 4 equal parts (sectors) and paint in the same way as the crown.
- When the paint is completely dry, glue the tree trunk to the base. Make sure that the colors on the base and crown of the tree match.
- Now you can start the fun part - decorating and decorating according to the seasons. To decorate the “summer side” you can use figures of decorative apples, cut out pictures of insects and birds, and small artificial flowers.
For the spring side, you can make a birdhouse and glue paper dandelion flowers.
The winter side of the craft can be decorated with snowflakes and figurines of Father Frost, Snow Maiden, and a snowman. Don't forget to glue the birds and the feeder (during the game, you can remind the children to take care of animals and to feed the birds in winter).
The autumn part of the tree can be decorated with colored leaves, animal figures, and forest gifts (mushrooms and berries).
To decorate the craft, you can use cut out fruits and leaves from cardboard, felt, ready-made plastic figures, small Kinder Surprise toys and other decorative elements. Often children themselves suggest decoration options. Let them use their imagination and creativity in decorating the sides of the tree to suit the season. You will be surprised at how kids can correctly arrange all the elements according to the seasons.
Corrugated paper
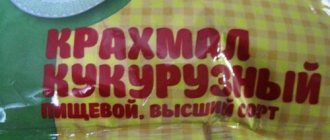
To make flowers from corrugated paper with your own hands, you need to take into account the characteristics of the material. This paper itself gives the product additional volume, but to enhance it you will need some tricks. Let's conduct a master class on how to make a tulip from corrugated paper.
- Cut a small piece of corrugated paper into a rectangular shape to fit the flower and slightly round the edges.
- To make the petal acquire a convex shape, you can slightly wet it (just a little so that the paper does not spread) and place it on the back of the tea cup.
- Let the paper dry. Do the same with all the petals.
- Prepare the stem. It can be made from a stick or thick wire wrapped in green crepe paper. As a center and to secure the petals, you can use a special base in the form of a semicircular mesh, as in the photo.
- Secure the corrugated paper petals to the stem or base so that there are no gaps between them.
This is what the step-by-step master class and the finished flower look like in the photo
Master class: tree “Seasons”
It is not so easy to explain to a child the characteristic features of the seasons. To adults such concepts seem simple and natural, but to a small child these things are incomprehensible. After all, they cannot be touched, tasted, or felt. The only way out is to teach the seasons through association. Already from the age of two, a child should be introduced to such concepts as cold - heat, sun - rain, snow - grass, etc. And from the age of 4, the child himself will be able to build associations and notice the characteristic signs of the seasons. It is at this age that it will be useful to consolidate the acquired knowledge in a playful way. All kinds of didactic games and visual aids are perfect for this.
On the shelves of bookstores and on the Internet you can find all kinds of cards and teaching aids that allow you to consolidate your knowledge of the seasons in an accessible form and explain many natural phenomena to your child. But it will be much more interesting for a child to play and study with the didactic material that is intended specifically for him. Therefore, it is best to make such an educational toy, taking into account all children's preferences, with your own hands.
In the article you can familiarize yourself with several master classes of varying degrees of complexity on making the “Seasons” tree. With such a craft, you can playfully explain to a young genius many natural patterns, signs of this or that time of year, and also learn the names of seasons and months. Not only while playing with a finished toy, but also while working together, you can (and should!) tell your child about weather phenomena and signs, explain what happens at each time of the year, what the weather is like. Only then will the baby fully feel and vividly imagine the full picture of the season.
All the colors of autumn in bright vegetables
At this time, the collection of vegetables and fruits begins. You can especially see all the colors and colors of autumn during the harvest. The pumpkin turns bright orange, and the newly dug potatoes turn brown and pink. Tomatoes are distinguished by a bright tint of red, and cabbage dilutes all these colors with green shades. This is perhaps the only vegetable that reminds us of summer days.
However, most people love autumn because at this time of year large and fragrant mushrooms begin to rapidly emerge from under the thickness of fallen leaves. Mushroom picking in the autumn forest cannot be compared with anything else. After all, the smells of mushrooms and forests are closely intertwined with the bright colors of fallen leaves.
But it is worth noting that autumn can radically change not only the surrounding nature, but also many people. After all, it is precisely at this time of year that a period begins in the souls of creative people when inspiration strikes them. They are ready to write poems and glorify in them the bright colors of autumn, which they need to enjoy to their fullest before winter covers everything with a snow-white blanket.
Rose
The master class on making a rose is very similar to the instructions on how to make a tulip with your own hands. The differences will be in the shape of the petals and their preliminary preparation.
- Prepare petals from corrugated paper, giving them the shape of an oval, widened on one side. You can use scissors to make small teeth in the petals. This is what it looks like in the photo
- Wind each petal lengthwise onto a pencil and hold in this position for a while. Without opening the petal, remove the pencil.
- It is necessary to start forming a rose from the inner petals, which should be more curled and pressed tightly to the stem. Secure the petals wrapped around the stem with glue.
- We attach all the petals in a checkerboard pattern, making them gradually more unfolded and curved outward. The degree of curvature of the petals can be varied.
A master class on how to make paper flowers with your own hands, in a simplified form, is perfect for kindergarten or primary school. Children will not only develop fine motor skills, but also aesthetic taste and show creative interest. The flowers can then be used to decorate the classroom.
You can easily conduct such a master class at home. You just have to stock up on scissors, paper, glue and patience, and the skill will come with practice.
paper and bead crafts for mom with photos
A scarlet flower (flower-shaped crafts in general) can be made from any materials: paper, beads, or yarn. The flower making techniques presented below are simple and understandable even for children. By following all the instructions, the child will be able to make a pleasant surprise for his mother. Below you can see photos with examples of work.
Handmade products will be a unique and beautiful gift for friends and relatives on any occasion, and bouquets of artificial flowers will be an original decoration for your apartment.
Working with beads
Beaded flowers are very beautiful. However, such crafts are a very painstaking and time-consuming process that requires patience, perseverance and perseverance. Even a beginner can figure it out step by step in the master class.
For a quality product, it is important to choose the right bead diameter and the right wire. It is important that the material matches the color scheme and is of equally good quality.
It is worth choosing Czech or Italian beads, these are the most durable. You should not take material made in China, it is of low quality. For beginning needlewomen, it’s worth starting to master small, simple crafts, rather than taking on complex work right away. In order to master the basics of needlework, ready-made bead kits are perfect. Those who know how to embroider can purchase an embroidery set with beads. With a little effort and imagination, you will get a stunning work of art.
You can learn the principles of flower weaving using the example of chamomile.
To work you will need:
- Wire;
- Beads for the base of white and green shades;
- Small beads;
- Stem tape.
Cut 40 centimeters of wire and string 25 beads, and then fold the loop. Thread the wire into the last bead. The ends of the product should come out of one bead.
Repeat the entire process three times.
Make a sepal from green beads in the same way. Twist the petals and sepals. Weave leaves according to the pattern.
The flower is ready!
Paper bouquets
There are many ways to make paper flowers:
- Origami;
- Quilling;
- Cutting out.
Below we will look at how to make a bouquet of dahlias. To do this, you just need to draw 7 circles on a sheet of red paper. The diameter of each subsequent circle should be 1.5 centimeters smaller than the previous one. Cut out circles and make petals just like in the picture.
At the last stage, you need to glue the parts of the flower, a large circle together with a small one.
Volume roses
You need to take crepe paper and make a bouquet of roses. Cut the paper into 15 cm strips. One strip will produce one finished flower. Bend the corners first inward, then upward. Twist the strips into a tube. Straighten the petal and strengthen it with wire.
Knitted flowers
The crochet pattern will help you make bright scarlet flowers. Work on the product begins in circular rows. Rings and air loops are knitted.
It is important to follow the schemes, then everything will work out.
New ideas for beautiful crafts for Mother's Day
For every person, mother is the closest person. Therefore, every child should take care of her from childhood and make pleasant surprises for her. For Mother's Day, you can make a wide variety of crafts from various materials. And in this case, you can use any of the available materials. Below we will tell you about what to make yourself for Mother’s Day. Surely, you will like our ideas.
Catalog of crafts for Mother's Day
Cute bouquet.
The first craft for Mother's Day in kindergarten is made from colored paper. You will also need glue and scissors.
- Fold the green sheet of paper into 2 parts. Then we retreat 3 cm from the edge of the sheet, and draw a horizontal stripe from the bottom. And at the top of the sheet, vertical lines are drawn, which will have a distance of 1-1.5 cm between each other.
- Where you made the lines, you need to make cuts. They are done to a straight line. At the same time, 3 cm does not reach the edge.
- Unfold the sheet with the cuts. Then turn the sheet over to the other side and fold it edge to edge. Then coat the edges with glue and glue them together.
- After the glue has dried, the sheet with the cuts is rolled up into a tube. The result is a blank for a kind of stem.
- Then it’s worth making flowers from a napkin: yellow, red, pink.
- The resulting flowers are glued to the bud. However, some places may be left without flowers.
- You can decorate the finished bouquet with a ribbon if you wish.
Beautiful card with balloons for mom.
In this article you can find not only easy crafts, but also those products that require work to create. Absolutely any schoolchild can make a truly interesting surprise for his mother. Here the following is prepared to create the product:
- Cardboard sheet, glue,
- Pieces of balloons, strings,
- Photograph.
- It is worth taking a photograph in advance. The child on it should imitate that he is holding the balls.
- First, the silhouette of a child is glued to a piece of cardboard. And mini-balls are made from pieces of the ball. They are tied with beautiful threads.
- Next, these balls are glued to a sheet of cardboard using super glue. A wonderful craft is ready. Now we just have to wait until it dries.
Original hearts for mom.
If the kids decide to make crafts for their mother for Mother's Day, then with the help of available materials and some effort they will succeed. For the next craft you should prepare:
- Bottle caps and popsicle sticks
- Colored paper and glue.
- It is better to use corks that have pre-drilled holes into which ice cream sticks can be inserted.
- Several hearts are cut out of paper and glued on top of each other.
- After that, the hearts are glued to the stick, and leaves are cut out of green colored paper, which are also glued to the stick.
Plasticine flower.
The most beautiful picture for Mother's Day is very easy to make even for the smallest children. In this case you will need: A sheet of colored cardboard, multi-colored plasticine and imagination. You will also need hairspray, which is sprayed onto a sheet of cardboard before further attaching the plasticine to it. Now all the kids have to do is sculpt the center of the flower and colored petals from plasticine.
Another applique made from plasticine.
You can sculpt a lot from plasticine. And it will be easy to congratulate your mother with the help of such crafts. The creation of the next composition involves cardboard and plasticine. Large sausages are molded from plasticine. To make cherries, roll them into circles. Leaves are formed in the same way. A twig is imitated with brown plasticine.
Craft idea from napkins and a plastic spoon.
Flowers are considered a traditional gift in our world. But at the end of November, when Mother's Day is celebrated, it is extremely difficult to find them. Flowers that you create yourself can help out. To make a craft, take:
- Thick napkins of different colors and a plastic spoon,
- Plastic cup and brushes with paints,
- Scissors, glue, and cotton pads.
- The napkin is folded several times. After that, a spoon is applied to the napkins and petals are cut out along its edge. Moreover, the size of the petals should not be much larger than the size of a plastic spoon.
- The resulting petals are placed on a plastic spoon. Everything is secured with glue. The number of petals can be as you wish. It could be a chamomile or a fluffy flower.
- Now a ball is formed from a piece of cotton wool or a cotton pad. It is fixed in the middle of the flower. Then proceed to the plastic cup. It will serve as a stand for the flower. To make the craft look beautiful, you need to paint it with paints. Watercolor will do. After the glass has dried, a hole is made in its bottom. We attach the flower and present it to our mother.
Postcard - sunshine.
There are so many wonderful products you can make for your mom as a gift. For example, an interesting postcard can be an excellent gift. And if you’ve decided to make crafts with your children for Mother’s Day, then take a closer look at the next option. To make a postcard take:
- Thick sheet of white cardboard,
- A sheet of yellow paper
- Colored paper and glue.
- For the “Sunny” postcard you need a base. It may be a sheet of white cardboard. A shape is cut out along the solid strip, and the card is folded along the dotted line.
- For the sun, you need to prepare the rays. For this purpose, sheets of colored paper are cut into not very wide strips. Then their ends are glued together.
- A circle is cut out of yellow paper. A smile from the sun is drawn on the mug, and then rays-loops are glued to it.
- The sun is cut in half, and each half is glued to the postcard. Inside the card, place your congratulations.
Finally
Mother's Day is everyone's favorite holiday. Therefore, a variety of crafts are made both in the garden and at school. Here we have provided just some craft ideas for you. However, each of these crafts is a lot of fun to make. The kids will love this activity anyway.
Peony
Master class on how to make a peony out of paper with your own hands, you can start by preparing light A4 paper. Flowers can be made in different shades that you like, from white or light pink to dark red. In the latter case, it is better to choose double-sided colored paper. Such flowers are suitable both for decorating the hall and as a decorative element of the room.
The master class and step-by-step instructions on how to make a peony with your own hands look quite simple:
- Fold a sheet of paper like an accordion along its entire length.
- Fold it in half and tie it with a thread in the middle.
- Prepare a few more of these “accordions”.
- Tie the pieces perpendicular to each other, placing one layer on top of the other.
- The result should be a lush, voluminous flower.
You can see how it looks in the photo here
Short mini essay
Autumn is the most beautiful time of the year, which inspires poets and writers to create magical works, and inspires artists to paint the true beauty of nature. Autumn time plays with different colors: yellow, green, red, brown, golden, so this is not the end yet. Because for three months the trees change into colorful outfits. Children and their classmates go to the forest, collect colorful maple leaves, weave wreaths, and make bouquets.
Not only does the color of the leaves change, fruit trees give us apples, pears and other fruits that Mother Nature gives us, they also change their color, from green to red or yellow. Autumn colors not only vegetables, fruits, trees, but also the sky; in September the sky is light, azure, and closer to the middle and end of autumn it becomes darker, blue colors mix with dark gray tones, it often rains, and sometimes snow flies , nature plunges into deep sleep.
From what is at hand
Old magazines or newspapers are used to make these products. This way you can make large flowers out of paper - the technique is simple, and paper crafts turn out to be quite impressive.
What you will need:
- unnecessary magazines (absolutely any);
- green adhesive tape;
- sharp scissors;
- large barbecue skewers;
- paper glue or regular hot melt glue.
How to make voluminous paper flowers easily and quickly? I'll tell you step by step.
- Disassemble the magazines into pages and choose the brightest and most colorful ones - these are the ones we will use to make decorative paper crafts.
- Each page must be folded four times along its length, cut with fringe from the fold side, not cutting to the edge about one centimeter.
- We begin directly making the buds - you need to take the resulting fringed ribbon and wrap it around the top of the skewer, securing it with glue or adhesive tape. This is how buds of voluminous flowers like asters and chrysanthemums are made.
- Then you need to make several turns around the skewer with a fringed ribbon so that the bud turns out lush and beautiful. When there are enough turns, you can glue the free edge of the fringe so that the bud holds on.
- Wrap a skewer with adhesive tape, cut out plant petals from magazines, shape them and glue them. Your beautiful and fluffy flowers are ready.
By the way, these recommendations can also be used for beginners - they are quite easy to do. If you want to make such flowers with children, then make sure that they have safety scissors, or cut the fringe yourself.
Autumn outfits
Autumn significantly transforms all trees. They begin to quickly change into golden outfits. Maples dress up in the golden colors of autumn with a reddish tint, and delicate birch trees gradually weave yellow ribbons into their long braids. Only old oaks lose their green colors and become gray and gloomy. Kalina, like a fashionable girl, begins to try on beautiful outfits and put on orange necklaces.
Each flowerbed pleasantly pleases people's eyes with its riot of flowers and colors that autumn brings with it. Dahlias stretch their heavy and bright heads towards the departing sun, as if they want to enjoy its warm rays for the last time. Asters, like little stars in the sky, shine with their beauty in flower beds. Delicate marigolds are trying to show all their beauty for the last time.
Colchicum spreads along the ground in a lush and thick carpet. Its small leaves press tightly against each other. As if the autumn frosts do not allow them to warm up, and they begin to look for warmth among themselves. The lady's slipper carefully preserves every drop of morning dew on its leaves. The leaves absorb the gentle dew, sip by sip, to get their fill and absorb the colorful colors of autumn.
We create a scarlet flower with our own hands: crafts from beads
Beadwork produces incredibly beautiful works, but the work is labor-intensive and requires patience and perseverance. In order for the craft to work out, you need to choose the right diameter of the beads and wire - the base. The beads you choose should be compatible not only in color, but also in quality: Czech and Italian beads are considered the most durable and produce almost no waste in the form of chipped beads. Cheap Chinese beads can be very brittle; there are often defects in the packaging that are impossible to work with.
Making a large flower at once is difficult; it requires experience. To learn how to make big crafts, you should start with small ones.
It is very convenient to buy ready-made kits for needlework with beads. They are easy to work with, contain everything you need, the colors are arranged together, the amount of beads is calculated so that there is exactly enough.
In addition, there are kits for bead embroidery. A very painstaking technique, but the result is excellent. This technique looks great on any subject – from biblical motifs to landscapes. They come with partial embroidery and with full filling of the base.
We offer a master class on making snow-white daisies from beads in our article.
You will need: base wire (white and green, 0.3 mm), scissors, beads of two colors - white and green, small beads, ribbon for the stem.
Cut a 40 cm piece of wire, put on 25 beads and fold the wire to form a loop.
We thread the wire through the last bead so that the ends come out of one bead.
We repeat this 3 times. The end result will be part of a flower.
We take a yellow bead and thread the ends of the wire towards each other.
We continue until we have how many petals we want to make. There are about 7 of them in real chamomile.
Upon completion, we thread the ends of the wire towards each other into the yellow bead and twist them together.
You can repeat the steps from above several times, then the flower will be voluminous and fluffy.
In order to make a sepal bed, take green beads and green wire and repeat the manipulations shown above.
We twist the white petals and sepals together.
For the leaf, you can take any of the patterns you like.
You get leaves that must also be screwed to the stem.
To complete the daisy, wrap the stem with ribbon or thread. Voila! Chamomile is ready!
Working using the beading technique is difficult and time-consuming, we suggest you consider how you can make flowers from paper.
There are a large number of techniques for working with paper: origami, cutting, quilling. By following the instructions and following the step-by-step recommendations in the photo, you can make paper flowers with your own hands.
Crochet crafts with flowers are no less beautiful. The diagram will show you how to master this type of needlework - crocheting is not difficult, and the result exceeds all expectations - the work turns out unusual and bright.
Any diagram contains a description and is easy to understand. The flower is most often knitted in circular rows. Work begins with a ring of air loops (in the diagrams they are depicted as hollow circles). The circle is closed into the first loop of the previous row and “lifting loops” must be made - these are air loops, the number of which is equal in height to the first loop of the next row (2 ch = single crochet). A vertical stick is a single crochet, a stick with a cross or oblique line is a single crochet with the appropriate number of crochets. Often on diagrams the direction of knitting is drawn with arrows - this is very convenient, since during knitting you can sometimes get confused in which direction you are knitting.
Several interesting essays
- Quotes from Napoleon (Tolstoy's War and Peace) essay Napoleon's speeches and thoughts in the novel characterize him as a cynical, selfish, self-confident ruler who is not aware of his responsibility for what he does.
- An essay on the topic Polutykin in the story Khor and Kalinich Turgenev Polutykin is a middle-aged man, short, stocky build. The author talks about him as a person who treats serfs well, by the standards of the general attitude towards them at that time
- Why did Oblomov choose Agafya Pshenitsyn over Olga Ilyinskaya? Oblomov is a man who is used to adapting to reality in the most convenient way, he does not show efforts as such, he lives all his life, as they say, ready-made. Even when he is inspired by Ilyinskaya
- Essay by Khlestakov and Khlestakovism 8th grade In Gogol’s work called “The Inspector General” there are two concepts that are inextricably linked with each other. Khlestakov and Khlestakovism, which over time went beyond simple literary concepts
- Come up with a fairy tale about a fish-whale, grade 4 (compose a fairy tale) Lived in the Arctic Ocean either a Fish or a Whale, in general, a good Fish-Whale. He lived well, swam in the open air, rested on ice floes, watched performances by fur seals. On the ice floes the seals were bored and cold, and they staged circus performances
Summer is a wonderful time when there is simply no time left to be bored! All day long in the summer, my friends and I play football, go to the river to sunbathe and swim, and walk in the park. Summer joys draw us into a special world that we remember all winter, dreaming of repeating many moments of the past summer.
The first month of summer I spend almost all the time at the dacha. After all, it is during this period that my help in the garden is especially important. The beds need to be constantly weeded and watered, and sometimes I even cook the food myself when my parents are very busy. But even there I found entertainment to my liking: riding a bicycle, walking through the forest, photographing various interesting birds and plants. Our dacha is located in a very interesting place, far out in the countryside. There is a beautiful forest and incredibly beautiful hills! Sometimes my parents and I went to the forest at the dacha to pick mushrooms and berries; usually I find a lot of boletus mushrooms.
When it's cold outside, my friends and I gather at my house and play computer games. I have many different interesting games that my friends really like. But still, more often we play outdoor games on the street, because in the summer you need to walk outside as much as possible, especially if the weather is warm.
Summer joys are real happiness that lasts for three whole months!
Summer is a wonderful time when there is simply no time to be bored! You always find something to do to your liking. And nature also puts you in a great mood. The earth is warmed by the bright sun. Beautiful flowers are blooming all around, trees are covered with leaves, birds are singing their sonorous songs, insects are working.
In the summer you don’t want to sit at home at all. I walk outside all day with my friends. We play different games - football, hide and seek and others. We also ride bicycles and organize running competitions. And only in the evening I return home and immediately sit down at the table. Mom always cooks a very tasty dinner, so I return home with pleasure, trying not to be a minute late.
I love summer for the joys of summer. Summer begins the season for fresh fruits and vegetables. I really like strawberries, raspberries, apples and apricots, and I also love watermelon. Sometimes my parents and I go to the forest to pick fragrant strawberries. We also wander through the forest for a long time during the mushroom season, I manage to collect a lot of boletus and boletus.
Even in the summer, my parents and I often go to the sea. I swim and sunbathe a lot, and you can also play various ball games there. When we return home, I immediately go to the shower and then fall asleep, after such water procedures I always feel sleepy.
Summer is a wonderful time of year that gives us warmth, joy and a great mood!
Master class on making a postcard using the origami technique “Scarlet Flower for Your Beloved Mommy”
Galina Shinaeva
Master class on making a postcard using the origami technique “Scarlet Flower for Your Beloved Mommy”
The most touching holiday is approaching - Mother's Day. Thanksgiving, expressions of love and respect for mothers.
Mothers gave us life, affection, care, love.
On this day, children of all ages give their beloved mothers heartfelt congratulations, flowers , and gifts.
In kindergarten, my preschoolers and I prepare for the holiday with trepidation. We learn poems and songs about beloved mothers . We make gifts , postcards , and publish wall newspapers.
This year, the guys and I decided to make a card .
They gave the title: “ Scarlet Flower for Beloved Mommy ”
.
The postcard is made using the origami technique.
For work we will need:
1) five red squares 5x5 cm . ,
2) a strip of green paper,
3) a sheet of colored cardboard for the background,
We start by folding the petal.
1. Bend the square diagonally
2. Bend the three corners one by one towards the center.
Origami flower: step-by-step instructions
One of the varieties of origami is kusudama, which involves the creation of three-dimensional balls from individual paper modules. It is popular to make flower kusudama, consisting of small elements made using the origami technique and connected with glue.
It is the creation of such a fragment of a flower that is proposed in our step-by-step master class, which will appeal to both adults and children.
If you decide to read or watch The Scarlet Flower (one of the many variations of the Beauty and the Beast plot), such a paper craft, created together with your child, will be an excellent addition to the fairy tale story.