Paper from which you can make dresses, and tools
Paper is a unique material that is distinguished by a variety of types, textures, colors, thickness, hardness, and elasticity. You can make a gorgeous outfit from any type of paper if you prepare it correctly.
You can use different types of paper for such crafts:
- corrugated;
- regular;
- cardboard;
- toilet;
- napkins;
- tracing paper;
- craft;
- perforated;
- newspaper;
- packaging;
- Whatman paper for drawing.
The tools you will need for work are:
- glue stick or PVA glue;
- scissors;
- templates for dresses and doll figurines;
- ruler;
- simple pencil;
- flat brushes;
- scotch;
- patterns for the pattern.
Having prepared the tools and material, you should learn the rules of working with paper, from which you can make a dress for a doll with your hands.
Materials for work
To conduct master classes on making decorative dresses for dolls, you will need to prepare the following materials:
The master classes presented in the following are intended for creating only doll dresses, which can be used to form a doll’s wardrobe, school crafts, or to create sketches of clothing models.
How to work with paper
Paper is an excellent material for crafts, which has a variety of properties, thanks to which you can make dress elements of various volumes and shapes.
You can give the paper an original texture by crumpling it. After this treatment, the paper will easily take any shape.
Using scissors, you can cut patterns, flat pieces, patterns, or lace trim from it. You can make thin strips of paper and weave them into fabric of different weaves.
This paper-working technique is considered very labor-intensive. Beginning needlewomen can make paper dresses using simpler technologies based on bending, cutting and gluing paper elements of various textures and densities.
With your own hands | Etsy
Etsy uses cookies and similar technologies to give you a better experience, such as:
- main functions of the site
- ensuring safe, secure transactions
- secure account login
- remembering account, browser and regional settings
- remembering privacy and security settings
- analysis of website traffic and use
- personalized search, content and recommendations
- helps sellers understand their audience
- , showing relevant, targeted advertising on Etsy
and beyond
For more information, please see Etsy's Cookies & Similar Technologies Policy and our Privacy Policy.
Always in touch
Necessary cookies and technologies
Some of the technologies we use are necessary for critical functions such as security and site integrity, account authentication, security and privacy preferences, internal site usage and maintenance data, and to make the site work properly for browsing and transactions.
Personalized advertising
These technologies are used for things like personalized advertising.
We do this with marketing and advertising partners (who may have their own information collected). Opting out won't stop you from seeing Etsy ads, but it may make them less relevant or more repetitive. Find out more in our Cookies and Similar Technologies Policy.
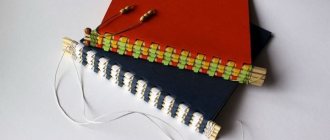
Postcard using contour quilling technique
This is a fairly simple technology, which is based on laying out thin paper strips twisted in different ways inside the created contour.
To create a feminine silhouette in a luxurious dress with a tight-fitting bodice and a wide floor-length skirt, you will need to choose the right colors of cardboard on which the paper pattern will be glued.
A contrasting combination of colors will look impressive: against a dark background, a light openwork image of a female silhouette made of paper.
To work you will need:
- scissors;
- thick cardboard of a dark shade;
- colored paper, which will need to be cut into thin strips;
- a wooden skewer on which the strips will be wound;
- a piece of black glossy paper from which a female head will be cut out in profile;
- colorless glue;
- simple pencil.
To choose a beautiful silhouette for a dress, you can use photos from fashion magazines, which are used to create a sketch of a postcard.
The principle of making contour quilling is that strips of colored paper rolled into a tube are glued along the contour with glue with one edge, repeating the smooth lines of the sketch.
Inside the created voluminous female silhouette, a pattern of quilling segments is laid out in the dress, which is created using strips rolled into a tube and formed in certain shapes.
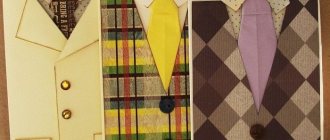
Paper dress for a doll using origami technique
You can make a craft using the origami technique: a paper dress for a doll, using a square sheet of colored paper according to a simple pattern, using any master class from the Internet.
The finished model of the dress must be glued to a cardboard base in order to see all the details and subtleties of the future accessory. The result is a three-dimensional sketch of the dress.
This technique can be used either when developing a pattern for a paper dress for a person, creating a miniature copy of the original, or as a decorative element when creating postcards by hand.
By gluing the resulting paper dress onto thick cardboard in a contrasting color, you can make a beautiful greeting card with a three-dimensional image.
Making a “Wonderful Day” or “Birthday Dress” Card
I found interesting stencils and an example of a postcard and decided to make the same one (scraplifting, the so-called, maybe too literal). So, let's get started, I think everything will be clear from the photo:
I had a large frame, I cut it and got two openwork elements, and I drew a rectangle with a semicircle myself (I cut out a circle and connected the rectangle in the center, circled everything. It turned out to be a stencil).
Glue it onto the card with the center offset.
Cut out the dress and mannequin.
Glue on cotton tape.
We attach the flower to the brads and sew on a ribbon (traces of glue would be visible on the glue).
The flower, ribbon and bow on the dress are of our own making, very light and airy. Crocheted from the finest silk threads 0.5 mm. Next, glue it onto the top of the card with cotton tape. And we are decorating our mannequin: gluing on the dress, beads and bow. I also cut out inscriptions from the same stencil, they are very positive and joyful, although difficult to translate (something like “fairytale day”, “dress for a celebration” and “splendor of a birthday”)
And so she came to us dressed up for the holiday. postcard, of course!
I always glue a pocket inside, because I need more than one sheet of paper for congratulations (since all colleagues must find a place for congratulations and signatures, therefore, a small book of thin sheets is inserted there and there is enough space for everyone)
And for those who read to the end and didn’t get tired, here is the original postcard:
Once again, I don’t know the author, if anyone knows, write. Thanks to him (the author) for this idea with stencils. I just
repeated this idea in her interpretation.
Everyone, I wish you pleasant creativity!
If my MK encourages someone to create the same postcard, post a photo, I will be very glad!
Source
Outfit made of paper napkins with a fluffy bottom
Another technique for making a flat dress from paper, in which using paper napkins to create a voluminous bottom of a dress of different types:
- Sun skirt;
- pleated skirt;
- layered skirt.
From thick colored cardboard you need to cut out the bodice of the dress and the belt. A round pattern for the skirt is cut out of napkins of a suitable shade, which, if necessary, can be folded like an accordion to make a pleated hem. You also need to decide on the length of the skirt in advance.
When all the details are ready, a fluffy skirt made of napkins is glued to the flat bodice at its lower part. The line for gluing napkins and cardboard is covered with a belt cut out of colored paper, which can then be decorated with rhinestones.
The finished dress is glued to the cardboard base with the back of the bodice so that the fluffy bottom is located harmoniously within the cardboard base. You can also make a beautiful postcard from such a blank.
Dress for Barbie doll made of corrugated paper
Corrugated paper, or crepe, is ideal for creating a voluminous paper dress. An excellent model for such an outfit could be a Barbie doll, which every girl has today.
Corrugated paper holds its shape well, drapes well, and does not require preliminary preparation before use. This material is very easy to work with by hand.
It takes the desired shape perfectly and drapes well. This paper can be ironed, creating the desired silhouettes and shapes of the doll's future toilet.
The manufacturing technique completely replicates sewing a dress from fabric. First, patterns are created for a specific style of dress, from which the details of the doll’s outfit are then cut out.
Instead of threads, the details of the dress are held together with glue and, if necessary, smoothed with a warm iron. You will have to warm up and stretch the edge of the hem of the dress so that it becomes wavy and stretches a little.
You can glue Velcro to the back of the finished dress, which will serve as a fastener, and decorate the dress itself with beads, rhinestones, and lace.
This outfit can be removed from the doll, since corrugated paper is quite durable. When cutting out the details of a paper dress, you should not forget about small allowances so that the outfit fits the doll figure loosely enough.
Mastering different techniques for making dresses from paper will become the basis for those who want to model real clothes. This craft will also be useful for those who like to create handmade cards.
Hand-made miniature models of dresses of different styles look organic on homemade postcards.
In addition, the ability to make a paper dress for a doll will help you master the principles of creating a life-size designer outfit from paper, which will be an excellent alternative to a purchased carnival costume for a girl.
A way to sew a princess dress with your own hands
Very often, with the birth of their first child, mummies reveal new, unexpected qualities. Including the possibility of sewing various dresses and clothes for your child. Your little daughter may be your new, perhaps your last, doll that you will want to dress in a variety of outfits and recreate her special look. Many people know that handmade gifts have a special connection with people, especially if they are made professionally. For these reasons, decorating a holiday gift with your own hands will not be difficult. We will tell you about a simple technique for creating a princess dress for a girl with your own hands, based on simple and convenient materials. So, let's try to figure out what we need for a dress?
- The fabric is one meter wide and 50 centimeters long for children. (chintz, linen, silk)
- Set of pins for counters and tailor's
- Ruler
- Scissors
- Pattern
- Chalk or pen
- Sewing threads
- Sewing machine
Next, we need to prepare the fabric for work. To do this, we need to pierce it and then iron it. The fabric should be treated before you start working with it, since natural fabric “settles” after washing and ironing.
Drawing
We don't need a pattern. We draw directly on the fabric. First of all, prepare two square molds with a side size of half a meter. Then they need to be cut, so we prepared the basis for the future dress. Next, we measure out two segments for the future stitching, each one and a half meters in size. After we decided on the image of the product and it became clear where the top part was and where the bottom part was, a base in the form of a tail pin for the past was pinned at a distance of 1 centimeter to the edge. Next, we direct the pins, not using the edges of the past, but across the past. Next you need to draw a line, but do not sweep away small parts of the material. After, you need to attach the firmware to the main part, fixing the seams, and also turn the machine in reverse and back. You can thread the thread through one side and tie them together. The pin is then removed.
Handling unevenness
Next we work with the unevenness of fabrics and materials like a pro. After this action, it is necessary to process our design using an overlocker, or using a zigzag seam element. In this case we use a seam height of 5 millimeters and a step length of one millimeter. After performing this operation, it is necessary to widen the edge and then wrap it towards the base, and then also lay another line of fishing line. Thanks to this line, the material of the charge can stand out. The exact same action must be done on another square of our fabric.
Creating squares
Then you need to fold the napkin squares, turning them towards each other. Then they need to be rolled, and then with a cobblestone, so that at the moment of cutting the squares do not move from one another.
Letters for cutting
After this action, in the center, at the fold, using the top of our future dress, you need to set aside 10 centimeters and make a point with the conditional letter C. Then, using point C, place another point A from the edge 5 centimeters (a total of 15 centimeters in the bend) and after you place point A, you need to draw a perpendicular line 10 centimeters long and place the last point - B. Using the extreme connection point, from the pluses to the base at point B, we draw a direct line and connect the elements. Use the Pattern Tool and make a connection point B to point C. We've made a pattern! Thus, with the help of this pattern, you can sew a beautiful dress only from the materials at hand. The finished pattern will help bring all your wishes to life, and you can decorate the material and create your own style, taking into account all the adjustments to the pattern from this lesson. We hope you liked this material.