Aerodesign has become increasingly popular in recent years. The opening of fashion stores, holding various entertainment events and holidays are not complete without the use of such unusual decor.
And therefore, it is not surprising that many are interested in mastering this skill. After all, in the future you can even make this a source of income or simply please your children by doing something creative with them.
Ball selection
Each master decides which balls to use for himself. These can be simple balls that are sold in every supermarket.
But if you need the flower to retain its presentation for a long time, it is recommended to make a composition from long balls. They are sold in gift shops, specialty sections of supermarkets and online markets.
Color selection
Before you start making flowers, you should choose a color scheme. If there is only one flower, you will need a green ball for the stem and several balls of the same color for the petals.
If you intend to create an entire composition, select colors carefully.
Safety precautions
Before you learn how to make flowers out of balloons step by step, you need to familiarize yourself with the safety rules.
- It is always worth remembering that the ball may burst during operation. It should be placed as far from the face as possible.
- Round balls cannot be twisted.
- The balls burst easily due to long nails. Before starting work, it is better to trim them.
- To decorate the balls with designs, it is best to use water-based markers.
Now, it's time to learn how to make a flower from a sausage ball.
Note!
- DIY fruit bouquets - TOP-200 photos with instructions for creating a bouquet of fruits with your own hands. Unconventional ideas with simple diagrams and work overviews
- Crocheted flowers: TOP-160 photos and step-by-step knitting pattern, review of finished products with your own hands. Crochet master class for beginners
- Paper lily - TOP 100 photos of the best product options. Master class with step-by-step diagrams and drawings for creating an origami lily with your own hands
Why is the pump better?
You can inflate a balloon with your mouth, but this process is not safe. If the inflation technique is not followed, you can damage: lips, cheeks, eyes, middle ear and even lungs. Such injuries are difficult to treat. In addition, when the balloon itself bursts, there is also a risk, especially to the eyes.
It is possible and necessary to train your lungs, but it is better to do this with ordinary balloons, and inflate narrow balloons using a hand pump.
But if the need to inflate the shdm nevertheless arises, a number of rules should be taken into account:
- puffing out the cheeks is unsafe and ineffective, so if the muscles are weak, it is better to abandon the idea immediately;
- step back from the end of the ball 2-4 cm long, press it tightly to your lips, if you manage to inflate even a small bubble, it will be much easier to inflate it than a long sausage;
- while inflating, slightly pull back the walls with your free hand, so they will give in easier;
- do not overdo it, because this leads to stress in the head and eyes; using the pump is faster and safer for your health.
Chamomile made from long balls
Don't inflate the balloons all the way. Long balloons should have an uninflated tail. With its help you can twist and tie the balls.
- Using a pump, inflate the balloons so that a tail measuring five centimeters remains.
- After this, you need to lower the ball a little and tie the hole with the ball.
- Now you need to connect the two ends to make a semicircle.
- Divide the piece into three sections. These will make petals.
- Now you need to take the workpiece in your hands so that there are 3 petals on top and bottom.
- Gently twist the petals together and unfold them. This simple manipulation will allow you to get 6 identical petals, similar in shape to the petals.
- After this, you need to inflate the green ball. A stem will be made from it.
- Separate a third of the ball by twisting it.
- The blank with petals must be threaded onto the stem. The separated part should be in the middle.
- Secure the part from below.
Interesting ideas for every taste
Using soft fabric, you can create a craft of extraordinary beauty. Flaps of different sizes are suitable for work; any spherical shape should be taken as a basis. This could be an old sock filled with cotton wool or rags, or special blanks for needlework.
Various buttons and small details will work for decoration; it’s better to try making a New Year’s ball using ruffles or fur inserts. With the help of threads or glue, such decorative details will take their place and delight you on a festive night. Lace decoration can add elegance to the entire tree; pasting over pieces of openwork will not take much time and effort, and the effect will be quite stunning.
Instructions for Beginners
Making a flower from round balls is no more difficult than from long ones.
Note!
- Crochet rose - diagrams and descriptions of how to crochet a rose with your own hands. Crochet technology + interesting craft ideas
- DIY edible bouquets - TOP 130 photos with instructions for creating a bouquet with your own hands. Creative ideas with simple diagrams and photos of finished works
- Craft primroses - simple instructions for creating crafts from scrap materials. Schemes of beautiful DIY products + photo reviews
Inflate and tie the balloons for the petals. To ensure that the workpieces are the same, it is recommended to calculate the number of presses on the pump. For a flower with five petals, the optimal number is four.
Now you need to tie the balls together in twos. To do this, twist the tails of the balls 2-3 times. The twist is fixed with knots. We screw the fifth petal into one of the twos.
Remember that knots do not hold air. To prevent the balloons from deflating, you need to twist them. And the knots simply fix the twist.
After this, you need to tie two blanks together so that all 5 petals are fastened together.
The next stage of the scheme for creating a flower from a balloon involves inflating the core. Remember that the middle part should be smaller than the petals.
Note!
Crafting tulips from paper - TOP-100 photos of interesting ideas for creating tulips from paper + simple instructions for beginners
Mimosa craft: TOP-160 photos of simple and complex crafts. Master class for children and adults on making mimosa with your own hands
- DIY napkin flowers - a detailed master class with simple diagrams. Non-standard solutions for creating flowers + photos of finished crafts
After this, you need to thread the tail of the central part through the bunch of petals.
Now you need to inflate a stem from a long green ball, divide it into five equal parts, twisting it with each other, and connect it into a ring.
The resulting bubbles need to be twisted into loops to create a green chamomile-shaped base.
The base must be wound to the round balls with tails and secured with the tail from the core.
From the second long green ball you need to make a stem. We twist two small bubbles and secure them together. We make a castle out of them and attach it to the base of the flower, fixing it with the tail from the middle.
Using approximately the same scheme, you can make a flower with six petals.
Making a stand for a bouquet
We align the flowers in height. We tie the ends of the stems into a knot. If necessary, deflate the balloons a little. Let's put the bouquet aside for now.
Inflate five small balloons. We collect them as we did with the petals for simple flowers. We do the same with five larger balls. Let's make a weight. To do this, you need to pour a little water into a separate ball.
Let's start assembling the stand. Again we take a bouquet of balloons. We tie a weight to it. We first attach large balls to the tip of the stems, and then small ones. Now the bouquet can stand on the floor or table.
Making a flower with 6 petals
Just like in the version with five petals, you will need round balls with a diameter of 5 inches. They are also inflated by counting moves. The only difference is that the balls should be smaller, which means you will need 3 pump strokes, not four.
Inflate the core in one stroke, twist and tie
we go to the node.
You will also need a base twisted from a long green ball. It is necessary so that the petals are located at the same level. From the second long ball you need to make a stem and twist all the parts together.
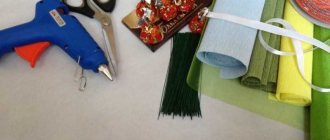
Elements and tools
Preparation for creative work begins with the selection of tools and material. At the beginning of training, you will need a few working items, and as you acquire skills and abilities, the set of available tools will increase.
So, for creative work they prepare:
- latex balloons or ready-made balloons for modeling;
- pump with piston;
- auxiliary materials, scissors, felt-tip pen and other parts.
A common type of balloon in aerodesign is latex. Such products are used to make toys and flowers. Latex is the milky natural sap of trees growing at the equator of the globe, a plant material that does not cause allergic reactions. Features of the properties of this substance are that it has elasticity and strength.
Decorate the premises with balls made of foil material or plastic, which hold the gel for up to 3 weeks. Accessories made from such raw materials are strong and durable.
To ensure the workflow goes smoothly, follow these tips:
- Rub the ball in your palms - the human hand transfers its heat to the rubber blank, the product will inflate better. This action reduces the risk of the ball bursting.
- The ball must be inflated smoothly, without jerking. Inflation occurs gradually. To facilitate the process, a pump is used, since some types of balls have dense walls.
- Twists are made individually, according to diagrams or step-by-step tips.
In twisting, the main effective element is ordinary twisting, which comes in several types:
- simple twisting;
- twist with lock;
- twisting with bending;
- tie with a knot.
To make an original product, the ball is twisted into bubbles (“sausages”), which have different lengths and are connected into a lock. You can twist the bubble correctly so that the ball does not burst if you step back a certain distance from the end (shown in each instruction) and twist it in a convenient direction. This type of conventional twisting is as follows: the measured size of a segment is compressed by hand and twisted several times in a given direction.
The second element is a twist with a lock. Three adjacent segments are fixed into the desired shape. The two outermost bubbles are folded at the connection point and then twisted around the middle one.
Twist with a bend - of three consecutive bubbles, the outer ones are not twisted, but bent. The bubble is twisted, the ball is bent and twisted 3-4 times.
The final stage is tying, it is made like a regular knot:
- the tail of the ball is pulled back;
- circle around the index finger;
- make a knot by pulling the free end into the loop that was formed in the process.
Various methods of twisting are practiced on latex balls, this is how skills are acquired and clear hand movements are developed. Once the technique has been mastered, it will become much easier to understand the instructions for creating figures and the technology of the process.
Instructions
You need to cut two even round holes from cardboard. One with a diameter of 15 centimeters, the second - 10. Balloons will be inflated using these patterns.
After this, you need to inflate the balloons for the petals. Check the size using a fifteen-centimeter template.
The middle should consist of two balls of different colors. The size is selected according to a 10 cm template. All balls are twisted and only then tied.
After this, you need to knit the balls for the petals in pairs. It is best to do this using wire. Wrap the extra ball to one of the ligaments.
Make sure that the balls are evenly distributed.
Also tie the balls for the middle to each other so that they look in opposite directions.
Connect the blanks with the petals around the core so that the middle balls are located on both sides of the petals. For convenience, tie the resulting flower with a ribbon.
How to make iris
Not only chamomile can be made from balls. In this section you will learn how to make a flower from a sausage ball.
To do this you need a long lilac or purple ball, and another long green ball.
First, inflate the balloon for the petals. Fold it in half, connect the ends and twist the workpiece twice in the center. The result will be two identical loops.
After this, step back a third from one end of the workpiece and twist the loops together. This is how easy it is to get an iris bud.
The next step is to make the stem and fasten it together with the bud. The stem can be decorated with a petal by simply twisting it in one place.
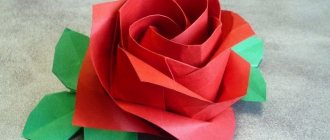
Irises and daisies are not the only flowers that can be made from balloons. Experienced craftsmen easily twist rosebuds and blossoming flowers, tulips and much more.
By the way, a tulip is made according to the same principle as an iris. Only the separated third of the bud should be located on top. And the bud itself consists not of two, but of three petals.
This is how, in just a few steps, you can make wonderful flowers from balloons. You don't need to watch a video to master this skill. You will need patience, accuracy and step-by-step instructions from this article.
History of twisting
Bouquets and crafts from balloons are created using a special technique - twisting, one of the areas of aerodesign. Translated from English, twisting is translated as rotating, twisting; in relation to balls, it literally means modeling shapes. In this type of creativity, special latex products are used. They are heavier than regular balloons, so even if they are filled with helium, they will not float. Modeling can be monosyllabic - from one ball and multi-component.
Creating figures from rubber and latex balloons began not so long ago, but already in ancient times the Egyptians and Aztecs modeled the silhouettes of animals from cleaned intestines. This is evidenced by rock paintings and hieroglyphs in ancient pyramids. With the development of chemistry and the invention of round balls, they were initially used for twisting. And in 1912 they created the first cigar-shaped elongated ball. Already by the 30s of the last century, magicians were playing them in numbers for circus performances. By the end of the 20th century, twisting turned into a mass hobby, communities, organizations, and training courses appeared.
But the wide distribution of this type of creativity today leads to the fact that it can be practiced everywhere and by completely unprepared people. Specific physical abilities are not required for classes, but you should stock up on a set of basic knowledge and suitable materials.
Aerodesign classes develop creative abilities, logical thinking, and help develop spatial modeling skills, so they are suitable for adults and children.